background image

29

Advanced

 Editing and Setting Channels

Apply

Caption detail

---

Caption select

Preset

Auto program

ANT In

Mode

Start scan

All

Cable

Edit

- - -

Favorite

Apply

No

Add

Edit

CH

1

2

3

4

5

- - -

2

- - -

- - -

- - -

Favorite

Apply

- - -

- - -

- - -

- - -

Caption

No

Yes

No

No

No

Add

Signal meter 

CH

Signal strength 

Current

Peak level 

85 % 

85 % 

2 - 1

Apply

12

Favorite

Favorite

Auto program

ANT In

Mode

Start scan

All

Cable

Check the signal strength if interference is found or freezing occurs on a digital image.

Select the station identifier

Select All or Analog
All: Analog and digital
Analog: Analog only

Settings are made 
automatically

After completing the setting, 
select “Apply”. (see below 

).

All previous memorized 
channels are erased.

 set

 select

 Select “ANT In”

 Select  “Mode”

 Select “Start scan”

 Select  “Edit”

 Select the item to be edited

 select item to edit

(Caption/Favorite/
Add)

 next

 Edit

Caption:

  Changes the station identifier

Favorite:

  Registers channel to Favorites List

Add:

  Adds or deletes channels

 start

 select

(Select Cable or Antenna)

 select

 next

Caption

Favorite

Add

 Caption

Preset

Caption detail

Rename (maximum 7 characters available)

Select the number

Favorite

Favorite

Add

Press “OK” button to select “Yes (add)” or “No 
(delete)”

 Select  “Apply”

Press to move cursor to 
“Apply”

Signal intensity 

 select  channel

 ok

Use this procedure when changing setting of receiving channels or changing the channel display.
Also, use to add or delete channels from channel list manually.

Automatically searches and adds receivable channels to memory.

 select

 set/next

ok
(to enter 
your
program)

 select

 next

If the signal is weak, check the antenna.
If no problem is found, consult your
local dealer.

Note

Not available if “Cable” is selected in “ANT In” 
(see above).

Effective only for digital antenna channels.

If “Channel lock” (p. 26) is activated and “Auto”, “Manual” or “Signal meter” is selected, “Enter password.” will be 
displayed.

Summary of Contents for TH-42PX60U

Page 1: ...utilizar su televisor y gu rdelas para consultarlas en el futuro Las im genes mostradas en este manual tienen solamente fines ilustrativos TQB2AA0663 2 For assistance please call 1 888 VIEW PTV 843 97...

Page 2: ...o a movie theater R Manufactured under license from Dolby Laboratories Dolby and the double D symbols are trademarks of Dolby Laboratories HDMI the HDMI logo and High Definition Multimedia Interface a...

Page 3: ...Closed Caption 30 Using Timer 32 Operating Peripheral Equipment 33 Recommended AV Connections 34 Remote Control Operation Code List 36 Ratings List for Channel Lock 39 Technical Information 40 Mainten...

Page 4: ...is intended to tell the user that parts inside the product are a risk of electric shock to persons The exclamation point within a triangle is intended to tell the user that important operating and ser...

Page 5: ...cting the power cable hold the plug not the cable Do not make any modifications to place heavy objects on place near hot objects heat bend twist or forcefully pull the power cable Doing so may cause d...

Page 6: ...mote control codes before changing batteries in case the codes are reset p 37 38 Wall hanging bracket vertical TY WK42PV3U TH 37PX60U TH 42PX60U TH 50PX60U TH 50PX60UX TH 58PX60U angle TY WK42PR2U TY...

Page 7: ...se the accessory fall prevention brackets to secure the plasma television If the unit is knocked or children climb onto the pedestal with the Plasma TV installed the plasma television may fall over an...

Page 8: ...s in the holes in the back edge of the wood worktop If there are no holes first drill them in the middle of the thickness of the wood worktop and then fasten the strap with wood screws Remove the scre...

Page 9: ...f the thickness of the wood worktop and then fasten the strap with wood screws Use a flat head screwdriver to remove the caps at the left and right top on the rear side of the plasma TV and attach the...

Page 10: ...TV For additional assistance visit us at www panasonic com www panasonic ca The S Video input will override the composite video signal when S Video cable is connected Connect either S Video cable or...

Page 11: ...ptional accessory follow the option s assembly manual to fix cables Remove from the TV unit Push both side hooks and pull out Cable clamper AC cord Bundle cables with the Cable clamper on the left sid...

Page 12: ...pect ratio p 15 Switch to previously viewed channel and input modes Selects channels in sequence Sleep Timer p 14 32 Power indicator on red off no light Viewing from SD Card p 16 SAP p 14 Exit menus S...

Page 13: ...ing later go to Menu screen p 20 set select item ANT In Cable Cable TV Antenna Antenna Mode All digital and analog Analog analog only Reduces time for scanning Auto channel setup 4 set select start se...

Page 14: ...amount of time from 0 to 90 minutes in 30 minute intervals Display or remove the channel banner Select Audio Mode for TV Viewing Digital mode Press SAP to select the next audio track if available whe...

Page 15: ...anada and Mexico Each press changes the mode 480i 4 3 480i 16 9 480p 4 3 480p 16 9 FULL JUST 4 3 or ZOOM 1080p 1080i 720p FULL H FILL JUST 4 3 or ZOOM Change the aspect p 40 FAVORITE Channel numbers r...

Page 16: ...2 Select the SD mode select view Thumbnail view Navigation Area Selected picture information is displayed No Image number or file name is displayed Date Date of recording is displayed Pixel Display re...

Page 17: ...SD Card 1 GB requiring mini SD Card adapter To change the view slide show adjusting images etc To watch photos in slide show In ok Insert the card When MENU is pressed the Picture Adjust menu is displ...

Page 18: ...back of the card Do not subject the card to a high pressure or impact Insert the card in the correct direction otherwise card may be damaged Electrical interference static electricity or erroneous op...

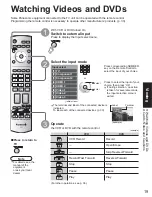
Page 19: ...the Input selection menu is exited Watching Videos and DVDs Some Panasonic equipment connected to the TV unit can be operated with the remote control Programming the remote control is necessary to ope...

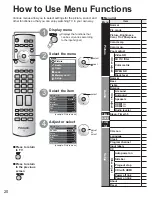
Page 20: ...Menu Picture Audio Lock Setup Memory card Timer No Standard 30 0 0 0 10 Picture 1 2 Normal Pic mode Picture Brightness Color Tint Sharpness No Standard 30 0 0 0 10 Picture 1 2 Normal Pic mode Picture...

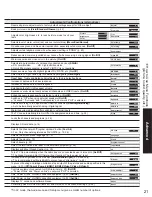
Page 21: ...Audio leveler do not work if Off is selected On Speakers Selects according to the signal when HDMI is connected Auto Digital Analog Auto Automatically selects Analog Digital signal Auto HDMI1 in Auto...

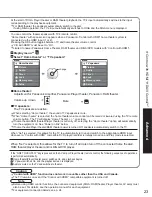
Page 22: ...TV s HDMI input are available This feature is limited to models incorporating Panasonic s Control with HDMI Refer to the individual instruction manuals for compatibility information Non HDMI compliant...

Page 23: ...eater on screen If home theater RAM theater Player theater is currently off selecting the Home theater option will automatically turn the equipment on See Power on link below If home theater Player th...

Page 24: ...RAM Theater or Player Theater system Refer to page 22 for Setup Menu settings and additional control information Optional HDMI and or optical cables are not provided If connection or setting of equip...

Page 25: ...connection as shown below One AV amp and one DIGA can be operated with this unit Be sure to connect the AV amp between this unit and the DIGA Individual HDMI equipment may require additional menu sett...

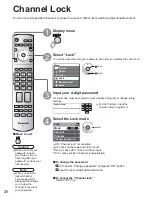
Page 26: ...al dealer For the first time input the number twice to register it Note When you select a locked channel a message will be displayed that allows you to view the channel if you input your password To c...

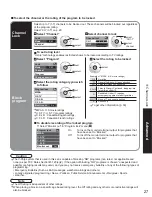
Page 27: ...Canadian English ratings C F L R Canadian French ratings To get other information p 39 Caution The V Chip system that is used in this set is capable of blocking NR programs non rated not applicable an...

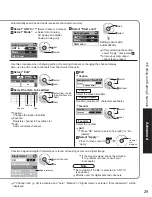
Page 28: ...urrent channel settings can be changed according to your needs and reception conditions To reset the settings of Setup menu Select Reset in Setup menu and press OK button Input your 4 digit password w...

Page 29: ...ext Edit Caption Changes the station identifier Favorite Registers channel to Favorites List Add Adds or deletes channels start select Select Cable or Antenna select next Caption Favorite Add Caption...

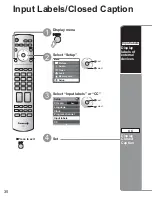
Page 30: ...CH scan Language Clock Program channel Input labels CC Input Labels Closed Caption Select Setup 2 next select Display menu 1 3 4 Press to exit Set Select Input labels or CC Display labels of external...

Page 31: ...play of the audio portion The program viewed must provide Closed Captioning CC for the television to display it p 40 Select the item and set Size Text size Font Text font Style Text style Raised Depre...

Page 32: ...can be set Timer 1 Timer 5 select set Select the channel CH Select the day Day The time to turn On On time The time to turn Off Off time Timer setting On Off Set To set Sleep Off Timer Press to set un...

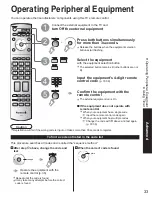
Page 33: ...uipment to the TV and turn Off the external equipment Input the equipment s 4 digit remote control code p 37 38 Confirm the equipment with the remote control The external equipment turns On If the equ...

Page 34: ...ase visit our website at www panasonic com www panasonic ca Camcorder S Video Camcorder VCR S Video VCR DVD Player To watch camcorder images INPUT3 To watch DVDs DVD Player Set Top Box Caution For Ant...

Page 35: ...HDMI Connections p 24 25 or or Note The picture and audio input signals connected to a terminal specified in Prog out stop p 20 cannot be output from OUTPUT terminals However audio output can be obtai...

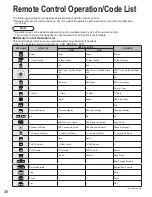
Page 36: ...TV Volume Up Down Sleep Sleep TV VCR Switch TV DBS Switch TV CBL Switch VCR Record PVR Record 1 PVR Record 1 Record Search 1 Search 1 Open Close Skip Reverse Forward Reverse Forward Rewind Fast Forwa...

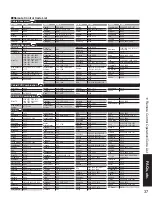
Page 37: ...37 0043 1278 1479 Fuji 0033 0035 Funai 0000 Garrard 0000 Gateway 1972 GE 0035 0060 0807 1035 1060 GoldStar 0037 1237 Gradiente 0000 Harley Davidson 0000 Hewlett Packard 1972 Hitachi 0000 0042 0089 How...

Page 38: ...CyberHome 0816 1023 1024 1129 Daewoo 0833 0869 Denon 0490 Disney 0675 DVD2000 0521 Emerson 0591 0675 Enterprise 0591 Funai 0675 Gateway 1158 GE 0522 Go Video 0741 0833 0869 1075 1158 1304 1730 GoldSt...

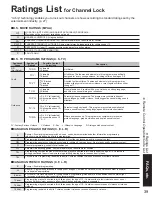
Page 39: ...des news sports documentaries and other information programming talk shows music videos and variety programming C Programming intended for children under age 8 No offensive language nudity or sexual c...

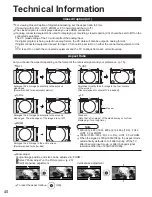
Page 40: ...ital broadcasting set the aspect ratio to FULL If viewing with H FILL JUST ZOOM or 4 3 characters will be cut off The closed caption is not displayed when you use HDMI connection If analog connected e...

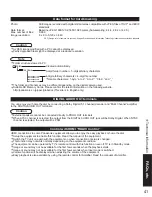
Page 41: ...l amplifier to the DIGITAL AUDIO OUT terminals Caution External speakers cannot be connected directly to PROG OUT terminals When ATSC channel is selected the output from the DIGITAL AUDIO OUT jack wil...

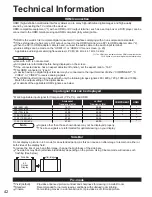
Page 42: ...rminal of either COMPONENT S VIDEO or VIDEO to receive analog signals The HDMI input terminal can be used with only the following image signals 480i 480p 720p 1080i and 1080p Match the output setting...

Page 43: ...abinet and then wipe it dry with a dry cloth Do not allow any detergent to come into direct contact with the surface of the Plasma TV If water droplets get inside the unit operating problems may resul...

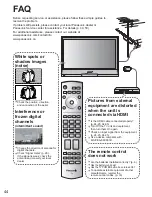
Page 44: ...Use a device compliant with EIA CEA 861 861B White spots or shadow images noise Check the position direction and connection of the aerial Interference or frozen digital channels intermittent sound Ch...

Page 45: ...ce please follow these simple guides to resolve the problem If problem still persists please contact your local Panasonic dealer or Panasonic Service center for assistance For details p 49 50 The func...

Page 46: ...PIN Type 2 0 5 V rms COMPONENT VIDEO INPUT 1 2 Y 1 0 V p p including synchronization PB PR 0 35 V p p AUDIO L R RCA PIN Type 2 0 5 V rms HDMI 1 2 TYPE A Connector AUDIO L R RCA PIN Type 2 0 5 V rms C...

Page 47: ...in Y 1 0 V p p 75 C 0 286 V p p 75 AUDIO L R RCA PIN Type 2 0 5 V rms COMPONENT VIDEO INPUT 1 2 Y 1 0 V p p including synchronization PB PR 0 35 V p p AUDIO L R RCA PIN Type 2 0 5 V rms HDMI 1 2 TYPE...

Page 48: ...ges which occurred in shipment or failures which are caused by products not supplied by the warrantor or failures which result from accidents misuse abuse neglect bug infestation mishandling misapplic...

Page 49: ...day 9 am 9 pm Saturday Sunday 10 am 7 pm EST For hearing or speech impaired TTY users TTY 1 877 833 8855 Purchase Parts Accessories and Instruction Books on line for all Panasonic Products by visiting...

Page 50: ...INC BE LIABLE FOR ANY SPECIAL INDIRECT OR CONSEQUENTIAL DAMAGES In certain instances some jurisdictions do not allow the exclusion or limitation of incidental or consequential damages or the exclusion...

Page 51: ...51 FAQs etc Limited Warranty for Canada Note...

Page 52: ...127...

Page 53: ...127...

Page 54: ...127...

Page 55: ...127...

Page 56: ...dentification in the event of theft or loss and for Warranty Service purposes Model Number Serial Number Panasonic Consumer Electronics Company Division of Panasonic Corporation of North America One P...

Reviews: