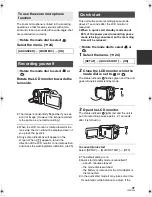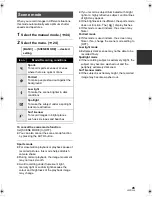
background image

30

LSQT1346

Recording 
(Basic)

1

Before recording

About auto mode

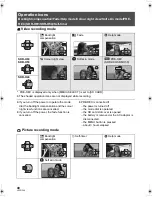
Press the AUTO button, colour balance (white 
balance) and focusing will be adjusted 
automatically.
(The auto mode icon [

] appears.)

j

Auto white balance (

l

108)

j

Auto focusing (

l

108)

Depending on the brightness of the subject etc., 
the aperture and shutter speed are automatically 
adjusted for optimum brightness.
(When set to the video recording mode:
The shutter speed is adjusted to a maximum of 
1/250.)

Colour balance and focus may not be adjusted 
automatically depending on light sources or 
scenes. If so, manually adjust these settings. 
(

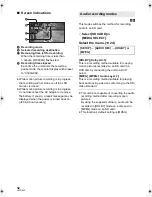
l

44)

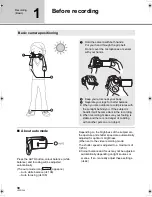
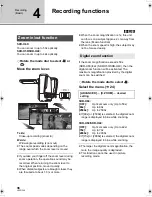
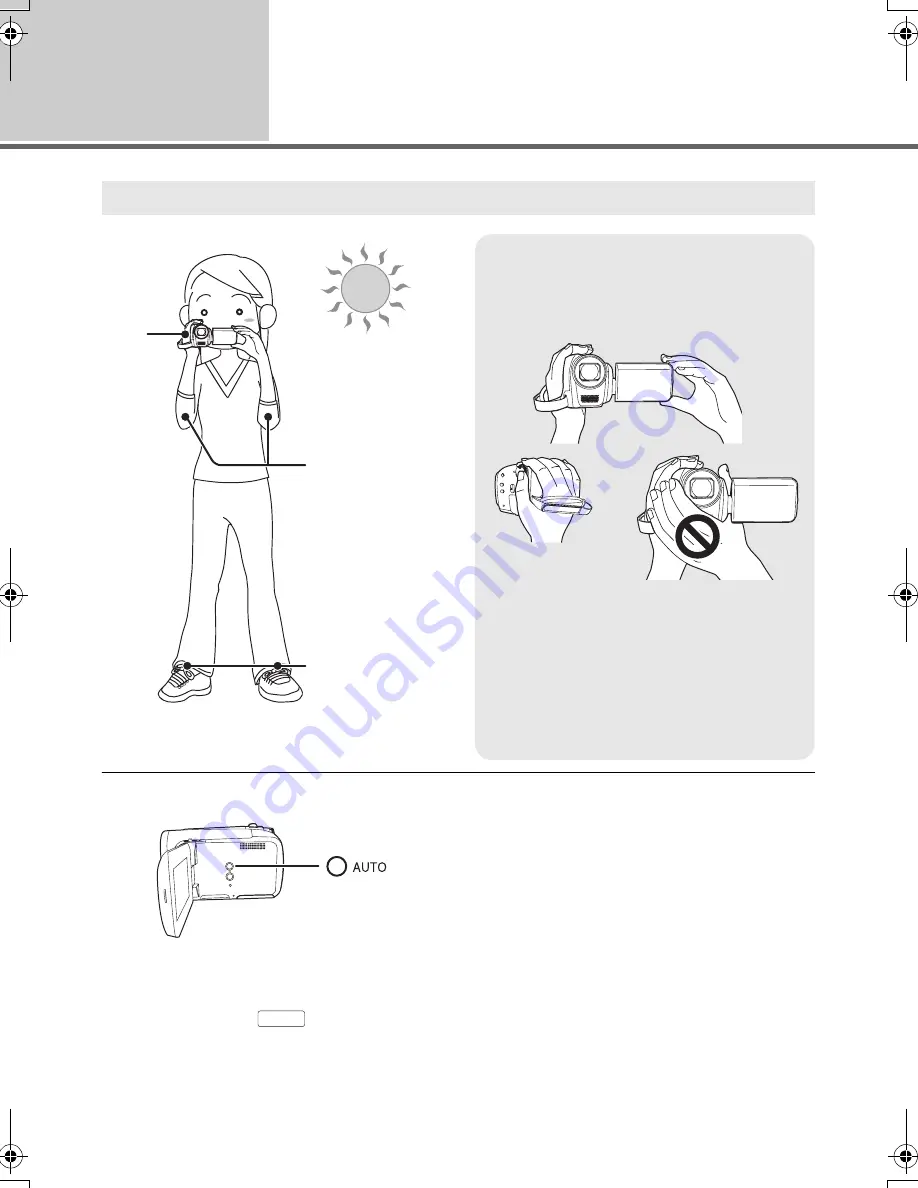
Basic camera positioning

2

3

1

1

Hold the camera with both hands.
Put your hand through the grip belt.
Do not cover the microphones or sensor 
with your hands.

2

Keep your arms near your body.

3

Separate your legs for better balance.

When you are outdoors, record pictures with 
the sunlight behind you. If the subject is 
backlit, it will become dark in the recording.

When recording, make sure your footing is 
stable and there is no danger of colliding 
with another person or an object.

AUTO

SDR-H60&40EP-LSQT1346_eng.book  30 ページ  2008年2月25日 月曜日 午後3時33分

Summary of Contents for SDR-H40

Page 1: ...ukcja obsługi SD Card Hard Disk Video Camera Model No SDR H60 SDR H50 SDR H40 Before use please read these instructions completely Przed pierwszym włączeniem kamery prosimy o dokładne przeczytanie instrukcji obsługi LSQT1346 B EP ...

Page 2: ...DE REFER SERVICING TO QUALIFIED SERVICE PERSONNEL CAUTION DO NOT INSTALL OR PLACE THIS UNIT IN A BOOKCASE BUILT IN CABINET OR IN ANOTHER CONFINED SPACE ENSURE THE UNIT IS WELL VENTILATED TO PREVENT RISK OF ELECTRIC SHOCK OR FIRE HAZARD DUE TO OVERHEATING ENSURE THAT CURTAINS AND ANY OTHER MATERIALS DO NOT OBSTRUCT THE VENTILATION VENTS DO NOT OBSTRUCT THE UNIT S VENTILATION OPENINGS WITH NEWSPAPER...

Page 3: ...er treatment recovery and recycling please take these products to designated collection points where they will be accepted on a free of charge basis Alternatively in some countries you may be able to return your products to your local retailer upon the purchase of an equivalent new product Disposing of this product correctly will help to save valuable resources and prevent any potential negative e...

Page 4: ...poses other than your own private use may infringe copyright laws Even for the purpose of private use recording of certain material may be restricted These operating instructions are designed for use with models SDR H60 SDR H50 and SDR H40 Pictures may be slightly different from the original The illustrations used in these operating instructions show model SDR H40 however parts of the explanation ...

Page 5: ...urself 37 Quick start 37 Image stabilizer function 38 Recording Advanced 1 Recording functions of operation icons 39 Operation icons 40 Backlight compensation Fade Help mode Colour night view Soft skin mode PRE REC SDR H60 SDR H50 Self timer 2 Recording functions of menus 43 Menus 43 Guideline Aspect ratio Wind noise reduction Auto slow shutter 3 Manual recording functions 44 Scene mode 45 Manual ...

Page 6: ...Agreement 83 Setup 1 Installation 84 Installing VideoCam Suite 84 Uninstalling the software 85 2 Connection and recognition 86 About the PC display 86 To disconnect USB cable safely 87 Using software 1 Using VideoCam Suite 88 Reading the operating instructions of the software 88 DVD COPY function 89 Using a Macintosh 1 If using a Macintosh 90 Others Indications 1 Indications 92 2 Messages 95 Helpf...

Page 7: ...ry pack VW VBG070A AC adaptor VSK0698 AC cable K2CQ2CA00006 or K2CR2DA00004 DC cable K2GJ2DC00021 or K2GJ2DC00022 AV cable K2KZ9CB00002 USB cable K1HA05CD0019 or K1HA05CD0016 CD ROM Optional accessories AC adaptor VW AD21E K 1 Battery pack lithium VW VBG130 1320 mAh Battery pack lithium VW VBG260 2640 mAh 2 Battery pack lithium VW VBG6 5800 mAh 2 Battery Pack Holder Kit VW VH04 DVD burner VW BN1 S...

Page 8: ...ecord motion pictures and still pictures on an SD card Using with a DVD burner Use the DVD burner to create the backup discs for motion pictures and still pictures recorded on this unit without using a PC l 69 Using with a PC If you use the supplied software you can create a backup DVD of the scenes recorded on this unit You can also make an original DVD Video by exporting the scenes to a PC and t...

Page 9: ...9 LSQT1346 Preparation Recording Playback With a PC Others 10 Before using 23 Setup ...

Page 10: ...open part 7 LCD monitor 8 SD Card slot cover SD CARD l 22 9 SD Card access lamp ACCESS l 21 86 10 Reset button RESET l 103 8 6 7 9 10 1 2 3 5 4 Due to limitations in LCD production technology there may be some tiny bright or dark spots on the LCD monitor screen However this is not a malfunction and does not affect the recorded picture Lens cover For the lens protection be sure to close the lens co...

Page 11: ...ion of the arrow with your fingers It can open up to 90o It can rotate up to 180o A towards the lens or 90o B towards the opposite direction The brightness and colour level of the LCD monitor can be adjusted l 28 B A Grip belt Adjust the belt length and the pad position 1 Flip the belt 2 Adjust the length 3 Replace the belt 13 11 12 14 3 1 2 ...

Page 12: ...r 26 USB terminal l 70 77 86 27 Audio video output terminal A V l 68 76 19 15 16 17 18 24 23 20 22 21 26 25 27 Joystick Use the joystick to select the recording functions and playback operations and to operate the menu screen Move the joystick up down left or right to select a setting or scene and then press the joystick to set it 1 Select by moving up down left or right 2 Set by pressing the cent...

Page 13: ...7 31 Battery release lever BATTERY l 15 17 Tripod receptacle This is a hole for attaching the unit to the optional tripod When the tripod is used the SD card slot cover cannot be opened Insert an SD card and the battery before attaching this unit to the tripod l 15 22 29 30 31 28 ...

Page 14: ...ely protected with internal protection to meet the requirements of appropriate safety standards There is a possibility that these battery packs may lead to fire or explosion Please be advised that we are not liable for any accident or failure occurring as a result of use of a counterfeit battery pack To ensure that safe products are used we would recommend that a genuine Panasonic battery pack is ...

Page 15: ... a battery pack in an automobile exposed to direct sunlight for a long period of time with doors and windows closed Notice about the rechargeable battery The battery is designated recyclable Please follow your local recycling regulations Inserting the battery A Removing the battery While pressing button B move C in the direction of the arrow to unlock it and then remove the battery Hold the batter...

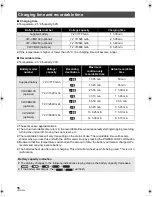
Page 16: ...s unit will also heat up while being used This is not a malfunction Charging time and recordable time Battery model number Voltage capacity Charging time Supplied battery 7 2 V 770 mAh 1 h 35 min VW VBG130 optional 7 2 V 1320 mAh 2 h 35 min VW VBG260 optional 7 2 V 2640 mAh 4 h 40 min VW VBG6 optional 7 2 V 5800 mAh 9 h 25 min Battery model number Voltage capacity Recording destination Maximum con...

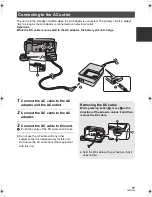
Page 17: ...nd the AC outlet 2 Connect the DC cable to the AC adaptor 3 Connect the DC cable to this unit A Push the centre of the DC cable until it locks Do not use the AC cable with any other equipment as it is designed only for this unit Do not use the AC cable from other equipment with this unit Connecting to the AC outlet 2 3 1 A Removing the DC cable While pressing button B move C in the direction of th...

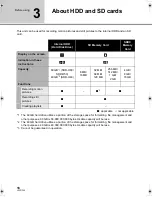
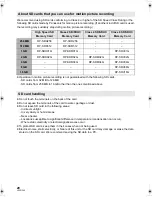
Page 18: ...rd drive utilizes a portion of the storage space for formatting file management and other purposes 40 GB is 40 000 000 000 bytes Usable capacity will be less 3 Cannot be guaranteed in operation Internal HDD Hard Disk Drive SD Memory Card SDHC Memory Card Display on the screen Indication in these instructions HDD SD Capacity 60 GB 1 SDR H60 SDR H50 40 GB 2 SDR H40 8 MB 16 MB 32 MB 64 MB 128 MB 256 ...

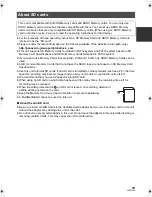
Page 19: ...d SD card When using an SD card on which data has been written many times the remaining time left for recording may be reduced When the write protect switch A on SD card is locked no recording deletion or editing will be possible on the card Keep the Memory Card out of reach of children to prevent swallowing A MultiMediaCard cannot be used on this unit About the miniSD Card Be sure to insert miniS...

Page 20: ...irect sunlight jIn very dusty or humid areas jNear a heater jLocations susceptible to significant difference in temperature condensation can occur jWhere static electricity or electromagnetic waves occur To protect SD cards keep them in their cases when not being used Electrical noise static electricity or failure of this unit or the SD card may damage or erase the data stored on the SD card We re...

Page 21: ...t be repaired Cautions for disposing of this unit Even if some scenes on the HDD are deleted or formatted the information is seemingly erased but may still remain To dispose of this unit the physical destruction is recommended Notes for recording Images may not be recorded properly to the HDD near high volume speakers due to the vibration from the speakers In such cases record in a location away f...

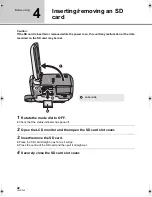
Page 22: ...rded on the SD card may be lost 1 Rotate the mode dial to OFF Check that the status indicator has gone off 2 Open the LCD monitor and then open the SD card slot cover 3 Insert remove the SD card Press the SD card straight in as far as it will go Press the centre of the SD card and then pull it straight out 4 Securely close the SD card slot cover A Label side 3 2 1 A ...

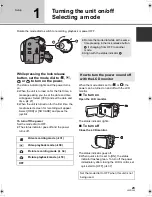
Page 23: ...e status indicator goes off and the power turns off When the mode dial is set to or the power can be turned on and off with the LCD monitor To turn on Open the LCD monitor The status indicator lights To turn off Close the LCD monitor The status indicator goes off When quick start is set to ON the status indicator flashes green To turn off the power immediately after closing the LCD monitor set qui...

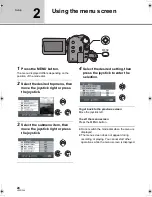
Page 24: ...submenu item then move the joystick right or press the joystick 4 Select the desired setting then press the joystick to enter the selection To get back to the previous screen Move the joystick left To exit the menu screen Press the MENU button Do not switch the mode dial when the menu is displayed The menu screen does not appear during recording or playing You cannot start other operations while t...

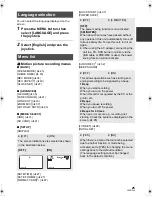
Page 25: ...on is not activated 5 MINUTES When about 5 minutes have passed without any operation this unit automatically turns off to save battery life To use this unit turn it on again When using the AC adaptor connecting the unit to a PC DVD burner or printer via the USB cable or PRE REC is used the power saving function will not activate OFF ON This allows operations such as starting and ending recording t...

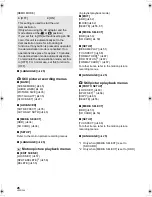
Page 26: ...NGUAGE l 25 Still picture playback menus PHOTO SETUP LOCK SET l 63 DPOF SET 1 l 64 COPY l 65 DELETE l 55 MEDIA SELECT HDD l 53 SD CARD l 53 SETUP TV ASPECT l 68 For other items refer to the motion picture recording menus LANGUAGE l 25 1 Only when MEDIA SELECT is set to SD CARD 2 Only when MEDIA SELECT is set to HDD OFF ON This setting is used to start the unit demonstration Only when using the AC ...

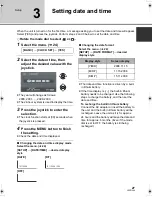
Page 27: ...g the date and time display mode Select the menu l 24 SETUP DATE TIME desired display style Changing the date format Select the menu l 24 SETUP DATE FORMAT desired display style The date and time function is driven by a built in lithium battery If the time display is the built in lithium battery needs to be charged Use the following steps to charge the battery and then set the date and time To rec...

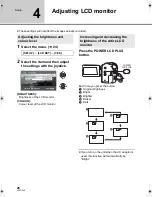
Page 28: ... monitor COLOUR Colour level of the LCD monitor Press the POWER LCD PLUS button Each time you press the button 1 Original brightness 2 Bright 3 Brighter 4 Darker 5 Dark If you turn on the unit when the AC adaptor is used this function will automatically be Bright Adjusting the brightness and colour level SETUP LCD SET YES Increasing and decreasing the brightness of the entire LCD monitor POWER LCD...

Page 29: ...29 LSQT1346 Preparation Recording Playback With a PC Others 30 Recording Basic 39 Recording Advanced ...

Page 30: ...maximum of 1 250 Colour balance and focus may not be adjusted automatically depending on light sources or scenes If so manually adjust these settings l 44 Basic camera positioning 2 3 1 1 Hold the camera with both hands Put your hand through the grip belt Do not cover the microphones or sensor with your hands 2 Keep your arms near your body 3 Separate your legs for better balance When you are outd...

Page 31: ...ed during recording Do not move this unit until is green The images recorded between pressing the recording start stop button to start recording and pressing it again to pause recording become one scene The scene is automatically divided when the recorded data exceeds 3 9 GB The recording will continue When about 5 minutes have passed without any operation in recording pause the unit automatically...

Page 32: ... 96 About recovery SD This mode switches the method for recording audio to an SD card Select SD CARD in MEDIA SELECT Select the menu l 24 DOLBY Dolby AC 3 This is a recording method suitable for copying motion pictures recorded on an SD card to a DVD disc by connecting the unit to a DVD burner MPEG MPEG 1 Audio Layer 2 This is a recording method suitable for playing back audio using a device confo...

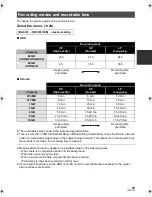
Page 33: ...sharp movements has been recorded Particularly if it has been recorded in LP mode If you record still pictures on the HDD or an SD card the recordable time available for the motion picture will become shorter Recording modes and recordable time BASIC REC MODE desired setting Recording mode XP High quality SP Normal LP Long play Capacity 60 GB SDR H60 SDR H50 14 h 27 h 54 h 40 GB SDR H40 9 h 18 h 3...

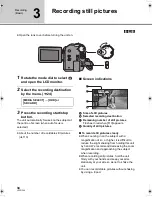
Page 34: ...lected recording destination C Remaining number of still pictures Flashes in red when R 0 appears D Quality of still pictures To record still pictures clearly When zooming in on the subject with a magnification of 4k or higher it is difficult to reduce the slight shaking from holding this unit by hand We recommend decreasing the zoom magnification and approaching the subject when recording When re...

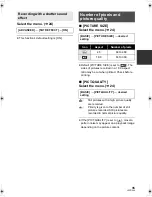
Page 35: ...gh picture quality are recorded Priority is given to the number of still pictures recorded Still pictures are recorded in normal picture quality If the PICT QUALITY is set to mosaic pattern noise may appear on a playback image depending on the picture content Recording with a shutter sound effect ADVANCED SHTR EFFECT ON Number of pixels and picture quality BASIC PICTURE SIZE desired setting Icon A...

Page 36: ...2 cm away from the lens Macro function When the zoom speed is high the subject may not be focused easily If the zoom magnification exceeds 50x SDR H60 42x SDR H50 SDR H40 then the digital zoom function will be activated The maximum magnification provided by the digital zoom can be switched Rotate the mode dial to select Select the menu l 24 SDR H60 OFF Optical zoom only Up to 50x 80x Up to 80x 250...

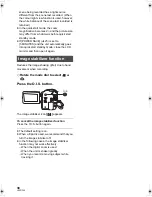
Page 37: ...out 2 1 seconds after the LCD monitor is reopened When in quick start standby mode about 60 of the power used in recording pause mode is being consumed so the recording time will be reduced Rotate the mode dial to select or 1 Select the menu l 24 2 Close the LCD monitor while the mode dial is set to or The status indicator A flashes green and the unit goes into quick start standby mode 3 Open the ...

Page 38: ...k start standby mode close the LCD monitor and then open it again Reduces the image shaking jitter due to hand movement when recording Rotate the mode dial to select or Press the O I S button The image stabilizer icon appears To cancel the image stabilizer function Press the O I S button again The default setting is on When a tripod is used we recommend that you turn the image stabilizer off In th...

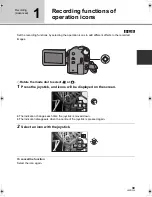
Page 39: ...corded images Rotate the mode dial to select or 1 Press the joystick and icons will be displayed on the screen The indication changes each time the joystick is moved down The indication disappears when the centre of the joystick is pressed again 2 Select an icon with the joystick To cancel the function Select the icon again 1 2 1 2NEXT NEXT 1 2NEXT 1 2 1 2NEXT NEXT 1 2NEXT ...

Page 40: ...sed jabout 3 hours elapsed Picture recording mode Operation icons Backlight compensation Fade Help mode Colour night view Soft skin mode PRE REC SDR H60 SDR H50 Self timer Backlight compensation Fade Help mode SDR H60 SDR H50 Colour night view Soft skin mode PRE REC SDR H60 SDR H50 SDR H40 1 2 1 2NEXT NEXT 1 2NEXT 1 2 1 2NEXT NEXT 1 2NEXT 1 2 1 2NEXT NEXT 1 2NEXT 1 2 1 2NEXT NEXT 1 2NEXT 2 2 2 2NE...

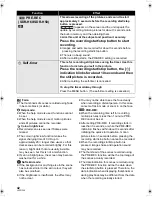
Page 41: ...he menu l 24 ADVANCED FADE COLOUR WHITE or BLACK Help mode This explains the recording functions Only for icons that can be selected in auto mode Select the desired icon with the joystick to display an explanation on the screen To exit the help mode Press the MENU button or select EXIT Colour night view This allows you to record colour subjects in dark locations to stand out against the background...

Page 42: ...utton cannot be recorded When the recording start stop button is pressed image shake and operation sound may be recorded The thumbnail of the scenes recorded using the PRE REC function will be the top image of the scenes actually recorded The date indication for scenes recorded using the PRE REC function will be the date when the start stop button is pressed Therefore the date indication when disp...

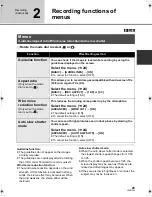
Page 43: ...t the subject may not be focused on Menus Guideline Aspect ratio Wind noise reduction Auto slow shutter Function Effect Setting method Guideline function You can check if the image is level while recording by using the guidelines displayed on the screen Select the menu l 24 BASIC GUIDE LINES ON To cancel the function select OFF Aspect ratio Only when the mode dial is set to This allows you to reco...

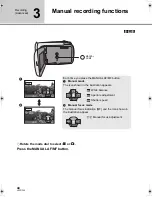
Page 44: ... 4NEXT MNL MNL 3 3 3 3NEXT NEXT 3 3NEXT 1 2 Each time you press the MANUAL AF MF button 1 Manual mode The icon shown in the illustration appears White balance Aperture adjustment Shutter speed 2 Manual focus mode The manual focus indication MF and the icon shown in the illustration appear Manual focus adjustment 3 3 3 3NEXT NEXT 3 3NEXT 4 4 4 4NEXT NEXT 4 4NEXT ...

Page 45: ... brightness is insufficient the sports mode does not function The 5 display flashes If this mode is used indoors the screen may flicker Portrait mode If this mode is used indoors the screen may flicker If so change the scene mode setting to OFF Low light mode Extremely dark scenes may not be able to be recorded finely Spotlight mode If the recording subject is extremely bright the subject may beco...

Page 46: ...l 44 2 Select with the joystick 3 Select the white balance mode with the joystick To restore to the automatic adjustment Set the white balance mode to You can also restore the automatic adjustment by pressing the AUTO button Manual focus adjustment White balance MNL 4 4 4 4NEXT NEXT 4 4NEXT MNL 3 3 3 3NEXT NEXT 3 3NEXT Icon Mode Recording conditions Auto white balance adjustment Indoor mode for re...

Page 47: ...rding Do not cover the white balance sensor during recording or it may not function properly When the unit is turned on with the lens cover closed the automatic white balance adjustment may not function properly Please turn the unit on after opening the lens cover When the display flashes the manual white balance previously adjusted is stored Whenever recording conditions change re set the white b...

Page 48: ...e iris gain value set the shutter speed and then set the iris gain value Manual shutter speed adjustment Avoid recording under fluorescent light mercury light or sodium light because the colour and brightness of the playback image may change If you increase the shutter speed manually the noise on the screen may increase You may see vertical lines of light in the playback image of a brightly shinin...

Page 49: ...49 LSQT1346 Preparation Recording Playback With a PC Others 50 Playback 55 Editing 67 Media management 68 With other products ...

Page 50: ...ed on the screen 4 Select the playback operation with the joystick 1 Playback Pause Skip playback backward 9 Skip playback forward Stops the playback and shows the thumbnails MEDIA SELECT HDD or SD CARD A Selecting pages Select and then press the joystick If you move and hold the joystick left or right you can fast forward or fast rewind the pages The screen will not change at this time but the sc...

Page 51: ...ith other products The recording time is not displayed on the screen during playback of scenes recorded on an SD card with other products Normal playback is restored when you move the joystick up Fast forward rewind playback Move and hold the joystick left or right during playback until fast forward rewind starts Move the joystick again to increase the speed Slow motion playback 1 Pause the playba...

Page 52: ... the screen showing all scenes Select VIEW ALL then press the joystick Even if scenes are recorded on the same day they are grouped separately when the number of scenes exceeds 99 Creating a new playlist l 60 HDD 1 Select PLAYLIST then press the joystick 2 Select the playlist to be played back then press the joystick 3 Select the scene to start playback then press the joystick To select a differen...

Page 53: ...number When is selected The method for selecting pages is the same as for motion picture playback l 50 The selected file is played back and the operation icon is automatically displayed on the screen 4 Select the playback operation with the joystick 1 Slide show start pause 2 Plays back the previous picture 1 Plays back the next picture Stops the playback and shows the thumbnails MEDIA SELECT HDD ...

Page 54: ...may degrade or not play back data recorded on this unit While this unit accesses the SD card the SD card access lamp is lit do not open the SD card slot cover and remove the SD card Do not operate the mode dial during the slide show It takes time to display the file and how long it will take depends on the number of pixels of the file When a file is displayed as on the thumbnail display playback i...

Page 55: ...ion message appears Select YES then press the joystick 1 Press the button in the thumbnail display 2 Select SELECT or ALL and press the joystick Only when ALL is selected All the scenes files on the HDD or SD card except the locked scenes files will be deleted Proceed to step 5 When the date is selected in motion picture playback all scenes on the selected date are deleted 3 Only when SELECT is se...

Page 56: ... 2 When the confirmation message appears Select YES then press the joystick The locked scenes or scenes of which copied information was destroyed cannot be deleted Notes for deleting scenes files Do not turn off this unit while deleting When you delete scenes files use a battery with sufficient battery power or use the AC adaptor Do not open the SD card slot cover and remove the SD card while dele...

Page 57: ... aware that if a medium is formatted then all the data on the medium will be erased Select HDD or SD CARD in MEDIA SELECT 1 Select the menu l 24 EDIT SCENE LOCK SET YES 2 Select the scene to be protected then press the joystick appears and the selected scene is locked Press the joystick again to release the lock setting You can also select multiple scenes in succession To complete the settings Pre...

Page 58: ... 2 Select the scene to be divided then press the joystick 3 When you reach the point where you want to divide the scene Select with the joystick Move the joystick left or right to fast forward rewind playback Using slow motion playback or frame by frame playback makes it easy to search for the point where you want to divide the scene l 51 4 Select the half that you want to delete and press the joy...

Page 59: ...is impossible to divide and delete scenes with a short recording time The length of the remaining scenes must be 3 seconds or longer It is impossible to set the dividing point at the beginning or the end of the scene When a scene that was divided and deleted using the SPLIT DELETE function is copied to a disc using the DVD burner or the supplied software and played back on another device a maximum...

Page 60: ...ist will not affect the original scenes You can create a playlist on the HDD only You cannot create a playlist on an SD card The maximum number of playlists on the HDD 4 The maximum number of playlist scenes on the HDD 99 If original scenes are deleted the portion of playlists created with these scenes is also deleted Rotate the mode dial to select Select HDD in MEDIA SELECT 1 Select PLAYLIST then...

Page 61: ...HDD in MEDIA SELECT 1 Select PLAYLIST then press the joystick 2 Select the playlist to be edited then press the joystick Editing a playlist Function Operating method Deleting scenes The method for deleting playlist scenes is the same as for Deleting scenes files l 55 If you delete scenes on a playlist it will not affect the original scenes When ALL is selected the selected playlist will be deleted...

Page 62: ...s possible to change the sequence of scenes in the playlist by moving them to another position 1 Select the menu l 24 EDIT MOVE YES 2 Select the scene to be moved then press the joystick The selected scene is encircled by a red frame and the position to insert is shown by a yellow bar 3 Select the position to insert the scene then press the joystick To continue moving other scenes in the playlist ...

Page 63: ...e be aware that if a medium is formatted then all the data on the medium will be erased Select HDD or SD CARD in MEDIA SELECT 1 Select the menu l 24 PHOTO SETUP LOCK SET YES 2 Select the file to be protected then press the joystick appears and the selected file is locked Press the joystick again to release the lock setting You can also select multiple files in succession To complete the settings P...

Page 64: ...CARD in MEDIA SELECT 1 Select the menu l 24 PHOTO SETUP DPOF SET SET 2 Select the file to be set then press the joystick 3 Select the number of prints then press the joystick To cancel the setting set the number of prints to 0 You can also select multiple files in succession To complete the settings Press the MENU button To cancel all DPOF settings Select PHOTO SETUP DPOF SET CANCEL ALL The DPOF s...

Page 65: ...ystick When ALL is selected all still picture files in the HDD or SD card will be copied Proceed to step 6 4 Only when SELECT is selected in step 3 Select the file to be copied then press the joystick The selected file is encircled by a red frame To unselect the scene press the joystick again Up to 50 files can be selected to be copied The files are copied in the order that they were selected 5 On...

Page 66: ...or use the AC adaptor Do not open the card slot cover while copying The copying will stop In case of ALL the copying may take time if there are many files The copied files are recorded after the still picture files in the copy destination The file names or the folder names will differ from the original file The lock and DPOF settings of the file cannot be copied When a still picture is copied to a...

Page 67: ...ing file management and other purposes 60 GB is 60 000 000 000 bytes Usable capacity will be less SDR H40 The 40 GB hard drive utilizes a portion of the storage space for formatting file management and other purposes 40 GB is 40 000 000 000 bytes Usable capacity will be less SD This is for initializing SD cards Please be aware that if an SD card is formatted then all the data recorded on the card ...

Page 68: ...more information please read the operating instructions for the TV To watch images with a 16 9 aspect ratio on a regular TV 4 3 If the images are squeezed horizontally on a TV with a 4 3 aspect ratio change the menu setting to play back the pictures in the original aspect ratio If the images are not displayed correctly on a wide screen TV adjust the aspect setting on the TV Refer to the operating ...

Page 69: ...er Operation cannot be guaranteed with cables other than the one supplied with the DVD burner About discs that can be used New 1 12 cm discs DVD RAM DVD RW 2 DVD R DVD R DL CD RW 3 CD R 3 Do not allow fingerprints or dirt to get on the recording playback side of the disc RW R R DL discs or 8 cm discs cannot be used for copying Refer to the operating instructions of the DVD burner for details about...

Page 70: ... Insert the disc into the DVD burner after connecting the DVD burner to this unit Please read the operating instructions of the DVD burner for how to use it If the DVD burner is connected to this unit with a disc already inserted the message CANNOT CHECK CONNECTED DEVICE DISCONNECT THE USB CABLE FROM THIS UNIT may be displayed after Please Wait is displayed for over a minute When this happens disc...

Page 71: ... press the joystick If all scenes are copied it is possible to create another set with the same contents Follow the instructions on the screen To finish eject the disc and disconnect the Mini AB USB Connection Cable Press the MENU button in the middle of the operation to return to the initial menu screen DVD COPY function 1 Copying all the scenes to discs BURN DISC HDD or SD CARD VIDEO or PICTURE ...

Page 72: ...oystick again Up to 50 scenes can be set in succession If the total data size of the scene exceeds the disc capacity the remaining space on the disc display will turn red and the amount in excess will be displayed Select scenes so that they fit on to one disc The units of usable capacity on a DVD disc are 1 MBl1 048 576 bytes 3 When the confirmation message appears Select START then press the joys...

Page 73: ...ect YES When a message appears indicating copying is complete then press the joystick It is possible to create another set with the same contents Follow the instructions on the screen To finish eject the disc and disconnect the Mini AB USB Connection Cable Press the MENU button in the middle of the operation to return to the initial menu screen 4 Selecting the scenes by date to copy to discs BURN ...

Page 74: ...d When a still picture is copied to an SD card using a PC and other equipment but it does not show up on the display of the unit the image will not be copied to the disc About the time it takes to copy The time it takes for copying to 1 disc When copying 4 GB of motion pictures to 1 disc The time it takes to copy differs depending on the number of scenes recorded on the media type of disc number o...

Page 75: ... the still pictures on the disc are displayed as thumbnails 3 Select the scene file to be played back then press the joystick 4 Select the playback operation with the joystick The playback operation is the same as when playing back motion pictures or still pictures l 50 53 After playback eject the disc and disconnect the Mini AB USB Connection Cable Playing back a disc inserted in the DVD burner ...

Page 76: ...unit can be dubbed onto the hard disk or a DVD disc Refer to the operating instructions of your DVD recorder for information about whether or not it supports dubbing from an SD card For details on how to dub the images refer to the operating instructions of the DVD recorder Dubbing images onto other video devices A AV cable supplied Insert the plugs as far as they will go Do not use any other AV c...

Page 77: ... on this unit s screen 3 Select a file to be printed then press the joystick 4 Select the desired number of prints then press the joystick You can set up to 9 prints To cancel the setting set the number of prints to 0 Up to 8 files can be selected to be printed 5 Press the MENU button to display the PictBridge menus 6 Select the date print setting on DATE PRINT then press the joystick If the print...

Page 78: ... selected the number of prints set is cancelled and the screen returns to step 3 If NO is selected all the settings are kept and the screen returns to step 3 Avoid the following operations during printing These operations disable proper printing jDisconnecting the USB cable jOpening the SD card slot cover and removing the SD card jSwitching the mode dial jTurning off the power Check the settings f...

Page 79: ...79 LSQT1346 Preparation Recording Playback With a PC Others 80 Before using 84 Setup 88 Using software 90 Using a Macintosh ...

Page 80: ...other than the supplied software Adobe Reader To view the installed operating instructions Adobe Reader Adobe Acrobat Reader 5 0 or later is required If the Adobe Reader Adobe Acrobat Reader is not already installed on your PC you can install it from the CD ROM Click the desired language in Setup Menu and follow the on screen messages to install The following system requirements are necessary in o...

Page 81: ...ixels or more Video card supporting DirectX 9 0c supports overlay of DirectDraw Free hard disk space DMA transfer effective at Ultra DMA 33 or more Ultra DMA 100 or higher recommended For installing the application 150 MB or more When creating discs DVD Video 5 GB or more for the work folder 10 GB or more in the case of dual layer discs If compression setting is enabled errors may occur during rec...

Page 82: ...ware Operation cannot be guaranteed on all DVD drives DVD discs authored with this software are not guaranteed to play in all DVD players Depending upon the environment of your PC if it does not support Hi Speed USB USB 2 0 for example frame dropout may occur the audio may be intermittent or the software may run slowly when you play back recorded images If your PC does not satisfy the above system...

Page 83: ...ing or Disassembly Licensee may not reverse engineer decompile or disassemble the Software except to the extent either of them is permitted under law or regulation of the country where Licensee resides Matsushita or its distributors or dealers will not be responsible for any defects in the Software or damage to Licensee caused by Licensee s reverse engineering decompiling or disassembly of the Sof...

Page 84: ...dialogue appears click Continue 1 Insert the CD ROM into the PC The Setup Menu screen will appear If the Setup Menu screen does not appear double click the CD ROM drive icon in My Computer Computer 2 Click VideoCam Suite 1 0 3 Click Next 4 Select where the application is to be installed then click Next 5 Select Yes or No to create shortcut 6 Select the country or region where you live then click N...

Page 85: ...atible contact the PC manufacturer Follow the steps below to uninstall the software if it is no longer required For Windows Vista 1 Select Start Control Panel Uninstall a program 2 Select VideoCam Suite 1 0 then click Uninstall For Windows XP 1 Select start Control Panel Add or Remove Programs 2 Select VideoCam Suite 1 0 then click Remove For Windows 2000 1 Select Start Settings Control Panel Add ...

Page 86: ...s on the LCD monitor Doing so may damage the data on the HDD or SD card The HDD and SD card cannot be accessed simultaneously It may be necessary to reboot the PC after connecting this unit to it for the first time When the unit is connected to a PC it is recognised as an external drive This unit supports only the readout of data using the PC The PC cannot write data to the unit or erase data from...

Page 87: ...and the HDD or the SD card can be used as an external drive still pictures on the drive can be copied to the PC with Windows Explorer or other programmes 1 Double click the folder that contains the files on the drive 100CDPFP etc 2 Drag and drop the files onto the destination folder on the PC hard disk Do not delete the SD card s folders Doing so may make the SD card unusable in this unit Always u...

Page 88: ...VideoCam Suite log on to your PC as Administrator or with a login name equally authorized If you log on with a login name other than Administrator the software cannot be used Select start All Programs Programs Panasonic VideoCam Suite 1 0 VideoCam Suite Refer to the operating instructions of the software PDF file for details on how to use it You will need Adobe Reader to read the PDF operating ins...

Page 89: ...is clicked the USB function will be set to PC CONNECT Before turning this unit off disconnect the USB cable l 87 Any scenes that are copied with the DVD COPY function are indicated by the copied icon and can be deleted as a group using the deletion menu l 56 71 The order of the motion pictures on a disc are set automatically when the disc is created with the DVD COPY function In order to designate...

Page 90: ...t this unit to a PC via the supplied USB cable The USB function selection screen will appear 2 Select PC CONNECT HDD or SD CARD then press the joystick 3 Double click HDD_CAMERA or NO NAME displayed on the desktop Files are stored in 100CDPFP folder etc in the DCIM folder 4 Drag and drop the files onto destination folder on the PC hard disk To disconnect USB cable safely Drag HDD_CAMERA or NO NAME...

Page 91: ...91 LSQT1346 Preparation Recording Playback With a PC Others 92 Indications 97 Helpful hints ...

Page 92: ...0dB MNL 15 11 2008 12 34 R 10000 0 2 1 PRE REC 16 9 AUTO MNL 1 100 Shutter speed l 48 OPEN F4 0 F number l 48 0dB Gain value l 48 Soft skin mode l 41 Fade White Fade Black l 41 Colour night view function l 41 Zoom microphone l 37 Wind noise reduction l 43 Power LCD plus function l 28 Motion picture recording mode l 33 5 Scene mode l 45 Sports mode Portrait mode Low light mode Spotlight mode Surf s...

Page 93: ... selected date displayed Scenes in the selected playlist displayed Motion picture recording mode l 33 No 10 Scene number Volume adjustment l 51 R Resume playback l 51 Locked motion pictures and still pictures l 57 63 Copied motion pictures l 71 100 0001 Still picture folder file number display XP SP LP 1 DPOF already set to more than 1 l 64 Number of recording pixels for still pictures l 35 640k48...

Page 94: ...Bridge is connected l 77 Accessing the HDD or an SD card l 86 Time display The built in battery is low l 27 The warning alarm indication appears when LCD monitor is rotated towards the lens side Return the direction of the LCD monitor to normal position and check the warning alarm indication No SD card is inserted unusable card The HDD cannot be accessed as the drop detection function has detected...

Page 95: ...e SD card When using any other card Use a Panasonic SD card or another SD card which can be used to record motion pictures l 20 THIS BATTERY CANNOT BE USED Use a battery that is compatible with this unit l 14 You are attempting to connect an AC adaptor not compatible with this unit Use the supplied AC adaptor l 17 If using a Panasonic battery compatible with this unit l 14 eject the battery and th...

Page 96: ...t appears after this message wait a while without turning the unit off It may take time until the unit can be used PUSH THE RESET SWITCH An irregularity in the unit has been detected Remove the SD card then press the RESET button to restart the unit l 103 DISCONNECT USB CABLE The unit cannot correctly establish the connection to the PC or printer Disconnect and reconnect the USB cable and then sel...

Page 97: ...sed Colour night view While recording Cannot set or cancel In picture recording mode SDR H60 SDR H50 When PRE REC is used Cannot set or cancel Backlight compensation When the colour night view function is used When the iris gain is set Soft skin mode Set and cancel While recording SDR H60 SDR H50 When PRE REC is used Help mode Scene mode In auto mode When the colour night view function is used Cha...

Page 98: ...ossible What should I do when the HDD is full Use the supplied software to back up the data to a PC or a DVD disc Images can also be copied to a disc by connecting this unit to the optional DVD burner After that delete unnecessary scenes or format the HDD l 55 67 What type of device is required for playback of a disc created with the DVD burner A disc created with the DVD burner can be played back...

Page 99: ... a PC Use VideoCam Suite Can I use the DVD COPY function to copy motion pictures recorded on SD cards onto DVD discs as well No you cannot You can use the DVD COPY function to copy only the motion pictures recorded on the HDD If you want to copy motion pictures from an SD card to a DVD disc copy the motion pictures to a PC first and then copy them to a DVD disc l 88 ...

Page 100: ...o resume recording turn the power back on The power will not turn off automatically when the power save function l 25 is set to OFF This unit cannot be operated though it is turned on This unit does not operate normally The unit cannot be operated unless you open the LCD monitor Remove the SD card then press the RESET button l 103 If normal conditions are not restored yet remove the battery or AC ...

Page 101: ...If the recording stops when the HDD is used back up the data on the HDD to a PC etc and then format the HDD l 67 The operation arbitrarily stops The drop detection function has activated to protect the HDD Do not drop or shake this unit while operating it Recording stops suddenly during motion picture recording on an SD card Use an SD card that can be used for motion picture recording l 20 When us...

Page 102: ... data l 67 Please be aware that if the HDD or the SD card is formatted then all the data recorded on the HDD or the SD card will be erased If the SD card s write protect switch is set to LOCK then deletion and editing are disabled l 19 The images on the SD card do not look normal The data may be destroyed It may have been destroyed by static or electromagnetic waves Store important data on a PC or...

Page 103: ...unit needs repair Detach the power connected and consult the dealer who you purchased this unit from Do not attempt to repair the appliance by yourself When the SD card is inserted in this unit it is not recognised Use this unit to format SD cards Please be aware that if an SD card is formatted then all the data recorded on the card will be erased l 67 When the SD card is inserted in another devic...

Page 104: ...B cable When the USB cable is disconnected an error message will appear on the PC To disconnect the USB cable safely double click the icon in the task tray and follow the instructions on the screen The DVD COPY function will not start even when I press the DVD COPY button To create DVD Video discs using the DVD COPY function you need to install VideoCam Suite from the supplied CD ROM to your PC l ...

Page 105: ...tend the cords and the cables Do not spray insecticides or volatile chemicals onto the unit If the unit is sprayed with such chemicals its body may be marred and the surface finish may peel off Do not leave rubber or plastic products in contact with the unit for a long time When you use the unit in a sandy or dusty place such as a beach do not let sand or fine dust get into the body and terminals ...

Page 106: ...ries when going out for recording Prepare enough batteries to last 3 to 4 times the period you are planning to record Cold weather such as when skiing can shorten the recording period If you drop the battery accidentally check to see if the terminals are damaged Inserting a battery with damaged terminals can damage the unit or AC adaptor Do not throw old battery into fire Heating a battery or thro...

Page 107: ...ights Use of this copyright protection technology must be authorized by Macrovision and is intended for home and other limited viewing uses only unless otherwise authorized by Macrovision Reverse engineering or disassembly is prohibited Manufactured under license from Dolby Laboratories Dolby and the double D symbol are trademarks of Dolby Laboratories Microsoft Windows Windows Vista DirectDraw Di...

Page 108: ...ite colour under different light sources By recognising which is the white colour under sunlight and which is the white colour under a fluorescent light the unit can adjust the balance among the other colours Since the white colour is the reference for all the colours the unit can record pictures in a natural hue if it can recognise the reference colour white Auto focus The lens is moved forward o...

Page 109: ...t focus correctly because the light information that comes through the lens decreases considerably Recording a fast moving subject As the focus lens inside moves mechanically it cannot keep up with a fast moving subject When for example recording a sports event with fast moving subjects the focus may lose its sharpness Recording a subject with little contrast It is easy to bring subjects with a sh...

Page 110: ...ll range AF SDR H50 SDR H40 Auto Iris F1 9 to F4 3 Focal length 1 8 mm to 75 6 mm Macro Full range AF Zoom SDR H60 50x optical zoom 80x 2500x digital zoom SDR H50 SDR H40 42x optical zoom 70x 2000x digital zoom Monitor 2 7z wide LCD monitor approx 123 K pixels Microphone Stereo with a zoom function Speaker 1 round speaker 20 mm Standard illumination 1 400 lx Minimum required illumination 6 lx appr...

Page 111: ... than 3000 m above sea level Recording media SD Memory Card removable type 32 MB 1 64 MB 1 128 MB 1 256 MB 512 MB 1 GB 2 GB FAT12 and FAT16 format corresponding SDHC Memory Card removable type 4 GB 8 GB 16 GB FAT32 format corresponding HDD fixed type 60 GB 2 SDR H60 SDR H50 40 GB 3 SDR H40 Compression MPEG 2 Recording mode and transfer rate XP 10 Mbps VBR SP 5 Mbps VBR LP 2 5 Mbps VBR Recordable t...

Page 112: ... notice Recording media SD Memory Card removable type 8 MB 16 MB 32 MB 64 MB 128 MB 256 MB 512 MB 1 GB 2 GB FAT12 and FAT16 format corresponding SDHC Memory Card removable type 4 GB 8 GB 16 GB FAT32 format corresponding HDD fixed type 60 GB 1 SDR H60 SDR H50 40 GB 2 SDR H40 Compression JPEG Design rule for Camera File system based on Exif 2 2 standard DPOF corresponding Picture size 640k480 4 3 64...

Page 113: ...roximations If you record motion pictures on the HDD or an SD card the number of recordable still pictures will become smaller Number of recordable pictures on the HDD or an SD card Picture size 640k480 640k360 Picture quality HDD 60 GB SDR H60 SDR H50 99999 99999 99999 99999 40 GB SDR H40 99999 99999 99999 99999 SD 8 MB 37 75 37 75 16 MB 92 185 92 185 32 MB 200 410 200 410 64 MB 430 850 430 850 1...

Reviews: