5
4
MEASURE INGREDIENTS
ACCURATELY
»
We recommend using a
digital scale
.
»
Use the included measuring spoons.
»
Ensure you use level spoonfuls.
ADJUST WATER TEMPERATURE depending on room temperature.
If the room temperature is higher than 77°F/25°C,
use colder water (about 41°F/5°C) to prevent collapse.
If the room temperature is below 50°F/10°C,
use warmer water (about 68°F/20°C) to help rise.
Bread-baking
basics
Bread-baking
tips
Baking bread might seem intimidating, but it's easy
when you follow these simple, basic steps.
The height and shape of finished breads may vary,
even when using the same ingredients and methods.
These guidelines will help achieve consistent results.
*Except for gluten free recipes.
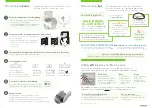
1. Twist the bread pan counter-clockwise to unlock.
2. Lift up using the attached handle.
3. Set the kneading blade onto the kneading mount
shaft. Ensure the blade is securely in place.
1. Place dry yeast first, then other dry ingredients.
2. Pour in any liquids.
3. Place the bread pan back into the breadmaker
and turn the bread pan slightly clockwise to
secure in place.
4. Close the lid.
1. Choose your settings
»
Press the [
] button
»
Press [ ] or [ ] once for mode
»
Press [ ] or [ ] again for menu#.
The “End” light will flash when baking is complete.
Using the handle and oven mitts, remove the bread pan from the
breadmaker and gently shake the bread out of the pan.
NOTE: Do not use a knife or sharp object to remove bread from pan.
2.
Set loaf size
Press the [
]
button to select
desired size.
3.
Set crust shade
Press the [
]
button to select
desired shade.
4.
Set timer
Press the [ ]
button to set desired
hours and minutes.
Please see page 5 for the “added ingredients” guide.
Remove bread pan and set kneading blade
Follow instructions for adding ingredients into bread pan
Pour any nuts/raisins/additional ingredients into raisin/nut dispenser (if needed)
Select baking processes
Baking complete!
1
2
3
4
6
Use
fresh
ingredients.
Ensure all parts are
clean and dry.
No peeking!
Keep lid closed
until done.
Always
set the kneading blade
into the kneading
mounting shaft
securely
.
Remove the
freshly
baked bread immediately.
Both bread and pan will be hot. Use dry oven gloves and place the loaf on a wire rack to cool.
Place ingredients into the bread pan
in the order listed on the recipe.
Place dry yeast into the bread pan first*
The start light will be lit and remain lit while cooking.
Displayed time will countdown remaining baking time.
Press the Start button to start baking
5
Adding
extra
texture and flavor, easily
The built-in raisin/nut dispenser makes it easy to add in tasty raisins or
crunchy nuts at the optimal time and evenly distributed throughout the dough.
When adding fresh fruit, chocolate, or any other moist or viscous ingredient,
add it directly into the bread pan. Do not use the raisin/nut dispenser.
Dried fruits
»
Rough chop into
approximately 1/4” (5mm).
»
Sugar-coated ingredients
may stick to dispenser and
may not be added.
Fresh fruits, alcohol-brined fruits
»
Do not use raisin/nut dispenser.
»
Only use added quantites in the recipe, as the extra water
content of the ingredients will affect your outcome.
Nuts
»
Chop finely.
»
May impair the
effects of gluten.
Avoid using too
much.
Cheese, chocolate
»
Do not use raisin/nut dispenser.
»
Break or cut into smaller chunks for
easier mixing.
Seeds
Large, hard seeds
may scratch
dispenser and
bread pan coating.
store
yeast
in a
cool dry place.
Be sure to use dry yeast that does
not require pre-fermentation.
"Instant yeast" or
"Bread machine yeast"
is recommended.


