background image

5

RQT7969

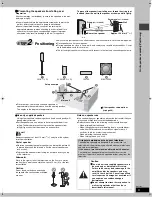
Preventing the speakers from falling over

Preparation

Attach screw eyes (not included) to secure the speakers to the wall 
(

diagram right).

You will need to obtain the appropriate screw eyes to match the 
walls or pillars to which they are going to be fastened.

Consult a qualified housing contractor concerning the 
appropriate procedure when attaching to a concrete wall or a 
surface that may not have strong enough support. Improper 
attachment may result in damage to the wall or speakers.

To prevent the speaker from falling over, thread the string (not 
included) from the wall to the speaker as shown and tie tightly.

Use only supplied speakers

Using other speakers can damage the unit, and sound quality will 
be negatively affected.

Set the speakers up on an even surface to prevent them from 
falling. Take proper precautions to prevent the speakers from 
falling if you cannot set them up on an even surface.

Main unit

[Note]

Keep your speakers at least 10 mm (

13

/

32

q

) away from the system 

for proper ventilation. 

Center speaker

Vibration caused by the center speaker can disrupt the picture if it 
is placed directly on the television. Put the center speaker on a 
rack or shelf.

To prevent the speakers from falling, do not place directly on top 
of the television.

Subwoofer 

Place to the right or left of the television, on the floor or a sturdy 
shelf so that it won’t cause vibration. Leave 10 cm (4

q

) at the rear 

for ventilation.

Caution

Do not stand on the base and shake 
the speaker. Be cautious when children 
are near.

Notes on speaker use

You can damage your speakers and shorten their useful life if you 
play sound at high levels over extended periods.

Reduce the volume in the following cases to avoid damage.
– When playing distorted sound.
– When the speakers are reverberating due to a record player, 

noise from FM broadcasts, or continuous signals from an 
oscillator, test disc, or electronic instrument.

– When adjusting the sound quality.
– When turning the unit on or off.

String

 (not included)

Wall

Screw eye

 (not included)

Rear of the speaker

Approx. 150 mm

 (5

29

/

32

z

)

STEP

2

Positioning

How you set up your speakers can affect the bass and the sound field. Note the following points:

Place speakers on flat secure bases.

Placing speakers too close to floors, walls, and corners can result in excessive bass. Cover 
walls and windows with thick curtains.

The left and right speakers are the same with respect to the front and surround speaker pairs.

FRONT (L, R)

CENTER

SURROUND (L, R)


SUBWOOFER


Setup example

Main unit

Place the front, center, and surround speakers at 
approximately the same distance from the seating position. 
The angles in the diagram are approximate.

Other speaker setup options 

(

page 26).

If irregular coloring occurs on your television

The supplied speakers are designed to be used close to a 
television, but the picture may be affected with some televisions 
and setup combinations.

If this occurs, turn the television off for about 30 minutes.

The television’s demagnetizing function should correct the 
problem. If it persists, move the speakers farther away from the 
television.

Caution

The main unit and supplied speakers are to 
be used only as indicated in this setup. 
Failure to do so may lead to damage to the 
amplifier and/or the speakers, and may 
result in the risk of fire. Consult a qualified 
service person if damage has occurred or if 
you experience a sudden change in 
performance.

Do not attempt to attach these speakers to 
walls using methods other than those 
described in this manual.

F

ro

n

t s

p

e

ake

r a

ssemb

ly

/P

o

si

ti

o

n

in

g

7969en-p03-26.fm  Page 5  Sunday, December 19, 2004  1:33 PM

Summary of Contents for SCHT680 - RECEIVER W/5-DISK DV

Page 1: ...s product meets the ENERGY STAR guidelines for energy efficiency If you have any questions contact In the U S A 1 800 211 PANA 7262 In Canada 1 800 561 5505 Before connecting operating or adjusting this product please read the instructions completely Please keep this manual for future reference Advanced progressive scan Provides a smoother and sharper image 6 page Compatible with a variety of medi...

Page 2: ...uipment generates uses and can radiate radio frequency energy and if not installed and used in accordance with the instructions may cause harmful interference to radio communications However there is no guarantee that interference will not occur in a particular installation If this equipment does cause harmful interference to radio or television reception which can be determined by turning the equ...

Page 3: ...as been damaged in any way such as power supply cord or plug is damaged liquid has been spilled or objects have fallen into the apparatus the apparatus has been exposed to rain or moisture does not operate normally or has been dropped IMPORTANT SAFETY INSTRUCTIONS 3 Control reference guide 8 Discs that can be played 9 Main unit and disc caution 9 Convenient functions 12 15 Disc information Display...

Page 4: ...ttach the pipes to the speakers Slot the screw head in between the 2 stoppers of the speaker groove Ensure the pipe is fastened on straight by gradually tightening the right and left screws alternately until fully tightened To prevent a short circuit do not cover the connection terminals with the pipe 4 Connect the speaker cables 5 Secure the speaker cables to the bases STEP1 Front speaker assembl...

Page 5: ... the volume in the following cases to avoid damage When playing distorted sound When the speakers are reverberating due to a record player noise from FM broadcasts or continuous signals from an oscillator test disc or electronic instrument When adjusting the sound quality When turning the unit on or off String not included Wall Screw eye not included Rear of the speaker Approx 150 mm 529 32z STEP2...

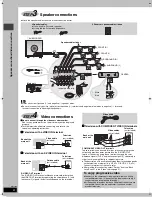
Page 6: ...r center speaker 2klong cables For surround speakers Speaker cable sticker 2 FRONT R 1 FRONT L 4 SURROUND R 3 SURROUND L 5 CENTER 6 SUBWOOFER White Blue Insert the wire fully Click Note Never short circuit positive i and negative j speaker wires Be sure to connect only positive white wires to positive i terminals and negative blue wires to negative j terminals Incorrect connection can damage the s...

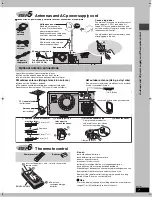
Page 7: ... AC power supply cord after all other connections are complete AM loop antenna Stand the antenna up on its base Place the antenna where reception is best Keep loose antenna cable away from other wires and cables Click AM loop antenna FM indoor antenna AC power supply cord To household AC outlet AC 120 V 60 Hz Adhesive tape AC IN R L R L L R COMPONENT COMPONENT VIDEO OUT VIDEO OUT 480p 480i 480p 48...

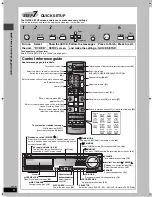
Page 8: ...ers 11 To use functions labeled in orange While pressing SHIFT press the corresponding button Basic operations for play 11 Show a disc top menu 16 or program list 17 Select or register menu items on the television screen Frame by frame 11 Show on screen menu 18 or television volume down 25 Television and Video cassette recorder operations 25 Channel select 24 25 Show a disc menu 16 or playlist 17 ...

Page 9: ...gn rule for Camera File system standard Version 1 0 To play JPEG files select Play as Data Disc in Other Menu page 19 DVD Audio DVD A DVD V Some DVD Audio discs contain DVD Video content To play DVD Video content select Play as DVD Video in Other Menu page 19 DVD Video DVD V DVD R DVD Video DVD RW DVD Video Discs recorded and finalized on DVD video recorders or DVD video cameras iR Video iRW Video...

Page 10: ...is facing up RAM Remove the disc from its cartridge before use To load discs on the other trays Press a disc button and then press OPEN CLOSE You can load up to 5 discs one per tray Do not pull or push the tray with your hand Pause Press to skip Press and hold to search during play slow motion during pause Motion picture part Press 1 play to start normal play 1 Power on 2 Select DVD CD Using the m...

Page 11: ...P MENU RETURN SUBTITLE AUDIO FL DISPLAY SHIFT ANGLE PAGE GROUP 1 2 5 4 CANCEL ENTER Numbered buttons SKIP ENTER SLOW SEARCH ENTER ENTER Select Register Enter number RAM DVD A DVD V VCD CD e g To select 12 S10 1 2 VCD with playback control Press to cancel the PBC function and then press the numbered buttons WMA MP3 JPEG e g To select 123 1 2 3 ENTER Press CANCEL to cancel the number s DVD A DVD V S...

Page 12: ... Mode is also canceled when you open the current disc tray select another source or switch the unit to standby Only when the elapsed play time can be displayed Except iR iRW Press QUICK REPLAY to skip back a few seconds Only when the elapsed play time can be displayed RAM DVD V Except iR iRW Play restarts from approximately a minute later Convenient when you want to skip commercials etc During pla...

Page 13: ... language On iR iRW a subtitle number may be shown for subtitles that are not displayed To display clear the subtitles Press 2 1 to select On or Off RAM On Off only with discs that contain subtitle on off information Press SHIFT i SUBTITLE to select On or Off Subtitle on off information cannot be recorded using Panasonic DVD Recorders Only when the elapsed play time can be displayed JPEG Works wit...

Page 14: ...ogram 1 Press 3 4 to select an item 2 Repeat above steps 1 and 2 To clear the selected program 1 Press 3 4 to select an item 2 Press CANCEL or press 3 4 2 1 to select Clear and press ENTER To clear the whole program Select Clear all with 3 4 2 1 and press ENTER Note The program is retained in memory unless one of the following occurs The current disc tray is opened Another source is selected The u...

Page 15: ...ethod claims of certain U S patents and other intellectual property rights owned by Macrovision Corporation and other rights owners Use of this copyright protection technology must be authorized by Macrovision Corporation and is intended for home and other limited viewing uses only unless otherwise authorized by Macrovision Corporation Reverse engineering or disassembly is prohibited MPEG Layer 3 ...

Page 16: ...E to skip page by page Press FUNCTIONS to show the playback condition and current position To exit the screen Press TOP MENU or MENU Playing data discs Playing items in order Playback Menu Playing from the selected item Navigation Menu VOLUME CH SKIP SLOW SEARCH MENU DIRECT NAVIGATOR TOP MENU RETURN FUNCTIONS ENTER SUBWOOFER LEVEL SUPER SRND C FOCUS SFC CD MODE PLAY MODE TEST CH SELECT SETUP MUTIN...

Page 17: ...a MP3 or mp3 JPG jpg JPEG or jpeg WMA You cannot play WMA files that are copy protected This unit does not support Multiple Bit Rate MBR MP3 This unit does not support ID3 tags Compatible sampling rates 8 11 02 12 16 22 05 24 32 44 1 and 48 kHz JPEG To view JPEG files on this unit Take them on a digital camera that meets the DCF Standard Design rule for Camera File system Version 1 0 Some digital ...

Page 18: ...UNCTIONS Items shown differ depending on the type of disc Main menu Program Group Title Chapter Track Playlist Content To start from a specific item Time Except iR iRW To skip incrementally or decrementally Time Slip for play only 1 Press ENTER twice to show the Time Slip indicator 2 Press 3 4 to select the time and press ENTER Press and hold 3 4 to alter faster To start from a specific time Time ...

Page 19: ... depth Video Output Mode 480i Interlace 480p Progressive When you select 480p a confirmation screen appears Select Yes only if connecting to a progressive output compatible television Transfer Mode If you have chosen 480p above select the method of conversion for progressive output to suit the type of material Auto1 normal Detects 24 frame per second film content and appropriately converts it Auto...

Page 20: ... SETUP MUTING ENTER Select Go right ENTER Select Register ENTER 1 2 3 4 5 6 7 8 0 9 S10 ENTER Select Register SHIFT SETUP MUTING QUICK SETUP enables successive settings of the items in the shaded area Audio Choose the audio language English French Spanish Original 1 Other 2 Subtitle Choose the subtitle language Automatic 3 English French Spanish Other 2 Menus Choose the language for disc menus Cha...

Page 21: ...PONENT VIDEO OUT terminals Lighter When connected through VIDEO OUT or S VIDEO OUT Darker When connected through COMPONENT VIDEO OUT Y PB PR Dynamic Range Compression Off On Adjusts for clarity even when the volume is low by compressing the range of the lowest sound level and the highest sound level Convenient for late night viewing Only works with Dolby Digital Speaker Settings below Set the dela...

Page 22: ...is turned on Dolby Pro Logic II is an advanced decoder that derives 5 channel surround Left and Right Front Center Left and Right Surround from any stereo program material whether or not it has been specifically Dolby Surround encoded Press ÎPLII Each time you press the button MOVIE Movie software recorded in Dolby Surround MUSIC Stereo sources OFF Cancel This works only in DVD CD mode ÎPLII light...

Page 23: ...surround speaker levels at the same time using 3 4 S 6 dB to i6 dB 2 Press 3 increase or 4 decrease to adjust the speaker level for each speaker C RS LS SW 6 dB to i6 dB L R Only the balance is adjustable To adjust the balance of the front speakers While L or R is selected press 2 1 Speaker level adjustments SHIFT TEST CH SELECT Other useful functions Press SHIFT i SLEEP to select the time in minu...

Page 24: ...et to that channel 1 Press TUNER BAND to select FM or AM 2 Press the numbered buttons to select the channel Alternatively press W CH X To select a 2 digit number e g 12 S10 1 2 When a stereo FM broadcast is being received If noise is excessive in FM Press FM MODE to display MONO Press FM MODE again to cancel the mode The mode is also canceled when you change the frequency FM frequency step You can...

Page 25: ... such equipment back cover Aim the remote control at the equipment While pressing TV or VCR Press a numbered button to enter the first digit and then the second digit The remote control outputs the on off signal If the code is correct the equipment turns on or off If it doesn t try entering another code Note Reenter the codes after you change the batteries AC IN R L R L L R COMPONENT COMPONENT VID...

Page 26: ...h this system Fitting speaker stands not included Except Front speakers Ensure the stands meet these conditions before purchasing them Note the diameter and length of the screws and the distance between screws as shown in the diagram The stands must be able to support over 10 kg 22 lbs The stands must be stable even if the speakers are in a high position 30 35 mm 13 16q 13 8q 7 5 9 4 mm 19 64q 3 8...

Page 27: ...l NTSC 0 286 Vp p 75 Terminal S terminal 1 system Component video output 480p 480i Y output level 1 Vp p 75 PB output level 0 7 Vp p 75 PR output level 0 7 Vp p 75 Terminal Pin jack Y green PB blue PR red 1 system SPEAKER SECTION Front speakers SB FS680 Type 2 way 2 speaker system Bass reflex Speaker unit s Impedance 6 1 Full range 6 5 cm 21 2z Cone type 2 Super tweeter Piezo type Input power IEC ...

Page 28: ...begin when an MP3 track has still picture data Even after the track starts the correct play time will not be displayed This is normal Folders deeper than the eighth layer on a data CD are not displayed correctly WMA MP3 JPEG Folders deeper than the eighth layer are displayed as the eighth layer A menu screen appears during skip or search VCD This is normal for Video CD s Playback control menu does...

Page 29: ...s displayed 10 19 6 Closed captions not displayed When progressive output is on closed captions will not be displayed Noise is heard ST flickers or doesn t light Sound is distorted Adjust the position of the FM or AM antenna Use an outdoor antenna 7 A beat sound is heard Turn the television off or move it away from the unit A low hum is heard during AM broadcasts Separate the antenna from other ca...

Page 30: ...ls so realistic sound effects are possible Dynamic range Dynamic range is the difference between the lowest level of sound that can be heard above the noise of the equipment and the highest level of sound before distortion occurs Frame still and field still Frames are the still pictures that go together to make a moving picture There are about 30 frames shown each second One frame is made up of tw...

Page 31: ...ABLE FOR INCIDENTAL OR CONSEQUENTIAL DAMAGES RESULTING FROM THE USE OF THIS PRODUCT OR ARISING OUT OF ANY BREACH OF THIS WARRANTY As examples this excludes damages for lost time travel to and from the servicer loss of media or images data or other memory content The items listed are not exclusive but are for illustration only ALL EXPRESS AND IMPLIED WARRANTIES INCLUDING THE WARRANTY OF MERCHANTABI...

Page 32: ...34 Funai 08 30 G E 02 03 11 Gold Star 27 Hitachi 09 10 11 JVC 19 25 31 38 39 40 LXI 10 13 14 15 18 27 30 Magnavox 02 09 12 Mitsubishi 21 22 28 29 NEC 19 25 31 38 Philco 02 09 12 30 Philips 02 09 12 Pioneer 09 Quasar 01 02 09 33 RCA 02 03 04 09 10 11 12 23 24 26 Sanyo 14 18 34 Sharp 16 17 Shintom 32 Sylvania 02 09 12 30 Symphonic 30 Toshiba 23 24 Zenith 20 Please check and identify the supplied acc...

Reviews: