background image

22

VQT2M13

STEP 7: 
Reprogramming the 
remote control

When other Panasonic products respond to this 
remote control

Change “Remote Control Code” (

>

38) on the main unit and 

the remote control (the two must match) if you place other 
Panasonic products close together and it responds to this 
remote control.

To change the code on the main unit.

1

While stopped, press [START].

2

Press [

3

,

4

] to select “Other Functions” 

and press [OK].

3

Press [

3

,

4

] to select “Setup

” 

and press 

[OK].

4

Press [

3

,

4

] to select “Others” and press 

[OK].

5

Press [

3

,

4

] to select “Remote Control 

Code” and press [OK].

6

Press [

3

,

4

] to select the code (1 or 2) and 

press [OK].

To change the code on the remote control.

1

While pressing [OK]

Press and hold the numbered button 
(1 or 2), which has the same number you 
selected in the step 6 for more than 5 
seconds.

2

Press [OK].

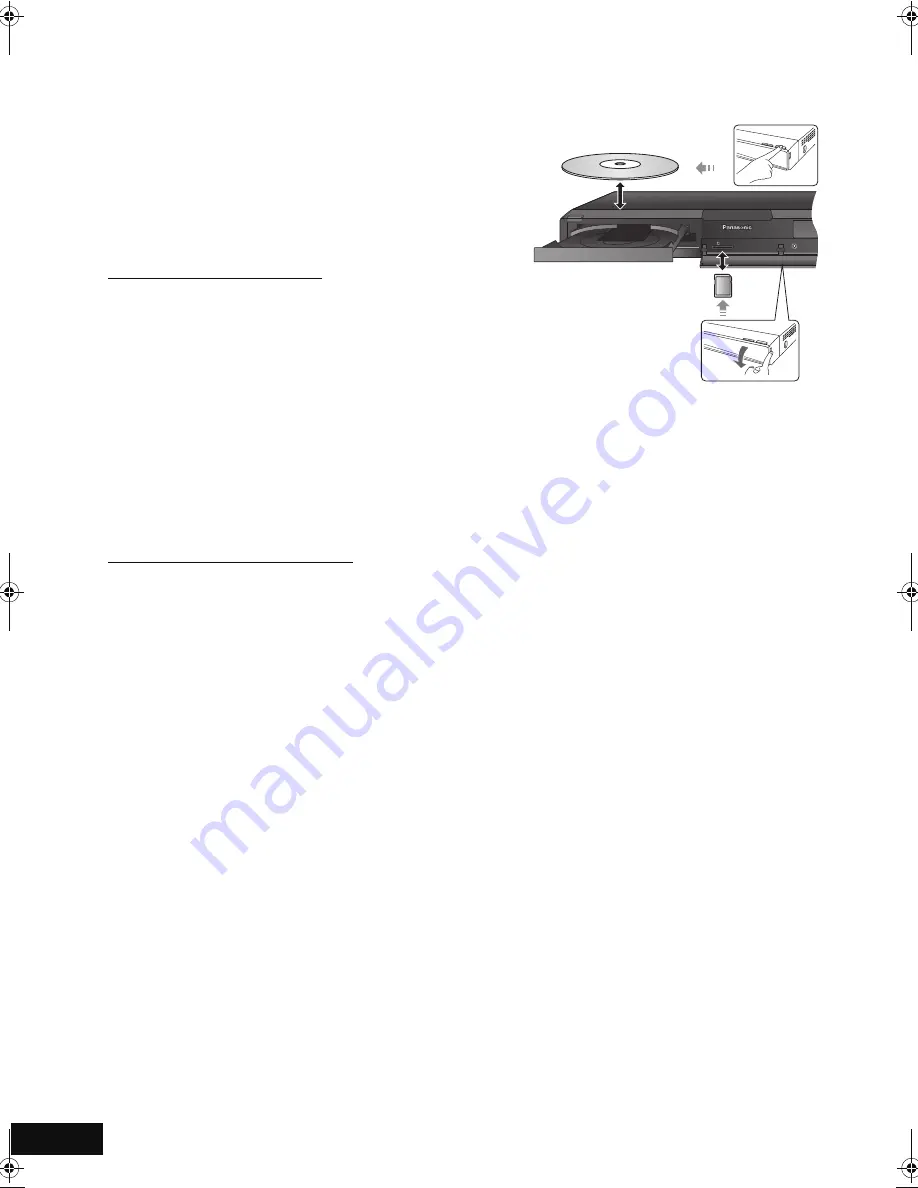
Inserting or removing a 
media

When inserting a media, ensure that it is facing the right way 
up.

While the reading indicator is displayed, do not turn off the 
unit or remove the media. Such action may result in loss of 
the media's contents.

When removing the SD card, press on the center of the card 
and pull it straight out.

To switch sources

Press [BD/SD] to select “BD/DVD” or “SD”.

If a media is inserted while the unit is stopped, the source 
switches automatically depending on the inserted media.

SD CARD

SETUP MIC

SC-BT230_330_730P_PC_VQT2M13_eng.book  22 ページ  2010年3月16日 火曜日 午後5時57分

Summary of Contents for SCBT230 - BLU RAY HOME THEATER SYSTEM

Page 1: ...cipant is used in place of the word Partner As an ENERGY STAR Partner Panasonic has determined that this product meets the ENERGY STAR guidelines for energy efficiency For the U S A and Canada If you have any questions contact For the U S A and Puerto Rico 1 800 211 PANA 7262 For Canada 1 800 561 5505 Only for U S A and Puerto Rico The warranty can be found on page 50 Please return the product reg...

Page 2: ... equipment has been tested and found to comply with the limits for a Class B digital device pursuant to Part 15 of the FCC Rules These limits are designed to provide reasonable protection against harmful interference in a residential installation This equipment generates uses and can radiate radio frequency energy and if not installed and used in accordance with the instructions may cause harmful ...

Page 3: ...ects have fallen into the apparatus the apparatus has been exposed to rain or moisture does not operate normally or has been dropped THE FOLLOWING APPLIES ONLY TO THE U S A AND CANADA Inside of product CAUTION DO NOT INSTALL OR PLACE THIS UNIT IN A BOOKCASE BUILT IN CABINET OR IN ANOTHER CONFINED SPACE ENSURE THE UNIT IS WELL VENTILATED TO PREVENT RISK OF ELECTRIC SHOCK OR FIRE HAZARD DUE TO OVERH...

Page 4: ...HDAVI ControlTM 31 Setting the audio link 31 Easy control only with VIERA remote control 32 Other devices Using the iPod iPhone 32 iPod iPhone Connection 32 iPod iPhone Playback 33 Advanced operations Enjoying VIERA CASTTM 34 Playback menu 34 Setup menu 36 Speaker settings 39 Optional speaker settings Speaker installation option 40 Reference Troubleshooting guide 41 Messages 43 About MP3 JPEG AVCH...

Page 5: ...te control but you can perform the operations on the main unit if the controls are the same System SC BT730 SC BT330 SC BT230 SC BT235 Main unit SA BT730 SA BT330 SA BT230 SA BT235 Speaker system Front speakers SB HF730 SB HF330 SB HF230 SB HF330 Center speaker SB HC730 SB HC230 SB HC230 SB HC230 Surround speakers SB HS230 SB HS230 SB HS230 SB HS230 Subwoofer SB HW330 SB HW330 SB HW480 SB HW480 Wi...

Page 6: ... on To cancel press the button again or adjust the volume Muting is canceled if the unit is turned off 16 Select the source BD SD Select disc drive or SD card drive 23 iPod Select iPod iPhone as the source 23 33 RADIO EXT IN Select FM tuner or external audio as the source 23 29 30 17 Select radio stations manually 29 18 Exit the menu screen 19 Show START menu 23 20 Show Pop up menu 25 21 Return to...

Page 7: ...ow moves correctly If it does not remove it and repeat the above procedure 1 AC IN terminal 18 For units with PX printed on the packaging The terminal is not polarized 2 Speaker terminals 13 3 Cooling fan 4 BT730 BT330 BT230 USB port for optional wireless adaptor 17 5 HDMI AV OUT terminal 15 6 FM radio antenna terminal 16 7 DIGITAL AUDIO IN terminals 14 15 Terminal 1 is designated for connection w...

Page 8: ...ed with labels containing the region code A Example DVD Video This unit plays DVD Video marked with labels containing the region number 1 or ALL Example Type Logo examples Type detail Playable contents BD BD Video Video BD RE Video JPEG BD R Video DVD DVD Video Video DVD RAM Video AVCHD JPEG DVD R Video AVCHD MP3 JPEG DVD R DL DVD RW Video AVCHD R RW R DL CD Music CD Music CD DA CD R CD RW Music C...

Page 9: ...h Clean the lens with the lens cleaner disc Clean discs Wipe with a damp cloth and then wipe dry Disc and card handling precautions Handle discs by the edges to avoid inadvertent scratches or fingerprints on the disc Do not attach labels or stickers to discs Do not use record cleaning sprays benzine thinner static electricity prevention liquids or any other solvent Clean any dust water or foreign ...

Page 10: ...the speakers BT730 2 Front speakers 2 Stands with cables 2 Bases 4 Screws A 2 Screws B BT330 BT235 2 Front speakers 2 Stands with cables 2 Bases 8 Screws A B 1 2 2 1 Tighten securely Insert the wire fully r White s Blue line Push Leave about 80 mm 3 5 32q Tighten securely Screw A Press into the groove Screw B Pull the cable straight along the line and slide into the groove Back of the base 1 2 2 1...

Page 11: ...e strong enough support Improper attachment may result in damage to the wall or speakers Use a string of less than 2 0 mm 3 32q which is capable of supporting over 10 kg 22 lbs e g BT730 A String not included Thread from the wall to the speaker and tie tightly B Rear of the speaker C Screw eye not included D Wall E Approx 150 mm 5 29 32q Speaker cable sticker Color 1 FRONT L WHITE 2 FRONT R RED 3 ...

Page 12: ...d interference maintain the following distances between the wireless system and other electronic devices that use the same radio frequency 2 4 GHz band The wireless system will automatically seek a clear channel if any of these other devices interfere with its communication When this happens the wireless link indicator W flashes on the main unit and there is a brief interruption in audio coming fr...

Page 13: ...SIDE Main unit Surround selector The surround selector switch must be set in the center position 6 PURPLE Subwoofer 5 GREEN Center speaker 2 RED Front speaker Rch 1 WHITE Front speaker Lch Wireless system 3 BLUE Surround speaker Lch 4 GRAY Surround speaker Rch AC IN 5 2 1 3 6 6 FRONT CENTER SUBWOOFER R L 4 3 3 SURROUND R L 6 Main unit 6 PURPLE Subwoofer 5 GREEN Center speaker 2 RED Front speaker R...

Page 14: ...t is recommended that you use Panasonic s HDMI cable When outputting 1080p signal please use HDMI cables 5 0 meters 16 4 ft or less Recommended part number RP CDHS15 1 5 m 4 9 ft RP CDHS30 3 0 m 9 8 ft RP CDHS50 5 0 m 16 4 ft etc To enjoy TV audio from this home theater system s speakers select AUX TV as a source 23 To enjoy TV audio from this home theater system s speakers select DIGITAL IN 1 TV ...

Page 15: ...RY SETTINGS HDMI Audio Output Off 37 Connection for the best picture and audio AV OUT VIDEO OUT AUX OPTICAL 2 1 DIGITAL AUDIO IN L R AV OUT OPTICAL 2 1 DIGITAL AUDIO IN L R ARC 2 OPTICAL 1 DIGITAL AUDIO IN OPTICAL OUT AV IN OPTICAL 1 HDMI AV OUT ARC TV A HDMI cable not included B Optical digital audio cable not included For the TV audio an audio cable not included can be also used by connecting th...

Page 16: ...tenna where reception is best Using an outdoor antenna FM ANT 75 A FM outdoor antenna Using a TV antenna not included The antenna should be installed by a competent technician B 75 coaxial cable not included C Antenna plug not included Main unit e g BT730 Digital transmitter connection DIGITAL TRANSMITTER Insert fully until you hear a click Do not insert or remove while the home theater unit is on...

Page 17: ...Broadband router etc C LAN Cable not included D Modem Broadband Provided by ISP A Wireless LAN Adaptor B Wireless router Access point etc C LAN Cable not included D Modem Broadband Provided by ISP Use shielded LAN cables when connecting to peripheral devices Inserting any cable other than a LAN cable in the LAN terminal can damage the unit Read the operating instructions for the Wireless LAN Adapt...

Page 18: ...2 W For units with PX printed on the packaging approx 0 3 W STEP 5 BT730 Preparing the wireless system Turn on the wireless system after all connections are complete AC IN 220 240V 110 127V VOLT ADJ Main unit The main unit shows SC BT730 for the U S A and Canada AC IN BT730 Wireless system For units with PX printed on the packaging Before connecting the AC power supply cord Set the voltage Use a f...

Page 19: ... specify the current settings BT330 BT235 BT230 Speakers position Specify the positioning of the surround speakers When using the optional wireless system this setting is not available BT730 only Speakers position is not available BT230 BT235 Speaker check Check if the connection to each speaker is valid BT730 BT330 Auto Speaker Setup Adjust the speaker output level automatically Speaker Output Ma...

Page 20: ...ireless LAN connection OK RETURN Access Point Connection Setting Select a connection method to use with an access point of Wireless LAN Please refer to the operating instructions of the access point about connection methods WPS PUSH button method Other methods p WPS PIN code method Search for access point Manual setting When you experience problems with settings Display Check the following A confl...

Page 21: ...h only To show the firmware version on this unit 38 System Information DO NOT DISCONNECT the unit from the AC power or perform any operation while the update takes place After the firmware is installed FINISH will be displayed on the unit s display Unit will restart and the following screen will be displayed You can perform update anytime by selecting Firmware Update in the Setup menu 38 Downloadi...

Page 22: ... 6 Press 3 4 to select the code 1 or 2 and press OK To change the code on the remote control 1 While pressing OK Press and hold the numbered button 1 or 2 which has the same number you selected in the step 6 for more than 5 seconds 2 Press OK Inserting or removing a media When inserting a media ensure that it is facing the right way up While the reading indicator is displayed do not turn off the u...

Page 23: ...s displayed next to items set for TV AUDIO input DIGITAL IN 2 2 To enjoy audio from other devices with this unit s speakers 30 2 CABLE SAT is displayed next to DIGITAL IN when set for CABLE SAT AUDIO input To enjoy sound from the TV Select one source from either AUX TV ARC TV or DIGITAL IN 1 TV Sound Equalizer 24 Other Functions Playlists You can play playlists created on DVD VR Setup 36 Card Mana...

Page 24: ...ereo sources 7 1CH VS 7 1CH Virtual Surround You can enjoy 6 1 7 1 channel surround like effect using 5 1 channel speakers S SURROUND Super Surround You can enjoy sound from all speakers with stereo sources 2CH STEREO You can play any source in stereo Sound will be output to the front speakers and the subwoofer only BT730 BT330 BT230 When the optional surround back speakers are connected L R Front...

Page 25: ...ions may not work depending on the media and contents Press STOP The stopped position is memorized Resume play function Press 1 PLAY to restart from this position The position is cleared if the tray is opened or you press STOP several times to display STOP on unit s display On BD Video discs including BD J 47 the resume play function does not work Press PAUSE Press PAUSE again or 1 PLAY to restart...

Page 26: ...select the On or Off 6 Press RETURN to exit A Secondary video B Primary video To turn on off secondary audio 1 Press DISPLAY 2 Press 3 4 to select the Disc menu and press 1 3 Press 3 4 to select the Signal Type menu and press OK 4 Press 3 4 to select the Soundtrack under Secondary Video menu and press 1 5 Press 3 4 to select the On or Off When On is selected press 1 and then press 3 4 to select th...

Page 27: ...n discs supporting BD Live are played back the player or disc IDs may be sent to the content provider via the Internet Playing still pictures BD DVD CD SD BD RE DVD RAM R R DL CD R RW SD Card 1 Insert a disc or SD card If the menu is displayed press 3 4 to select the item and press OK 2 BD RE DVD RAM Press 3 4 2 1 to select the album and press OK 3 Press 3 4 2 1 to select the still picture and pre...

Page 28: ...t Slideshow You can display still pictures one by one at a constant interval Slideshow Settings Display Interval Change the display interval Transition Effect Set display method Repeat Play Repeat slideshow Soundtrack Music files on an iPod iPhone or a music CD can be played back as Background Music during the slideshow Press 3 4 2 1 to select Set and press OK Select Root folder To switch to anoth...

Page 29: ...tored in the same channel preset 1 Press RADIO to select FM 2 Press the numbered buttons to select the channel To select a 1 digit number e g 1 1 B OK To select a 2 digit number e g 12 1 B 2 Alternatively press W X or 2 1 Display on the main unit TUNED STEREO Displayed when receiving stereo broadcasting TUNED Displayed when receiving monaural broadcasting or monaural sound is selected FM frequency...

Page 30: ...n on this operation please refer to the Changing the sound modes section on page 24 Select to suit the type of audio from the DIGITAL AUDIO IN terminals on the main unit Press EXT IN several times to select D IN 1 DIGITAL IN 1 or D IN 2 DIGITAL IN 2 DIGITAL IN 1 DIGITAL IN 2 Press AUDIO MAIN SAP M S stereo audio SAP Secondary Audio Program Only works with Dolby Dual Mono MAIN or SAP is not availab...

Page 31: ... mode Press 1 PLAY You can select whether audio is output from the unit s speakers or the TV speakers by using the TV menu settings Home theater This unit s speakers are active When this unit is in standby mode changing the TV speakers to this unit s speakers in the TV menu will automatically turn the unit on and select AUX 1 ARC 1 or D IN 1 DIGITAL IN 1 1 as the source You can control the volume ...

Page 32: ...nnect the iPod iPhone not included firmly About recharging the battery iPod iPhone will start recharging regardless of whether this unit is on or off IPOD will be shown on the main unit s display during iPod iPhone charging in main unit standby mode Once fully recharged additional recharging will not occur Compatible iPod iPhone as of December 2009 Compatibility depends on the software version of ...

Page 33: ...on your TV You can use the remote control to operate the iPod iPhone menu The operation may vary among iPod iPhone models 3 4 To navigate menu items OK To go to the next menu RETURN To return to the previous menu 1 Press START 2 Press 3 4 to select Menu and then press OK 3 Press 3 4 to select Playback Mode and then press OK 4 Press 3 4 to select an item and press OK Shuffle For music playback only...

Page 34: ...uity of the services All features of websites or content of the service may not be available Some content may be inappropriate for some viewers Some content may only be available for specific countries and may be presented in specific languages Playback menu 1 Press BD SD to select BD DVD 2 Press DISPLAY e g BD Video 3 Press 3 4 to select the menu and press 1 4 Press 3 4 2 1 to select the item and...

Page 35: ...e selected On in 24p Output 37 Sound Effects 1 2 Discs recorded at 48 kHz or less This feature gives you brighter sound by increasing the high frequency portion of the audio Dialog Enhancer 1 The volume of the center channel is raised to make dialog easier to hear High Clarity Sound When connected to TV via HDMI AV OUT terminal for outputting image it produces clearer sound because the analog vide...

Page 36: ...sed video Select the type of picture shown when you pause playback Seamless Play The chapters segment in playlists are played seamlessly Select On when the picture freezes for a moment at the chapters segment in playlists Black Level Control Select lighter or darker for adjusting the black level control to the desired setting for picture enhancement Dynamic Range Compression You can listen at low ...

Page 37: ...is displayed as a 4 3 ratio image in the center of the screen HDMI Resolution The items supported by the connected devices are indicated on the screen as When any item without is selected the images may be distorted If Auto is selected automatically selects the output resolution best suited to the connected television To enjoy high definition video up converted to 1080p you need to connect the uni...

Page 38: ...tion Mode Select connection method BT730 BT330 BT230 Access Point Connection Setting This allows the Wireless router Access point and connection settings to be set and the current connection settings and connection state to be checked when a wireless connection is used BT730 BT330 BT230 Connection Setting The Wireless router Access point connection wizard will be displayed IP Address DNS Settings ...

Page 39: ...ker volume respectively No signal is output for the subwoofer To adjust its volume see page 24 Adjusting speaker level during play 3 Press OK The test signal stops To finish the speaker setting Press 3 4 2 1 to select Complete and press OK Speaker settings A B C Primary listening distance A Approximate room dimensions B Actual speaker position C Ideal speaker position D Circle of constant primary ...

Page 40: ...6 mm 1 1 32q BT730 Center speaker BT330 BT230 BT235 Center speaker K 117 mm 4 19 32q L 209 mm to 211 mm 8 7 32q to 8 5 16q M 97 mm 3 13 16q N 18 8 mm 3 4q O 17 mm 21 32q P 99 mm to 101 mm 3 29 32q to 3 31 32q To avoid speaker dropping BT730 Front speaker Center speaker BT330 BT235 Front speaker e g BT730 Front speaker Consult a qualified building contractor to avoid damage to the wall or speakers ...

Page 41: ...C power supply cord securely into a household AC outlet 18 The unit switches to standby mode For the U S A and Canada This unit will automatically turn to standby mode after 30 minutes if it is inactive 7 For units with PX printed on the packaging This is a power saving feature It can be changed if desired using Off Timer in the Setup menu 38 When the time set for the sleep timer has passed the po...

Page 42: ...witch audio When audio is output from the HDMI AV OUT terminal set Dolby D Dolby D Dolby TrueHD or DTS DTS HD to PCM 36 No sound from the TV Press EXT IN to select the corresponding source 23 The ARC Audio Return Channel function is not available Instead use an optical digital audio cable or an audio cable to have the TV sound 14 15 If the TV is not ARC compatible and only the HDMI connection is u...

Page 43: ...e automatic address acquisition if necessary No Video Depending on the connected iPod iPhone video menu may not be available on the TV Select ALL on the unit s display and operate video playback from your iPod iPhone menu 33 F99 The unit fails to operate properly Press POWER Í I on the main unit to switch the unit to standby for 3 seconds Now press POWER Í I on the main unit again to turn the unit...

Page 44: ... not compatible with packet writing DVD R DVD R DL except for AVCHD ISO9660 level 1 or 2 except for extended formats Joliet UDF bridge UDF 1 02 ISO9660 This unit is not compatible with multi session This unit is not compatible with packet writing You can play files on this unit by structure of folders as shown below However depending on the method of writing data writing software play may not be i...

Page 45: ...per second Transfer rate of bit Language Code Language Code Language Code ENG FRA DEU ITA ESP NLD SVE NOR DAN POR RUS English French German Italian Spanish Dutch Swedish Norwegian Danish Portuguese Russian ARA HIN PER IND MRI BUL RUM GRE TUR JPN CHI KOR MAL VIE THA POL CES SLK HUN FIN Japanese Chinese Korean Malay Vietnamese Thai Polish Czech Slovak Hungarian Finnish Arabic Hindi Persian Indonesia...

Page 46: ... with iPhone means that an electronic accessory has been designed to connect specifically to iPhone and has been certified by the developer to meet Apple performance standards Apple is not responsible for the operation of this device or its compliance with safety and regulatory standards iPod is a trademark of Apple Inc registered in the U S and other countries iPhone is a trademark of Apple Inc T...

Page 47: ...S ES and DTS 96 24 formats It is compatible with sampling frequency 96 kHz 48 kHz BD Video supports up to 7 1 channel output DTS HD Master Audio This is a lossless audio format and compatible with 96 kHz 7 1 ch or less In addition faithful reproduction of the master audio is enabled using lossless audio encoding technology BD Video supports up to 7 1 channel output Dynamic range Dynamic range is t...

Page 48: ... FRONT 125 W per ch 3 CENTER 250 W per ch 6 SURROUND 125 W per ch 3 100 Hz 10 total harmonic distortion SUBWOOFER 250 W per ch 6 FTC TTL POWER OUTPUT 446 W 120 Hz to 20 kHz 1 0 total harmonic distortion FRONT 60 W per ch 3 CENTER 106 W per ch 6 SURROUND 60 W per ch 3 45 Hz to 120 Hz 1 0 total harmonic distortion SUBWOOFER 100 W per ch 6 Audio Input AUX k 1 Digital Audio Input Optical k 2 Sampling ...

Page 49: ...330 Calibration Mic Sensitivity 100 mV 4 7 k Terminal Mono 3 5 mm 1 8q jack VIDEO SECTION Signal system NTSC Video output Output level 1 0 Vp p 75 Output connector Pin jack 1 system HDMI AV output Output format 1080p 1080i 720p 480p Output connector Type A 19 pin HDMI Deep Color x v ColorTM High Bit rate Audio This unit supports HDAVI Control 5 function LASER Specification For the U S A and Canada...

Page 50: ...tallation set up adjustments misadjustment of consumer controls improper maintenance power line surge lightning damage modification introduction of sand humidity or liquids commercial use such as hotel office restaurant or other business or rental use of the product or service by anyone other than a Factory Service Center or other Authorized Servicer or damage that is attributable to acts of God T...

Page 51: ... A PARTICULAR PURPOSE IN NO EVENT WILL PANASONIC CANADA INC BE LIABLE FOR ANY SPECIAL INDIRECT OR CONSEQUENTIAL DAMAGES In certain instances some jurisdictions do not allow the exclusion or limitation of incidental or consequential damages or the exclusion of implied warranties so the above limitations and exclusions may not be applicable WARRANTY SERVICE FOR PRODUCT OPERATION ASSISTANCE please co...

Page 52: ... 8 DNS Server 38 Dolby Digital 36 47 Dolby Digital Plus 36 47 Dolby Pro Logic II 24 47 Dolby TrueHD 36 47 DTS 36 47 DTS HD 36 47 DVD Video Ratings 36 F Finalize 9 Firmware update 21 Format 27 Frame by frame 25 H HDMI 15 47 High Clarity Sound 35 37 I iPod iPhone 32 IP address 38 J JPEG 27 44 L LAN 17 Language Audio 36 Code list 45 Menu 36 On screen 37 Soundtrack 34 Subtitle 34 36 Local storage 47 L...

Reviews: