background image

16

RQ

T

9

59

6

Getting S

tarted

Playing

 Discs

Ot

her Op

era

tions

Reference


Select to suit the type of equipment you connected to the HDMI AV OUT 
terminal.
Select “Bitstream” when the equipment can decode the bitstream (digital 
form of 5.1-channel data). Otherwise, select “PCM”.
(If the bitstream is output to the equipment without a decoder, high levels 
of noise can be output and may damage your speakers and hearing.)

Digital Output

When audio output is from HDMI AV OUT terminal, and the connected 
equipment does not support the item selected, the actual output will 
depend on the performance of this connected equipment.

Time Delay

When connected with a Plasma display, adjust if you notice the audio is 
out of sync with the video.

0ms/Auto

20ms

40ms

60ms

80ms

100ms

When using VIERA Link “HDAVI Control” with “HDAVI Control 3 or later” 
compatible TV (

B

14), select “0ms/Auto”.

Audio and video will automatically be set in sync.

Video Resolution

This works only when the HDMI connection is being used.
Select suitable picture quality for your TV.
(Video recordings will be converted to, and output as, high-definition 
video.)

Auto

480i

480p

720p

1080i

1080p

Ensure that your TV can support the resolution that you choose.
If a message screen appears, confirm your selection by pressing 
[

2

,

1

]

8

 to select “Yes” and press [OK]

8

. If the picture is distorted, wait 

for 15 seconds or press [

2

,

1

]

8

 to select “No”. To accept the setting, 

select “Yes” again.

HD JPEG Mode


[JPEG]


(This works only when using HDMI connection with “Video Resolution” 
(

B

above) set to “Auto”, “720p”, “1080i” or “1080p”.)

On:

HD JPEG playback is available. (JPEG images will be displayed 
in original resolution.)

Off

During HD JPEG playback, there will be no on-screen menus (

B

13) and 

on-screen displays.

Black Level

(This works only for video output from the VIDEO OUT terminal.)
Change the black level of the picture.

Lighter

Darker

Audio menu

Bitstream

PCM

Dynamic Range

On:

Adjusts for clarity even when the volume is low. Convenient for 
late night viewing. (Only works with Dolby Digital)

Off:

The full dynamic range of the signal is reproduced.

Speaker Settings

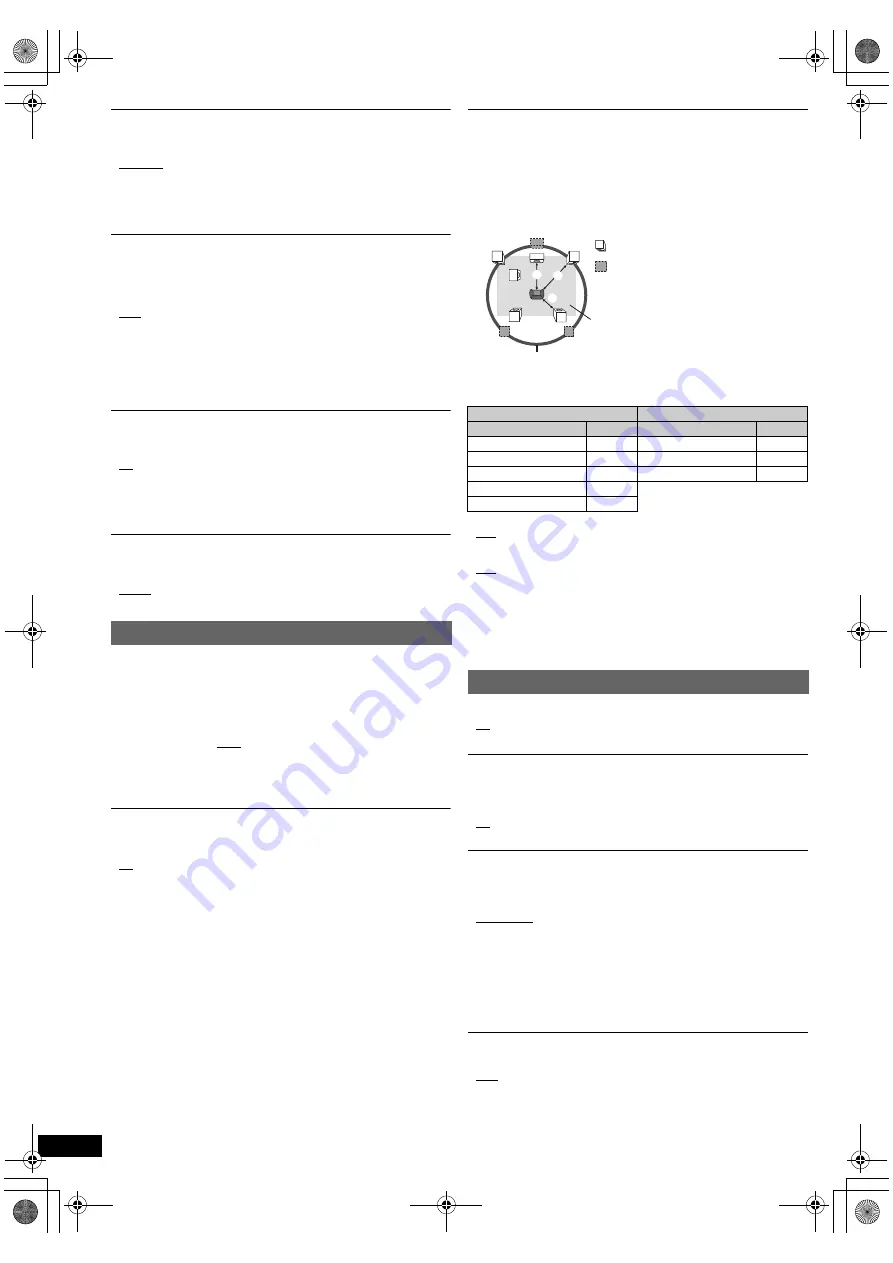
Select the delay time of the speakers.
(Effective only when “Surround layout (Recommended)” mode is selected 
in “Speaker layout” (

B

8, Easy setup).)

(Center and surround speakers only)
For optimum listening with 5.1-channel sound, all the speakers, except for 
the subwoofer, should be the same distance from the seating position.
If you have to place the center or surround speakers closer to the seating 
position, adjust the delay time to make up for the difference.

If either distance 

a

 or 

b

 is less than 

c

, find the difference in the table 

and change to the recommended setting.

a

 Center speaker

b

 Surround speaker

Difference (Approx.)

Setting

Difference (Approx.)

Setting

30 cm (1 foot)

1ms

150 cm (5 feet)

5ms

60 cm (2 feet)

2ms

300 cm (10 feet)

10ms

90 cm (3 feet)

3ms

450 cm (15 feet)

15ms

120 cm (4 feet)

4ms

150 cm (5 feet)

5ms

C Delay (Center Delay): 
0ms, 1ms, 2ms, 3ms, 4ms, 5ms
Select the delay time for your center speaker.

LS/RS Delay (Left Surround/Right Surround Delay): 
0ms, 5ms, 10ms, 15ms
Select the delay time for your surround speakers.

Test Tone:
Use the test tone to listen to the speaker output to confirm speaker 
connections.
Test tone will be output to each channel in the following order.
Left, Center, Right, Surround Right, Surround Left, Subwoofer
To stop the test tone, press [RETURN]

D

.

HDMI menu

VIERA Link

On:

The VIERA Link “HDAVI Control” function is available (

B

14).

Off

Audio Out

On:

When audio output is from the HDMI AV OUT terminal. 
(Depending on the capabilities of the connected equipment, 
audio output may differ from the audio settings of the main unit.)

Off:

When audio output is not from the HDMI AV OUT terminal. (The 
audio is output using the settings of the main unit.)

Power Off Link

Select the desired power off link setting of this unit for VIERA Link operation 
(

B

14). (This works depending on the settings of the connected VIERA Link 

“HDAVI Control” compatible equipment.)

Video/Audio: When the TV is turned off, this unit will turn off 

automatically.

Video: When the TV is turned off, this unit will turn off except during the 

following conditions:

– audio playback (

[CD]


[MP3]

)

– radio mode
– “AUX”, “ARC” or “D-IN” mode (non-selected TV audio setting 

for VIERA Link)

– “MUSIC P.” mode

TV Audio

Select the TV audio input to work with the VIERA Link operations (

B

14).

AUX

ARC

DIGITAL IN

L

LS

R

SW

C

RS

C

RS

LS



Actual speaker position

Ideal speaker position

Primary listening 
distance

Approximate room dimensions

Circle of constant primary listening distance

SC-XH70 PPC_eng.book  Page 16  Tuesday, December 27, 2011  9:25 AM

Summary of Contents for SC-XH70

Page 1: ...for purchasing this product For optimum performance and safety please read these instructions carefully Please keep this manual for future reference If you have any questions contact U S A and Puerto Rico 1 800 211 PANA 7262 Canada 1 800 561 5505 SC XH70 PPC_eng book Page 1 Tuesday December 27 2011 9 25 AM ...

Page 2: ...ment To reduce the risk of fire electric shock or product damage Do not install or place this unit in a bookcase built in cabinet or in another confined space Ensure this unit is well ventilated Do not obstruct this unit s ventilation openings with newspapers tablecloths curtains and similar items Batteries Danger of explosion if battery is incorrectly replaced Replace only with the type recommend...

Page 3: ...TURN VOL STOP VOL TV INPUT AV SKIP SLOW PAUSE SEARCH SEARCH PLAY DVD RADIO EXT IN EXIT REPEAT PLAYMODE SOUND SURROUND FLDISPLAY 1 2 3 4 5 6 7 8 0 9 10 10 CANCEL FUNCTIONS MUTE M E N U START T O P M E N U OK SKIP SLEEP CHSELECT W SRD MUSIC PORT 1 MIC 2 MUSIC PORT VOL SC XH70 PPC_eng book Page 3 Tuesday December 27 2011 9 25 AM ...

Page 4: ...button again TV operations Aim the remote control at the Panasonic TV and press the button TV Í Turn the TV on off INPUT AV Change the TV s video input mode r VOL s Adjust the TV volume This may not work properly with some models Adjust the volume of the main unit Mute the sound MUTE flashes on the main unit s display while the function is on To cancel press the button again or adjust the volume M...

Page 5: ...Playing from the selected item 12 Other modes of play 12 Program and Random play 12 Repeat play 12 Using on screen menus 13 Other Operations Linked operations with the TV VIERA LinkTM HDAVI ControlTM 14 Setting the audio link 14 Easy control only with VIERA remote control 15 Playing from MUSIC PORT 15 Reference Changing the player settings 15 Discs that can be played 17 Maintenance 18 Speaker inst...

Page 6: ... If this occurs turn the TV off for about 30 minutes The demagnetizing function of the TV should correct the problem If it persists move the speakers further away from the TV Turn off all equipment before connection and read the appropriate operating instructions Do not connect the AC power supply cord until all other connections are completed step 1 Positioning Caution The main unit and supplied ...

Page 7: ...your STB etc to this unit Connect the optical digital audio cable not supplied from the DIGITAL AUDIO IN OPTICAL terminal on the main unit to the OPTICAL OUT terminal on your STB If the DIGITAL AUDIO IN OPTICAL terminal is already in use for the TV audio reconnect the TV audio to the AUX terminal using an audio cable If you have various sound sources such as Blu ray Disc player DVD recorder VCR et...

Page 8: ...C IN Main unit rear AC power supply cord supplied To household AC outlet AC 120 V 60 Hz R6 LR6 AA Press in and lift up Replace the cover Insert so the poles r and j match those in the remote control step 5 Easy setup Preparation Turn on your TV and select the appropriate video input mode e g VIDEO 1 AV 1 HDMI etc to suit the connection to this unit To change your TV s video input mode refer to its...

Page 9: ...ate the playback with the indicated controls Confirm the audio connection to the AUX HDMI AV OUT or DIGITAL AUDIO IN OPTICAL terminal on the main unit when you select the corresponding sources B 7 Reduce the volume on the TV to its minimum and then adjust the volume of the main unit Listening to the radio Presetting stations automatically 1 Press RADIO 4 to select FM 2 Press MENU C to select LOWES...

Page 10: ...ut Available settings Mode Setting DUAL Only works with Dolby Dual Mono MAIN SAP stereo audio MAIN SAP SAP Secondary Audio Program Set PCM FIX mode to OFF to listen to the MAIN or SAP audio DRC Dynamic Range Compression ON Adjust for clarity even when the volume is low by compressing the range of the lowest sound level and the highest sound level Convenient for late night viewing Only works with D...

Page 11: ...elected You can make the sound of the center speaker seem like it is coming from within the TV ON OFF Whisper mode Surround Adjusting the speaker level during playback 1 Press CH SELECT F to select the speaker Each time you press the button e g L C R RS LS SW You can adjust SW Subwoofer only if the disc includes a subwoofer channel When S appears only the surround speaker channel can be adjusted B...

Page 12: ...e is displayed press TOP MENU 7 to show the thumbnail menu e g 2 Press 3 4 2 1 8 to select a picture and press OK 8 Press SKIP SKIP 9 5 to skip page by page While a picture is displayed press 3 4 2 1 8 to rotate the picture Other modes of play Program and Random play CD MP3 JPEG While stopped press PLAY MODE 9 to select the play mode Each time you press the button CD MP3 Music Program menu JPEG Pi...

Page 13: ...6 to k1 4 in 0 1 unit steps Press 1 PLAY 5 to return to normal play After you change the speed Dolby Pro Logic II has no effect Audio output switches to 2 channel stereo Sampling frequency of 96 kHz is converted to 48 kHz This function does not work with DTS source The play speed will return to k1 0 This function may not work depending on the disc s recording Repeat Mode B 12 Repeat play A B Repea...

Page 14: ...put channel this unit will automatically switch to AUX 2 ARC 1 2 or D IN 2 3 When you start disc play the TV will automatically switch its input mode for this unit All connected equipment compatible with HDAVI Control including this unit automatically turn off when you switch the TV off To continue audio playback even when the TV is turned off select Video B 16 Power Off Link in HDMI menu When you...

Page 15: ... control e g SUB MENU When DVD CD is selected as the source the TV s remote control works only during stop mode 2 Select the desired item on the START menu B 9 When the on screen control panel appears e g DVD V when Playback Disc is selected from the START menu Playing from MUSIC PORT 1 Connect the external music device not supplied to the MUSIC PORT6 Plug type 3 5 mm 1 8q stereo mini plug 2 Press...

Page 16: ...ted in Speaker layout B 8 Easy setup Center and surround speakers only For optimum listening with 5 1 channel sound all the speakers except for the subwoofer should be the same distance from the seating position If you have to place the center or surround speakers closer to the seating position adjust the delay time to make up for the difference If either distance a or b is less than c find the di...

Page 17: ...D VR CD ROM CDV CD G SACD WMA discs DivX discs and Photo CD DVD RAM and Chaoji VCD available on the market including CVD DVCD and SVCD that do not conform to IEC62107 Others menu Slide Show Time Set the speed of the slideshow 3 Seconds 5 Seconds 10 Seconds 15 Seconds Easy setup You can execute basic settings to optimize your home theater system B 8 FL Dimmer Change the brightness of the unit s dis...

Page 18: ...amage to the wall and speakers and personal injury 1 Drive a screw not supplied into the wall 2 Fit the speaker securely onto the screw s with the hole s Tips Use the measurements indicated below to identify the screwing positions on the wall Leave at least 20 mm 25 32q of space above the speaker and 10 mm 13 32q on each side to allow enough space for fitting the speaker To prevent speakers from f...

Page 19: ...ideo menu or Display B 15 Language menu does not work The settings for TV Aspect 1 and Display 2 will automatically follow the information from the TV B 8 Easy setup 1 When using VIERA Link HDAVI Control with HDAVI Control 3 or later compatible TV 2 When using VIERA Link HDAVI Control with HDAVI Control 2 or later compatible TV It takes time before play starts MP3 Play may take time to begin when ...

Page 20: ...B 6 F76 There is a power supply problem Consult the dealer DVD U11 Disc may be dirty Wipe it clean SET OK SET OK is displayed when the stations are set and the radio tunes to the last preset station ERROR Incorrect operation performed Read the instructions and try again ERROR is displayed when automatic presetting is unsuccessful Preset the stations manually TUNED STEREO Displayed when receiving s...

Page 21: ...cture contents and groups 2600 audio and picture contents and 259 groups Excluding Root folder Pick up Wavelength DVD CD 655 790 nm Laser power For U S A For Canada CLASS IIa CLASS II CLASS 1 Audio output Disc Number of channels 5 1 ch FL FR C SL SR SW VIDEO SECTION Video system NTSC Composite video output Output level Terminal 1 Vp p 75 Pin jack 1 system HDMI AV output Terminal 19 pin type A conn...

Page 22: ...htning damage modification introduction of sand humidity or liquids commercial use such as hotel office restaurant or other business or rental use of the product or service by anyone other than a Factory Service Center or other Authorized Servicer or damage that is attributable to acts of God THERE ARE NO EXPRESS WARRANTIES EXCEPT AS LISTED UNDER LIMITED WARRANTY COVERAGE THE WARRANTOR IS NOT LIAB...

Page 23: ...consumer controls improper maintenance power line surge lightning damage modification introduction of sand humidity or liquids commercial use such as hotel office restaurant or other business or rental use of the product or service by anyone other than an Authorized Servicer or damage that is attributable to acts of God Dry cell batteries are also excluded from coverage under this warranty THIS EX...

Page 24: ...24 RQT9596 SC XH70 PPC_eng book Page 24 Tuesday December 27 2011 9 25 AM ...

Page 25: ...25 RQT9596 SC XH70 PPC_eng book Page 25 Tuesday December 27 2011 9 25 AM ...

Page 26: ... equipment has been tested and found to comply with the limits for a Class B digital device pursuant to Part 15 of the FCC Rules These limits are designed to provide reasonable protection against harmful interference in a residential installation This equipment generates uses and can radiate radio frequency energy and if not installed and used in accordance with the instructions may cause harmful ...

Reviews: