


RQTX0250
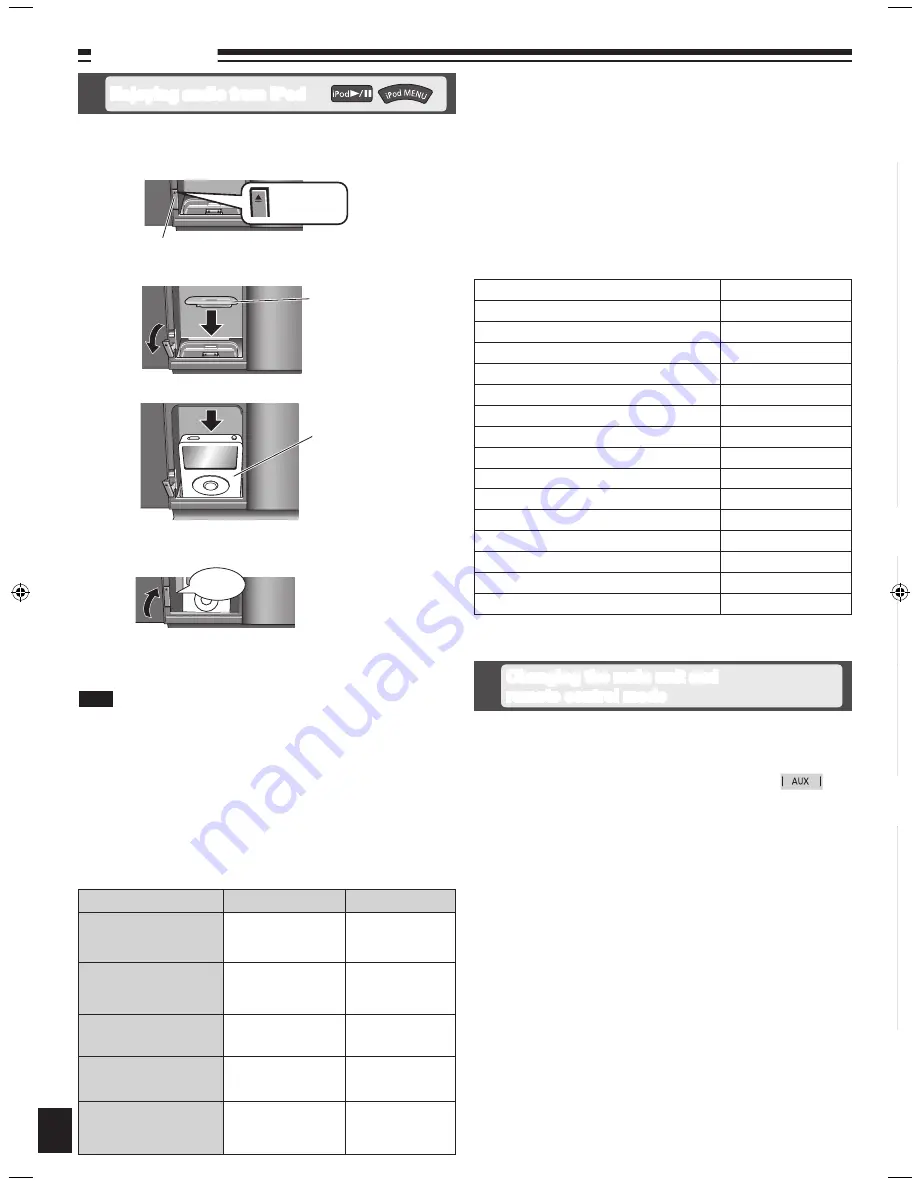
Press [iPod
;
, OPEN/CLOSE] to open the sliding door.
Push [
;
] to open the docking switch.
Adjust the docking switch and insert the suitable dock adapter for
your iPod.
Insert your iPod into the dock.
Push back the docking switch.
Recharging starts when the iPod dock is properly locked.
Press [iPod
;
, OPEN/CLOSE] again to close the sliding door.
Keep fingers away from the sliding door when it is closing to avoid
possible minor injuries.
•
12
External unit
To
Remote control
Main unit
display iPod menu/return
previous menu
(During play/pause)
Press
[iPod MENU]
.
3
select contents from iPod
menu
(During play/pause)
Press
[
e
,
r
,
ALBUM]
followed by
[OK]
.
3
pause track
Press
[iPod
q
/
h
]
or
[
g
]
.
Press
[iPod
q
/
h
]
or
[
g
]
.
skip a track
(During play/pause)
Press
[
u
/
t
]
or
[
y
/
i
]
.
Press
[
u
/
t
]
or
[
y
/
i
]
.
search the current track
(During play/pause)
Press and hold
[
u
/
t
]
or
[
y
/
i
]
.
Press and hold
[
u
/
t
]
or
[
y
/
i
]
.
Preparation:
Reduce the volume of the main unit to minimum before connecting/
disconnecting the iPod.
Confirm the iPod connection. (
➡
above)
Press [iPod
q
/
h
] to play the iPod.
Adjust the volume of the main unit.
•
•
■
Compatible iPod
Name
Memory size
iPod touch 2nd generation
8 GB, 16 GB, 32 GB
iPod nano 4th generation (video)
8 GB, 16 GB
iPod classic
120 GB
iPod touch 1st generation
8 GB, 16 GB, 32 GB
iPod nano 3rd generation (video)
4 GB, 8 GB
iPod classic
80 GB, 160 GB
iPod nano 2nd generation (aluminum)
2 GB, 4 GB, 8 GB
iPod 5th generation (video)
60 GB, 80 GB
iPod 5th generation (video)
30 GB
iPod nano 1st generation
1 GB, 2 GB, 4 GB
iPod 4th generation (color display)
40 GB, 60 GB
iPod 4th generation (color display)
20 GB, 30 GB
iPod 4th generation
40 GB
iPod 4th generation
20 GB
iPod mini
4 GB, 6 GB
Compatibility depends on the software version of your iPod.
•
The remote control and main unit are factory-set to “REMOTE 1” mode.
If you find the remote control unintentionally also controls other equipment,
you can switch to operate in “REMOTE 2” mode.
To switch to “REMOTE 2” mode
Press [AUX] to enter AUX mode.
(While pressing [AUX] on the main unit)
Press and hold [2] until “REMOTE 2” appears on the main unit
display.
Press and hold [OK] followed by [2] for at least 2 seconds.
The main unit and remote control are now set to operate in “REMOTE 2”
mode.
To return to “REMOTE 1” mode
Perform steps 1 to 3 but use
[1]
instead of
[2]
for steps 2 and 3.
(“REMOTE 1” appears on the main unit during step 2.)
The remote control cannot work with the main unit if their modes are
different.
“REMOTE 1” or “REMOTE 2” appears on the main unit when you operate
the remote control.*
* If “REMOTE 1” appears (The main unit is in “REMOTE 1” mode.)
Press and hold
[OK]
followed by
[1]
on the remote control for at least 2
seconds.
If “REMOTE 2” appears (The main unit is in “REMOTE 2” mode.)
Press and hold
[OK]
followed by
[2]
on the remote control for at least 2
seconds.
Changing the main unit and
remote control mode
iPod will start recharging regardless of whether this unit is in ON or
Standby condition.
“IPOD
” will be shown on the main unit’s display during iPod charging
in main unit standby mode.
Check iPod to see if the battery is fully recharged.
If you are not using iPod for an extended period of time after recharging
has completed, disconnect it from main unit, as the battery will be
depleted naturally. (Once fully recharged, additional recharging will not
occur.)
•
•
•
•
g
Charging the iPod
g
Playing the iPod
g
Inserting the iPod
Before requesting service, make the following checks. If you are in doubt about some of the check points, or if the remedies indicated in the
chart do not solve the problem, refer to “Customer Services Directory (United States and Puerto Rico)” on page 15 if you reside in the U.S.A. or
Puerto Rico, or refer to “Product information” on page 3 if you reside in Canada.
Common problems
Incorrect display or play will not
start.
You have not inserted the disc correctly; insert it correctly.
The disc is scratched or dirty. (Tracks skipped.)
There is moisture on the lens. Wait for about an hour and then try again.
•
•
•
MP3 cannot be read.
You may not be able to play MP3 if you have copied a multi-session disc that has no data between sessions.
When creating a multi-session disc, it is necessary to close the session.
The amount of data on the disc is too small. Set the amount of data to greater than approximately 5 MB.
•
•
•
Noise is heard or no sound.
Noise may occur when playing MP3 if recording quality is poor.
Keep this unit away from mobile telephones if the interference is apparent.
Turn the volume up.
Switch the unit off, check and correct the connection, then switch the unit on. Causes include straining of the
speakers through excessive volume or power, and using the unit in a hot environment.
•
•
•
•
Humming heard during play.
An AC power supply cord or fluorescent light is near the cords. Keep other appliances and cords away from
this unit’s cables.
•
A beat sound or noise is heard
while receiving a radio broadcast.
Switch the television or other audio player off or separate it from the unit.
Switch off the portable audio player if connected to “AUX” port.
•
•
A low hum or noise is heard
during AM broadcasts.
Keep the antenna away from other cables and cords.
Keep the AM antenna away from the unit.
•
•
The picture on the television near
the unit disappears or stripes
appear on the screen.
The location and orientation of the antenna are incorrect.
The television antenna wire is too close to the unit. Separate the antenna wire of the television from the unit.
•
•
No response when remote
control buttons are pressed.
Check that the batteries are inserted correctly. (
➡
page 5)
•
Display
“--:--”
You plugged the AC power supply in for the first time and there was a power failure recently. Set the time.
(
➡
page 10)
•
“ADJUST CLOCK”
Clock not set. Adjust the clock accordingly.
•
“ADJUST TIMER”
Play timer not set. Adjust the play timer accordingly.
•
“PGM FULL”
The number of programmed tracks is limited to 24. No further tracks can be programmed.
•
“NO PLAY”
A CD-ROM disc that is not CD-DA or MP3 format is inserted. It cannot be played.
•
“ERROR”
Incorrect operation performed. Read the instructions and try again.
•
“F61” or “F76”
There is a power supply problem. Consult the dealer.
•
“UNLOCKED”
Make sure the docking switch is pushed back properly.
•
“ILLEGAL OPEN”
Sliding door is not in correct position. Turn the unit off and on again.
•
“IPOD NO DEV”
The iPod device is not inserted correctly. Read the instructions and try again. (
➡
page 12).
•
iPod
iPod does not turn on.
Verify that the iPod battery is not depleted before connecting it to the unit.
Before inserting your iPod into the dock, turn off both the unit and iPod. Turn power back on and select the
appropriate source.
•
•
No sound is coming from the
speakers.
The iPod is not correctly inserted into the dock. Turn off the iPod, remove it from the dock connector. Reinsert
it and turn it on again.
Make sure that iPod is actually playing something.
Adjust the volume.
•
•
•
Distorted sound or the sound
level is too low.
Make sure the equalizer function of your iPod is turned off.
•
Cannot control the iPod using
remote control or main unit.
Make sure the iPod is inserted properly into the dock.
Check the dock connection and make sure that iPod is selected as the source of music. (
➡
page 12)
•
•
iPod does not charge.
Check all connections. (
➡
page 4, 12)
•
Enjoying audio from iPod
Push [
;
]
iPod
(not included)
Click
Docking switch
Dock adapter
(not included)
Note
It is recommended to use the dock adapter from Apple.
Be sure to push
[
;
]
to open and adjust the docking switch when
removing the iPod. Push back the docking switch after iPod being
removed.
•
•
SC-HC3_En (RQTX0250-2P)_032509.indd 12
3/25/2009 9:56:05 AM


