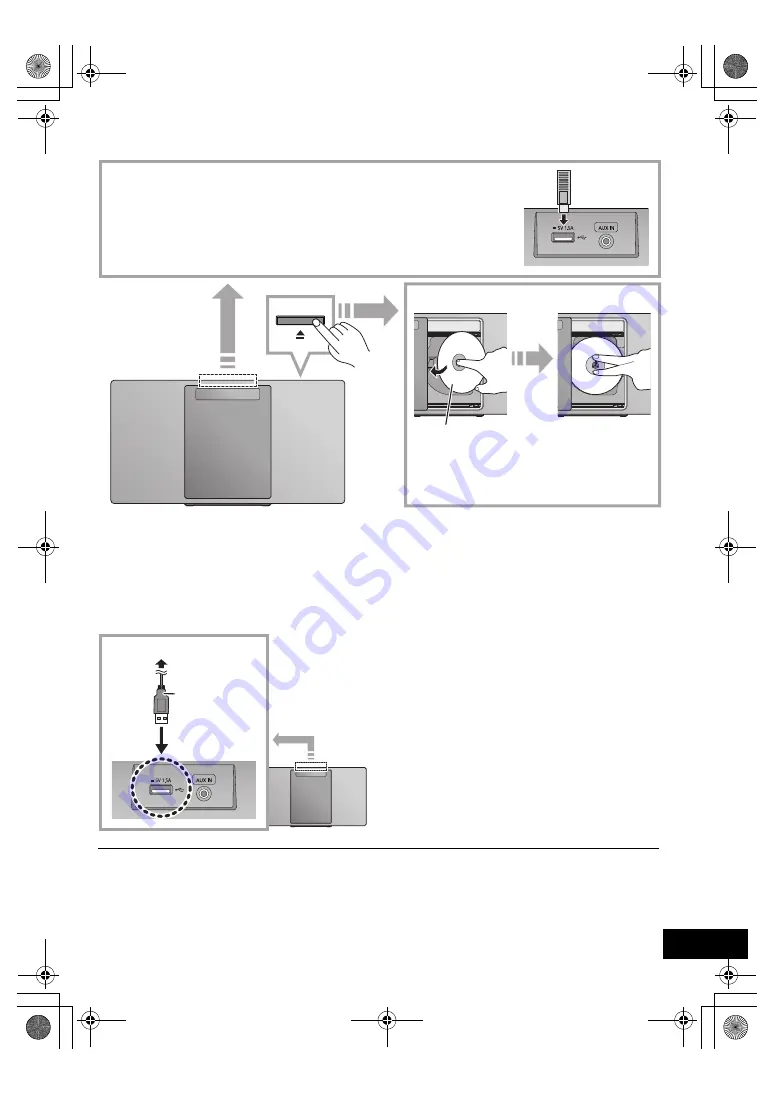
background image

7

TQBJ2049

Inserting media

Charging a device

Charging starts when a device (rated value: 5 V/1.5 A) is connected to the USB port of this unit.

1

Turn the unit on.

2

Connect a device.

{.

Confirm from the screen of the connected device, etc. to 
make sure charging has started.

A cable compatible with your device is required. Use the 
cable that comes with your device.

Even if you connect a cable compatible with the USB port of 
this unit, your device may not be charged. In that case, use 
the charger that comes with the device.

Depending on your device, using other chargers may not 
work. Check the operating instructions of your device before 
use.

Do not connect a device with a rated value higher than 5 V/
1.5 A to this unit.

To check if charging is complete, look at the screen of the 
connected device, etc.

Once fully charged, remove the USB cable from the USB 
port.

After the device has started charging, you can turn the unit to 
standby mode.
– When charging a depleted device, do not turn the unit to 

standby mode until the device becomes operational.

Make sure that the unit does not fall when inserting or removing media.

When moving this unit, be sure to remove all media and turn this unit to standby mode.

Make sure to tilt the disc so as not to touch the sliding 
door.

Do not open the sliding door manually.

The label side

Connecting a USB device

Insert the USB device directly. Do not use any USB extension cable.

Please disconnect the USB device if you finish using.

Before removing the USB device, select a source other than “USB”.

Inserting a CD

USB cable 
(not supplied)

To the compatible device

SC-HC400PC.book  7 ページ  2017年3月14日 火曜日 午後1時19分

Summary of Contents for SC-HC400

Page 1: ...l 3 18 and 19 The installation work should be done by a qualified installation specialist Before commencing work carefully read these installation instructions and the operating instructions to ensur...

Page 2: ...he risk of fire electric shock or product damage Do not expose this unit to rain moisture dripping or splashing Do not place objects filled with liquids such as vases on this unit Use only the recomme...

Page 3: ...posure and compliance The symbols on this product including the accessories represent the following AC DC Class II equipment The construction of the product is double insulated I On Standby The lightn...

Page 4: ...ack control buttons 6 Adjust the volume 0 min to 50 max 7 FAVOURITE buttons for storing or selecting radio station 1 to 5 l 11 8 Set wall mount mode 9 Select D BASS 10 Adjust surround 11 Open or close...

Page 5: ...im the display panel and indicator Press again to cancel Using the remote control Insert the battery so the terminals i and j match those in the remote control Point it at the remote control signal se...

Page 6: ...is selected select NORMAL Switch the equalizer off or turn the volume of the external device down to reduce the input signal High level of input signal will distort the sound For details refer to the...

Page 7: ...to this unit To check if charging is complete look at the screen of the connected device etc Once fully charged remove the USB cable from the USB port After the device has started charging you can tu...

Page 8: ...t will automatically try and connect to the last connected Bluetooth device LINKING is indicated on the display during this process If the connection attempt fails try to establish a connection again...

Page 9: ...y broadcasting station etc is too strong Intended usage This system is for normal general use only Do not use this system near an equipment or in an environment that is sensitive to radio frequency in...

Page 10: ...am other tracks 3 Press 1 to start playback CD MP3 USB 1 Press PROGRAM in the stop mode PROGRAM is shown for a few seconds 2 Press 3 4 to select the desired album 3 Press 9 and then press the numeric...

Page 11: ...ically press and hold the button until the frequency starts changing quickly 2 To change the tune mode 1 Press RADIO MENU repeatedly to select TUNE MODE 2 Press 2 1 to select MANUAL or PRESET and then...

Page 12: ...ET EQ is selected Bass and Treble settings will be changed to the settings in preset EQ setting Clock and Timer This is a 12 hour clock 1 Press CLOCK TIMER to select CLOCK 2 Press 3 4 to set the time...

Page 13: ...g cannot be selected when radio is the source When connected to a Bluetooth device the function does not work When SC HC400 is selected from a paired Bluetooth device s Bluetooth menu this unit will t...

Page 14: ...ce If noise is excessive during FM reception Change the audio to be output as monaural 1 Press RADIO MENU repeatedly to select FM MODE 2 Press 2 1 to select MONO and then press OK The sound becomes mo...

Page 15: ...about 30 seconds Wait for about 10 seconds then turn on the unit If the message is still displayed disconnect the AC power supply cord and consult your dealer LINKING This system is trying to connect...

Page 16: ...this unit either by disposal or transfer then follow the procedure to return all the settings to the factory defaults to delete the user settings l 14 To return all settings to the factory defaults Pl...

Page 17: ...Ch both ch driven 20 W per channel 8 1 kHz 10 THD Total RMS power 40 W TUNER SECTION Preset Memory FM 30 stations Frequency Modulation FM Frequency range 87 9 MHz to 107 9 MHz 200 kHz step 87 5 MHz to...

Page 18: ...ly pull the stand forward 3 Attach the fall prevention cord not supplied to this unit A Fall prevention cord not supplied Bend the cord twice from the tip each at 45o and 5 mm 3 16q apart for it to go...

Page 19: ...d locked in the safety holder The unit will be locked onto the safety holder with a click sound After hanging the unit release your hands carefully to confirm the unit sits securely on the wall mount...

Page 20: ...f the product or service by anyone other than an Authorized Servicer or damage that is attributable to acts of God Dry cell batteries are also excluded from coverage under this warranty THIS EXPRESS L...

Reviews: