background image

16

TQBJ2049

Unit and media care

Pull out the AC power supply cord from the outlet 
before maintenance.

Clean this unit with a soft, dry cloth

When dirt is heavy, wring a wet cloth tightly to wipe the dirt, 
and then wipe it with a dry cloth.

When cleaning the speaker covers, use a fine cloth.
Do not use tissues or other materials that can fall apart. 
Small pieces may get stuck inside the speaker cover.

Never use alcohol, paint thinner or benzine to clean this unit.

Before using chemically treated cloth, carefully read the 
cloth’s instructions.

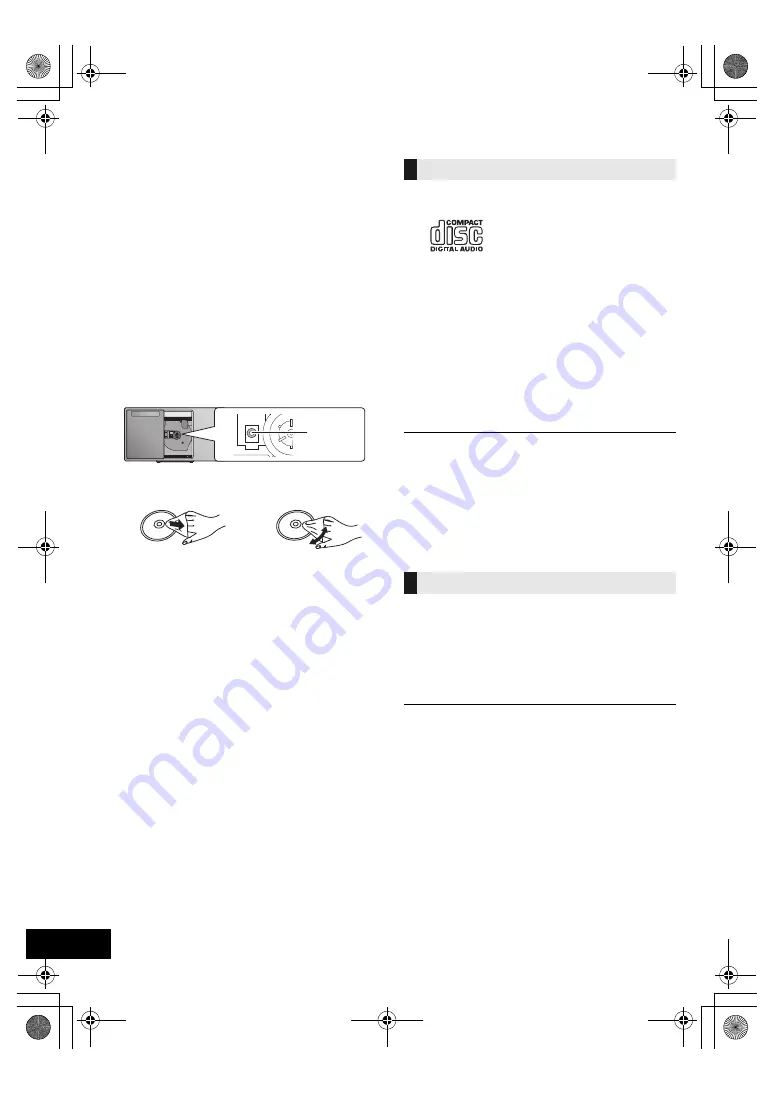
Maintenance of the lens

Clean the lens regularly to prevent malfunctions. Use a dust 
blower to remove dust and a cotton swab if it is extremely 
dirty.

You cannot use a CD type lens cleaner.

Do not leave the sliding door open for prolonged periods of 
time. This will cause the lens to get dirty.

Be careful not to touch the lens with your fingers.

Clean discs

Wipe with a damp cloth and then wipe dry.

Disc handling precautions

Handle discs by the edges to avoid inadvertent scratches or 
fingerprints on the disc.

Do not attach labels or stickers to discs.

Do not use record cleaning sprays, benzine, thinner, static 
electricity prevention liquids or any other solvent.

Do not use the following discs:
– Discs with exposed adhesive from removed stickers or 

labels (rented discs etc.).

– Discs that are badly warped or cracked.
– Irregularly shaped discs, such as heart shapes.

To dispose or transfer this unit

The unit may keep the user settings information in the 
unit. If you discard this unit either by disposal or 
transfer, then follow the procedure to return all the 
settings to the factory defaults to delete the user 
settings. 
(

l

14, “To return all settings to the factory defaults”)

Playable media

A disc with the CD Logo.

This unit can play back discs that conform to the CD-DA 
format.

This system can play back CD-R/RW with CD-DA or MP3 
format content.

The unit may not be able to play some discs due to the 
condition of the recording.

Before playback, finalize the disc on the device it was 
recorded on.

If the disc includes both MP3 and normal audio data 
(CD-DA), the unit plays the type recorded in the inner part of 
the disc.

This unit cannot play files recorded using packet write.

Disc must conform to ISO9660 level 1 or 2 (except for 
extended formats).

Some CD-R/RW cannot be played because of the condition 
of the recording.

MP3 files are defined as tracks and folders are defined as 
albums.

This system can access up to:
– CD-DA: 99 tracks

– MP3: 999 tracks, 255 albums (including root folder)

Recordings will not necessarily be played in the order you 
recorded them.

This unit does not guarantee connection with all USB 
devices.

FAT12, FAT16 and FAT32 file systems are supported.

This unit supports USB 2.0 Full Speed.

USB devices with storage capacity of more than 32 GB 
cannot work in some conditions.

Supported format: Files with the extension “.mp3” or “.MP3”.

Depending on how you create the files, they may not play in 
the order you numbered them or may not play at all.

Files are defined as tracks and folders are defined as 
albums.

This system can access up to:
– 800 albums (including root folder)

– 8000 tracks

– 999 tracks in one album

DO

DO NOT

Lens

Compatible CD

Compatible USB devices

SC-HC400PC.book  16 ページ  2017年3月14日 火曜日 午後1時19分

Summary of Contents for SC-HC400

Page 1: ...l 3 18 and 19 The installation work should be done by a qualified installation specialist Before commencing work carefully read these installation instructions and the operating instructions to ensur...

Page 2: ...he risk of fire electric shock or product damage Do not expose this unit to rain moisture dripping or splashing Do not place objects filled with liquids such as vases on this unit Use only the recomme...

Page 3: ...posure and compliance The symbols on this product including the accessories represent the following AC DC Class II equipment The construction of the product is double insulated I On Standby The lightn...

Page 4: ...ack control buttons 6 Adjust the volume 0 min to 50 max 7 FAVOURITE buttons for storing or selecting radio station 1 to 5 l 11 8 Set wall mount mode 9 Select D BASS 10 Adjust surround 11 Open or close...

Page 5: ...im the display panel and indicator Press again to cancel Using the remote control Insert the battery so the terminals i and j match those in the remote control Point it at the remote control signal se...

Page 6: ...is selected select NORMAL Switch the equalizer off or turn the volume of the external device down to reduce the input signal High level of input signal will distort the sound For details refer to the...

Page 7: ...to this unit To check if charging is complete look at the screen of the connected device etc Once fully charged remove the USB cable from the USB port After the device has started charging you can tu...

Page 8: ...t will automatically try and connect to the last connected Bluetooth device LINKING is indicated on the display during this process If the connection attempt fails try to establish a connection again...

Page 9: ...y broadcasting station etc is too strong Intended usage This system is for normal general use only Do not use this system near an equipment or in an environment that is sensitive to radio frequency in...

Page 10: ...am other tracks 3 Press 1 to start playback CD MP3 USB 1 Press PROGRAM in the stop mode PROGRAM is shown for a few seconds 2 Press 3 4 to select the desired album 3 Press 9 and then press the numeric...

Page 11: ...ically press and hold the button until the frequency starts changing quickly 2 To change the tune mode 1 Press RADIO MENU repeatedly to select TUNE MODE 2 Press 2 1 to select MANUAL or PRESET and then...

Page 12: ...ET EQ is selected Bass and Treble settings will be changed to the settings in preset EQ setting Clock and Timer This is a 12 hour clock 1 Press CLOCK TIMER to select CLOCK 2 Press 3 4 to set the time...

Page 13: ...g cannot be selected when radio is the source When connected to a Bluetooth device the function does not work When SC HC400 is selected from a paired Bluetooth device s Bluetooth menu this unit will t...

Page 14: ...ce If noise is excessive during FM reception Change the audio to be output as monaural 1 Press RADIO MENU repeatedly to select FM MODE 2 Press 2 1 to select MONO and then press OK The sound becomes mo...

Page 15: ...about 30 seconds Wait for about 10 seconds then turn on the unit If the message is still displayed disconnect the AC power supply cord and consult your dealer LINKING This system is trying to connect...

Page 16: ...this unit either by disposal or transfer then follow the procedure to return all the settings to the factory defaults to delete the user settings l 14 To return all settings to the factory defaults Pl...

Page 17: ...Ch both ch driven 20 W per channel 8 1 kHz 10 THD Total RMS power 40 W TUNER SECTION Preset Memory FM 30 stations Frequency Modulation FM Frequency range 87 9 MHz to 107 9 MHz 200 kHz step 87 5 MHz to...

Page 18: ...ly pull the stand forward 3 Attach the fall prevention cord not supplied to this unit A Fall prevention cord not supplied Bend the cord twice from the tip each at 45o and 5 mm 3 16q apart for it to go...

Page 19: ...d locked in the safety holder The unit will be locked onto the safety holder with a click sound After hanging the unit release your hands carefully to confirm the unit sits securely on the wall mount...

Page 20: ...f the product or service by anyone other than an Authorized Servicer or damage that is attributable to acts of God Dry cell batteries are also excluded from coverage under this warranty THIS EXPRESS L...

Reviews: