background image

8

RQT9882

Bluetooth

®

 operations

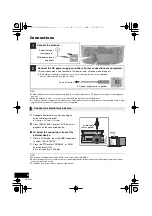
You can listen to the sound from the Bluetooth

®

 audio device from this unit wirelessly.

Refer to the owner’s manual of the Bluetooth

®

 device for details.

If you intend to use an NFC (Near Field Communication)-compatible Bluetooth

®

 device, proceed to 

“One-Touch Connection (Connecting by NFC)”.
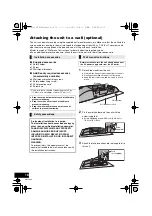
Preparation

Turn on the Bluetooth

®

 feature of the device and 

place the device near this unit.
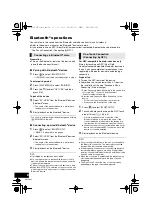
Pairing with Bluetooth

®

 devices

1

Press [

] to select “BLUETOOTH”.

{.

If “PAIRING” is indicated on the display, go to step 4.

To enter pairing mode*

2

Press [PLAY MENU] to select “PAIRING”.

3

Press [

3

,

4

] to select “OK? YES” and then 

press [OK].

To pair with a device

4

Select “SC-HC39” from the Bluetooth

®

 device’s 

Bluetooth

®

 menu.

{.

The name of the connected device is indicated on 
the display for a few seconds.

5

Start playback on the Bluetooth

®

 device.

* You can also enter pairing mode by pressing and holding 

[

-PAIRING] on the unit.
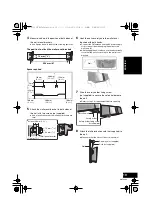
Connecting a paired Bluetooth

®

 device

1

Press [

] to select “BLUETOOTH”.

{.

“READY” is indicated on the display.

2

Select “SC-HC39” from the Bluetooth

®

 device’s 

Bluetooth

®

 menu.

{.

The name of the connected device is indicated on 
the display for a few seconds.

3

Start playback on the Bluetooth

®

 device.


If prompted for the passkey, input “0000”.

You can register up to 8 devices with this unit. If a 9th 
device is paired, the device that has not been used the 
longest will be replaced.

This unit can only be connected to one device at a time.

When “BLUETOOTH” is selected as the source, this unit 
will automatically try and connect to the last connected 
Bluetooth

®

 device.

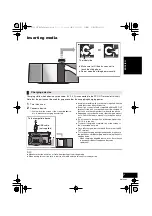
For NFC-compatible Android

TM

 devices only

Simply by touching an NFC (Near Field 
Communication)-compatible Bluetooth

®

 device on 

the unit, you can complete all preparations, from 
registering a Bluetooth

®

 device to establishing a 

connection.

Preparation

Turn on the NFC feature of the device.

Android device version lower than 4.1 requires 
the installation of the app “Panasonic Music 
Streaming” (Free of charge).

1 Enter “Panasonic Music Streaming” in the search box 

of Google Play

TM

 to search, and then select 

“Panasonic Music Streaming”.

2 Start the app “Panasonic Music Streaming” on the 

device.
– Follow on-screen instructions on your device.
– Always use the latest version of the app.

1

Press [

] to select “BLUETOOTH”.

2

Touch and hold your device on the NFC touch 

area of this unit [

]. (

l

p. 5)

{.

Once the registration and connection of the 
Bluetooth

®

 device is complete, the name of the 

connected device is indicated on the display for a 
few seconds. Move the device away from the unit.

When the connection is not established even if your 
device has touched the NFC touch area, move the 
device so it can be detected.

3

Start playback on the Bluetooth

®

 device.


If you touch another device to this unit, you can update 
the Bluetooth

®

 connection. The previously connected 

device will be disconnected automatically.

If the image and sound are out of sync during playback, 
restart the playback app you are using. If the problem 
persists, connect the Bluetooth

®

 device and this unit with 

an audio cable (not supplied).

When the connection is established, the playback may 
start automatically depending on the type of device 
being used.

The One-Touch Connection may not work properly 
depending on the type of device being used.

Connecting via Bluetooth

®

 menu

One-Touch Connection
(Connecting by NFC)

SC-HC39_PPC~body1_mst.fm  8 ページ  2014年2月6日 木曜日 午前9時29分

Summary of Contents for SC-HC39

Page 1: ...om register U S customers only Compact Stereo System Model No SC HC39 Included Installation Instructions l p 2 and 18 19 The installation work should be done by a qualified installation specialist Bef...

Page 2: ...or objects have fallen into the apparatus the apparatus has been exposed to rain or moisture does not operate normally or has been dropped Unit To reduce the risk of fire electric shock or product dam...

Page 3: ...LLOWING APPLIES ONLY IN THE U S A FCC Note This equipment has been tested and found to comply with the limits for a Class B digital device pursuant to Part 15 of the FCC Rules These limits are designe...

Page 4: ...ories About descriptions in this Owner s Manual Pages to be referred to are indicated as l p Unless otherwise indicated operations are described using the remote control Check the supplied accessories...

Page 5: ...ea l p 8 8 DC OUT terminal l p 7 9 AUX IN jack l p 6 10 Remote control signal sensor Distance Within approx 7 m 23 ft directly in front Angle Approx 30o left and right 11 Display 12 Sliding door 13 En...

Page 6: ...to select INPUT LEVEL 2 Press 3 4 to select NORMAL or HIGH and then press OK The factory default is NORMAL To improve sound distortion when HIGH is selected select NORMAL Switch the equalizer off or t...

Page 7: ...e owner s manual of your device before use Do not connect a device with a rated value higher than 5 V 1 5 A to this unit To check if charging is complete look at the screen of the connected device etc...

Page 8: ...atible AndroidTM devices only Simply by touching an NFC Near Field Communication compatible Bluetooth device on the unit you can complete all preparations from registering a Bluetooth device to establ...

Page 9: ...change the input level setting Preparation Connect a Bluetooth device 1 Press PLAY MENU repeatedly to select INPUT LEVEL 2 Press 3 4 to select the level and then press OK LEVEL 0 LEVEL i1 LEVEL i2 J...

Page 10: ...AT 2 Press 3 4 to select the setting and then press OK During random play you cannot skip to the previous track The mode is canceled when you open the sliding door CD CD audio in CD DA format Bluetoot...

Page 11: ...TUNEMODE 2 Press 3 4 to select MANUAL and then press OK 3 Press 6 or 5 9 to tune to the required station To start automatic tuning press and hold 6 or 5 9 until the frequency starts scrolling Tuning...

Page 12: ...y to select TIMER SET 3 Press 3 4 to select SET and then press OK F is displayed To turn the timer off select OFF 4 Press to turn the unit to standby mode To display the timer settings press SETUP rep...

Page 13: ...equipment responds to the supplied remote control change the remote control code 1 Press CD to select CD 2 While pressing and holding SELECTOR on the unit press and hold CD on the remote control unti...

Page 14: ...for about an hour and then try again Pairing cannot be completed Check the Bluetooth device condition The device cannot be connected The pairing of the device was unsuccessful or the registration has...

Page 15: ...CK Clock is not set Adjust the clock accordingly ADJUST TIMER Play timer is not set Adjust the play timer accordingly AUTO OFF The unit has been left unused for about 20 minutes and will shut down wit...

Page 16: ...dirty You cannot use a CD type lens cleaner Do not leave the sliding door open for prolonged periods of time This will cause the lens to get dirty Be careful not to touch the lens with your fingers Cl...

Page 17: ...curity is possibly not sufficient Transmit data wirelessly to this system with caution This system cannot transmit data to a Bluetooth device Range of use Use this device at a maximum range of 10 m 33...

Page 18: ...off the unit as illustrated Keep the removed screw and the stand in a safe place 2 Fix the safety holder onto the unit with the screw supplied Screw tightening torque 50 N0cm 0 4 lbf0ft to 70 N0cm 0 5...

Page 19: ...ging the unit release your hands carefully to confirm the unit sits securely on the wall mount brackets 7 Drive the safety holder fixing screw not supplied to secure the safety holder onto the wall Re...

Page 20: ...ont Ch both ch driven 20 W per channel 8 1 kHz 10 THD Total RMS Stereo mode power 40 W FTC Output Power Stereo mode Front Ch both ch driven 15 W per channel 8 20 Hz to 20 kHz 1 THD Total FTC Stereo mo...

Page 21: ...e 3 4 para seleccionar la hora y luego presione OK Spanish Quick Reference Referencia r pida en espa ol 1 2 Cinta adhesiva no suministrado Antena interior FM suministrado Conecte el cable de alimentac...

Page 22: ...ffice restaurant or other business or rental use of the product or service by anyone other than a Factory Service Center or other Authorized Servicer or damage that is attributable to acts of God THER...

Page 23: ...consumer controls improper maintenance power line surge lightning damage modification introduction of sand humidity or liquids commercial use such as hotel office restaurant or other business or rent...

Page 24: ...front Plaza Newark NJ 07102 5490 http www panasonic com C Panasonic Corporation 2013 Printed in Malaysia Panasonic Canada Inc 5770 Ambler Drive Mississauga Ontario L4W 2T3 www panasonic com RQT9882 3P...

Reviews: