background image

Advanced 

operations 

43

VQT3X49

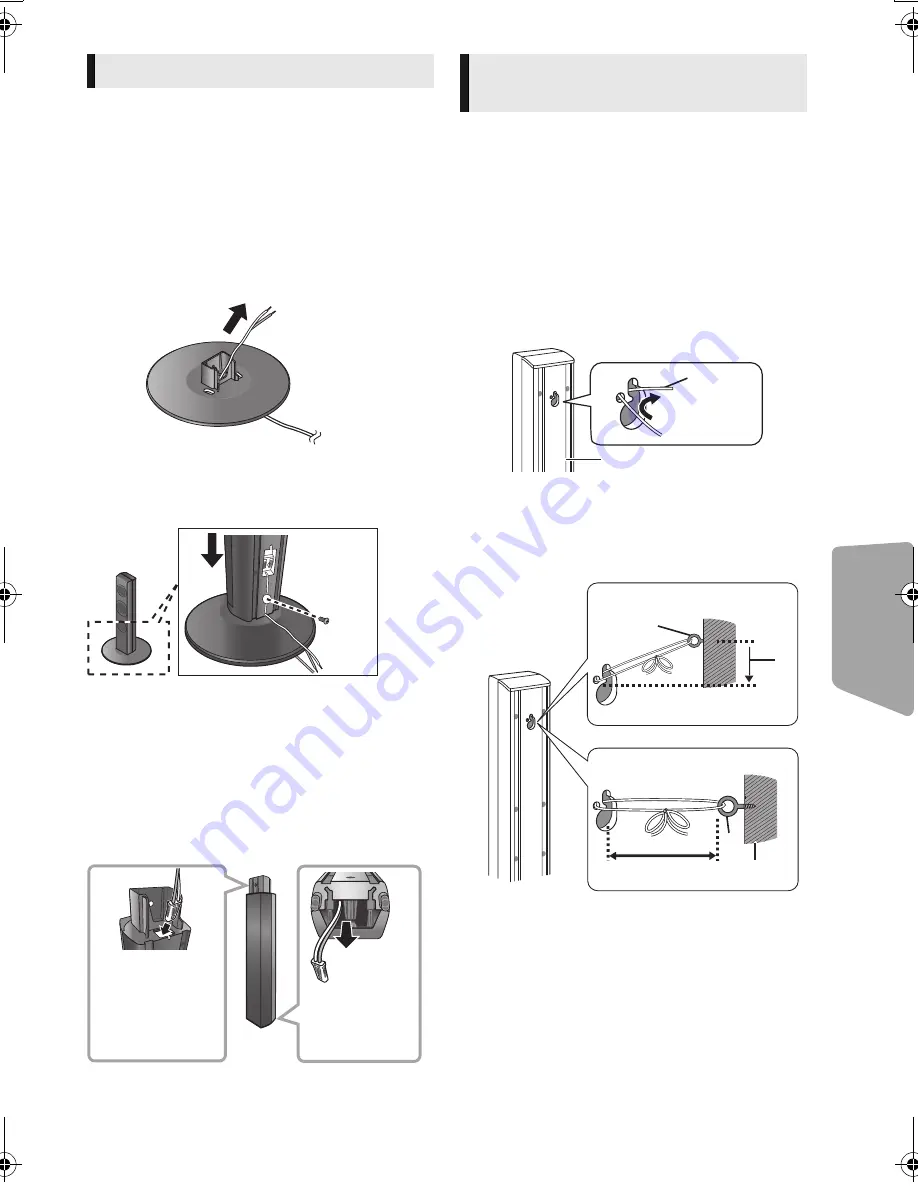
It is possible to shorten the height of the front 
speaker by directly connecting the speaker to the 
base without using the stand.

Preparation

Detach the speaker cable from the stand.

1

Thread the detached cable through the 

base.

2

Attach the speaker to the base and tighten 

the screw (supplied) securely.

3

Connect the speaker cable to the speaker 

and to the terminal of the main unit. 
(

>

12, 13)

Reattaching the speaker cable 

to the stand

Preventing from falling

Front speaker

Preventing from dropping

Front speaker, Surround speaker, Center speaker

1

Thread a string to the speaker.

Use a string of less than 

 2.0 mm (

3

/

32

q

), 

which is capable of supporting over 10 k

g


(22 lbs).

e.g., Front speaker

A

String (not supplied)

B

Rear of the speaker

2

Thread a string from the wall to the 

speaker and tie tightly.

C

Screw eye (not supplied)

D

Wall

E

Approx.150 mm (5 

29

/

32

q

)

F

Less than 100 mm (3 

15

/

16

q

)

Front speaker assembly option

Straighten the 
cable and run 
through the 
stand.

Pull out the 
cable through 
the hole.

Preventing the speakers 

from falling or dropping

When mounted on a wall

When placed on the floor

SC-BTT490P_eng.book  43 ページ  2012年2月22日 水曜日 午前9時1分

Summary of Contents for SC-BTT490

Page 1: ...ct For optimum performance and safety please read these instructions carefully Please keep this manual for future reference If you have any questions contact U S A and Puerto Rico 1 800 211 PANA 7262...

Page 2: ...mall object Keep the Memory Card out of reach of children to prevent swallowing Keep the screws out of reach of children to prevent swallowing Unit This unit utilizes a laser Use of controls or adjust...

Page 3: ...eaker installation option 42 Reference Troubleshooting guide 44 Messages 47 Specifications 49 Supplemental information 50 Limited Warranty 54 Index Back cover Please note that the actual controls and...

Page 4: ...his unit Package contents Parts Parts number Stands with cables RYP1714B K RED RYP1714A K WHITE Bases RYP1745 K k 2 Screws XSN5i12FJKk 8 Speaker cables REEX1268 GREEN REEX1269 GRAY REEX1270 BLUE SUBWO...

Page 5: ...ine thinner static electricity prevention liquids or any other solvent Clean any dust water or foreign matter from the terminals on the rear side of the card Do not use the following discs Discs with...

Page 6: ...Video Video DVD R Video AVCHD MKV JPEG MPO FLAC MP3 WAV DVD R DL DVD RW Video AVCHD R RW R DL Music CD Music CD DA CD R CD RW MKV JPEG MPO FLAC MP3 Music CD DA WAV SD Memory Card from 8 MB to 2 GB SDH...

Page 7: ...l Audio CD DA format so playback may not be possible SD card miniSD Cards microSD Cards microSDHC Cards and microSDXC Cards can be used but must be used with an adaptor card These are usually supplied...

Page 8: ...LEEP 2While SLEEP is displayed press SLEEP several times to select the time in minutes Timer selection is up to 120 minutes Select OFF when canceling the setting To confirm the remaining time Press an...

Page 9: ...1 AC IN terminal 17 For units with PX printed on the packaging The terminal is not polarized 2 Speaker terminals 13 3 Cooling fan 4 LAN port 17 5 USB port 30 6 HDMI AV OUT ARC terminal 14 16 7 HDMI1 I...

Page 10: ...lose to floors walls and corners can result in excessive bass Cover walls and windows with thick curtains For optional wall mount refer to page 42 Enjoy surround speaker sound wirelessly Use the optio...

Page 11: ...akers 1 Attach the stand to the base 2 Tighten the 3 screws supplied securely 3 Attach the speaker Continued on the next page Assembling the front speakers Thread the speaker cable through the base Sl...

Page 12: ...peakers When connecting speakers with the optional wireless system SH FX71 10 use the supplied speaker cables of SH FX71 e g Surround speaker Connecting the speaker cables SURROUND Lch Push r White s...

Page 13: ...s Turn off all equipment before connection and read the appropriate owner s manual Do not connect the AC power supply cord until all other connections are complete Connect the speaker cables to the te...

Page 14: ...witch the selector 20 OPTICAL IN After making the digital audio connection make settings to suit the type of audio from your digital equipment 37 Do not make the video connections through the VCR Due...

Page 15: ...ure and audio OPTICAL OUT L VIDEO IN R AUDIO IN Optical digital audio cable not supplied Video cable not supplied L VIDEO IN R AUDIO IN L R AUDIO OUT Video cable not supplied Audio cable not supplied...

Page 16: ...I AV OUT terminal the sound will not be output from this system Even while the unit is in the standby mode you can change the input signal HDMI1 IN CABLE SAT or HDMI2 IN by pressing EXT IN on the remo...

Page 17: ...c See page 3 for the precautions of wireless LAN connection Use category 5 or above straight LAN cables STP when connecting to peripheral devices Inserting any cable other than a LAN cable in the LAN...

Page 18: ...then follow the on screen instructions and apply the settings WPS PUSH button method If you are using a wireless router that supports WPS Wi Fi Protected SetupTM you can easily perform the settings Se...

Page 19: ...to identify a particular network Transmission is possible if the SSID matches for both devices If you have more than one Panasonic products and the remote control operates both products at once you w...

Page 20: ...e USB port on the rear panel is only for the Communication Camera Enjoying TV with unit s speakers 1 Connect the TV and the main unit 14 15 2 Press EXT IN several times to select the appropriate exter...

Page 21: ...to play back the selected video and or audio To save on electricity the power is turned off automatically if there is no button operation for about 30 minutes when not playing back such as when pause...

Page 22: ...ys the results 4 Press OK To redo the facial recognition press RETURN Using registered smartphones When the unit is turned on using the registered smartphone the user who registered the smartphone wil...

Page 23: ...opened or you press STOP several times to display STOP on the unit s display On BD Video discs including BD J the resume play function does not work Press PAUSE Press PAUSE again or 1PLAY to restart...

Page 24: ...HDMI Resolution and 24p Output 36 When playing back 3D photos from Photos screen select from the 3D list Still pictures in 2D are played back in 2D If 2D and 3D indications are not displayed press R...

Page 25: ...d to this unit make the setting so that the iPhone does not receive calls Avoid using Wi Fi mode on your iPhone while the network functions or surround speakers on this unit are in use wirelessly Abou...

Page 26: ...de is used you can use your iPod or iPhone to play back music photo video files The remote control of this unit can be used to control iPod iPhone operations Album artwork For music playback only e g...

Page 27: ...perform various playback operations and settings See the operating instructions of the TV for more details The buttons that you can use for this unit vary depending on the TV For details refer to the...

Page 28: ...and the audio is output from the speakers of this unit When HDMI Standby Pass Through is set to Yes 36 this unit will not turn on Connecting the HDMI cable The setting for audio output is not necessa...

Page 29: ...ttons to select the channel To select a 1 digit number e g 1 1 B OK To select a 2 digit number e g 12 1 B 2 Alternatively press W X or 3 4 Manual tuning and presetting Select a radio broadcast 1 Press...

Page 30: ...the audio is distorted 38 Audio Auto Gain Control When wrong time is displayed 38 Time Zone DST If using slow Internet connection the video may not be displayed correctly A high speed Internet service...

Page 31: ...Home Network Press EXIT HOME or POP UP MENU TOP MENU You can use the smartphone etc as the Digital Media Controller DMC to play back contents from DLNA server on the Renderer this unit Possible appli...

Page 32: ...is being displayed on the unit s display Select the item which you want to repeat The items displayed differ depending on the type of media Select Off to cancel Shuffle Select whether or not to play...

Page 33: ...Integrated NR Smoothes block noise and reduces the smudging that appears around contrasting sections of the picture Chroma Process The high resolution processing of HDMI chroma signals produces a high...

Page 34: ...ly Multi Channel Out You can enjoy sound from the front speakers as well as the surround speakers even when playing stereo sources Super Surround You can enjoy sound from all speakers with stereo sour...

Page 35: ...22 for details about user registration and switching 1 Press HOME 2 Press 3 4 2 1 to select Others and press OK 3 Press 2 1 to select Setup and press OK 4 Select an item and change the settings To ex...

Page 36: ...HDMI Standby Pass Through Even if this unit is in standby mode a device connected with this unit can output videos and sound to the TV Moreover you can switch the HDMI input terminal by pressing EXT I...

Page 37: ...image it produces clearer sound Select Enable to use High Clarity Sound or High Clarity Sound Plus in the Option menu 34 35 Audio Delay Synchronization between picture and sound is corrected by adjust...

Page 38: ...cking the state of the network connection and setting the IP address and DNS related Press OK to show the respective setting Proxy Server Settings This is for checking the state of connection with the...

Page 39: ...a list of playback content is displayed and there is no operation for 10 minutes or more the screen switches to HOME menu automatically While playing and pausing etc this function is not available Sta...

Page 40: ...irmware manually if a firmware update is available System Information Press OK to show the following settings License Information about the software used by this unit is displayed Firmware Version Inf...

Page 41: ...g 3 While the selected mode is displayed Press 3 4 to select the desired setting 34 Adjusting speaker level during play 1 Press CH SELECT to activate the speaker setting mode 2 Press CH SELECT severa...

Page 42: ...r E 5 5 mm to 7 5 mm 7 32q to 5 16q 2 Fit the speaker securely onto the screw s with the hole s Use the measurements indicated below to identify the screwing positions on the wall Leave at least 20 mm...

Page 43: ...tand Preventing from falling Front speaker Preventing from dropping Front speaker Surround speaker Center speaker 1 Thread a string to the speaker Use a string of less than 2 0 mm 3 32q which is capab...

Page 44: ...atteries in the remote control 8 The remote control and main unit are using different codes If SET is displayed on the unit s display when a button is pressed on the remote control change the code on...

Page 45: ...s in Restore Default Settings and make proper settings 40 When 3D BD Video Playback in the Setup menu is set to Auto images may not be output depending on the connection method After removing the disc...

Page 46: ...14 If there is no sound from the equipment connected to this unit s DIGITAL AUDIO IN terminal please make sure that the optical audio output of the equipment is set to PCM Disc cannot be played The di...

Page 47: ...nection If 3 or fewer indicators are lit or the connection is being interrupted change the position or angle of your wireless router and see if the connection state improves If there is no improvement...

Page 48: ...e unit H or F stands for a number Check and correct the speaker cable connections There is something unusual Check the unit using the troubleshooting guide If the service number remains displayed do t...

Page 49: ...k 2 Sampling frequency 32 kHz 44 1 kHz 48 kHz Audio Format PCM Dolby Digital DTS FM TUNER SECTION Frequency range 87 9 MHz to 107 9 MHz 200 kHz step 87 5 MHz to 108 0 MHz 100 kHz step Antenna terminal...

Page 50: ...ch German Italian Spanish Dutch Swedish Norwegian Danish Portuguese Russian ARA HIN PER IND MRI BUL RUM GRE TUR JPN CHI KOR MAL VIE THA POL CES SLK HUN FIN Japanese Chinese Korean Malay Vietnamese Tha...

Page 51: ...will not occur in a particular installation If this equipment does cause harmful interference to radio or television reception which can be determined by turning the equipment off and on the user is e...

Page 52: ...l be implied for any other use Additional information may be obtained from MPEG LA LLC See http www mpegla com HDAVI Control is a trademark of Panasonic Corporation VIERA Link is a trademark of Panaso...

Page 53: ...orbis The software license is displayed when License in the Setup menu is selected 40 5 FLAC WPA Supplicant The software licenses are displayed when License in the Setup menu is selected 40 This produ...

Page 54: ...or liquids commercial use such as hotel office restaurant or other business or rental use of the product or service by anyone other than a Factory Service Center or other Authorized Servicer or damag...

Page 55: ...ion set up adjustments misadjustment of consumer controls improper maintenance power line surge lightning damage modification introduction of sand humidity or liquids commercial use such as hotel offi...

Page 56: ...Re master 34 Restore Default Settings 40 Resume play function 23 S Subtitle 32 U USB device 7 V VIERA Connect 30 VIERA LinkTM HDAVI ControlTM 27 W Wireless LAN 17 24p 33 36 3D 24 VQT3X49 3 F1211SB302...

Reviews: