59
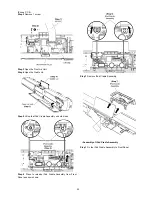
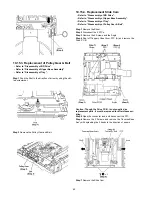
10.15.1. Replacement of Upper Base Ass’y
• Refer to “Disassembly of BD Drive”.
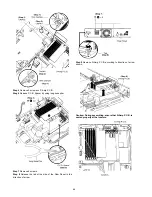
Step 1 Remove the 4 screws, and push the Hook in.
Step 2 Lift up the Upper Base Ass’y, and pull it out to the direc-
tion of arrow.
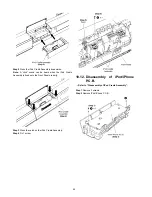
10.15.2. Replacement of Tray
• Refer to “Disassembly of BD Drive”.
• Refer to “Disassembly of Upper Base Assembly”.
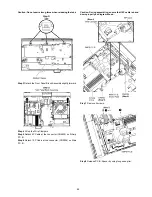
Step 1 Insert the Eject Pin into the hole of the bottom side, and
slide it to the direction of arrow until it can be.
Step 2 Pull the Tray to the direction of arrow until it can be.
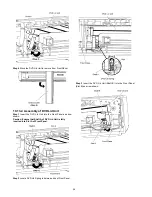
Step 3 Insert the Eject Pin into the hole of the Tray at 45
degrees, and lean it to the direction of arrow with pushing the
dotted point of the tray forward.
Then the one side of the tray is come off from the Drive.
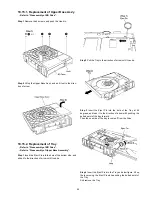
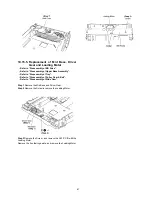
Step 4 Insert the Eject Pin into the Tray as below figure, lift up
the lever using the Eject Pin while pushing the dotted point of
the Tray.
And remove the Tray.
Summary of Contents for SA-BT222EB
Page 6: ...6 1 5 Caution for AC Cord For EB only ...
Page 14: ...14 ...
Page 15: ...15 5 Location of Controls and Components 5 1 Remote Control Key Button Operations ...
Page 16: ...16 5 2 Main Unit Key Button Operations ...
Page 17: ...17 5 3 Using BD LIVE BONUSVIEW in BD Video ...
Page 18: ...18 5 4 Using the iPod iPhone ...
Page 19: ...19 5 4 1 iPod iPhone Playback ...
Page 20: ...20 5 5 Speaker Connections ...
Page 21: ...21 5 6 Disc Playability ...
Page 22: ...22 ...
Page 23: ...23 5 7 SD USB Information ...
Page 24: ...24 5 8 File Extension Type Support MP3 JPEG DivX AVCHD MPEG2 files ...
Page 25: ...25 5 8 1 File Folders Structures ...
Page 39: ...39 8 1 3 Main P C B Fig 3 Main P C B IC2302 LB2301 CN2004 ...
Page 43: ...43 10 2 Main Components and P C B Locations ...
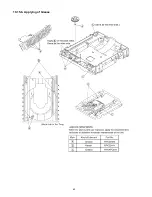
Page 62: ...62 10 15 6 Applying of Grease ...
Page 84: ...84 ...
Page 100: ...100 ...
Page 102: ...102 ...
Page 124: ...124 ...
Page 126: ...126 ...
Page 128: ...128 20 1 2 Mechanism BD Drive ...
Page 130: ...130 ...

