background image

3

D

This TV set is designed to operate on 220

--

240V, 50Hz A.C.

D

To prevent damage which might result in

electric shock or fire, do not expose this TV

set to rain or excessive moisture.

This TV must not be exposed to dripping or

splashing water and objects filled with liquid,

such as vases, must not be placed on top of

or above the TV.

H

WARNING : HIGH VOLTAGE !!!

Do not remove the rear cover as live parts are

accessible when it is removed. There are no

user serviceable parts inside.

D

Avoid exposing the TV set to direct sunlight
and other sources of heat. To prevent fire,

never place any type of candle or naked flame

on top of, or near the TV set.

D

Ensure that the mains plug is easily

accessible.

D

The On/Off switch on this model does not fully

disconnect the TV from the mains supply.
Remove the mains plug from the wall socket

when the TV set is not used for a prolonged

period of time.

H

CABINET AND PICTURE TUBE CARE

Remove the mains plug from the wall socket.

The cabinet and picture tube can be cleaned

with a soft cloth moistened with mild detergent

and water. Do not use solutions containing

benzol or petroleum. TV sets can produce

static electricity, care must be taken whenever

touching the TV screen.

D

Adequate ventilation is essential to prevent

failure of electrical components, we

recommend that a gap of at least 5cm is left all

around this television receiver even when it is

placed inside a cabinet or between shelves.

D

Ventilation should not be impleded by

covering the ventilation openings with items

such as newspapers, tabel cloths and

curtains.

H

ENVIRONMENT

Batteries, packaging and old equipment should

not be disposed of as domestic waste, but in

accordance with the applicable regulations.

H

TV GAMES / HOME COMPUTERS

Extended use of TV games or home computers

with any television set can cause a permanent

‘shadow’ on the screen. This type of irreversible

picture tube damage, can be limited by
observing the following points:

D

Reduce the brightness and contrast levels

to a minimum viewing level.

D

Do not operate the television set for a

continuous period of time while using TV

games or home computers.

D

This type of picture tube damage, is not an

operating defect, and as such is not
covered by the Panasonic warranty.

H

SLEEP FEATURE

If the set is not switched off when the TV station

stops transmitting , it will automatically go to

standby mode after 30 minutes. This function

will not operate when the TV is in AV mode.

WARNINGS AND PRECAUTIONS

Summary of Contents for QuintrixF TX-28PM1D

Page 1: ...ic Panasonic Panasonic Panasonic Panasonic Panasonic Panasonic Panasonic Panasoni c Panasonic Panasonic Panasonic Panasonic Panasonic Panasonic Panasonic Panasonic Panasonic Panasonic Panasonic Panasonic Panasonic Panasonic Panasonic Panasonic Pa nasonic Panasonic Panasonic Panasonic Panasonic Panasonic Panasonic Panasonic Pana sonic Panasonic Panasonic Panasonic Panasonic Panasonic Panasonic Pana...

Page 2: ...ons 3 Accessories 4 Quick Start Guide 5 Basic Controls 8 Menu Structure 9 Using the On Screen Displays 10 Aspect Controls 11 Main Menu 13 Picture Menu 14 Sound Menu 15 Setup Menu 16 Tuning Menu 18 Tuning Menu Programme edit 19 Programme table 22 Tuning Menu Auto setup 23 Tuning Menu Manual tuning 24 OSD Language 26 Q Link 27 VCR DVD R Operation 29 Teletext Operation 30 Audio Video AV Connections 3...

Page 3: ...duce static electricity care must be taken whenever touching the TV screen D Adequate ventilation is essential to prevent failure of electrical components we recommend that a gap of at least 5cm is left all around this television receiver even when it is placed inside a cabinet or between shelves D Ventilation should not be impleded by covering the ventilation openings with items such as newspaper...

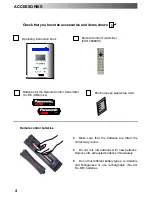
Page 4: ...ure that the batteries are fitted the correct way round D Do not mix old batteries with new batteries Remove old exhausted batteries immediately D Do not mix different battery types i e Alkaline and Manganese or use rechargeable Ni Cd Ni MH batteries Remote control batteries Remote Control Transmitter EUR 7628010 Pan European Guarantee Card ACCESSORIES ...

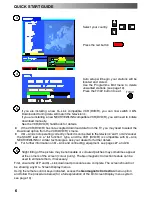
Page 5: ...5 1 VCR DVD R AV1 AV2 AV1 2 SATELLITE RECEIVER Plug in aerial and connect ancillary equipment First ensure that the VCR DVD R is in Standby mode Plug in TV and switch on OR AV2 QUICK START GUIDE ...

Page 6: ...g correctly check it is connected to the television s AV1 or AV2 socket the SCART lead is a full function type and the VCR DVD R is compatible with Q Link NEXTVIEWLINK or similar technologies Ask your dealer for further details D For further information on Q Link and connecting equipment see pages 27 and 28 6 Slight tilting of the picture may be noticeable or coloured patches may sometimes appear ...

Page 7: ...s the F button repeatedly until the Geomagnetic Correction feature is displayed Press the or buttons repeatedly until the picture appears to be level Press the F button again to return to normal viewing Close the flap to prevent damage The function geomagnetic correction is also accessible from the front panel F F v Adjust Volume Change Programme You are now ready to begin viewing programmes The c...

Page 8: ...t button see page 11 Menu button Press to access the Main Picture Sound and Setup menus see page 10 Teletext buttons see page 30 Direct Channel Access During normal TV viewing or when in the Tuning Programme edit or Manual tuning menus press and then enter channel number using the numeric buttons VCR DVD buttons see page 29 Programme position for selection of two digit programmes 10 99 using numer...

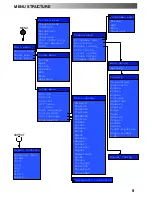
Page 9: ...me edit Auto setup Manual tuning Fine tuning Colour system Volume correc Decoder AV2 Tuning menu OSD language Geomagnetic correction Country Delete Add Move Download Programme edit Warning Auto Setup Manual tuning MENU ASPECT Deutsch English Français Italiano ELLHNIKA Čeština Română Polski Español Norsk Dansk Svenska Magyar Russkij Slovensky Srpski Nederlands Suomi Türkçe Português Hrvatski Bulgar...

Page 10: ...MENU button is used to open the main menu and also to return to the previous menu MENU The up and down cursor buttons are used to move the cursor up and down the menus The left and right cursor buttons are used to access menus adjust levels or to select from a range of options The OK button used to store and confirm tuning OSD functions and other settings The TV AV button is used to exit the menu ...

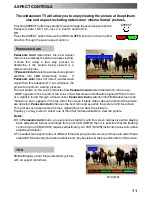
Page 11: ... screen if a widescreeen identification signal WSS is found or a signal is found through a Scart socket Panasonic Auto switches into 16 9 widescreen ratio Panasonic Auto appears in the top left of the screen if black stripes above and below the picture are detected Panasonic Auto chooses the best ratio and expands the picture to fill the screen This process can take several minutes depending how d...

Page 12: ...ally so that the image fills the screen this is done in such a way that the stretching is only obvious at the left and right edges of the screen 4 3 4 3 will display a 4 3 picture at its standard 4 3 size with no aspect distortions Zoom1 Zoom1 will display 16 9 letterbox or 4 3 pictures with no aspect distortions Zoom2 Zoom2 will display 16 9 anamorphic letterbox pictures as a full screen display ...

Page 13: ...nu system This menu allows you to make adjustments to the picture quality The Sound menu will allow you to set your personal preferences for all aspects of sound quality The Setup menu provides access to various advanced features and also to the Tuning menu MAIN MENU MENU TV AV Main menu OK Select Access Exit Picture menu Access Sound menu Setup menu Picture menu Sound menu Setup menu ...

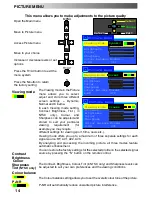
Page 14: ...F AV1 AV2 AV3 By analysing and processing the incoming picture all three modes feature automatic enhancement You can restore the factory settings for the selected profile on the selected signal source by pressing the N button on the remote control The Contrast Brightness Colour Tint in NTSC only and Sharpness levels can be adjusted to suit your own preferences and the viewing conditions The Colour...

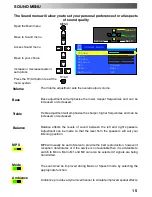
Page 15: ...the levels of sound between the left and right speakers Adjustment can be made so that the level from the speakers will suit your listening position MPX will usually be set to Stereo to provide the best reproduction however if reception deteriorates or if the service is not available then it is advisable to switch to Mono Mono M1 and M2 can also be selected if signals are being transmitted The sou...

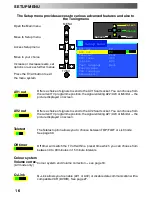
Page 16: ...can choose from the current TV programme position the signal entering AV1 AV3 or Monitor the picture displayed on screen The Teletext option allows you to choose between TOP FLOF or List mode See page 30 Off timer will switch the TV off within a preset time which you can choose from between 0 to 90 minutes in 15 minute intervals Colour system and Volume correction see page 18 Q Link allows you to ...

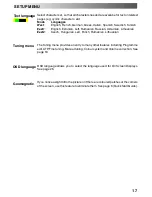
Page 17: ...sh Rumanian Lithuanian The Tuning menu provides an entry to many other features including Programme edit ATP Fine tuning Manual tuning Colour system and Volume correction See page 18 OSD language allows you to select the language used for On Screen Displays See page 26 If you notice a slight tilt to the picture or if there are coloured patches at the corners of the screen use this feature to elimi...

Page 18: ...allows individual programme positions to be tuned manually See page 24 Stations can be finely tuned using the Fine tuning adjustment The Colour system menu allows you to decide the correct choice of transmission standard Volume correction allows you to adjust the volume level of individual stations This option is used when a decoder is connected via AV2 Set to On if a scrambled signal is to be pro...

Page 19: ...n unwanted programme position Choose the programme position Press the Red button on remote control Press the Red button again to confirm TUNING MENU PROGRAMME EDIT Tuning menu OK Select Access Exit Return 1 CH41 XYZ Off SC1 2 Off SC1 3 Off SC1 4 Off SC1 5 Off SC1 Prog Chan Name Lock Sys Programme edit OK Change programme Select option Exit Return Prog Chan Name Lock Sys Programme edit Delete Add M...

Page 20: ...irm To tune a programme position Choose the programme position Move to the channel column Increase or decrease channel number or use the C key for Direct Channel Access or use the C and buttons for Direct Channel Access in hyperband see page 8 TUNING MENU PROGRAMME EDIT Prog Chan Name Lock Sys Programme edit Add Cancel Prog Chan Name Lock Sys Programme edit Confirm Cancel 1 CH41 XYZ Off SC1 2 Off ...

Page 21: ... programme position Choose the programme position Move to the Sys column Choose the required sound system SC1 PAL B G SECAM B G SC2 PAL I SC3 PAL D K SECAM D K F SECAM L L TUNING MENU PROGRAMME EDIT Prog Chan Name Lock Sys Programme edit 1 CH41 XYZ Off SC1 2 Off SC1 3 Off SC1 4 Off SC1 5 Off SC1 OK Change character Select option Exit Return 1 CH41 XYZ Off SC1 2 Off SC1 3 Off SC1 4 Off SC1 5 Off SC...

Page 22: ... the screen the television is unable to send the programme information to the VCR DVD R See the VCR DVD R handbook for further information The programme table allows you easy to select tuned programme positions Press STATUS button Use colour buttons to select desirable programme table You can scroll within the programme tables by using red and green buttons Select the chosen programme position by ...

Page 23: ...le VCR DVD R is connected via the AV1 or AV2 socket programme data will be sent to the VCR DVD R via Q Link see page 27 Once this operation is completed the TV will display programme position 1 TUNING MENU AUTO SETUP ATP WARNING All current tuning data will be erased OK Start Auto Setup Exit Return Country Deutschland Österreich France Italia España Portugal Nederland Danmark Sverige Norge Suomi B...

Page 24: ...Move to Manual tuning Access Manual tuning Select the programme position to be tuned Start tuning When the desired programme is found press OK button to store Press the TV AV button to exit TUNING MENU MANUAL TUNING Tuning menu Programme edit Auto setup Manual tuning Access Fine tuning Colour system Auto Volume correc Decoder AV2 Off OK Select Access Exit Return CH41 02 78 01 41 Manual tuning OK P...

Page 25: ...Change TV system Press the or button to change programme position start search or alter TV system When the desired station is found press STR to store the changes Repeat above procedure to tune additional programmes or press the F button to exit TUNING MENU MANUAL TUNING Search TV AV Move cursor STR To store F To exit 02 78 01 41 Manual tuning Front panel STR F V TV AV 1 CH41 SC1 Tuning mode F No ...

Page 26: ...g menu OSD language Access Geomagnetic OK Select Access Exit Return OK Select language Select language Exit Return 26 When you first installed the TV the On Screen Display language was set according to your choice of country If you wish to use a different language then it can be chosen from the OSD language menu Open the Main menu Move to Setup menu Access Setup menu Move to the OSD language menu ...

Page 27: ... the VCR DVD R is off it will automatically switch on when you press the DIRECT TV REC button A message sent from the VCR DVD R will appear on screen showing what is being recorded or if it is not possible to record DOWNLOAD IN PROGRESS Recording TV source Recording stopped TV source changed No recording Check tape or disc VCR DVD R is recording the programme signal from its own tuner If you wish ...

Page 28: ...d select the AV1 or AV2 input so you can view the tape D If you switch off the television whilst the VCR DVD R is in Stop Fast Forward or Rewind modes the VCR DVD R will switch off automatically To turn off Q Link communication If you do not wish to use the Q Link feature go to the Setup menu and set the Q Link option to Off See page 16 Important Note Not all VCRs DVD R support this type of data c...

Page 29: ...ode press to view the picture rapidly forward DVD Press once to skip to the next track In play mode press and hold to view the picture rapidly forward Skip Fast Forward Cue VCR Press to rewind the tape In Play mode press to view the picture rapidly in reverse DVD Press once to skip to the previous track In play mode press and hold to view the picture rapidly in reverse Skip Rewind Review Press in ...

Page 30: ... four coloured buttons Red Green Yellow and Blue to select the following information D To move between subject blocks SPORT for example use the Blue button Within this SPORT topic it is possible to select different groups such as Tennis Football Baseball etc by using the Yellow button When the last group within the block is reached the yellow button moves to the next block D The Green button will ...

Page 31: ...ed on screen Press the Yellow button to display the News Flash Press TV TEXT to return to normal TV operation Update Press MENU Yellow to see the update of information on certain pages When an update is received the page number will be displayed at the top left of the screen Press the Yellow button to view the page Press TV TEXT to return to normal TV operation Update Display Hold To hold the Tele...

Page 32: ...be displayed at the top right of the screen Enter desired sub page number before the T disappears To select page 6 enter 0 0 0 and 6 Press the Yellow button to view a normal TV programme Press MENU Yellow in LIST mode When the page is available press the Yellow button to view the page To clear the page perform one of the following D Press MENU D Select a new page number D Press TV TEXT to return t...

Page 33: ...be displayed in the left top corner of the screen and the signal from the AV equipment for the RGB signal the EC RGB willbe displayed The picture received will remain the same when the TV programme is changed D You may switch back to the television by pressing button TV AV or by disconnecting the AV device D You can also select an AV source using the TV AV button on the control panel on the front ...

Page 34: ...from L R AUDIO OUT Sockets 2 x RCA Audio Cables SCART Cable SCART Cable VCR Q LINK COMPATIBLE VCR SATELLITE RECEIVER CAMCORDER GAMES CONSOLE COMPUTER RGB SATELLITE RECEIVER DVD PLAYER DVD R S VIDEO CAMCORDER Notes D Additional equipment and cables shown are not supplied with this TV set D Do not connect a computer with TTL output 5V to this set AUDIO VIDEO CONNECTIONS ...

Page 35: ...nk data Status CVBS Audio in L Audio earth Audio in R Earth AV2 Pins 15 and 20 are dependent on AV2 S VHS VIDEO switching S Video 4 pin socket Luminance earth Luminance in Chrominance in Chrominance earth AV1 21 pin SCART terminal Suitable inputs for AV1 include RGB Red Green Blue Socket Earth CVBS out video CVBS earth Red in Red earth Green in Green earth Blue in Blue earth Audio out L Audio out ...

Page 36: ...plugged into A C outlet Not switched on Picture Sound controls set at minimum levels Check if in standby mode No Colour Normal Sound Colour controls set at minimum levels Poor or Distorted Picture Weak or No Sound Retune Channel s Coloured Patches Normal Sound Magnetic Interference from unshielded equipment Receiver moved while switched ON switch TV off for 30 minutes If picture is also tilted use...

Page 37: ...1 S10 M1 M10 CATV S11 S20 U1 U10 CATV S21 S41 Hyperband PAL D K SECAM D K Receiving Systems Band name PAL D K SECAM D K VHF R1 R2 VHF R3 R5 VHF R6 R12 UHF E21 E69 PAL 525 60 Playback of NTSC tape from some PAL video recorders VCR DVD R M NTSC AV input only Playback from NTSC 4 43 MHz devices NTSC AV input only Playback from NTSC devices Number of programme positions 99 VCR Teletext Pages 10 Aerial...

Page 38: ...38 ...

Page 39: ...39 ...

Page 40: ...40 2004CS ...

Reviews: