background image

37

Special Features

Digital Still Camera

Displayed Directory/Image
Number

Before you begin...

• Connect Camcorder to power source.
• Insert the CompactFlash Card (page 34).
• Set POWER to PHOTO.

1

Repeat steps 1 and 2 on page 36 to
display Multi Image Playback screen.
Select any image and press PLAY.

2

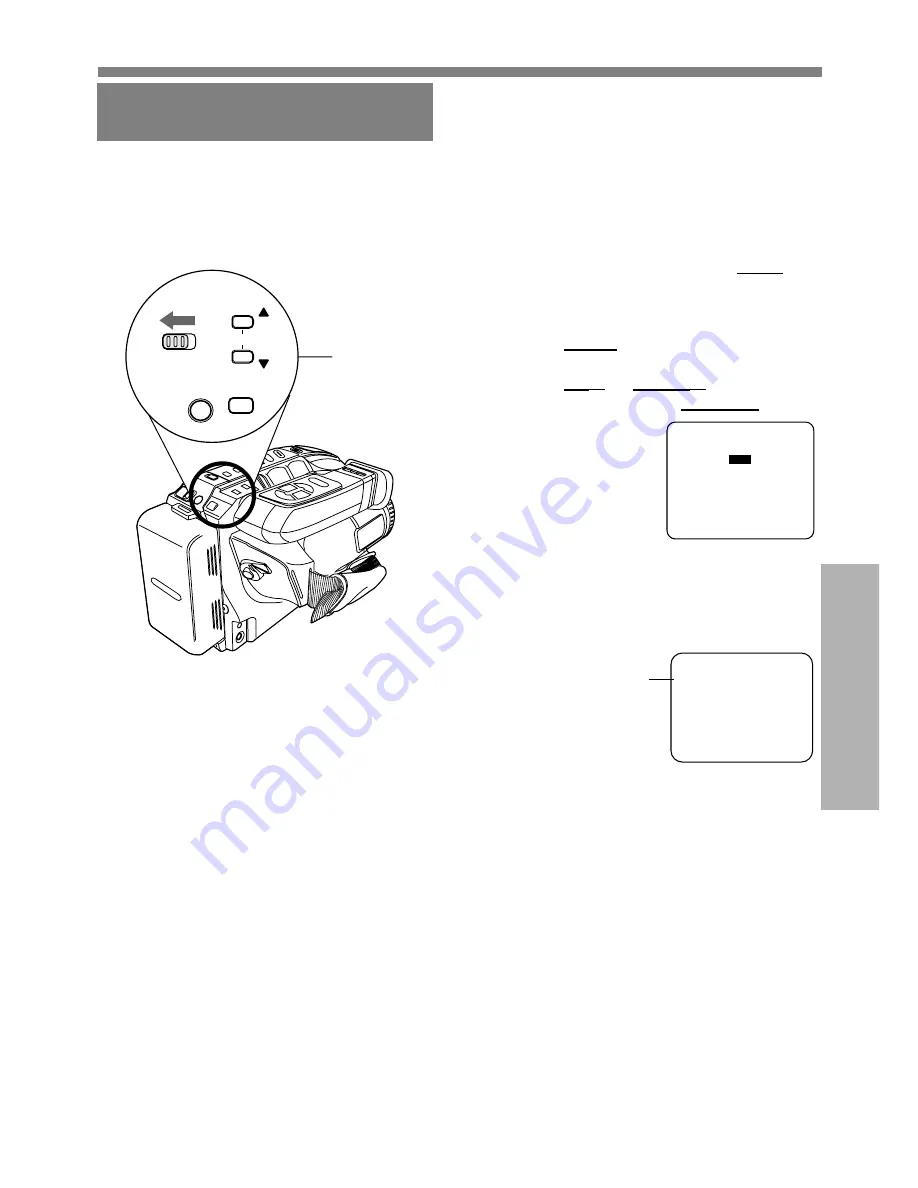
Press MENU for DCF NUMBER
DISPLAY menu.
Press UP

 or DOWN

 to select ON

or OFF. Then, press DISPLAY to set.

ON  

Directory/Image Number is
displayed.

OFF

Directory/Image Number is not
displayed.

SELECT :  PUSH  

SELECT :  PUSH  

/

 KEY

 KEY

SET        :  PUSH  DISPLAY  KEY

SET        :  PUSH  DISPLAY  KEY

ON

ON

- -  DCF NUMBER DISPLAY  - -

- -  DCF NUMBER DISPLAY  - -

OFF

OFF

Note:
• Directory/Image Number “xxx-xxxx”

(x indicates the number) is assigned
automatically.

• Even if ON is set, if the Directory/Image

Number does not correspond with DCF it
is not displayed.

• The Directory/Image Number becomes the

folder and file name when viewed with
card reader.

SELECT :  PUSH  -/+ KEY

SELECT :  PUSH  -/+ KEY
MULTI    :  PUSH  STOP  KEY

MULTI    :  PUSH  STOP  KEY

060  FINE                       PHOTO

060  FINE                       PHOTO
000-0000

000-0000

Directory/Image
Number

1,2

MENU

REC

REC

PLAY


PHOTO

PHOTO

DISPLAY

UP

UP

DOWN

DOWN

FOCUS

FAR

NEAR

Summary of Contents for PV-L751

Page 1: ...nstructions Please read these instructions carefully before attempting to operate this product Please save this manual Gu a para r pida consulta en espa ol est incluida Model No LSQT0359A For assistan...

Page 2: ...HS PlayPak PV P1 VYMW0009 and one AA battery page 21 1 pc CR2025 Clock Battery VSBW0004 installed in Camcorder page 51 1 pc Shoulder Strap VYCW0225 page 50 1 pc Audio Video Cable LSJA0283 pages 21 22...

Page 3: ...SERVICE PERSONNEL This device complies with Part 15 of the FCC Rules Operation is subject to the following two conditions 1 This device may not cause harmful interference and 2 this device must accept...

Page 4: ...er source indicated on the marking label If you are not sure of the type of power supply to your home consult your appliance dealer or local power company For video units intended to be operated from...

Page 5: ...utside antenna system should not be located in the vicinity of overhead power lines or other electric light or power circuits or where it can fall into such power lines or circuits When installing an...

Page 6: ...ng Time 13 14 Built in Auto Light Using the Light Replacing the Bulb 15 Camera Recording Basic Stand by Programmed Recording 16 18 8 Function Remote Control 19 Playing Back Recordings Basic Playback V...

Page 7: ...ource Self Demo mode is on when the screen below appears To turn it off follow steps 1 4 below 1 Set POWER to CAMERA 2 Press MENU for MENU mode Press UP or DOWN to select SELF DEMO 3 Press DISPLAY to...

Page 8: ...Slide TAPE EJECT to open door 3Insert cassette page 11 4Press here to close door 1Press LCD OPEN to unlock the LCD monitor Swing it fully open and adjust the angle see above 2Set POWER to VCR Charging...

Page 9: ...nt charge discard Battery properly page 10 Charge Battery Pack fully before use POWER Lamp CHARGE Lamp 1 Plug in AC Adaptor POWER Lamp lights 2 Insert Battery A Align left side of Battery with left ed...

Page 10: ...te While the DC Power Cable supplied is connected to the AC Adaptor the Battery cannot be charged When not in use unplug AC Adaptor from AC outlet Adaptor uses 1 2 W of electricity while plugged in 1...

Page 11: ...asing break off tab with screwdriver Or slide tab open 2 To record again cover hole with adhesive tape Or slide tab closed Protects tapes from being accidentally erased Erase Protection Tab Cassette I...

Page 12: ...AGE 1 2 1 2 1 2 3 4 5 6 7 8 9 DISPLAY ON SELF DEMO OFF SECURITY OFF VIDEO EFFECTS FADE BLACK SELECT PUSH PUSH KEY KEY SET SET PUSH PUSH DI DISPLAY KEY SPLAY KEY END END PUSH MENU KEY PUSH MENU KEY PAG...

Page 13: ...ON 1 Press MENU for MENU mode Press UP or DOWN to select CLOCK SET 2 Press DISPLAY for CLOCK SET menu Press UP or DOWN to select TIME ZONE DST or DATE TIME 3 Press DISPLAY for menu of item selected i...

Page 14: ...onfirm entry DST AUTO Press or hold down UP or DOWN to select hour then press DISPLAY to fix Repeat for minute month day and year Clock starts when year is entered and DISPLAY is pressed EXAMPLE DISPL...

Page 15: ...LIGHT OFF AUTO ON 12 00 00AM JAN 1 2001 SP REC 1x Replacing the Bulb Note Handle bulb gently Excessive force may cause bulb to crack 1 Press in on both sides of lens cover and pull straight out and o...

Page 16: ...your eyesight 4 Hold down TAPE SPEED for about 1 second to change tape speed to SP SLP page 11 5 Press RECORD PAUSE to start or pause recording 6 Set POWER to OFF when finished To remove the cassette...

Page 17: ...Stand by mode to conserve battery When set to ON Stand by Quick Release lets you resume recording by pressing RECORD PAUSE two times Stand by Quick Release is set to OFF at the factory a Press RECORD...

Page 18: ...01 STAND BY Set a recording start and stop time Or set a 5 or 10 second interval recording to be done each minute 1 Record 5 seconds each minute 2 Record 10 seconds each minute START START 10 20PM 10...

Page 19: ...corder will shut off to conserve battery power If recording is resumed within 30 minutes press REC PAUSE once If over 30 minutes set POWER to OFF then CAMERA then press REC PAUSE Remote Control Operat...

Page 20: ...ot in use When earphone M3 type not supplied is connected to PHONE jack speaker is muted 1 1 Press LCD OPEN and swing LCD monitor fully open If you want to playback on EVF close and lock LCD monitor 2...

Page 21: ...ck or recordings in progress Before you begin Connect Camcorder to power source Make all TV Camcorder connections To Video In To Audio In Audio Video Cable Supplied T V TV Playback or Viewing Remove B...

Page 22: ...E on VCR 4 Press STILL on Camcorder and STILL PAUSE on VCR to start copying 5 Press STOP on both units to stop copying Note Camcorder will only playback tapes recorded in SP or SLP mode Dubbing may re...

Page 23: ...ranging from slow 16 seconds to fast 2 seconds 2X 8X Use when subject is darker than surroundings in shadowed area or in front of the light source Backlight Before you begin Connect Camcorder to power...

Page 24: ...to maximum zoom in 3Press UP FAR or DOWN NEAR until subject is in focus Back away from subject if necessary 4Hold down W wide angle on POWER ZOOM as desired Refocus as needed when aiming at new scenes...

Page 25: ...is auto adjusted from 1 60 to 1 350 according to subject brightness AUTO mode is selected each time POWER is set to CAMERA The faster the shutter speed the more light is needed for proper picture and...

Page 26: ...ORD PAUSE Recording starts as picture and sound gradually fade in Fade Out While recording press FADE so FADE flashes in EVF or LCD monitor Press RECORD PAUSE Picture and sound gradually fade out and...

Page 27: ...of each color is displayed as it is selected 6 Press DISPLAY to confirm entry Press MENU twice to exit 7 Press FADE for about 2 seconds to fade out during recording selected fade type flashes Press FA...

Page 28: ...xit 6 Start recording page 16 To cancel Digital Filter set POWER to OFF Color Digital Filter Digital Filter adds one of 5 colors to entire picture like a color filter SELECT PUSH SELECT PUSH KEY KEY S...

Page 29: ...enlarged and shutter speed auto adjusts from 1 80 to 1 350 according to brightness Use High Speed Shutter page 25 if needed Shutter speed setting remains after EIS is canceled 3 Press EIS again to can...

Page 30: ...AL WIPE mode and the STILL STROBE WIDE feature is not available Wide screen recordings must be played back on a wide screen TV 16 9 aspect ratio or picture will be distorted If title is added pages 32...

Page 31: ...o select SECURITY 3 Press DISPLAY to select ON 4 Press MENU for Motion Security stand by mode If cassette is not inserted will flash Recording will start about 3 seconds after motion is detected Date...

Page 32: ...Once removed title will not be auto displayed To redisplay or select from other titles use Manual Title see below Before you begin Connect Camcorder to power source Insert cassette with record tab pa...

Page 33: ...KEY MENU MENU PAGE PAGE 1 2 1 2 PROGRAMMED REC PROGRAMMED REC T I T I TLE TLE AUTO MANUAL AUTO MANUAL SHUTTER SHUTTER AUTO AUTO STAND BY RELEASE OFF STAND BY RELEASE OFF CLOCK SET CLOCK SET APress ME...

Page 34: ...downward If CF CARD ERROR appears on screen see page 56 2 3 Concerning the CompactFlash Card Except for some special features this card is compatible with other Panasonic brand products like Digital C...

Page 35: ...to PHOTO Built in Lens Cover opens and Power Lamp lights Be sure POWER is fully rotated to PHOTO position 3 Slide PHOTO MODE to REC 4 Press MENU for REC Mode Press UP or DOWN to select NORMAL or FINE...

Page 36: ...NORMAL mode green FINE mode white 3 Press FF next Press REW previous The selected image will be underlined in green Continue pressing FF or REW for next or previous page 4 Press PLAY to display image...

Page 37: ...Image Number is not displayed SELECT PUSH SELECT PUSH KEY KEY SET PUSH DISPLAY KEY SET PUSH DISPLAY KEY ON ON DCF NUMBER DISPLAY DCF NUMBER DISPLAY OFF OFF Note Directory Image Number xxx xxxx x indic...

Page 38: ...eted page numbers adjust automatically YES PUSH DEL KEY YES PUSH DEL KEY CANCEL PUSH STOP KEY CANCEL PUSH STOP KEY 1 2 3 4 5 6 DELETE PAGES ARE YOU SURE WARNING Do not under any circumstances remove t...

Page 39: ...an be recorded along with the current picture To exit from the Picture in Picture Wipe title mode press MODE page 40 1 P P SP P20 Moving Picture Still image Note If CompactFlash Card is not inserted N...

Page 40: ...CARD appears on screen Set Power to OFF then insert the CompactFlash Card Pictures captured with other brand products cannot be used with this Camcorder If INCOMPATIBLE IMAGE appears on screen the siz...

Page 41: ...n insert any one of the 12 included pre recorded titles into your current video recording by following the steps outlined below Before you begin Connect Camcorder to power source Insert the CompactFla...

Page 42: ...r PC Connector cable supplied Connect Camcorder PC jack to the serial port on your PC Personal Computer using the supplied PC connector cable Refer to PC or Windows manual to identify which COM port t...

Page 43: ...eview then Click on Capture Repeat this step to decide on an image Captured image is transferred to your PC when you click on Capture 4 Click on Window then select Live photo Zoom In 5 Click on File t...

Page 44: ...t to camera then select Fine or Normal mode Your PC image data is transferred to the Camcorder PC Connection Using CF Card Image Data Pictures captured with your Camcorder can be transferred to your P...

Page 45: ...from the CF Card memory Communication To specify the port to which the Camcorder is connected Print To print the currently active image Exit To quit the Digital PhotoShot application 2 Image Image Adj...

Page 46: ...Adaptor so that the arrow side points toward the PCMCIA type II slot of your PC Personal Computer Securely insert the PCMCIA Adaptor as far as it will go Depending on the PC it may be necessary to tu...

Page 47: ...PUSH DI DISPLAY KEY SPLAY KEY END END PUSH MENU KEY PUSH MENU KEY MENU CLOCK SET DISPLAY ON SELECT PUSH KEY SET PUSH DISPLAY KEY END PUSH MENU KEY PAGE PAGE 2 2 2 2 DI DISPLAY SPLAY ON ON SELF DEMO SE...

Page 48: ...inue 5 TAPE SPEED pages 11 16 SP standard play SLP super long play 6 Digital E I S page 29 7 Digital Zoom page 29 8 Digital Wipe pages 39 40 9 Still Strobe page 30 10 VCR MODE VCR MODE appears 1 minut...

Page 49: ...PROCESSING is displayed COMPLETED Image processing is completed The next image may be captured when COMPLETED disappears PLEASE WAIT Displayed when image is selected from Multi Image Playback screen...

Page 50: ...er Strap Adjust the Length of the Shoulder Strap Pull a loop of strap from buckle then pull strap tight to shorten or lengthen Adjust Hand Strap length to fit your hand as shown OR 2Thread strap ends...

Page 51: ...pressed Battery life is approximately 5 years WARNING Replace battery with Panasonic PART NO VSBW0004 CR2025 only Use of another battery may present a risk of fire or explosion Caution Battery may ex...

Page 52: ...mium Battery AC Adaptor with Call For DC Power Cable Pricing PV A19 Charging of the Nickel Cadmium Battery or Nickel Metal Hydride Battery Up to 6 hr Battery Pack 119 95 HHR V60A 1B Rechargeable Nicke...

Page 53: ...mer Signature Make Check or Money Order to MATSUSHITA ACCESSORIES Please do not send cash 2 Items Ordered Quantity Accessory Price Each Description Total Price 6 95 Subtotal Your State Local Sales Tax...

Page 54: ...ength 3 8 mm 98 8 mm 4 speed power zoom function Viewfinder 14 mm 0 55 inch Liquid Crystal Color Electronic Viewfinder LCD Monitor 101 6 mm 4 0 inch Liquid Crystal Display Memory 8 MB CompactFlash Car...

Page 55: ...s normally not needed playing old or damaged tapes may clog the heads When playback picture resembles example at the left head cleaning is required Ideally head cleaning should be performed by a quali...

Page 56: ...eed your repair please provide an explanation of what is wrong with the unit and any symptom it is exhibiting Request for Service Notice Before Requesting Service Self Diagnostic System If any of the...

Page 57: ...teration modification faulty installation set up adjustments improper antenna inadequate signal pickup maladjustment of consumer controls improper operation power line surge improper voltage supply li...

Page 58: ...e G Westwood MA 02090 MICHIGAN 37048 Van Dyke Avenue Sterling Heights MI 48312 MINNESOTA 7850 12th Avenue South Airport Business Center Bloomington MN 55425 OHIO 2236 Waycross Road Civic Center Plaza...

Page 59: ...USE otra vez para hacer una pausa en la grabaci n Reproduzca usando el monitor LCD Cuando el monitor LCD est completamente abierto el visor se desconecta autom ticamente 3Presione REWIND SEARCH para r...

Page 60: ...20 47 Display off Mode 47 E EIS Button 29 External MIC IN 50 F Fade 26 27 FADE Button 26 27 FAST FORWARD SEARCH Button 20 Focus 24 H Hand Strap 50 High Speed Shutter 25 L LCD Monitor 16 20 35 36 LCD O...

Reviews: