background image

16

For assistance, please call : 1-800-211-PANA(7262) or, contact us via the web at: http://www.panasonic.com/contactinfo

Before Use

While the Camcorder is accessing the Card (reading, 
recording, playback or erasing), the Card Access 
Lamp lights up.
•  While the Card Access Lamp is on, 

never

 attempt 

to open the Card Slot Cover, to pull out the Card, 
to turn off the Camcorder, or to turn the Mode Dial. 
Such actions will damage the Card, and recorded 
data, and cause the Camcorder to malfunction.

Card Access Lamp 

12

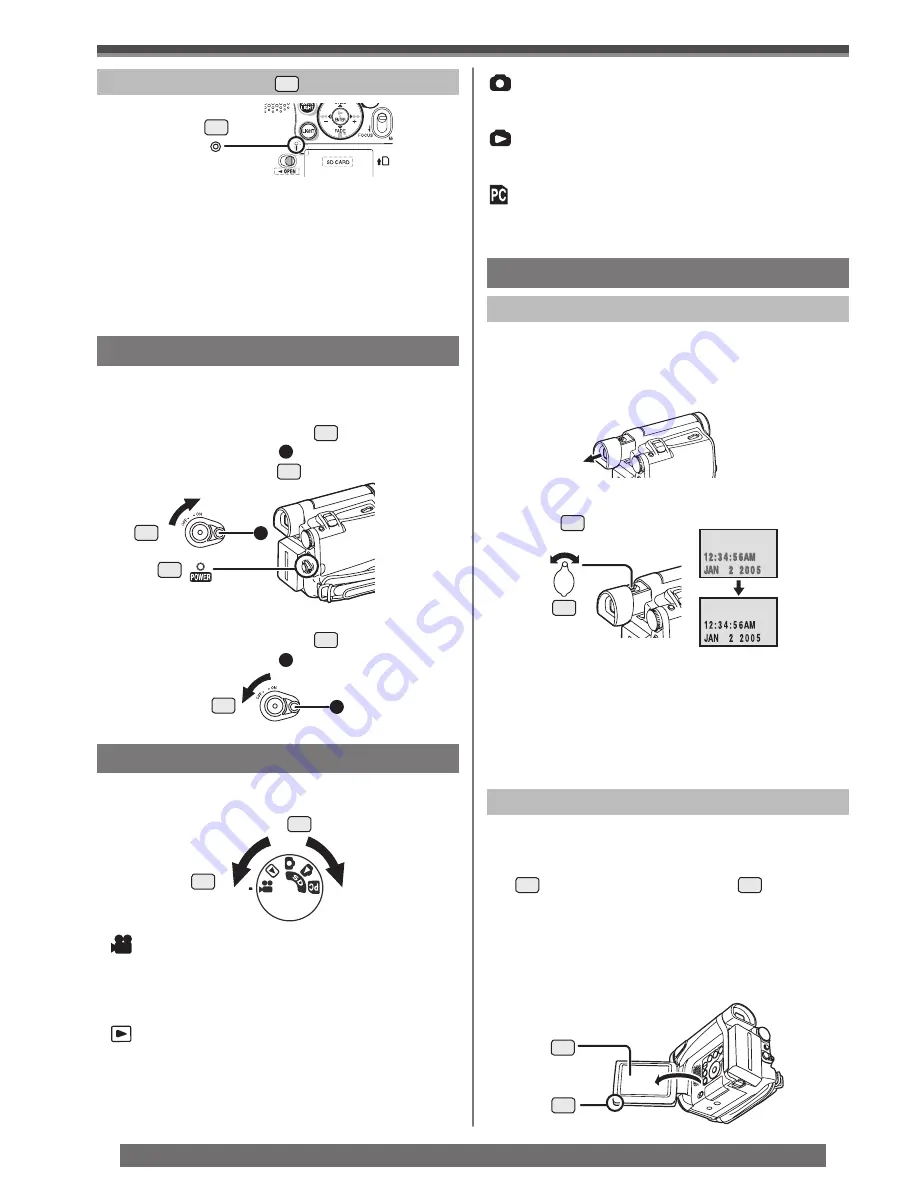
Turning on the Camcorder

Turn on the power first and then select modes.

„

 How to Turn on the Power

1

  Set the [OFF/ON] Switch 

42

 to [ON] while 

pressing the button 

1

.

•  The [POWER] Lamp 

39

 lights up.

„

 How to Turn off the Power

2

  Set the [OFF/ON] Switch 

42

 to [OFF] while 

pressing the button 

1

.

Easy to Use Mode Dial

You can choose a desired mode by rotating the Mode 
Dial.

1

  Rotate the Mode Dial 

38

.

42

39

42

38

12

Using the  Viewfinder/ LCD Monitor

Before using the Viewfinder, adjust the field of view so 
that the displays inside the Viewfinder become clear 
and easy to read.

1

  Pull the View

fi

 nder.

2

  Adjust by turning the Eyepiece Corrector 

Knob 

34

.

„

 To Use the Viewfinder at the Same Time 

as the LCD Monitor

Set [LCD/EVF] >> [EVF ON/AUTO] >> [ON].
•  The Viewfinder does not turn off even if the LCD 

Monitor is opened.

•  When you turn the Camcorder off, this setting is 

canceled.

With the LCD Monitor open, you can also record the 
picture while watching it.

1

  Place your Thumb on the [OPEN

] Knob 

1

 and pull the LCD Monitor 

2

 out in the 

direction of the arrow.

•  The Viewfinder is now deactivated.
•  The LCD Monitor can be opened a maximum 

of 120°. If you open the LCD Monitor by 120°, 
it becomes convenient to operate menus or to 
play back pictures.

34

2

1

 :

Tape Recording Mode

Use this mode when recording pictures on 
a tape. Also, you can record still pictures on 
the card simultaneously while recording on 
a tape.

 :

Tape Playback Mode

Use this mode when playing back the 
recorded scene on a tape.

 :

Card Recording Mode

Use this mode when recording still pictures 
on a card.

 :

Picture Playback Mode

Use this mode when playing back the 
recorded still picture on a card.

 :

PC Mode

Use this mode when you want to connect the 
Camcorder to your Personal Computer.

Using the LCD Monitor

Using the Viewfinder

1

1

Summary of Contents for PV-GS16 - Mini Dv Digital Video Camcorder

Page 1: ...ons thoroughly LSQT0885 A PV GS16 Digital Video Camcorder Operating Instructions Model No Spanish Quick Use Guide is included Gu a para r pida consulta en espa ol est incluida For assistance please ca...

Page 2: ...manual as your convenient Camcorder information source This symbol alerts the user that important literature concerning the operation and maintenance of this unit has been included Therefore it shoul...

Page 3: ...r is encouraged to try to correct the interference by one or more of the following measures Reorient or relocate the receiving antenna Increase the separation between the equipment and receiver Connec...

Page 4: ...power line surges 1 Read Instructions All the safety and operating instructions should be read before the unit is operated 2 Retain Instructions The safety and operating instructions should be retaine...

Page 5: ...r and power supply should not be exposed to rain or moisture Do not connect the power supply or operate your Camcorder if it gets wet Your Camcorder has been designed for outdoor use however it is not...

Page 6: ...s 18 Setting Date and Time 21 Internal Lithium Battery Recharge 21 LP Mode 21 Audio Recording Mode 21 About Recording 22 Recording on a Tape 22 Recording a Still Picture on a Card Photoshot 23 Recordi...

Page 7: ...Audio Dubbing Optional Remote Control Only 41 Copying on a VHS Cassette Dubbing 42 Using the DV Cable for Recording Digital Dubbing 42 PC Connection With DV Interface Cable 43 Using the Software with...

Page 8: ...Cover To protect the tape if the cover is not fully opened the cassette holder cannot be ejected 2 Insert a Cassette 3 Close the Cassette Holder by pressing the PUSH mark 2 4 Close the Cassette Compa...

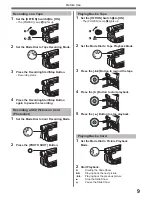
Page 9: ...Set the OFF ON Switch 1 to ON The POWER Lamp 2 lights up 2 Set the Mode Dial to Tape Playback Mode 3 Press the Button to rewind the tape 4 Press the Button to start playback 5 Press the Button to sto...

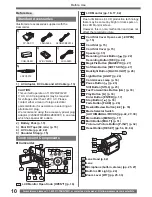
Page 10: ...Cover Open Lever OPEN p 15 4 Card Slot p 15 5 Card Slot Cover p 15 6 Speaker p 33 7 Recording Check Button p 22 Recording Button REC p 42 8 MagicPix Button MAGICPIX p 27 9 Soft Skin Button SOFT SKIN...

Page 11: ...y bright or dark spots on the Viewfinder screen However this is not a malfunction and does not affect the recorded picture 43 Shoulder Strap Holders p 15 44 Grip Belt p 14 45 Battery Holder 46 Battery...

Page 12: ...MENU p 17 63 64 65 66 67 68 69 70 71 72 73 The Remote Control Optional 1 While pressing the Lock Button 1 pull out the Battery Holder 2 Insert a button type battery with the marking facing upward 3 I...

Page 13: ...te Control 15 15 15 15 1 2 31 Power Supply Using the AC Adaptor 1 Connect the DC Cable to the Camcorder 2 Connect the DC Cable to the AC Adaptor 3 Connect the AC Cable to the AC Adaptor and the AC Jac...

Page 14: ...imes shown in the table are for continuous recording at a temperature of 68 F 25 C and humidity of 60 If the Battery is charged at a higher or lower temperature the charging time may be longer The ava...

Page 15: ...For other notes concerning this item see page 55 1 When you remove the Lens Cap press the knobs firmly Using a Memory Card Optional A Card can be used to record still pictures Use a genuine SD Memory...

Page 16: ...er become clear and easy to read 1 Pull the Viewfinder 2 Adjust by turning the Eyepiece Corrector Knob 34 To Use the Viewfinder at the Same Time as the LCD Monitor Set LCD EVF EVF ON AUTO ON The Viewf...

Page 17: ...function or setup this Camcorder displays various function setups on Menus When operating the menu with the Viewfinder set LCD EVF EVF ON AUTO ON or rotate the LCD Monitor by 180 1 Press the MENU But...

Page 18: ...ion purposes only and they are different from the actual Menus TAPE RECORDING MENU Tape Recording Menu 1 Press the Button and select a file The selected file is marked by a frame File Selection in the...

Page 19: ...utomatically set to Demonstration Mode for introducing its functions If any button is pressed or operated the Demonstration Mode is canceled The Demonstration Mode can be started by setting DEMO MODE...

Page 20: ...N AUTO Using the Viewfinder p 16 INITIAL Initial Setup Sub Menu AV JACK AV Jack pp 11 59 REMOTE Remote Control Mode p 13 BEEP SOUND Beep Sound p 55 CLOCK SET Date and Time Setting p 21 INITIAL SET Ini...

Page 21: ...s selected the recording time becomes 1 5 times longer than that of SP Mode Although the image quality does not decrease with the LP Mode recording mosaic pattern noise may appear on a playback image...

Page 22: ...er with a USB Cable Standby mode is not available Recording on a Tape 1 Set the OFF ON Switch 42 to ON The POWER Lamp 39 lights up 2 Set the Mode Dial 38 to Tape Recording Mode 4 Press the Recording S...

Page 23: ...ubject being photographed RapidFire Consecutive Photoshot The Indication appears 19 14 15 13 16 17 When the STILL Button 13 is pressed images become still pictures When the button is pressed again the...

Page 24: ...1 3 seconds For other notes concerning this item see page 56 Self timer Recording When you set the self timer the recording starts automatically after 10 seconds on the Card 1 Set TAPE RECORDING MENU...

Page 25: ...ZOOM 50 or 800 50 Digital zooming to 50 800 Digital zooming to 800 19 14 15 13 16 17 2 Push the W T Lever 26 towards W or towards T to zoom in or out To Cancel the Digital Zoom Function Set TAPE RECO...

Page 26: ...1 Press the BACK LIGHT Button 10 The Indication flashes and then is displayed The entire screen becomes brighter To Resume Normal Recording Press the BACK LIGHT Button For other notes concerning this...

Page 27: ...e Soft Skin Mode Press the SOFT SKIN Button 9 The MAGICPIX Indication appears Wind Noise Reduction Function This function reduces the sound of wind hitting the microphone when recording 1 Set TAPE REC...

Page 28: ...White Balance Adjustment range use the Manual White Balance Adjustment Mode 1 Set the AUTO MANUAL FOCUS Switch 18 to MANUAL 18 1 Set the AUTO MANUAL FOCUS Switch 18 to MANUAL Depending on the scene o...

Page 29: ...on this Camcorder 2 Blue sky 3 Cloudy sky rain 4 TV screen 5 Sunlight 6 White fluorescent lamp 7 Halogen light bulb 8 Incandescent light bulb 9 Sunrise or sunset 10 Candlelight The White Balance Sens...

Page 30: ...STROBE 6 TRAIL 7 MOSAIC 8 MIRROR If you keep pressing the Button 14 or Button 17 the speed of adjusting becomes faster 9 STRETCH 10 SLIM Manual Iris Adjustment F Number You can use this function when...

Page 31: ...To Cancel the Digital Effect Set TAPE RECORDING MENU DIGITAL EFFECT1 or EFFECT2 OFF For other notes concerning this item see page 57 Multi Picture Mode Manual Multi Picture Mode You can manually capt...

Page 32: ...the Recording Start Stop Button 41 to restart the recording The last image of the previous scene gradually changes to the new scene For other notes concerning this item see page 57 19 14 15 13 16 17 4...

Page 33: ...me The VOLUME indication disappears immediately after adjustment is made The sound volume cannot be adjusted using the Remote Control in Playback Zoom Mode pp 35 36 Finding a Scene You Want to Play Ba...

Page 34: ...nce Playback This Camcorder is capable of still picture playback and frame advance playback 1 Press the Button 70 2 Press the Button 67 The playback image stops in the Still Playback Mode 3 Press the...

Page 35: ...A part of the image can be enlarged up to 10 times during playback 1 During playback press the P B ZOOM Button 72 on the Remote Control The center of the image is enlarged by approximately 2 times 19...

Page 36: ...EFFECT SEL Sub Menu on the TAPE PLAYBACK MENU To suspend Playback Digital Effect Temporarily Press the OFF ON Button 59 to suspend or restart the digital effect When the digital effect is paused tempo...

Page 37: ...ures in the Card can be played back like a Slide Show 1 Set the Mode Dial 38 to Picture Playback Mode 1 2 3 38 20 1 2 3 14 15 13 16 17 20 38 The selected file is marked with a frame 2 Press the Button...

Page 38: ...ack Mode 13 2 Set CARD CREATE TITLE YES 3 Press the PHOTO SHOT Button 35 4 Select LUMINANCE and press the ENTER Button 15 then press the Button 14 or Button 17 to adjust the title contrast and press t...

Page 39: ...ndication 1 appears Repeat this procedure to lock 2 or more files Press the ENTER Button 15 again to cancel The SD Memory Card has a write protection switch p 59 For other notes concerning this item s...

Page 40: ...able pictures are stored on your PC before proceeding A Card formatted on other equipment e g PC might be unusable or it might take more time for recording We recommend that you use this equipment to...

Page 41: ...l Audio Dubbing Press the Button 67 on the Remote Control The Camcorder is in the Still Playback Mode again To Play Back the Sound Recorded by 12bit Audio Dubbing Set TAPE PLAYBACK MENU PLAYBACK 12bit...

Page 42: ...s the Button to stop playback To Dub Audio While Listening to a Pre recorded Sound When pausing the audio dubbing set the 12bit AUDIO on the PLAYBACK Sub Menu to ST2 and you can check the pre recorded...

Page 43: ...Our DVC being OHCI compliant should have no problem working with any OHCI compliant Firewire Card video Editing software package Personal Computer must be equipped with an DV Terminal During Camcorde...

Page 44: ...Software Installation For Windows If you have direct dial up connection capability to the Internet please down load the USB Driver and Video Stream Driver http www panasonic com consumerdownloads 1 I...

Page 45: ...able you can transfer still images saved on a Memory Card directly to your Personal Computer For Windows 1 Insert the Memory Card into the Camcorder 2 Set the Camcorder to PC Mode 3 Connect the Camcor...

Page 46: ...e cable To disconnect USB cable safely For Windows If USB Cable is disconnected while computer is on error dialog may appear In such case click OK and close the dialog box By following the steps below...

Page 47: ...Edition CPU Intel Pentium ll Celeron 450 MHz or higher Celeron 400 MHz or higher including compatible CPU RAM 128 MB or more 256 MB or more recommended Free hard disk space At least 250 MB or more Po...

Page 48: ...s XP If the Camcorder is used as a Web Camera the quality of the video to be exchanged will depend on the Internet connection status If the USB Cable is disconnected from the personal computer the Web...

Page 49: ...nished close Windows Messenger then turn off the Camcorder Finally disconnect the USB Cable If the Camcorder is used as Web Camera continuously for two hours the communication is automatically shut OF...

Page 50: ...f the OS 1 Select Start Settings Control Panel select the software or the driver from Add Remove Programs to uninstall Uninstalling steps may vary depending on the OS Please refer to the user manual o...

Page 51: ...estart the Windows Messenger or MSN Messenger Do not delete the folders in the memory card such as picture folder Memory card may not be recognized if folders are deleted When the Camcorder is connect...

Page 52: ...tions In the Card Mode the Camcorder automatically saves file numbers IMGA0001 JPG etc along with the images The file numbers are recorded with each image as consecutive numbers When using software wi...

Page 53: ...now Mode Program AE p 28 REC Recording p 22 PAUSE Recording Pause p 22 Self Timer Recording p 24 Playback p 33 Still Playback p 34 Fast forward Cue Playback p 33 Rewind Review Playback p 33 Slow Motio...

Page 54: ...an change the Menu settings back to the shipping condition 1 Set INITIAL INITIAL SET YES The initializing takes a little while After the initializing is completed the COMPLETED Indication appears with...

Page 55: ...r The Video Light brightens images recorded in a dimly lit place however we recommend using it in a bright place in order to obtain high quality images INCORRECT OPERATION The Recording Start Stop But...

Page 56: ...of image may deteriorate White balance cannot be set in the digital zoom range Image Stabilizer Function The Image Stabilizer Function does not operate in a dimly lit place In this case the EIS Indic...

Page 57: ...images will be erased and Wipe and Mix Functions cannot be used Set another Digital Effect item Operate the OFF ON switch or Mode Dial Insert or eject a cassette The Cinema Mode and the Title Creatio...

Page 58: ...back the non recorded portion of tape Playing Back a Card If a blank nothing recorded Card is played the screen becomes white If you attempt to play back a file recorded in a different format or if f...

Page 59: ...are not output from the DV terminal Even if you use a device equipped with DV Terminals you may not be able to perform Digital Dubbing in some cases Date or other information to be displayed cannot b...

Page 60: ...the worst case the Camcorder cannot record at all When you use your Camcorder on a beach or similar place do not let sand or fine dust get into the Camcorder Sand or dust may damage the Camcorder or C...

Page 61: ...ays or humidity may damage the tape Dust contains hard mineral particles and dusty Cassettes damage the heads of the Camcorder and other components Develop a habit of returning the Cassette back to it...

Page 62: ...etic waves or static electricity are easily generated Do not bend or drop the Card The Card or the recorded content may be damaged After use be sure to remove the Card from the Camcorder After usage s...

Page 63: ...it Mode at the time of recording Battery Battery runs down quickly Is the Battery fully charged Charge it with the AC Adaptor p 13 Are you using the Battery in an extremely cold place In cold places t...

Page 64: ...disconnect the USB cable safely double click the icon in the task tray and follow the instructions on the screen p 46 1 2 Using the RESET button 1 Open the LCD Monitor p 16 2 Undo Grip Belt end 1 and...

Page 65: ...omes through the lens decreases considerably the Camcorder cannot focus correctly 4 Recording a subject that is surrounded by objects with glossy surfaces or by highly reflective objects Because the C...

Page 66: ...1 400 lx Minimum Required Illumination 2 lx MagicPix Mode Video Output Level 1 0 Vp p 75 ohm Audio Output Level Line 316 mV 600 ohm USB Card reader writer function USB 2 0 compliant max 12 Mbps No co...

Page 67: ...e Cable i LINK 4 pin to 4 pin 55 00 LSSQ0411 IR Remote Control Call For Pricing RP SDH01GU1A RP SDH512U1A RP SDH256U1A W RP SD128BU1A W RP SD064BPPA W RP SD032BPPA 1 GB SD Memory Card 512 MB SD Memory...

Page 68: ...h Kent WA 98032 4 Shipping information UPS delivery requires complete street address Please photocopy this form when placing an order 2 Items Ordered 1 Camcorder Model Accessory Description Price Each...

Page 69: ...proof of purchase Failure to do so will delay your repair To further speed your repair please provide an explanation of what is wrong with the unit and any symptom it is exhibiting Mail this complete...

Page 70: ...tp www panasonic com For assistance in Puerto Rico call Panasonic Sales Company 787 750 4300 or fax 787 768 2910 In Home service if applicable requires clear complete and easy access to the product by...

Page 71: ...repaid and insured to the Elgin Centralized Factory Servicenter Customer s in Puerto Rico please ship or carry in to location below Service in Puerto Rico Service in Puerto Rico Panasonic Puerto Rico...

Page 72: ...sujeto a las dos siguientes condiciones 1 Este dispositivo puede no causar interferencias perjudiciales y 2 este dispositivo debe aceptar cualquier interferencia recibida incluyendo interferencias que...

Page 73: ...etamente abierta 2 Inserte un cassette 3 Cierre el soporte del cassette presionando la marca PUSH 2 4 Cierre la cubierta del compartimiento del cassette presionando la marca 3 2 1 Inserci n de un cass...

Page 74: ...rabaci n de tarjeta 2 Presione el bot n PHOTO SHOT Grabaci n de una imagen fija en tarjeta Photoshot 1 Ajuste el interruptor OFF ON 1 a ON La l mpara POWER 2 se enciende 2 Gire el dial de modo a Modo...

Page 75: ...Photoshot 23 Picture in Picture Mode 32 Picture Size 37 Playback Digital Effects 36 Playback with Zoom Lever 34 Playback Zoom 35 Portrait Mode 28 Program AE 27 Q Quick Start 24 R RapidFire Consecutiv...

Page 76: ...Electronics Company Division of Panasonic Corporation of North America One Panasonic Way Secaucus New Jersey 07094 Panasonic Sales Company PSC Division of Panasonic Puerto Rico Inc Ave 65 de Infanteri...

Reviews: