background image

16

1

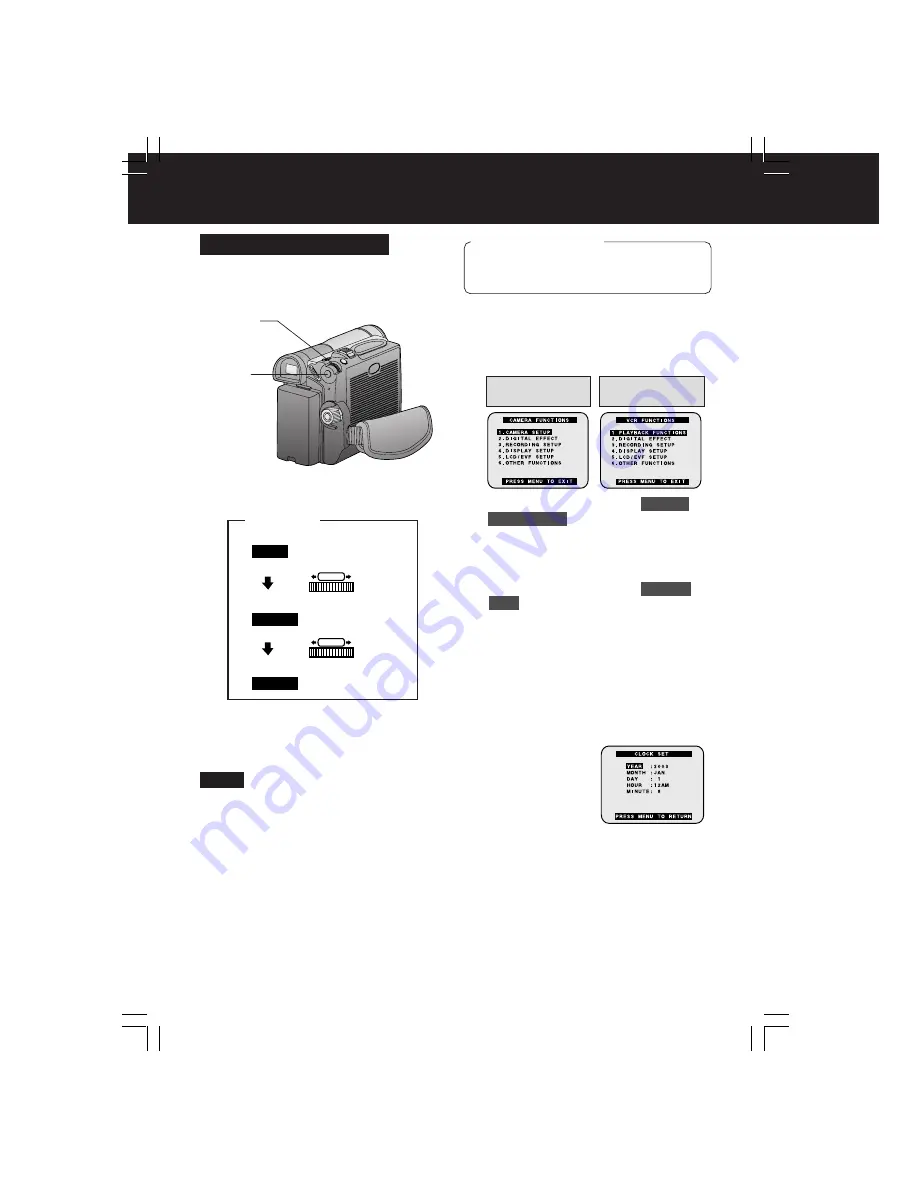
Press MENU

 to display the Camera or

VCR mode menu screen.
(p. 17)

2

Rotate JOG KEY 

to select 

OTHER

 FUNCTIONS 

, and then 

press JOG

KEY

 to display the OTHER

FUNCTIONS menu screen.

3

Rotate JOG KEY 

to select 

CLOCK

 SET 

, and then 

press JOG KEY

 to set

to ON. (Menu OSD: pp. 60, 62.)
• The CLOCK SET menu screen

is displayed.

4

Rotate JOG KEY 

to select YEAR, then

press JOG KEY

 to fix and move to the

next item. Likewise, set the month,
day, hour, and minute.

Setting the Clock

• To make corrections,

Press JOG KEY repeatedly to move back
to an item and correct.

• If “CLOCK BATTERY” indication appears,

please refer to “Replacing Clock Battery”
on page 52.

EXAMPLE:

When CLOCK SET setting is
completed, press MENU twice to start
the clock and exit.

: 2003

YEAR

Push

PUSH

Rotate

PUSH

: JAN

: FEB

MONTH

MONTH

The date and time is calculated, including
leap year, up to DEC 31 2089.

Note

Set the Date and Time

Before you begin

• Connect the Palmcorder to a power

source. (pp. 14, 15)

• Set POWER to CAMERA or VCR.

1

MENU

2, 3, 4

JOG KEY

CAMERA

FUNCTIONS

VCR

FUNCTIONS

DV103-K.p15-17.p65

2003/06/11, 13:18

16

Summary of Contents for PV-DV103-K

Page 1: ...this product please read these instructions thoroughly LSQT0723A Model No PV DV103 K Digital Video Camcorder Operating Instructions Mini R For assistance please call 1 800 561 5505 or visit us at www panasonic ca DV103 K p 1 4 p65 2003 06 11 13 18 1 ...

Page 2: ...nance of this unit has been included Therefore it should be read carefully in order to avoid any problems CAUTION RISK OF ELECTRIC SHOCK DO NOT OPEN CAUTION TO REDUCE THE RISK OF ELECTRIC SHOCK DO NOT REMOVE COVER OR BACK NO USER SERVICEABLE PARTS INSIDE REFER SERVICING TO QUALIFIED SERVICE PERSONNEL The above markings are located on the appliance bottom cover Your Mini Palmcorder is designed to r...

Page 3: ...ents Do not use attachments not recommended by the video product manufacturer as they may be hazardous 7 Water and Moisture Do not use this video unit near water for example near a bath tub wash bowl kitchen sink or laundry tub in a wet basement or near a swimming pool and the like 8 Accessories Do not place this video unit on an unstable cart stand tripod bracket or table The video unit may fall ...

Page 4: ...etc This action could permanently damage the internal parts of your Palmcorder AVOID SUDDEN CHANGES IN TEMPERATURE If the unit is suddenly moved from a cold place to a warm place moisture may form on the tape and inside the unit DO NOT LEAVE YOUR PALMCORDER OR THE POWER SUPPLY TURNED ON WHEN NOT IN USE STORAGE OF YOUR PALMCORDER Store and handle your Palmcorder in a manner that will not subject it...

Page 5: ...e Recording 18 Digital PhotoShot Mode 20 Zoom 21 Special Effect Features 23 Advanced Settings 26 Palmcorder Accessory System 51 Notes On Operations 52 Specifications 54 Before Requesting Service 55 On Screen Displays OSD 57 Warranty 58 MENU OSD 59 Electronic Viewfinder LCD Monitor Indications 63 Index of Controls 66 Index 69 Playback Your Recordings 30 Special Effect Features 32 Digital Features 3...

Page 6: ...C Cable 1 pc Shoulder Strap LSFC0016 1 pc Battery Pack CGR D08 CGR D08R 1 pc Lens Cap LSYF0535 with Lens Cap Strap LSGQ0066 1 pc A V Cable LSJA0280 Microsoft and Windows are registered trademarks of Microsoft in the United States and other countries Intel Pentium is a registered trademark i LINK is a trademark IBM is a registered trademark of IBM Company Unpack your Palmcorder 1 To prevent acciden...

Page 7: ... 3 When inserting the cassette make sure it is facing the right direction and then push it in completely If Hand Strap is tight it may prevent Cassette Holder from fully opening for Cassette insert or eject Loosen Hand Strap if necessary Cassette Compartment Cover 1TAPE EJECT 3PUSH CLOSE Note 1 Undo the two strap ends from their buckles 2 Thread the strap end through the Strap Attachment Rings Til...

Page 8: ...g Light reduces battery time Set LIGHT to OFF when not in use Do not look directly into the light If the LED Light is used with a Conversion Lens attached a slight vignetting darkening around edges effect occurs on the screen Using MagicPix at the same time will make conditions even brighter p 39 Built in LED Light Note Before you begin Connect the Palmcorder to a power source pp 14 15 Set POWER t...

Page 9: ...press the desired buttons Remote Sensor is located under the lens Remote Control Remote Sensor Controlled Functions Rec Pause p 18 Tele Zoom p 21 Wide Zoom p 21 Date Time p 63 Reset p 44 PhotoShot p 20 Display On TV p 37 Counter Time Code p 64 Audio Dubbing p 43 Record p 46 Menu p 17 Play p 30 FF Search p 32 REW Search p 32 Pause Select p 34 Stop Set pp 16 17 30 46 Slow Frame Advance Forward pp 33...

Page 10: ...CTIONS in the CAMERA or VCR mode menu screen then press JOG KEY to display the OTHER FUNCTIONS menu screen 4 Rotate JOG KEY to select REMOTE and then press JOG KEY to select VCR 2 Menu OSD pp 60 62 Leave the other Palmcorder set to VCR1 5 Set the Remote Control to VCR 1 or VCR 2 to correspond with the Palmcorder you wish to control See above left When the Palmcorder and remote are not set to the s...

Page 11: ...rder to a power source pp 14 15 1 Set POWER to CAMERA 2 Press MENU to display the CAMERA FUNCTIONS menu screen 3 Rotate JOG KEY to select OTHER FUNCTIONS and press JOG KEY to display the OTHER FUNCTIONS menu screen 4 Rotate JOG KEY to select DEMO MODE and press JOG KEY to select OFF Press MENU to exit If any button is pressed or operated except PLAY MULTI and ZOOM the Self Demo mode is cancelled T...

Page 12: ... begin Charge the Battery p 14 1 Set POWER to VCR or CAMERA 1 2 These Palmcorders are equipped with the Easy Cassette Eject System so it is easy to insert or remove tapes even when on a tripod p 7 3 Insert a cassette record tab up window side facing out Make sure the record tab is closed p 6 4 Press PUSH CLOSE mark to close the Cassette Compartment Cover DV103 K p12 14 p65 2003 06 11 13 18 12 ...

Page 13: ...EN tab on underside of the LCD monitor to unlock Swing it fully open and adjust the angle To Watch Playback in the LCD Liquid Crystal Display When the LCD monitor is fully open the Viewfinder automatically turns OFF 2 Use OPEN tab on underside of the LCD monitor to unlock Swing it fully open and adjust the angle 3 Press REW to rewind the tape 4 Press PLAY to start playback 5 Press STOP to stop pla...

Page 14: ... Flashing of the CHARGE Lamp Charge the Battery within an ambient temperature range of 10 C 50 F and 30 C 86 F If charging is done in extreme low or high temperatures Battery charge time increases CHARGE Lamp flashes when The Battery is being charged but charging is taking longer than normal Charging is not possible Remove the Battery once wait a short time then re attach it for charging Note 1 In...

Page 15: ... temperatures Battery charge time increases Safety precautions Do not place the Battery near or dispose of in fire Do not directly connect short circuit the positive and negative terminals Never attempt to disassemble or reassemble the Battery To avoid damage to the Battery Do not drop or jar the Battery Use the Battery with specified models only If the Battery is used in extremely high temperatur...

Page 16: ...ur and minute Setting the Clock To make corrections Press JOG KEY repeatedly to move back to an item and correct If CLOCK BATTERY indication appears please refer to Replacing Clock Battery on page 52 EXAMPLE When CLOCK SET setting is completed press MENU twice to start the clock and exit 2003 YEAR Push PUSH Rotate PUSH JAN FEB MONTH MONTH The date and time is calculated including leap year up to D...

Page 17: ... CAMERA or VCR 1 CAMERA SETUP To select PROG AE PROGRESSIVE D ZOOM or CINEMA 2 DIGITAL EFFECT To select EFFECT 3 RECORDING SETUP To select REC SPEED AUDIO REC SCENEINDEX WIND CUT or ZOOM MIC 4 DISPLAY SETUP To select DATE TIME C DISPLAY C RESET or DISPLAY 5 LCD EVF SETUP To select LCD BRIGHTNESS LCD COLOR or EVF BRIGHTNESS 6 OTHER FUNCTIONS To select REMOTE BEEP SOUND SHTR EFFECT CLOCK SET SELF RE...

Page 18: ... EVF To conserve power After 5 minutes the Record Pause mode will automatically change to Standby mode To resume recording set POWER to OFF and then ON again When the Palmcorder is aimed at excessively bright objects or bright lights a vertical bar may appear in the picture This is a normal characteristic of the CCD pick up device Try to avoid this whenever possible Simple Recording Before you beg...

Page 19: ...BRIGHTNESS or COLOR below 3 Start recording Using the LCD monitor will reduce battery operating time Close the LCD monitor completely when not in use Using the LCD Monitor 1OPEN Note 180 90 90 Camera Recording To adjust the LCD EVF BRIGHTNESS or COLOR 1Press MENU to display the main menu screen 2 Rotate JOG KEY to select LCD EVF SETUP from the main menu screen Menu OSD pp 60 62 3 Press JOG KEY to ...

Page 20: ...ng slide show etc p 43 1 Set POWER to CAMERA 2 Press PHOTOSHOT in Record Pause mode PHOTO will appear in the EVF or the LCD monitor If SHTR EFFECT on the OTHER FUNCTIONS menu screen is set to ON a sound effect similar to the shutter of a film camera will be heard when PHOTOSHOT is pressed When PHOTOSHOT is pressed the playback image takes approx 7 seconds to process After that the Camera mode scre...

Page 21: ...unction 1 Set POWER to CAMERA 2 Press MENU to display the CAMERA FUNCTIONS menu screen 3 Rotate JOG KEY to select RECORDING SETUP then press JOG KEY to display the RECORDING SETUP menu screen 4 Rotate JOG KEY to select ZOOM MIC in the RECORDING SETUP menu Menu OSD p 59 5 Press JOG KEY to select ON Press MENU to exit Z MIC will appear on the screen The Zoom Microphone Function may not work effectiv...

Page 22: ...in RECORD mode press STILL to capture a still picture The captured still picture will be recorded together with sound 2Press STILL once again to release the still picture The camera will resume recording real time pictures To record yourself rotate the LCD monitor 180 degrees so it faces the same direction as the lens 1 Set POWER to CAMERA 2 Press MENU to display the CAMERA FUNCTIONS menu screen 3...

Page 23: ... wide screen TV equipped with S Video picture terminal and Zoom Wide features Backlight 2 3BACK LIGHT The Indicator will not appear in the EVF or LCD monitor when OFF is selected in the DISPLAY menu Note Use when recording a subject that is darker than the surrounding scene in a shadowed area or when the light source is behind your subject 3 4 JOG KEY 5REC PAUSE 1POWER EVF LCD 2MENU 1 Set POWER to...

Page 24: ...d out It is not possible to select the SPORTS mode or PORTRAIT mode or Low Light mode together with the GAIN UP mode and MAGIC PIX mode Program AE 3MENU The Auto Exposure feature can be used to make quality recordings in a variety of scene situations Note 1 Set POWER to CAMERA 2 Press AUTO MANUAL so that the MNL indication appears in the EVF or the LCD monitor 3 Press MENU to display the CAMERA FU...

Page 25: ...e picture will gradually fade in Fade Out Use to create a soft ending or together with fade in for a soft transition from one scene to the next ADuring recording hold down FADE until the picture fades out BPress REC PAUSE to pause the recording You can make smooth scene transitions for a more professional look Note Starting the first scene with fade in is very effective DV103 K p23 25 p65 2003 06 ...

Page 26: ...nce setting that was previously set manually For manual White Balance adjustment A Rotate JOG KEY to select B Point the Palmcorder at a white object full screen and hold JOG KEY down until indication stops flashing If indication flashes when the Palmcorder is turned on the previous manual White Balance setting is in effect In the following cases the indication flashes The flashing indicates that t...

Page 27: ... the MF Manual Focus indication appears in the EVF or the LCD monitor 4Press and hold POWER ZOOM T side Telephoto until the lens is at maximum zoom in 5Turn M FOCUS DIAL until the picture is in focus It may be necessary to back away from the subject to focus the image properly 6Press POWER ZOOM to W or T as desired The subject will remain in focus over the entire zooming range It may be necessary ...

Page 28: ...ose one of the following shutter speeds Press AUTO MANUAL to cancel the setting For proper colour reproduction it is recommended that you use this feature outdoors For indoor High Speed Shutter recording additional halogen or tungsten light should be provided Fluorescent light will degrade the picture quality This feature requires ample light More light is required for the fastest shutter speeds T...

Page 29: ...e to which dB is attached indicates a gain value If this value is too large the quality of the image deteriorates Depending on ZOOM magnification the iris value may not be displayed correctly If you are using Program AE mode you cannot adjust the iris If the iris is adjusted manually the above modes will be cancelled Note 3 4 JOG KEY 1POWER Iris Setting WIND CUT You can reduce sound distortion cau...

Page 30: ...onitor to playback your recording Note EARPHONE Jack Before you begin Connect the Palmcorder to a power source pp 14 15 Insert a recorded cassette When a tape recorded in LP mode on another digital video camera is played back on this unit the picture may appear mosaic Using the LCD monitor reduces battery operating time You can place the Palmcorder on a table etc for viewing Rotate the LCD Monitor...

Page 31: ...UNCTIONS then press JOG KEY to display the PLAYBACK FUNCTIONS menu screen 4 Rotate JOG KEY to select BLANK SEARCH in the VCR PLAY MODE menu Menu OSD p 61 5 Press JOG KEY to select ON BLANK will appear on the screen 3 4 5 JOG KEY 1POWER Blank Search You can go directly to a blank portion of tape and start recording exactly where you left off Repeat Playback Adjusting the Volume 2MENU EVF LCD EVF LC...

Page 32: ...or an instant or mosaic This is normal during this mode Note Note 1Press PAUSE during playback 2Press PLAY or PAUSE to release To protect the tape and video heads your Palmcorder s operating modes will revert as follows STILL STOP after 3 minutes AHold down FAST FORWARD SEARCH during fast forward BHold down REWIND SEARCH during rewind The picture will appear for as long as the button is held down ...

Page 33: ... speed Rotate JOG KEY clockwise for forward playback Rotate JOG KEY counter clockwise for reverse playback To return to normal playback Press PLAY Playback will continue at normal speed The Variable Speed Search function offers a choice of six playback speeds 1 5X LP mode 1 3X 1X 2X 5X 10X 20X both in forward and reverse directions The review playback at the 1X speed is playback in reverse directi...

Page 34: ...rse 3 Press PLAY to release If you hold down SLOW F ADV you can see a continuous series of still images at a slower speed than normal slow mode During frame by frame advance a few frames may move automatically and the picture may become bluish for an instant Special Effect Features Sound is muted during all special effects Note When using Remote Control When using Palmcorder 2 SLOW F ADV 3PLAY 2 S...

Page 35: ...rch mode playback will not begin when a tape rewinds all the way to the beginning Search for a particular scene by using the electronic index marks placed at the beginning of each recording 1 Press MENU to display the VCR FUNCTIONS menu screen 2 Rotate JOG KEY to select PLAYBACK FUNCTIONS then press JOG KEY to display the PLAYBACK FUNCTIONS menu screen 3 Rotate JOG KEY to select SEARCH and then pr...

Page 36: ...turing A succession of 9 screens will be captured and playback will stop Press PLAY to start playback Press STOP to stop playback A Multi Image Playback screen cannot be output from the DV terminal or PC Connector terminal A Multi screen will have slightly lower image quality Note In Strobe Multi Mode you can select the rate at which a succession of still screens are captured from the playback pic...

Page 37: ...operating instructions for further information 3Start playback or begin a recording Make sure the Palmcorder and TV are turned off while connecting Please connect the A V Cable securely Remote Control Only You can display the various EVF and LCD indications on your TV by pressing DISPLAY ON TV on remote control Press again to remove the indications Note TV with AUDIO VIDEO IN Jacks View Recording ...

Page 38: ... D ZOOM then press JOG KEY to select 25X or 700X 25X from 10X to 25X 700X from 10X to 700X OFF Turn off D ZOOM Press MENU to exit 5 Press REC PAUSE to start recording and press POWER ZOOM to zoom in or zoom out The magnification level is always displayed in the EVF or the LCD monitor when DISPLAY is set to ALL or PARTIAL Menu OSD p 60 6 Repeat steps 2 4 to select OFF to cancel this feature Other D...

Page 39: ... The center portion of the image doubles in size 6 Repeat steps 2 4 to select OFF to cancel this feature 5PLAY Colour recording of video or still images onto the Mini DV tape in low lighting MagicPix Images 1 Set POWER to CAMERA 2 Press MAGIC PIX MAGICPIX will appear on the screen 3 To cancel the Digital Function press MAGIC PIX again Digital Zoom Continued 2MENU 1POWER 3 4 JOG KEY 1POWER EVF LCD ...

Page 40: ... in both the Recording and Playback VCR modes CAMERA mode VCR mode Other Digital Functions are turned off automatically when the EIS and Digital Zoom are selected A Set POWER to VCR B Press PLAY to start playback C Press EIS to stabilize the picture D Press EIS again to cancel Be sure that D E I S is turned off when not needed Note When using D E I S in VCR mode the image size is slightly larger N...

Page 41: ...ETCH The picture is expanded horizontally GAIN UP Not available during playback Picture sensitivity is increased The image will be brighter than normal however motion shake will increase WIPE Not available during playback Successive scenes are separated in a way which simulates the drawing of a curtain MIX Not available during playback The current scene is mixed in with the following scene during ...

Page 42: ...AL EFFECT menu screen 4 Press JOG KEY to select P IN P Press MENU to exit this menu P IN P will appear in the EVF or the LCD monitor 5 Aim at the scene you wish to place as PinP then press P IN P to freeze the image 6 Press P IN P again to place the frozen image as PinP 7 Press REC PAUSE to record a scene with PinP image Press PHOTOSHOT to record a scene with PinP image in PhotoShot mode Press P I...

Page 43: ...appears in the EVF or the LCD monitor Go to step 4 2PLAY 2PAUSE Before you begin Turn on the Palmcorder Insert a pre recorded tape to be dubbed Built in Microphone Select 12 bit if you do not want the original sound to be completely replaced during an audio dub With tape containing both 12 bit and 16 bit audio please note that if dubbing is started in a 16 bit portion the 12 bit audio will also be...

Page 44: ...ck and MIX is selected as the AUDIO both the original audio and the dubbed audio are played back If you recorded in LP mode you cannot use the A DUB feature Note You can set an automatic Dubbing stop point APress MENU to display the VCR FUNCTIONS menu screen BRotate JOG KEY to select DISPLAY SETUP and then press JOG KEY to display the DISPLAY SETUP menu CRotate JOG KEY to select C DISPLAY and then...

Page 45: ... Monitor with your TV 1Insert a pre recorded tape into the source playing Palmcorder and a blank tape with record tab in place into the target VCR Recorder 2Press PLAY on the Palmcorder When the tape reaches the point you want to start dubbing press PAUSE 3Place the VCR into REC PAUSE mode See VCR manual 4Simultaneously press PAUSE on both units to begin copying 5Press STOP on both units when copy...

Page 46: ...ape at the starting point of the dub 5 Simultaneously press PAUSE on both units to begin dubbing 6 Press STOP on the recording unit and then press STOP on the playing unit to end dubbing When two Palmcorders are used for dubbing it is recommended that the Remote Control optional VCR1 or VCR2 setting be used to avoid improper operation CAUTION Unauthorized exchanging and or copying of copyrighted r...

Page 47: ...ce Cable i LINK A video clip can be transferred directly to your PC Personal Computer via a DV Interface Cable i LINK not supplied using products and software from a number of video editing software companies Using products from video editing software companies allows you to capture and edit video clips using the DV Interface i LINK Our DVC being OHCI compliant should have no problem working with ...

Page 48: ...cting Cable for Windows optional PC Connection Unit PV DRS2A p 51 An image recorded on the DV Tape can be transferred to your PC Personal Computer Connection 1 Turn off your PC 2 Connect the Palmcorder to your PC Windows using the PC connecting cable optional PC Connection Unit PV DRS2A p 51 Before connecting the Palmcorder to the PC make sure the PC power is off to ensure that images are transfer...

Page 49: ...er 5 Follow the instructions as they appear on the PC screen until the installation is complete Setup window will disappear when the installation is complete 1 Click on Start All Programs Panasonic Palmcorder then PHOTOVU LINK 2 PHOTOVU LINK is opened COM Port and Baudrate are automatically selected Refer to Help for information about application operations and other Error messages Note Before you...

Page 50: ...or STILL mode 4Click on File then Save As Save transferred image to PC Note If while transferring the image to your PC the displayed picture appears abnormal close PHOTOVU LINK and turn Palmcorder POWER off Run PHOTOVU LINK again and turn Palmcorder Power back on Now transfer again Photo Search may fail to detect a recorded PhotoShot image if the image is 3 seconds or less Transfer Button Operatio...

Page 51: ...3A 1K PV DDC9 K PV DRC9 K PV DRS2A Description AC Adaptor with AC Cable and DC Cable 800mAh 1 h 30 min Battery Pack 1 600mAh 3 h Battery Pack 2 800mAh 5 h Battery Pack 5 300mAh 9 h Battery Pack DV Interface Cable i LINK 4 pin to 4 pin IR Remote Control PC Connection Unit Figure DV103 K P51 53 p65 2003 06 11 13 19 51 ...

Page 52: ...y 1 While pinching the 2 tabs pull Battery Tray out 2 Bend middle tab out and remove Battery 3 Snap new Battery mark down into Battery Tray Do not reverse the polarity 4 Insert Battery Tray so the triangle marks meet Note Keep Battery out of children s reach Swallowing it may be harmful Improper installation discharge or missing battery causes CLOCK BATTERY to appear Battery life is approximately ...

Page 53: ...ggest that you adjust the White Balance Do not cover the White Balance Sensor with your hand during recording Otherwise White Balance will not work normally COLOUR TINT MIXTURE PALMCORDER SETTINGS Blue Filter Range Bluish Whitish Yellowish Reddish ARTIFICIAL LIGHT SOURCE NATURAL LIGHT CONDITIONS OUTDOOR INDOOR Colour television Fluorescent lamp Daylight Camera flash bulb Blue lamp for photography ...

Page 54: ... Coupled Device CCD 1 6 inch Lens 10 1 zoom lens F1 1 8 with auto iris control Focal length 2 3 mm 23 mm Power zoom function Lens filter diameter 27 mm Viewfinder 8 4 mm 0 33 inch Liquid Crystal Electronic Viewfinder LCD Monitor 63 5 mm 2 5 inch Liquid Crystal Display Minimum Illumination Required 10 lx F1 1 8 1 footcandle Operating Temperature 32 F 104 F 0 C 40 C Operating Humidity 10 75 Weight P...

Page 55: ... record at all Causes of Digital Video Heads Becoming Dirty Large quantity of dust in the air High temperature and high humidity environment Damaged tape Long operating hours Using Mini DV Format Digital Video Head Cleaner 1 Insert the Head Cleaner into the Palmcorder in the same manner as aVideo Cassette 2 Push the Button 20 seconds later push the Button Do not rewind the tape 3 Take out the head...

Page 56: ...ut p 12 Make sure the Power source is connected pp 14 15 Check the Dew Indicator p 57 Make sure the record tab is closed p 6 Check the Battery Indication p 63 Make sure FOCUS is set to AUTO p 27 Make sure the unit is ON and set to CAMERA mode p 18 Make sure the unit is set to REC or REC PAUSE mode p 18 Make sure the Audio on the VCR MENU is set to ST1 pp 43 61 Correction Before Requesting Service ...

Page 57: ...ppear for 5 seconds When the Palmcorder and remote are not set to the same mode VCR1 or VCR2 CHECK REMOTE MODE REMOTE appears for 5 seconds It also appears when the Palmcorder is first turned on Condition When an AUDIO DUB is attempted on a pre recorded LP tape CANNOT REC LP MODE will appear for 5 seconds If excessive moisture condenses in the unit WARNING will flash DEW DETECTED will appear and t...

Page 58: ...mercially Dry cell batteries are also excluded from coverage under this warranty This warranty is extended to the original end user purchaser only A purchase receipt or other proof of date of original purchase is required before warranty service is performed THIS EXPRESS LIMITED WARRANTY IS IN LIEU OF ALL OTHER WARRANTIES EXPRESS OR IMPLIED EXCLUDING ANY IMPLIED WARRANTIES OF MERCHANTABILITY OR FI...

Page 59: ...t The sound is recorded in the 12 bit 32 kHz mode 16 bit The sound is recorded in the 16 bit 48 kHz high quality mode SCENEINDEX DAY An index signal is recorded when recording is restarted after the date has changed since the last recording 2 HOUR An index signal is recorded when recording is restarted after a lapse of more than 2 hours WIND CUT p 29 To reduce sound distortion caused by wind hitti...

Page 60: ...to ON still pictures taken in the PhotoShot mode are recorded with a visual shutter effect and click sound CLOCK SET p 14 When set to ON the date and time can be set on the screen SELF REC p 22 NORMAL During self recording the picture on the LCD Monitor is the same as it will be recorded MIRROR During self recording the picture on the LCD Monitor is horizontally reversed DEMO MODE p 11 When set to...

Page 61: ... original sound and the dubbed sound are played back together MULTI SPEED p 36 In Strobe Multi mode used to select the interval at which a succession of still screens are captured from the playback picture FAST Every 0 3 seconds NORMAL Every 0 6 seconds SLOW Every 1 0 seconds EFFECT1 p 41 To select one of the 6 digital functions Setting to OFF cancels the previously selected digital function EFFEC...

Page 62: ...tor or in the viewfinder C RESET p 64 Setting to ON resets the counter to zero DISPLAY p 64 To select the desired type of display changes to all function display Partial display and Minimum display LCD EVF SETUP p 19 Setting to ON displays the menu for adjusting the LCD brightness colour level and the EVF brightness REMOTE p 10 VCR1 To receive signals from the Remote Control set to VCR1 VCR2 To re...

Page 63: ...hen SEPIA or B W is selected in VCR menu Volume Display p 31 The volume bar appears when the volume of the built in speaker is being adjusted AY DVM30EJ AY DVM60EJ FULL EMPTY R0 30 R0 00 R1 00 R0 00 a b c d e Electronic Viewfinder LCD Monitor Indications CAMERA VCR Mode f g h h Date and Time Indication Menu OSD pp 60 62 As shown below the date and time indication changes each time DATE TIME is sel...

Page 64: ...n terms of hours minutes seconds and frames 30 frames 1 second This display cannot be reset Linear Time Counter Memory Counter Time Code j k IMPORTANT NOTE Display must be set to ALL for MF AE W BALANCE or BACK LIGHT indications to be displayed on the EVF or LCD Panel when selected C RESET does not work when C DISPLAY is set to T CODE Tape Mode Indications REC Recording PHOTO PhotoShot recording P...

Page 65: ...ay appears when PROGRESSIVE is set to ON Electronic Viewfinder LCD Monitor Indications CAMERA VCR Mode Zoom Magnification Level p 38 Digital EIS Indications p 40 This display appears when EIS is pressed Backlight Indication p 23 This display appears when BACK LIGHT is pressed PROGRAM AE Indication p 24 Manual Focus Indication p 27 White Balance Indication p 26 Shutter Mode Indication p 28 Iris Ind...

Page 66: ... Controls Built in LED Light p 8 Electronic Viewfinder EVF p 13 POWER ZOOM pp 21 38 VOLUME p 31 Rear View PHOTOSHOT p 20 Lens Cap p 7 REC PAUSE pp 13 18 MENU pp 16 17 TAPE EJECT pp 7 12 Cassette Compartment Cover p 7 JOG KEY pp 16 17 M FOCUS DIAL p 31 POWER VCR OFF CAMERA pp 12 13 Hand Strap p 7 Side View Built in Speaker DV103 K p66 70 p65 2003 06 11 13 19 66 ...

Page 67: ...djustment Control pp 13 18 POWER Lamp p 18 Tripod Receptacle AUTO MANUAL pp 26 29 EIS p 40 BATTERY RELEASE pp 14 15 MAGIC PIX p 39 FADE p 25 BACK LIGHT p 23 Shoulder Strap Attachment Ring p 7 Shoulder Strap Attachment Ring p 7 PC Connector p 48 DC IN Terminal p 15 DV Input Output i LINK Connector pp 46 47 Clock Battery Tray p 52 A V Output Connector pp 37 45 EARPHONE p 30 Underside View DV103 K p6...

Page 68: ...VJSS0070 KZDB4ZE00001 in an area which has special AC outlets Remote Control Index of Controls AC Adaptor COUNTER TC pp 9 64 RESET pp 9 44 REWIND SEARCH pp 9 32 MENU pp 9 16 17 44 VIDEO REC pp 9 46 POWER ZOOM pp 9 21 SPKR VOL pp 9 31 REC PAUSE pp 9 18 PHOTOSHOT pp 9 20 DATE TIME pp 9 63 DISPLAY ON TV pp 9 37 FAST FORWARD SEARCH pp 9 32 REVERSE INDEX SEARCH pp 9 35 REVERSE SLOW F ADV pp 9 33 34 STO...

Page 69: ...rap 7 High Speed Shutter 28 I Important Safeguards 3 Index of Controls 66 68 Index Search 35 Iris 29 L LCD EVF Setting 19 Lens Cap 6 7 18 Lens Cap Strap 6 7 M MagicPix Images 39 Memory Counter 64 Memory Stop Editing 44 MENU OSD 59 62 O On Screen Displays OSD 57 P PC Connection 47 48 PHOTOVU LINK 49 50 Picture in Picture PinP 42 Playback using the LCD Monitor 30 Precautions 4 Program AE 24 Progress...

Page 70: ...T3 905 238 2181 Calgary 6835 8th Street N E Calgary Alberta T2E 7H7 403 295 3922 Vancouver 12111 Riverside Way Richmond BC V6W 1K8 604 278 4211 Panasonic Canada Inc 5770 Ambler Drive Mississauga Ontario L4W 2T3 905 624 5010 www panasonic ca Printed in Japan LSQT0723A S0203A0 K DV103 K p66 70 p65 2003 06 11 13 19 70 ...

Reviews: