background image

75

Setting FUNC1

The user can specify the function of the “FUNC 1”
button on the remote control.

“P IN P”: Displays the P IN P function.
“LAMP POWER”: Allows the user to set the lamp power.
“SIZE”: Allows the user to set the picture size.

Password 

This function is used when a service person.
Input the password with the numeric buttons (0 to 9) of
the remote control and press ENTER button to confirm
the entry.

FUNC1

LAMP POWER

SIZE

P IN P

ET-MD95SD1

ET-MD95SD2

ET-MD95SD3

ET-MD75DV

ET-MD75NT

AUX

AUX

ET-MD95RGB

RGB1

Subwindow

Main window

RGB2

RGB1

RGB2

ET-MD95VM2

ET-MD96RGB

ET-MD95VM2

ET-MD95SD1

ET-MD95SD2

ET-MD95SD3

ET-MD75DV

ET-MD75NT

LINE input

RGB input

VIDEO input

S-VIDEO input

VIDEO input

S-VIDEO input

RGB input

Y / C input

YCbCr input

RGB input

RGBrealiry input

YCbCr input

YPbPr input

LINE input

Y / C input

YCbCr input

YCbCr input

YCbCr input

RGBrealiry input

YPbPr input

YPbPr input

RGB input

YCbCr input

YPbPr input

RGB input

YCbCr input

YPbPr input

RGB input

YCbCr input

YPbPr

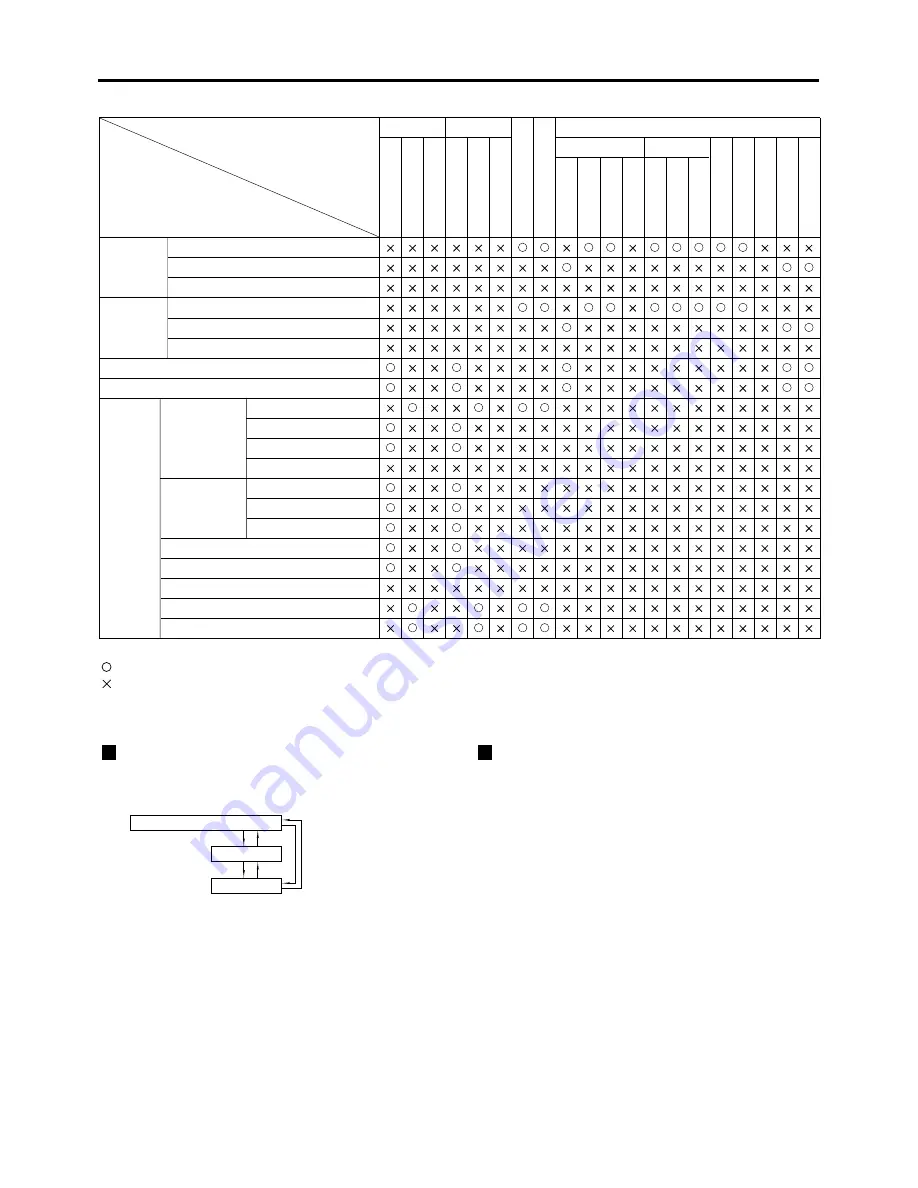
List of P IN P

: P in P (Picture in Picture) combinations are enabled
: P in P (Picture in Picture) combinations are disabled

Summary of Contents for PTD7600U - DLP PROJECTOR

Page 1: ...is unit TQBJ 0113 3 POWER ON OFF RGB 1 RGB 2 AUX MENU STD LENS OSD 1 4 7 2 5 8 3 6 9 0 NEXT USER LIGHT ID ALL ASPECT ID SET Projector Computer Numetric BRIGHT CONTRAST ON SCREEN SYSTEM SEL FUNC 1 D ZO...

Page 2: ...CE THE RISK OF FIRE OR ELECTRIC SHOCK DO NOT EXPOSE THIS PRODUCT TO RAIN OR MOISTURE CAUTION RISK OF ELECTRIC SHOCK DO NOT OPEN AVIS VORSICHT RISQUE DE CHOC LECTRIQUE NE PAS OUVRIR ZUR VERMEIDUNG EINE...

Page 3: ...the following measures Reorient or relocate the receiving antenna Increase the separation between the equipment and receiver Connect the equipment into an outlet on a circuit different from that to w...

Page 4: ...en menus 49 Structure of menu screens 49 Basic operations on menu screen 50 Returning to the previous screen 50 Menu items shown in gray characters 50 Menu items setting 50 Resetting to the factory de...

Page 5: ...r modify it in any way High voltages which can cause fire or electric shocks are present inside the projector For any inspection adjustment and repair work please contact an Authorized Service Center...

Page 6: ...y places or in places where the projector may come into contact with smoke or steam Using the projector under such conditions may result in fire or electric shocks When disconnecting the power cord ho...

Page 7: ...e lamp unit has high internal pressure It can easily become damaged if struck against hard objects or dropped and injury or malfunctions may result Do not use the old lamp unit The lamp section may br...

Page 8: ...st and clear images if outside light or the illumination interferes the screen surface Draw window curtains or blinds turn off the lightings near the screen or take other proper measures In rare cases...

Page 9: ...brightness System 3 PC equipped with a DVI D input module an optional item can be attached to the projector for computer image viewing Realization of high resolution picture System 2 The optional high...

Page 10: ...ess this button to enter your menu selection or to run function Standard STD button page 50 Press this button to restore the default factory setting ON SCREEN button page 49 This button turns on and o...

Page 11: ...M A S P E C T POWER ON OFF RGB 1 RGB 2 AUX MENU STD LENS OSD 1 4 7 2 5 8 3 6 9 0 NEXT USER LIGHT ID ALL ASPECT ID SET Projector Computer Numetric BRIGHT CONTRAST ON SCREEN SYSTEM SEL FUNC 1 D ZOOM ENT...

Page 12: ...and rear right and left Remote control receiver window front page 15 This window receives the signal beam emitted from the remote control Projection lens optional Lens for projecting images on the sc...

Page 13: ...g an image automatically corrects the picture positioning on the screen While the auto setup feature is active a message EXECUTING appears on the screen SHUTTER button page 48 Press this button to bla...

Page 14: ...ssary to supply signals given to the serial input terminal D SUB 9 pin male RGB YPBPR 1 input terminal pages 26 27 A terminal to input RGB or YPBPR signals BNC RGB YPBPR 2 input RGB YPBPR 1 output ter...

Page 15: ...re 2 The effective control range is approx 7 meters from the beam receiver on the front or rear Do not drop the remote control unit Do not expose remote control unit to any liquid Do not use NiCd batt...

Page 16: ...is pressed the projector can be controlled regardless of the ID number of the projector simultaneous control mode If the ID SET button is pressed the ID number goes back to the one set before pressin...

Page 17: ...FR EE ZE SH UT TE R A U T O S E T U P S T D L E N S O S D 1 4 7 2 5 8 3 6 9 0 N E X T U S E R LIG HT ID AL L ID SE T P ro je c to r C o m p u te r Nu m et ric BR IG HT C O N T R A S T O N S C R E E N...

Page 18: ...ered zoom lens and lens shifting mechanism Front Side Leveling feet Installation Adjusting the leveling feet The four leveling feet mounted at the bottom of the projector are level adjustable 0 mm 33...

Page 19: ...47 2 16 40 53 11 20 52 67 6 24 64 81 0 3 74 12 3 4 29 14 1 4 84 15 11 5 39 17 9 6 49 21 4 8 13 26 9 10 88 35 9 13 62 44 10 16 37 53 16 19 11 62 10 21 86 71 11 27 35 90 1 32 84 108 1 3 78 12 5 4 34 14...

Page 20: ...31 680 104 2 36 219 119 1 45 298 149 0 54 377 178 11 10 326 34 0 11 819 38 11 13 311 43 9 14 804 48 8 17 788 58 6 22 266 73 3 29 728 97 10 37 190 122 4 44 652 146 11 52 114 171 5 59 577 196 0 74 501 2...

Page 21: ...1 9 57 31 6 12 79 42 1 16 02 52 8 19 24 63 3 22 47 73 11 25 69 84 6 32 14 105 9 38 59 126 11 4 42 14 6 5 06 16 7 5 71 18 9 6 35 20 10 7 64 25 2 9 58 31 6 12 80 42 1 16 03 52 8 19 25 63 4 22 48 74 0 25...

Page 22: ...70 9 25 107 82 7 28 708 94 5 35 909 118 2 43 110 191 10 8 279 27 3 9 479 31 2 10 680 35 2 11 880 39 1 14 280 47 0 17 881 58 10 23 882 78 7 29 882 98 4 35 883 118 0 41 884 137 10 47 885 157 6 59 893 19...

Page 23: ...090 x Screen diagonal inch 0 0963 Maximal distance L 0 0149 x Screen diagonal inch 0 1023 Minimal distance L 0 137 x Screen diagonal inch 0 1146 Maximal distance L 0 2222 x Screen diagonal inch 0 102...

Page 24: ...ase a time base corrector TBC must be connected The projector accepts the following signals video S Video analog RGB and digital signals from the PC Some PC models cannot be connected to the projector...

Page 25: ...o PR terminal Blue connected to PB terminal Green connected to Y terminal Video deck TBC built in Example of connecting with VIDEO devices When connecting with a video deck be sure to use the one with...

Page 26: ...n stacking projectors using RGB YPBPR YCBCR signals divide the signals at the signal source and use RGB1 input for both projectors When the RGB1 OUT is connected to the external RGB monitor the image...

Page 27: ...FF Signal Selector TW SWS Color monitor with RGB input terminal Digital broadcasting tuner DVD player Signal selector Video deck TBC built in Notebook computer Control PC When stacking projectors usin...

Page 28: ...ee value composite SYNC not supported For separate SYNC 75 0 6 V p p 4 0 V p p For 1 k TTL level Signals supporting analog RGB input modules fH 15kHz 100kHz fV 24Hz 120Hz Dot clock frequency 20 MHz 16...

Page 29: ...cover Remove 2 screws Insert the input module Input module Slot Fix the input module Register the input signal Tighten the two screws This projector needs to register the type of input signal after th...

Page 30: ...nput terminal on the signal selector Digital signals cannot be connected to the signal selector RGB signal input module ET MD95RGB I F Input Input Input Output RS 232C Output RGB signal Component sign...

Page 31: ...e three value synchronizing input to the H H V and V terminals Do not supply synchronizing input signals to H H V and V terminals when supplying SYNC ON GREEN signals Attention Please purchase commerc...

Page 32: ...NE and Y C input Example Each time AUX button is pressed LINE input Y C input The above cycle is repeated When connecting with a video deck be sure to use the one with built in TBC time base corrector...

Page 33: ...Module ET MD95VM2 Video signal input module optional ET MD95VM2 Color difference signals Cr Luminance signals Y Video deck TBC built in For details on switching between the video signals connection an...

Page 34: ...nal specifications Upon toggling the input signals are displayed on the screen and cleared automatically SD signal SD signal output active through Serial digital input module optional ET MD95SD1 for 4...

Page 35: ...SYSTEM SELECTOR button Use a 3C2W or superior cable for connection to transmit the image information without error Example 3C2W 3CFB 4CFB 5C2W 5CFB 5CFTX 7CFB etc MAIN IN ET MD95SD2 for 480p 480i 576i...

Page 36: ...connection is made in any other way than listed above or if any unstable signal is connected If this happens switch to a system that is compatible with the signal format using the SYSTEM SELECTOR butt...

Page 37: ...are listed in the table at right terminal for TMDS equipped PC Pin No Pin No Signal TMDS data 2 TMDS data 2 TMDS data 2 4 shield T M D S data 4 T M D S data 4 DDC clock DDC data T M D S data 1 T M D...

Page 38: ...e lens clockwise until it clicks Insert the tab at the left of the projection lens cover into the projector and while pressing the lock button mount the projection lens cover Figure 3 How to remove th...

Page 39: ...m up period When the warm up is completed the temperature monitor TEMP lamp turns off and the image is projected on the screen If the surrounding temperature is very low and the warm up period exceeds...

Page 40: ...Turning on the power supply will not light up the light source lamp if the lamp is in the process of cooling down after turning off the power supply To light up the lamp turn on the power supply agai...

Page 41: ...NS ZOOM and LENS SHIFT Choose an item and adjust it using buttons How to adjust the lens Caution Be careful not to catch your fingers between the lens and shroud when shifting the lens How to adjust t...

Page 42: ...lens removed in step Adjust the lens by turning the adjustment screws and counterclockwise Tool to be used Allen hex socket driver or Allen wrench 2 5 mm diagonal hexagon Vup H left H right Vbottom a...

Page 43: ...e been shifted even when the adjustment ended normally In this case manually adjust the CLOCK PHASE If an image with blurred edges or a dark image is supplied a message INCOMPLETE appears indicating t...

Page 44: ...frequency synchronization signal and other data are automatically identified and displayed For memory numbers 12 pages are available eight pieces of data can be registered on each page from A to L an...

Page 45: ...on A to L pages Select the signal to erase with the and buttons Press the ENTER button The SIGNAL STATUS screen will be displayed If you do not want to erase press the MENU button to return to the SI...

Page 46: ...POS ENTER EXECUTE MENU ESC Press the USER button or the and buttons on normal screen menu is not displayed A Check sub memory registration screen will appear if sub memory has not been registered The...

Page 47: ...code A1 A2 H7 and H8 signals are registered displays the sub memory number Details of registered signal Restrictions The maximum sub memory items that can be registered for the projector are 96 inclu...

Page 48: ...presentation Press the D ZOOM button of the remote control The image is zoomed in Change the magnification with the D ZOOM button The magnification can be adjusted in 0 1 steps over the range of 1 0...

Page 49: ...A2 RGB1 A3 XGA60 A3 RGB1 A4 SXGA60 A4 RGB1 A5 XGA60 A5 AUX A6 NTSC A6 VIDEO A7 XGA60 A7 RGB1 A8 SXGA60 A8 RGB1 SELECT ENTER DETAILS STD DELETE OPTION ID 2 SETTING FRONT F LAMP1 RUNTIME 57h LAMP2 RUNT...

Page 50: ...32 Returning to the previous screen When the MENU is on the screen pressing the MENU button returns to the previous page When the MAIN MENU is on the screen pressing the MENU button clears all menus f...

Page 51: ...d Select PICTURE MODE with the buttons Select PICTURE MODE with the buttons GRAPHIC The picture becomes suitable for input from to the personal computer STANDARD The picture becomes suitable for movin...

Page 52: ...table Repeat Steps and to adjust the BRIGHT COLOR or TINT The individual adjustment screen can be displayed for CONTRAST and BRIGHT by the remote control Refer to the following table Item Adjustment...

Page 53: ...perly unless adequate adjustment is made If the adjustment is not successful press STD standard button when the individual adjustment screen is displayed to restore the factory default setting only fo...

Page 54: ...tons Press the ENTER button Select the color to be corrected with the buttons Adjust with the buttons R R 2048 G 0 B 0 MENU SELECT ADJUST Adjustment The effects of correcting the adjustment color When...

Page 55: ...e RGB system and the HD system factory setting is 2 0 to 15 for the SD system factory setting is 6 10 types including Standard 1 Standard 2 Cinema User 1 User 2 2 2 2 5 Natural Graphic 1 Graphic 2 Fac...

Page 56: ...odule ET MD95RGB RGB1 RGB2 inputs do not support BETACAM signals This function can be switched only when receiving the picture of 480i in the YCbCr mode It cannot be switched when receiving the pictur...

Page 57: ...buttons MAIN MENU PICTURE POSITION LANGUAGE OPTION TEST PATTERN SIGNAL LIST MENU SELECT ENTER SUB MENU Press the ENTER button The POSITION screen will be displayed Select SHIFT with the buttons SHIFT...

Page 58: ...ELECT CHANGE Press the ENTER button The SIZE adjustment screen will be displayed Select the desired item with the buttons Adjust with the buttons Size adjustment Procedure of adjustment Press the ENTE...

Page 59: ...changing the aspect ratio of the input signals This mode is used when projecting the 4 3 pictures on the 16 9 screen HV FIT Pictures are displayed on the whole panel pixels If the aspect ratio of the...

Page 60: ...ust blanking with the buttons The value changes from 0 to 511 Press button to move the blanking zone upward button to downward Press button to move the blanking zone upward button to downward Press bu...

Page 61: ...ect CLOCK PHASE with the buttons Adjust the clock phase with the buttons The value changes from 0 to 31 Clock phase adjustment Clock phase adjustment achieves the best image when the screen flickers o...

Page 62: ...cal stripes appear on the screen or the image is partly missing increase or decrease the displayed value while observing the screen to achieve the optimal value Adjusting the input resolution Input re...

Page 63: ...where the green area becomes dark and clear Adjusting the clamp position Use the clamp position adjustment to achieve the optimal value when dark areas of the image are crushed or displayed in green...

Page 64: ...ect KEYSTONE with the buttons Press the ENTER button The KEYSTONE screen will be displayed Adjust the KEYSTONE horizontally with the buttons The value changes from 0 to 127 Adjust the vertical LINEARI...

Page 65: ...ect ON with the ENTER buttons The optimal point is where these lines overlap Adjustment marker When the MARKER is set to ON the image position adjustment marker is displayed Green lines are shown on t...

Page 66: ...avoid the conspicuous BRIGHT of the part in which picture images are superimposed on each other when multi screens are displayed using the edge blending system The optimal point will be achieved when...

Page 67: ...95VM2 For the setting of AUTO2 For the setting of ET MD95VM2 YCbCr ET MD95VM2 For the setting of AUTO1 S video Video terminal input signal AUTO1 NTSC PAL SECAM PAL60 NTSC4 43 AUTO2 NTSC PAL M PAL N Fo...

Page 68: ...a video system with the buttons and switch to AUTO1 or AUTO2 with the buttons The selected signaling system appears The picture may be distorted during the switching operation Press the MENU button t...

Page 69: ...480i fH kHz fV Hz RGB mode RGB REALITY mode Remarks 15 73 60 576i 15 63 50 480p 31 47 60 720 60p 45 00 60 1035 60i 33 75 60 1080 60i 33 75 60 1080 24p 27 00 24 1080 50i 28 12 50 1080 30p 33 75 30 108...

Page 70: ...rojectors are given ID numbers their remote controls must be assigned the same ID numbers respectively If the ID number of a projector is set to ALL it can be controlled by the remote control or the P...

Page 71: ...LANGUAGE OPTION TEST PATTERN SIGNAL LIST MENU SELECT ENTER SUB MENU Press the MENU button The MAIN MENU screen will be displayed Select OPTION with the buttons Press the ENTER button The OPTION screen...

Page 72: ...ELECT RGB2 IN RGB1 OUT Position of on screen indications The user can specify the position of the on screen indications 1 Top of the screen 2 Middle of the screen 3 Bottom of the screen OSD POSITION 1...

Page 73: ...MODE STANDARD WIDE Applicable resolution 640 x 400 640 x 480 800 x 600 832 x 624 960 x 720 1 024 x 768 1 152 x 864 1 152 x 870 1 280 x 960 1 280 x 1 024 1 600 x 1 200 720 x 400 848 x 480 1 280 x 720 1...

Page 74: ...e main window SUBWINDOW Frame lock is set for the input signals specified for the subwindow Type The user can select the window that is displayed by priority when two windows overlap MAIN WINDOW The m...

Page 75: ...ET MD95SD3 ET MD75DV ET MD75NT AUX AUX ET MD95RGB RGB1 Subwindow Main window RGB2 RGB1 RGB2 ET MD95VM2 ET MD96RGB ET MD95VM2 ET MD95SD1 ET MD95SD2 ET MD95SD3 ET MD75DV ET MD75NT LINE input RGB input V...

Page 76: ...ON TEST PATTERN SIGNAL LIST MENU SELECT ENTER SUB MENU Press the MENU button The MAIN MENU screen will be displayed Select OPTION with the buttons Press ENTER button The OPTION screen will be displaye...

Page 77: ...RD MENU SELECT CHANGE Press the MENU button The MAIN MENU screen will be displayed Select OPTION with the buttons MAIN MENU PICTURE POSITION LANGUAGE OPTION TEST PATTERN SIGNAL LIST MENU SELECT ENTER...

Page 78: ...0bps None 8 bits 1 bit None None PC D Sub 9 pin male Communication cable D Sub 9 pin male D Sub 9 pin female Communication cable Terminal section on Projector 1 Terminal section on Projector 2 D Sub 9...

Page 79: ...U button three times The on screen indications disappear and the system returns to the normal screen Procedure of setting communication conditions OPTION ID 2 SETTING FRONT F LAMP1 RUNTIME 57h LAMP2 R...

Page 80: ...nds other than PON are invalid While the lamp is ON and being controlled a PON command will not be accepted Parameter VID VIDEO SVD S VIDEO RG1 RGB1 RG2 RGB2 AUX AUX Parameter 0 DUAL 1 SINGLE 2 LAMP 1...

Page 81: ...DBY ON VIDEO S VIDEO S VIDEO RGB2 RGB VIDEO RGB1 LAMP Remote terminal External control Remote terminal External control RGB VIDEO INPUT SELECT Using the REMOTE 2 terminal Names of terminals GND POWER...

Page 82: ...ayed Select TEST PATTERN with the buttons Search through the various types of test patterns with the buttons Cycle of displayed internal test patterns MENU screen All white MENU screen All black MENU...

Page 83: ...sure that E mail feature is available in your system Use a LAN cable of straight connection and compatible to Category 5 The length of LAN cable must be 100 m or shorter Name and function of network...

Page 84: ...NGUAGE OPTION TEST PATTERN SIGNAL LIST MENU SELECT ENTER SUB MENU OPTION SYSTEM INFORMATION VIDEO SETTING NETWORK SETTING FAN CONTROL NORMAL P IN P ON FUNC1 P IN P CONTRAST NORMAL PASSWORD MENU SELECT...

Page 85: ...sed Enter the gateway address if DHCP server is not used Displays the MAC address Media Access Control Address which is proper to the network device This function may be needed when to use the DHCP se...

Page 86: ...RL input field of the Web browser Enter user1 in the user name field and enter panasonic lower case in the password field Press OK and the top page will appear Avoid activating two or more Web browser...

Page 87: ...k this item and an E mail setting page appears Link button to time setting If time setting goes wrong immediately after setting time the battery must be replaced Link button to network setting Link bu...

Page 88: ...if DHCP server is not used Enter the projector name Enter this field when the host name is required such as when to use the DHCP server Projector control page On screen status is displayed even if th...

Page 89: ...tor exhaust Displays the lamp lit hours Displays used hours of the projector Displays self diagnosis information Displays the firmware version of the projector main unit Displays the type of projector...

Page 90: ...ginator of the E mail Enter the E mail address of the projector The user can modify the minimum time interval of temperature warning mail The default value is 60 minutes In this case the user cannot s...

Page 91: ...emperature temperature inside the projector has reached the value set in the above field Warning output air Temperature exhaust temperature has reached the value set in the above field Select the cond...

Page 92: ...s to finish transfer The time will depend on the network situation Enter the file name of the desired firmware for updating Current version appears Transferred updating version is displayed here Check...

Page 93: ...peration is complete Do not use a pencil or other fragile thing to depress the function switch Note Page for control of image files Folder selection button This button specifies the folder to store th...

Page 94: ...is blocking the ventilation port Move the projector to a temperature of 0 to 40 C and the humidity of 20 to 80 no condensation Turn off the MAIN POWER switch using the procedure on page 40 and clean t...

Page 95: ...itself The air filter must be fitted in place when using the projector Using the projector without the air filter fitted inside dirt and dust are sucked into the projector causing failure Attention At...

Page 96: ...ht by the time of 1 500 hours depending on the characteristics of individual lamps and working conditions lamps may reduce their life affected by the times of lighting and the intervals between previo...

Page 97: ...urn freely Then hold the handle of the lamp unit and gently pull it out from the projector Caution The lamp unit will be hot after it has been used You might get burned if you touch it while it is sti...

Page 98: ...e and buttons to select for replacement lamp setting LAMP1 Replace the LAMP UNIT 1 LAMP2 Replace the LAMP UNIT 2 DUAL Replace the LAMP UNIT 1 LAMP UNIT 2 14 Press the ENTER button When OK is displayed...

Page 99: ...device s connected to the projector adjusted correctly Pale color bad color tint Are dry batteries consumed Is polarity correct in battery setting Refer to page 15 Are there any obstacle between the...

Page 100: ...0p horizontally 31 5 kHz vertically 59 94 Hz 576i horizontally 15 63 kHz vertically 50 Hz 720 60p horizontally 45 kHz vertically 60 Hz 1035 60i horizontally 33 75 kHz vertically 60 Hz 1080 60i horizon...

Page 101: ...s 19 8 kg 44 lb without lens Working environment condition 1 Ambient temperature 0 to 40 C for setting of lamp output at LOW and lamp selection at DUAL LAMP 1 LAMP 2 or SINGLE 0 to 35 C for setting of...

Page 102: ...0 50 0 60 0 66 3 71 7 75 0 85 0 86 0 88 9 60 0 74 6 75 0 60 0 60 0 59 9 50 0 59 9 Applicable input signal data Display mode VGA400 VGA480 XGA MXGA SVGA SXGA UXGA MAC16 MAC21 HDTV 720p NTSC PAL 480p N...

Page 103: ...red trademark of the Microsoft Corporation U S A in the U S and other countries Netscape and Netscape Navigator are registered trademarks of the Netscape Communications Corporation in the U S and othe...

Page 104: ...pour constituer un risque de choc Iectrique aux personnes Le point d exclamation dans un triangle avertit l usager de la pr sence d instructions importantes concernant l utilisation et l entretien r p...

Page 105: ...es puissent tre faites Ne pas couvrir le filtre et la sortie d air Cela risque de faire surchauffer le projecteur et causer un incendie ou endommager le projecteur Ne pas surcharger la prise de couran...

Page 106: ...ilis es Ne pas placer le projecteur sur des surfaces instables Si le projecteur est plac sur une surface qui est inclin e ou instable il risque de tomber ou de se renverser et cela peut causer des ble...

Page 107: ...n bloc lampe usag Cela peut entra ner une rupture de la lampe Le remplacement de l unit de lampe ne devrait tre effectu que par un technicien qualifi L unit de lampe a une pression interne lev e Elle...

Page 108: ...ttes si la lumi re ext rieure ou l clairage interf re avec la surface de l cran Tirez les rideaux des fen tres ou les stores teignez l clairage pr s de l cran ou prenez d autres mesures adapt es Cas r...

Page 109: ...UBLE Il peut arriver que la lampe soit puis e ne s allume pas 1 500 heures selon les caract ristiques des lampes individuelles et les conditions de travail la vie de service des lampes peut tre r duit...

Page 110: ...x vis de fixation de la lampe jusqu ce qu elles puissent tourner facilement Ensuite saisissez la poign e de la lampe et tirez doucement pour la sortir du projecteur Attention La lampe est chaude si el...

Page 111: ...pour s lectionner le param tre de remplacement de la lampe LAMPE 1 Remplacement de la lampe 1 LAMPE 2 Remplacement de la lampe 2 DOUBLE Remplacement de la lampe 1 et de la lampe 2 14 Appuyez sur la t...

Page 112: ...merica One Panasonic Way 4E 7 Secaucus NJ 07094 201 392 4443 3330 Cahuenga Blvd West Los Angels CA 90068 323 436 3500 Technical Support 800 524 1448 800 526 6610 FAX 201 392 6514 E Mail pbtssupport pa...

Reviews: