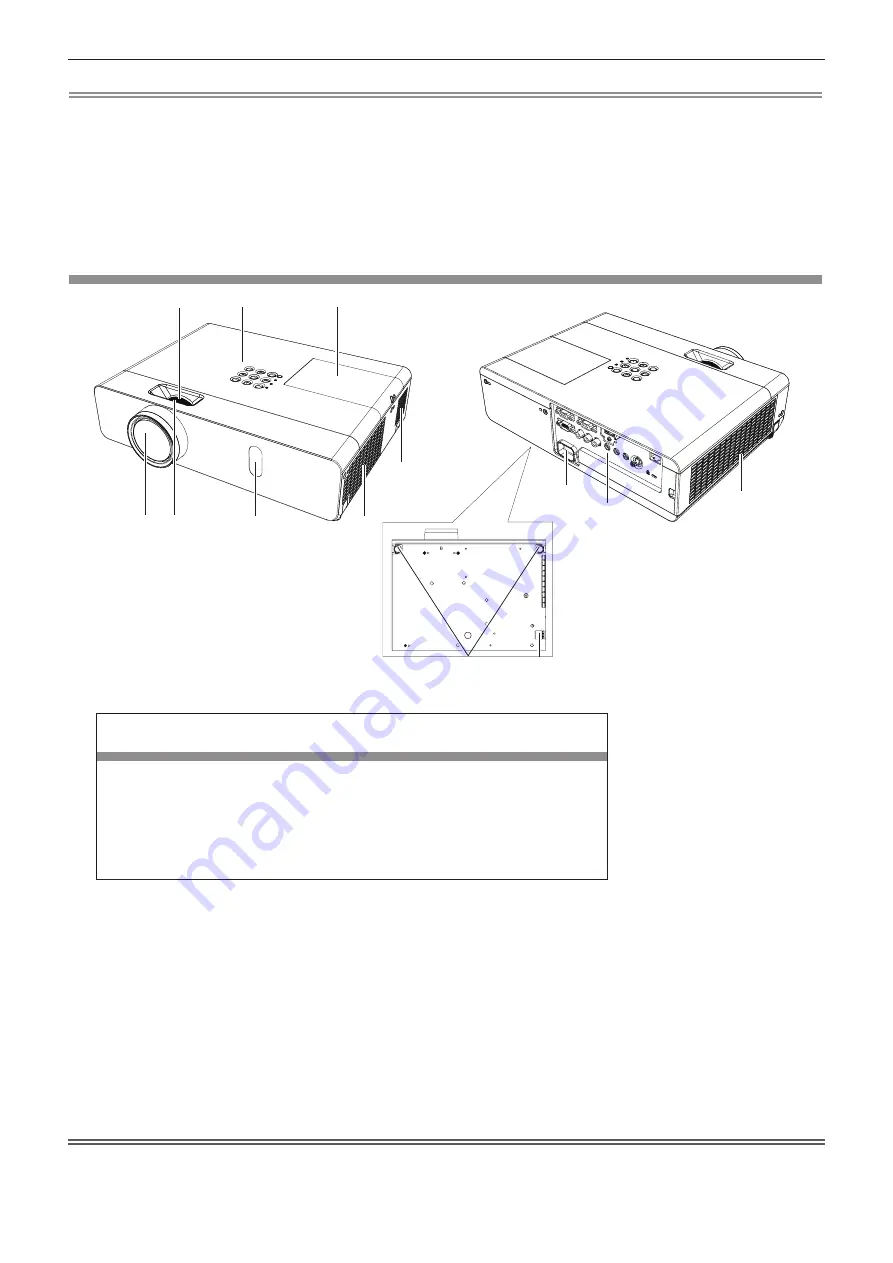
Panasonic PT-VW340za Operating Instructions Manual Download Page 21

Zoom ring (Back)

Adjust the zoom.

Control Panel and Indicators (

Æ

page 22)

Lamp cover (

Æ

page 97)

The lamp unit is located inside.

Projection Lens

Focus ring (Front)

Adjust the focus.

Remote control signal receiver


Air exhaust port

Speaker

<AC IN> terminal 

Connect the supplied power cord.

Rear terminals (

10 

Æ

page 22)

Air intake port / Air filter cover (

11 

Æ

page 95) 

The air filter unit is inside.

Adjustable feet 

12 

Adjust the projection angle.

Security Chain Hook 

13 

Attaches a burglar prevention cable, etc.

Note

The remote control can be used within a distance of about 7 m (22.97') if pointed directly at the remote control signal 


f

receiver. The remote control can control at angles of up to ± 30 ° vertically and ± 30 ° horizontally, but the effective control 

range may be reduced.

If there are any obstacles between the remote control and the remote control signal receiver, the remote control may not 


f

operate correctly.

You can operate the projector by reflecting the remote control signal on the screen. The operating range may differ due to 


f

the loss of light caused by the properties of the screen.

When the remote control signal receiver is lit with a fluorescent light or other strong light source, the projector may become 


f

inoperative. Set the projector as far from the luminous source as possible.

Projector body

1

5

6

4

2

3

7

11

9

10

12

WARNING

Keep your hands and other objects away from the air exhaust port.

Keep your hand and face away.


f

Do not insert your finger.


f

Keep heat-sensitive articles away.


f

Heated air from the air exhaust port can cause burns or external damage.

13

Attention

Do not block the ventilation ports (intake and exhaust) of the projector.


f

8

ENGLISH


-


21

Chapter 1   Preparation - About your projector

Summary of Contents for PT-VW340za

Page 1: ...hank you for purchasing this Panasonic Product Before operating this product please read the instructions carefully and save this manual for future use Before using your projector be sure to read Read...

Page 2: ...e purpose of the earthing plug CAUTION To assure continued compliance follow the attached installation instructions This includes using the provided power cord and shielded interface cables when conne...

Page 3: ...not occur in a particular installation If this equipment does cause harmful interference to radio or television reception which can be determined by turning the equipment off and on the user is encou...

Page 4: ...trical shock if the cut off plug is inserted into any 13 amp socket If a new plug is to be fitted please observe the wiring code as shown below If in any doubt please consult a qualified electrician W...

Page 5: ...utlet If the power supply is overloaded ex by using too many adapters overheating may occur and fire will result ON USE INSTALLATION Do not place liquid containers on top of the projector If water spi...

Page 6: ...bracket specified by Panasonic Defects in the ceiling mount bracket will result in falling accidents Attach the supplied safety cable to the ceiling mount bracket to prevent the projector from falling...

Page 7: ...all outlet before carrying out any cleaning and replacing the unit Electric shocks can result if this is not done ON USE INSTALLATION Do not place heavy objects on top of the projector Failure to obse...

Page 8: ...lucro ou o vazamento provocar calor ruptura da blindagem e produzir fogo devido ao curto circuito dos terminais N o incinere nem aque a as baterias elas n o podem ficar expostas a temperaturas superio...

Page 9: ...nc Adobe Adobe Flash Player and Adobe Reader are trademarks or registered trademarks of Adobe Systems Inc in the United f f States and or other countries Some of the fonts used in the on screen menu a...

Page 10: ...r via network Useful Functions for Presentations The digital zoom function allows you to focus on the crucial information during a presentation The MIC function and 10 W audio output allows you to mak...

Page 11: ...l 38 How to adjust the state of the image 38 Basic operations by using the remote control 39 Using the AUTO SETUP function 39 Using the KEYSTONE button 39 Switching the input signal 40 Using the FUNCT...

Page 12: ...E CHANGE 77 NETWORK CONTROL 77 AMX D D 77 Crestron Connected TM 77 STATUS 78 INITIALIZE 78 Network connections 79 Accessing from the Web browser 80 Chapter 5 Maintenance LAMP and WARNING Indicators 94...

Page 13: ...Chapter 1 Preparation This chapter describes things you need to know or check before using the projector ENGLISH 13...

Page 14: ...s an optional ceiling mount bracket Model No ET PKV100H for high ceilings ET PKV100S for low ceilings ET PKV101B Projector Mount Bracket When using the projector in the elevation of below 1 400 m 4 59...

Page 15: ...g or stopping of this product by a malicious third party f f Security instruction pages 73 89 Make your password as difficult to guess as possible f f Change your password periodically f f Panasonic o...

Page 16: ...a longer time may result in an after image on the LCD panels If this happens display the all white screen in the test pattern for an hour or more Optical components r r Operating the projector in an...

Page 17: ...TKKL5568 Attention After unpacking the projector discard the power cord cap and packaging material properly f f Do not use the supplied power cord for devices other than this projector f f For lost ac...

Page 18: ...ndows This software allows you to monitor and control multiple projectors connected to the LAN Logo Transfer Software Windows This software allows you to create original images such as company logos t...

Page 19: ...to the initial setting 2 Initial setting projector setup Set each item Press 1 as to select an item Press 2 qw to switch the setting PROJECTION METHOD f f page 67 SCREEN FORMAT Only for PT VW340Z f f...

Page 20: ...page 40 D ZOOM Buttons 8 Zoom in and out the images page 41 VOL Buttons 9 Adjust the volume of the speaker page 42 KEYSTONE Button 10 Correct keystone distortion page 39 P IN P Button 11 Only for PT V...

Page 21: ...ced If there are any obstacles between the remote control and the remote control signal receiver the remote control may not f f operate correctly You can operate the projector by reflecting the remote...

Page 22: ...s the terminal to input audio signals Or connect the MIC to this terminal VARIABLE AUDIO OUT terminal 10 This is the terminal to output audio signals input to the projector S VIDEO IN terminal 11 This...

Page 23: ...rojector ID How to set Press the ID SET button on the remote control 1 Within five seconds press the one digit ID number set on the projector using the number 1 6 2 buttons If you press the ID ALL but...

Page 24: ...Chapter 2 Getting Started This chapter describes things you need to do before using the projector such as the setup and connections 24 ENGLISH...

Page 25: ...nu item Method Menu item Method PROJECTION METHOD REAR CEILING PROJECTION METHOD FRONT DESK Parts for ceiling mount Optional You can install the projector on the ceiling by using the optional ceiling...

Page 26: ...atio For 16 10 aspect ratio Screen diagonal SD Minimum distance LW Maximum distance LT Height position H Minimum distance LW Maximum distance LT Height position H Minimum distance LW Maximum distance...

Page 27: ...0 381 6 6 10 6 0 311 7 62 300 7 3 11 7 0 457 7 9 12 7 0 374 Projection distance formulas Any other projection distance can be obtained according to the screen dimensions m using the following calcula...

Page 28: ...to contract them You can adjust the projection angle vertically Feet lock latches Attention Heated air comes out of the air exhaust port while the lamp is lit Do not touch the air exhaust port direct...

Page 29: ...no optional cable is available for connection of the device f f prepare a necessary system connection cable to suit the device Video signals containing too much jitter may cause the images on the scr...

Page 30: ...t terminal HDMI IN terminal pin assignments and signal names Outside view Pin No Signal names Pin No Signal names T M D S data 2 T M D S clock shield T M D S data 2 shield T M D S clock T M D S data 2...

Page 31: ...nal devices Note For an HDMI cable use an HDMI High Speed cable that conforms to HDMI standards If a cable that does not conform to f f HDMI standards is used images may be interrupted or may not be d...

Page 32: ...memory you may have to reset the resume f f feature to operate the projector Connecting example Audio Note If the AUDIO IN SELECT settings are incorrect the projector may have malfunctions such as the...

Page 33: ...Chapter 3 Basic Operations This chapter describes basic operations to start with ENGLISH 33...

Page 34: ...s of the AC IN terminal on the back of the projector body and the power cord 1 connector and insert the plug completely in the correct direction until you hear the side tabs click in place Removing Tu...

Page 35: ...et to NORMAL 2 Orange Lit The projector is cooling down The power is switched off after a while Changes to the standby mode Green Lit Projecting Blinking The power is on and the lamp is not working Th...

Page 36: ...hange the settings of the PROJECTOR SETUP menu PROJECTION METHOD depending on 2 the installation mode page 25 Refer to Navigating through the menu f f page 45 for the operation of the menu screen Pres...

Page 37: ...f Note Do not put the projector in a case before the projector is cooled enough f f While the ON G STANDBY R indicator is lighting in orange the lamp is being cooled down and the projector cannot be...

Page 38: ...ge If the projected image or the position is not correct when the positioning of the projector and the screen is correctly installed adjust the focus and zoom Adjust the projection angle 1 Install the...

Page 39: ...the the model of the computer and the input signal f f Images may be disrupted for a few seconds during automatic adjustment but it is not a malfunction f f If you press any button on the remote cont...

Page 40: ...igating through the menu f f x page 45 for the operation of the on screen menu Press and hold the FUNCTION button for 3 seconds or more 2 Note After settings have been completed the assigned menu item...

Page 41: ...f f Press the P TIMER button again 3 You can restart the count f f Note Pressing the button for at least 3 seconds to release the P TIMER function f f For details please refer to the DISPLAY OPTION me...

Page 42: ...he DIGITAL ZOOM function will be cancelled f f When the input signals change during DIGITAL ZOOM the DIGITAL ZOOM function will be cancelled f f When DIGITAL ZOOM is active the FREEZE function is not...

Page 43: ...N P function is operating Switch the input source of the main screen r r Switch the input source as the same operation as the single screen Switch the input source of the sub screen r r When two scree...

Page 44: ...Chapter 4 Settings This chapter describes the settings and adjustments you can make using the on screen menu 44 ENGLISH...

Page 45: ...item from the main menu The selected item is highlighted in yellow f f Press the ENTER button 3 The submenu is displayed and submenu items become selectable f f Press 4 as to select the desired sub me...

Page 46: ...ing adjustment values to the factory default If the DEFAULT button on the remote control is pressed the values adjusted in the menu items are restored to the factory default settings button Press the...

Page 47: ...O IN terminal is selected 3 Only when the COMPUTER 1 IN HDMI IN terminal is selected 4 Note The factory default settings may vary depending on the picture mode f f POSITION Sub menu item Factory defau...

Page 48: ...ANGE 73 TEXT DISPLAY OFF 74 TEXT CHANGE 74 MENU LOCK OFF 74 MENU LOCK PASSWORD 74 CONTROL DEVICE SETUP 75 NETWORK Sub menu item Factory default Page WIRED LAN 76 NAME CHANGE 77 NETWORK CONTROL ON 77 A...

Page 49: ...RD The picture becomes suitable for projecting on a white board CINEMA 1 The picture becomes suitable for movie sources NATURAL 2 The picture complies with sRGB Only for the movie based signals 1 Only...

Page 50: ...2 Press the button Weakens colors TINT When input movie based signal to the S VIDEO IN VIDEO IN terminal only for NTSC NTSC4 43 signal You can adjust the skin tone in the projected image Press 1 as to...

Page 51: ...BRIGHTNESS B Press 4 qw or the ENTER button The individual adjustment screen of items are displayed f f Press 5 qw to adjust the value Items Operation Adjustment Adjustment range CONTRAST R Press the...

Page 52: ...INEMA REALITY NOISE REDUCTION Only when the S VIDEO IN VIDEO IN terminal is selected You can reduce noises when the input image is degraded and noise is occurring in the image signal Press 1 as to sel...

Page 53: ...R RGB Select it for RGB signal input YPBPR Select it for YPBPR signal input YCBCR Select it for YCBCR signal input When the COMPUTER 1 IN terminal is selected For 525i 480i 625i 576i 525p 480p and 625...

Page 54: ...o off ON Executes vertical keystone correction automatically when the projector is installed tilted KEYSTONE You can correct the trapezoidal distortion that occurs when the projector is installed tilt...

Page 55: ...alue is valid When KEYSTONE or CORNER CORRECTION f f adjustment is finished you adjust the other one the adjusted value will be reset Press the KEYSTONE button on the remote control when the KEYSTONE...

Page 56: ...inimize the effect of interference caused by projection of patterns consisting of vertical stripes The projection of the following striped pattern may cause cyclic patterns noise Adjust so that the am...

Page 57: ...o of the input signals AUTO 1 The aspect ratio is automatically switched to the optimum aspect ratio when an aspect ratio identifier is included in the input signal WIDE Displays images with the aspec...

Page 58: ...er for that program under copyright protection laws Take care when using a function of the projector such as the aspect ratio adjustment and zoom function If conventional normal 4 3 images which are n...

Page 59: ...enus settings adjustment screens control button names etc are displayed in the selected language f f The language can be changed to English German French Italian Spanish Portuguese Dutch Swedish Finni...

Page 60: ...ch each time you press the button f f DETAILED Displays the name of input terminal and input signal graphically OFF Disables the input guide SIMPLE Displays the name of input terminal and input signal...

Page 61: ...put of a computer or other device is connected to the HDMI IN terminal Note The optimal setting varies depending on the output setting of the connected external device Refer to the operation f f instr...

Page 62: ...ed f f Press 3 qw to switch the SCREEN FORMAT item The items will switch each time you press the button f f SCREEN FORMAT Description Range when SCREEN POSITION is selected 16 10 The projected aspect...

Page 63: ...isplay of the projected screen when there is no signal input Press 1 as to select BACK COLOR Press 2 qw to switch the item The items will switch each time you press the button f f BLUE Displays the en...

Page 64: ...arts counting Press the ENTER button 2 When you select START or RESTART the remaining time or the elapsed time will be displayed in the lower right of f f the projected image When you select STOP the...

Page 65: ...ch time you press the button as following f f LOWER RIGHT LOWER LEFT UPPER LEFT UPPER RIGHT LOWER RIGHT Note The P IN P function may be unavailable for some signals being input or terminals being sele...

Page 66: ...ion is required to calculate the rough estimate for lamp replacement 1 Formula for lamp replacement time rough estimate A x 1 B x 0 8 C x 2 3 A Runtime which is displayed in STATUS screen RUNTIME LAMP...

Page 67: ...ECTION METHOD Press 2 qw to switch the item The items will switch each time you press the button f f FRONT DESK When installing the projector on the desk etc in front of the screen FRONT CEILING When...

Page 68: ...WER SAVE cannot be set when the LAMP POWER is set f f to ECO2 Press 4 qw to switch the AUTO POWER SAVE ON Enables power saving mode OFF Disables power saving mode Press 5 as to select one item AMBIENT...

Page 69: ...MODE is set to NETWORK it takes less power consumption than it is set to NORMAL f f When STANDBY MODE is set to NETWORK it will be no restriction for network function and serial communication f f func...

Page 70: ...the menu item to be canceled main f f menu submenu or details menu and then pressing the FUNCTION button for at least 3 seconds AUDIO SETTING You can perform more detailed setting for Audio Adjusting...

Page 71: ...N 2 or AUDIO IN 3 VIDEO Select one item among AUDIO IN 1 AUDIO IN 2 or AUDIO IN 3 S VIDEO Select one item among AUDIO IN 1 AUDIO IN 2 or AUDIO IN 3 HDMI Select one item among HDMI AUDIO IN AUDIO IN 1...

Page 72: ...ER Displays the using time of the filter TIMER Sets the timer when you want to display an alert message of filter replacement FILTER COUNTER RESET Resets the filter counter Setting TIMER Press 1 as to...

Page 73: ...ayed when the power is turned on INITIALIZE ALL is executed or INITIALIZE in the NETWORK menu is executed When the entered password is incorrect the operation will be restricted to the power standby v...

Page 74: ...ENTER button The text is changed f f MENU LOCK Display the menu with the MENU button and set whether to enable menu operations Press 1 as to select MENU LOCK Press 2 qw to switch the item The items wi...

Page 75: ...ENABLE Enable the button operations DISABLE Disable the button operations A confirmation screen will be displayed when you change ENABLE to DISABLE f f Press 5 qw to select OK and then press the ENTER...

Page 76: ...r is connected additionally set IP ADDRESS SUBNET MASK and DEFAULT GATEWAY IP ADDRESS Enter the IP address if DHCP server is not used SUBNET MASK If not using a DHCP server enter the subnet mask DEFAU...

Page 77: ...ss 1 as to select NETWORK CONTROL Press 2 qw to switch the item The items will switch each time you press the button f f ON This function is enabled Web control PJLink control the command control of t...

Page 78: ...reen is displayed INITIALIZE This function is used to return various setting values of NETWORK to the factory default value Press 1 as to select INITIALIZE Press the ENTER button 2 The f f INITIALIZE...

Page 79: ...nected For details of f f Crestron Connected refer to the Crestron Electronics Inc website Provided only in English http www crestron com For the download of RoomView Express refer to the Crestron Ele...

Page 80: ...puters Change the password first f f page 89 The administrator rights allow use of all functions The user rights allow use of Projector status f f page 81 confirmation of the error information page pa...

Page 81: ...ON 2 Displays the firmware version of the projector POWER 3 Displays the status of the power PICTURE MODE 4 Displays the status of the picture mode SERIAL NUMBER 5 Displays the serial number of the pr...

Page 82: ...is too high The projector may be used in an operating environment where the temperature is high such as near a heating appliance EXHAUST AIR TEMPERATURE The exhaust air temperature is high The air exh...

Page 83: ...es the picture mode AV MUTE 4 Switches between AV mute on off POWER 5 Turns on off the power CLOSED CAPTION 6 Switches the closed caption mode Advanced control page Click Projector control Advanced co...

Page 84: ...ULT GATEWAY 5 Enter the default gateway address when not using a DHCP server DNS1 DNS2 6 Enter the DNS1 DNS2 server address Permissible available characters for the entry of DNS1 DNS2 server address p...

Page 85: ...ME 2 Enter the IP address or the server name of the E mail server SMTP To enter the server name the DNS server needs to beset up MAIL FROM 3 Enter the E mail address of the projector Up to 63 characte...

Page 86: ...e settings Authentication set up page Set the authentication items when POP authentication or SMTP authentication is necessary to send an E mail Click Detailed set up Authentication set up 1 2 3 4 5 6...

Page 87: ...AMP OK INTAKE AIR TEMPERATURE OK EXHAUST AIR TEMPERATURE OK OPTICS MODULE TEMPERATURE OK LAMP REMAIN TIME OK LAMP STATUS OK APERTURE CONTRAST SHUTTER OK AIR FILTER OK Error code 00 00 00 00 00 00 00 0...

Page 88: ...37 degC 98 degF Optics module temperature 39 degC 102 degF PROJECTOR RUNTIME 800 H LAMP NORMAL 100 H LAMP ECO1 500 H LAMP ECO2 200 H LAMP REMAIN 3400 H Current status MAIN VERSION 1 00 NETWORK VERSIO...

Page 89: ...n function SIGNAL DETECTION 4 Enable ON disable OFF the signal detection function AV MUTE DETECTION 5 Enable ON disable OFF the AV mute detection function POWER MANAGEMENT 6 Select the power consumpti...

Page 90: ...ssword Retype 6 Enter the desired new password again OK 7 Determines the change of password User account 1 2 3 5 4 Account User 1 Displays the account to change New User name 2 Enter the desired new u...

Page 91: ...ed is displayed by clicking Crestron Connected TM It is not displayed if Adobe Flash Player is not installed on the computer used or the browser used does not support Flash In that case click Back on...

Page 92: ...rent setting DNS Server Displays the current setting Exit 5 Returns to the control page Info page Click Info on the control page 4 5 6 7 1 2 3 8 Projector Name 1 Displays the projector name Mac Addres...

Page 93: ...Chapter 5 Maintenance This chapter describes methods of inspection when there are problems maintenance and replacements of the units ENGLISH 93...

Page 94: ...hting in red Flashing in red Flashing in red Slow Status Internal temperature is high warning Internal temperature is high standby status The projector detects an abnormal condition and cannot be turn...

Page 95: ...The lens is made of glass Impacts or excessive force when wiping may scratch its surface f f Please handle with care Replacing the unit Air filter unit The air filter prevents dust from accumulating o...

Page 96: ...e time is 0 after reset f f Attention Turn off the power before you replace the air filter unit f f When attaching the air filter unit make sure that the projector is stable and work in an environment...

Page 97: ...f When to replace the lamp unit The lamp unit is a consumable component Since its brightness gradually decreases over time it is necessary to replace the lamp unit regularly The estimated duration bef...

Page 98: ...on Tighten the three lamp unit fixing screws 3 securely with a Phillips screwdriver Attach the lamp cover 5 Attach the lamp cover and tighten the lamp cover fixing screw 1 securely with a Phillips scr...

Page 99: ...or s built in speaker f f is not available The MUTE function may have been turned on f f 29 32 42 70 42 22 42 70 The remote control does not operate The batteries may be weak f f The batteries may not...

Page 100: ...Chapter 6 Appendix This chapter describes specifications and after sales service for the projector 100 ENGLISH...

Page 101: ...errors range 0 2 3rd byte Indicates temperature errors range 0 2 4th byte Fixed at 0 5th byte Indicates filter errors range 0 2 6th byte Indicates other errors range 0 2 LAMP Lamp status query xxxxxx...

Page 102: ...3 xxxxxx yyyyy zzzzzzzz f f xxxxxx Administrator rights user name for WEB CONTROL Default user name is admin1 yyyyy Password of above administrator rights user Default password is panasonic zzzzzzzz 8...

Page 103: ...ta length 9 bytes 1 byte 1 byte 1 byte Mode 0 Non protect mode f f Command transmission method Transmit by the following command format Transmitted data r r Header Data section Termination symbol Comm...

Page 104: ...pin female Computer D Sub 9 pin male Communication cable straight Pin assignments and signal names D Sub 9 pin female Outside view Pin No Signal name Contents NC TXD Transmitted data RXD Received data...

Page 105: ...nds When transmitting multiple commands be sure to wait until 0 5 seconds has elapsed after receiving the response from the f f projector before sending the next command When transmitting a command wh...

Page 106: ...nts Parameter return string Remarks PON Power on To check if the power is on use the Power query command POF Power off IIS INPUT selection VID SVD RG1 RG2 HD1 VIDEO S VIDEO RGB1 RGB2 HDMI OSH AV mute...

Page 107: ...n setting the movie based signal 1080 24p 1080 24sF 1080 25p 1080 30p 1080 50p or 1080 60p for HDMI input the f f two window display function will be disabled The image of the sub window picture may b...

Page 108: ...25p 1 920 x 1 080 28 1 25 0 74 3 C Y H 1125 1080 30p 1 920 x 1 080 33 8 30 0 74 3 C Y H 1125 1080 60p 1 920 x 1 080 67 5 60 0 148 5 C Y H l 1125 1080 50p 1 920 x 1 080 56 3 50 0 148 5 C Y H l VESA400...

Page 109: ...is only for RGB signals input 1 Where marked 2 l signals indicates in Plug and Play is compatible with EDID of projector Unmarked signals in Plug and Play may also be compliant if input terminals are...

Page 110: ...625i 576i Horizontal 15 63 kHz Vertical 50 Hz 625p 576p Horizontal 31 25 kHz Vertical 50 Hz 750 720 50p Horizontal 37 50 kHz Vertical 50 Hz 1125 1080 50i Horizontal 28 13 kHz Vertical 50 Hz HD SYNC a...

Page 111: ...AN 1 for RJ 45 network connection PJLink compatible Power cable length For Europe U K and USA 2 0 m 78 3 4 For India 3 0 m 118 1 8 Cabinet Molded plastic Dimensions Width 352 mm 13 86 Height 98 mm 3 8...

Page 112: ...imensions Unit mm inch 113 0 4 45 255 0 10 04 352 0 13 86 24 4 0 96 98 0 3 86 90 0 3 54 326 0 12 83 198 0 7 80 54 8 2 16 Actual dimension may differ by product 112 ENGLISH Chapter 6 Appendix Dimension...

Page 113: ...ured by Panasonic or the inappropriate choice of location for installation even if the warranty period of the projector has not expired Unused products must be removed promptly by a qualified technici...

Page 114: ...dicator 94 LAMP POWER 68 Lamp unit 96 LANGUAGE 59 List of compatible signals 108 M Main menu 46 Maintenance 95 Making adjustments and selections 36 MENU LOCK 74 MENU LOCK PASSWORD 74 Menu Navigation 4...

Page 115: ...f old products and batteries please contact your local municipality your waste disposal service or the point of sale where you purchased the items Penalties may be applicable for incorrect disposal of...

Reviews: