background image

Remote control operation

Basic Operation

28 - 

E

NGLISH

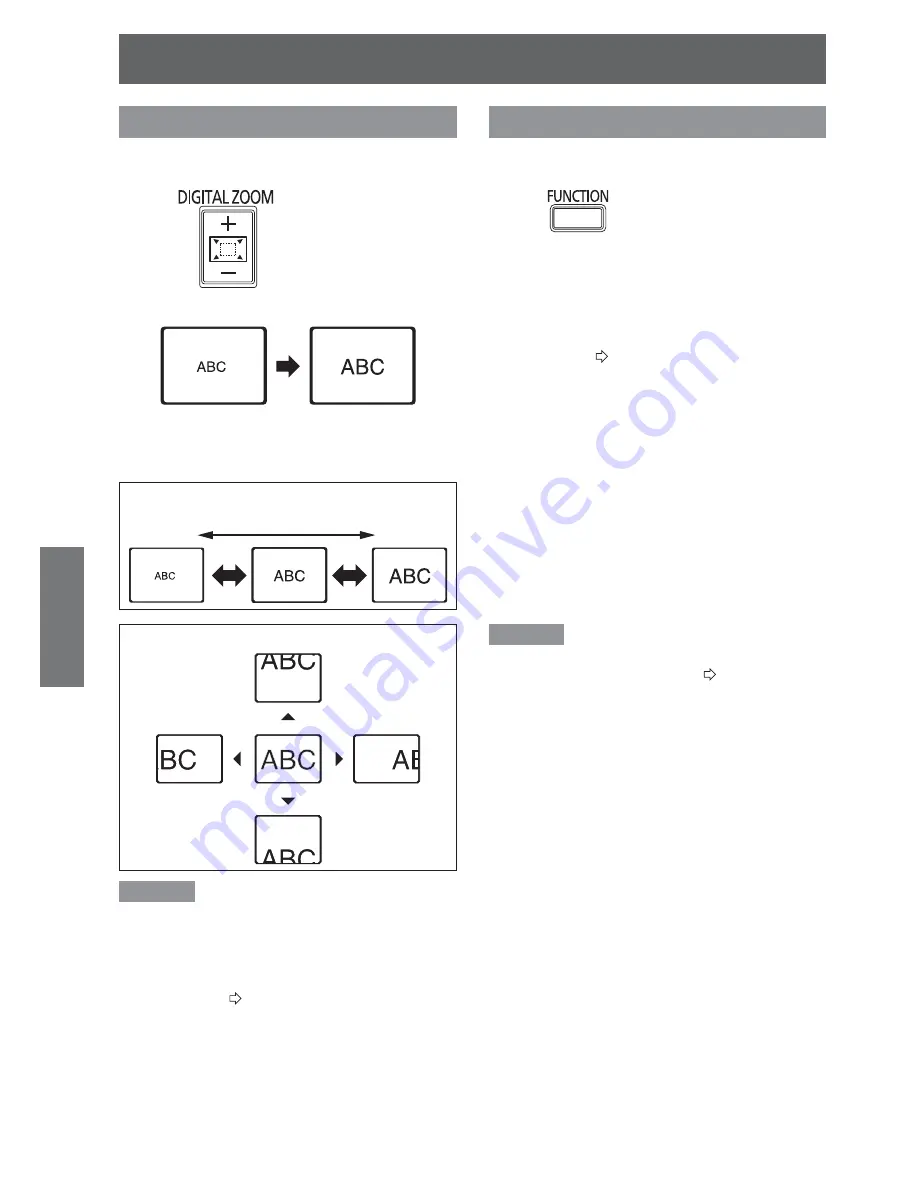
Enlarging the image

You can enlarge the projected image down to a centred 
area for emphasizing within the range of 1× to 2×.

Press

 button.

Press the 

RETURN

 button to escape.

J

%XWWRQIXQFWLRQVLQGLJLWDO]RRP

mode

+ button: zooms in
- button: zooms out

Press “-”

Press “+”

3UHVVŸźŻŹWRVKLIWWKHFHQWUHSRLQW

5HPDUNV

When the 

z

COMPUTER

 signal is projected, the 

enlargement range will be changed to 1× to 3×. 
When

)5$0(/2&.

 in the 

POSITION

 menu is set 

to

ON

, the enlargement range is 1× to 2×. However, 

the enlargement range is 1× to 3× if 

)5$0(/2&.

is set to 

2))

. (

¨

page 36)

When the input signal is changed while the 

z

DIGITAL ZOOM

 is activated, the 

DIGITAL ZOOM

mode will be cancelled.
While the 

z

DIGITAL ZOOM

 is activated, the 

AUTO 

SETUP

,

)5((=(

,

'()$8/7

,

INDEX-WINDOW

and

)81&7,21

 (except when 

AV MUTE

 is 

assigned) buttons are not available.

Using an assigned function

You can select a useful function from the list and 
assign it to the 

)81&7,21

 button for a short-cut.

Press

 button.

Press the MENU button of the control 

1 )

panel or remote control to display the 
on screen menu (main menu, sub-
menu or detailed menu) .

For the menu operation, see “Navigating through 
the MENU”. (

¨

page 29)

3UHVVDQGKROGWKH)81&7,21EXWWRQ

2 )

of the control panel or remote control 
for 3 seconds or more.

:KHQQRWXVLQJWKH)81&7,21EXWWRQ

Q

Select DISABLE in this menu 

1 )

)81&7,21%87721LQWKH

PROJECTOR SETUP menu).

Press the ENTER button.

2 )

Select OK.

3 )

Press the ENTER button.

4 )

5HPDUNV

For details, see “FUNCTION BUTTON” in the 

z

“PROJECTOR SETUP menu”. (

¨

page 43)

Summary of Contents for PT-LB75VE

Page 1: ...jector Commercial Use Thank you for purchasing a Panasonic Projector Before operating this product please read the instructions carefully and save this manual J for future use Before using your projector be sure to read Precautions with regard to safety pages 8 12 TQBJ0303 ENGLISH ...

Page 2: ...ket when this unit is not in use for a prolonged period of time 7R SUHYHQW HOHFWULF VKRFN GR QRW UHPRYH FRYHU 1R XVHU VHUYLFHDEOH SDUWV LQVLGH 5HIHU VHUYLFLQJ WR TXDOL HG service personnel 3 Do not remove the earthing pin on the mains plug This apparatus is equipped with a three prong earthing W SH PDLQV SOXJ 7KLV SOXJ ZLOO RQO W DQ HDUWKLQJ W SH PDLQV VRFNHW 7KLV LV D VDIHW IHDWXUH I RX DUH unabl...

Page 3: ...rmation about collection and recycling of old products and batteries please contact your local municipality your waste disposal service or the point of sale where you purchased the items Penalties may be applicable for incorrect disposal of this waste in accordance with national legisla tion RU EXVLQHVV XVHUV LQ WKH XURSHDQ 8QLRQ If you wish to discard electrical and electronic equipment please co...

Page 4: ... 3DQDVRQLF Testing Centre Winsbergring 15 22525 Hamburg F R Germany H SURGXLW HVW FRQoX SRXU O XWLOLVDWLRQ GDQV OHV SD V VXLYDQWV Autriche Belgique Bulgarie République Tchéquie Chypre Danemark Estonie Finlande France Allemagne Grèce Hongrie Islande Irlande Italie Lettonie Lituanie Luxembourg Malte Pays Bas Norvège Pologne Portugal Roumanie Slovénie Slovaquie Espagne Suède Suisse et Royaume Uni Les...

Page 5: ...Important Safety Notice Important Information ENGLISH 5 ...

Page 6: ... Declaration of Conformity 4 Precautions with regard to safety 8 WARNING 8 CAUTION 9 Cautions when transporting 10 Cautions when installing 10 Cautions on use 11 Security 11 Cleaning and maintenance 11 Disposal 11 Accessories 12 Preparation 5HDG WKLV UVW 13 About Your Projector 14 Projector body 14 Remote control 16 Getting Started Setting up 17 Screen size and throw distance 17 Projection method ...

Page 7: ...CH 39 BACK COLOR 39 WIDE MODE 39 SXGA MODE 39 OTHER FUNCTIONS 40 PROJECTOR SETUP menu 41 STATUS 41 NO SIGNAL SHUT OFF 41 INITIAL START UP 41 INSTALLATION 41 HIGH ALTITUDE MODE 41 STANDBY MODE 42 LAMP POWER 42 LAMP RUNTIME 42 EMULATE 42 FUNCTION BUTTON 43 AUDIO SETTING 43 TEST PATTERN 44 INITIALIZE ALL 44 SECURITY menu 45 PASSWORD 45 PASSWORD CHANGE 45 TEXT DISPLAY 45 TEXT CHANGE 45 MENU LOCK 46 ME...

Page 8: ... using too many DGDSWHUV RYHUKHDWLQJ PD RFFXU DQG UH ZLOO UHVXOW ON USE INSTALLATION Do not place liquid containers on top of the projector I ZDWHU VSLOOV RQWR WKH SURMHFWRU RU JHWV LQVLGH LW UH RU electric shocks will result If any water gets inside the projector contact an Authorised Service Centre Do not place the projector on soft materi als such as carpets or sponge mats Doing so will cause t...

Page 9: ...moved Remove the empty batteries from the remote con z trol at once Insulate the battery using tape or something similar z before disposal Do not allow children to reach the batter ies The battery can cause death by suffocation if swal z lowed If swallowed seek medical advice immediately z I WKH EDWWHU ÀXLG OHDNV GR QRW WRXFK LW ZLWK EDUH KDQGV DQG WDNH WKH IROORZLQJ measures if necessary DWWHU ÀX...

Page 10: ...it gently into the carrying bag Do not put anything other than the projector and its z accessories in the carrying bag Cautions when installing Do not use under the following conditions Do not set up the projector outdoors z The projector is designed for indoor use only Avoid setting up in places which are subject to z YLEUDWLRQ RU VKRFNV If the projector is installed in a place where vibra tions ...

Page 11: ...vailable shielded interface cable Optical components It may be necessary to replace the optical compo nents such as Liquid crystal panels and Polarizing plates in less than 1 year if using the projector in a high temperature environment or in a very dusty oily smoke or tobacco smoke environment For more details please contact your dealer Liquid crystal panel The Liquid crystal panels are precision...

Page 12: ...or PT LB90E LB78VE LB75VE 1 N2QAYB000262 Mains lead 1 K2CM3DR00004 RGB signal cable 1 1 8 m 5 10 K1HA15DA0002 Power cord secure lock 1 TTRA0185 R6 size batteries for Remote control 2 Carrying bag 1 TPEP021 CD ROM 1 TXFQB02VKJ2 PT LB90NTE only Note The protectors for enclosed products such as a plug cover or foam cartons must be treated properly z Contact to an Authorised Service Centre for lost ac...

Page 13: ...RQV WR VHOHFW WKH UHTXLUHG 1 menu 3UHVV ŻŹEXWWRQV WR FKDQJH WKH VHWWLQJV 2 RI 167 7 21 RU 7 78 MODE RETURN SELECT ENTER INSTALLATION INITIAL SETTING FRONT DESK HIGH ALTITUDE MODE SWITCH TO HIGH ALTITUDE MODE ON IF OVER 1400m 4593Ft OFF INSTALLATION z page 18 41 5217 DESK 6HWWLQJ RQ D GHVN ÀRRU DQG projecting from front 5217 CEILING Mounting in the ceiling with a ceiling mount bracket sold separate...

Page 14: ...RP RFXV ULQJ FRYHU Control panel Note Do not use other than a provided mains lead z Do not cover the ventilation openings of the air intake port or air outlet port z After adjusting the zoom and focus be sure to close the Zoom Focus ring cover to protect from dust z Do not apply extreme force on the Zoom Focus ring cover z J Control panel RELEASE button Press to release the locked POWER button whe...

Page 15: ...le page 18 25 Terminals J VARIABLE AUDIO OUT Connect an audio cable for outputting audio signals to the connected equipment page 19 20 COMPUTER1 IN COMPUTER2 IN Connect a computer or YPBPR signal cable page 20 S VIDEO VIDEO IN Connect a S VIDEO signal cable or an RCA composite video cable page 19 AUDIO IN Connect audio cables for inputting audio signal corresponding to VIDEO IN S VIDEO IN page 19 ...

Page 16: ...5 button is only for PT LB90NTE See CD ROM contents Assign a useful function for a shortcut page 28 43 Control to adjust the volume of the speaker page 27 Note Do not drop the remote control z Avoid contact with liquids or moisture z Do not attempt to modify or disassemble the remote control z Do not mix old and new batteries or batteries of different types z Use only manganese batteries or alkali...

Page 17: ...0 5 8 m 19 0 7 0 m 22 11 6 3 m 20 8 7 6 m 24 11 6 35 m 250 7 3 m 23 11 8 7 m 28 6 7 9 m 25 11 9 5 m 31 2 7 62 m 300 8 7 m 28 6 10 5 m 34 5 9 5 m 31 2 11 4 m 37 4 You can calculate more detailed screen dimensions from the screen diagonal The results below are approximate and may differ slightly from the actual measurements If the projection size is SD For 4 3 aspect ratio For 16 9 aspect ratio Scre...

Page 18: ...QG J projecting from rear Using translucent screen Mounting in the ceiling and J projecting from rear Using translucent screen Menu Method INSTALLATION REAR DESK Menu Method INSTALLATION REAR CEILING 5HPDUNV When mounting the projector in the ceiling the optional ceiling mount bracket ET PKB80 is required z URQW OHJ DGMXVWHUV DQG WKURZLQJ DQJOH You can adjust the projection angle in the vertical d...

Page 19: ...ffected by signal jitter the projected image may have poor image quality and timebase z correction is effective RQ UP WKH W SH RI YLGHR VLJQDOV VHH LVW RI FRPSDWLEOH VLJQDOV z page 54 RQQHFWLQJ H DPSOH 9 HTXLSPHQW or To S VIDEO output To video output or audio output DVD player Video player Audio system To audio input 5HPDUNV When you connect more than one AV equipment switch the audio connection m...

Page 20: ... LQJ VFUHZV RQ WKH 6XE SLQ z mains socket 5HPDUNV For the network connection between the projector and computers see the CD ROM contents provided z PT LB90NTE only When you connect more than one computer switch the computer connection manually z One RGB cable is provided with the projector If necessary prepare commercial connecting cables that match z with the projector and each peripheral device ...

Page 21: ...mains VRFNHW J Disconnecting 1 Unplug the mains lead from the mains VRFNHW 2 Depress the latch and slide the cover off Latch 6OLGH WKH SRZHU FRUG VHFXUH ORFN XS along the side guide rail and remove Rail guide ROG WKH SOXJ DQG XQSOXJ WKH PDLQV lead from the AC IN terminal on the EDFN RI WKH SURMHFWRU Direct power off function J You can switch off the electric power supply any time by unplugging the...

Page 22: ...KLQJ No power is supplied and the internal cooling fan is not operating Red Lit The power is turned off when STANDBY MODE is set to ECO If the POWER button is pressed projection starts Flashing The power is turned off when STANDBY MODE is set to NORMAL Green Flashing The power is on and preparing for projection Lit The projector is projecting Orange Lit No power supply and the internal fan is cool...

Page 23: ...OL PANEL when operating with the projector body or REMOTE CONTROLLER when operating with the remote control under CONTROL DEVICE SETUP in the SECURITY menu is set to ENABLE page 46 The projector does not operate when the z POWER button of the projector body is pressed while it is locked If the z POWER button is not being pressed in 10 seconds after the RELEASE button is pressed the POWER LOCK indi...

Page 24: ...cator lights in orange Wait until the POWER LOCK indicator and POWER indicator turn into red If z STANDBY MODE is set to NORMAL the POWER LQGLFDWRU ÀDVKHV LQ UHG page 42 You can set to z ON or 2 the beeping sound that occurs when the POWER button is in operation in AUDIO SETTING page 43 After the POWER LOCK indicator and POWER indicator light in red disconnect the 3 PDLQV SOXJ IURP WKH PDLQV VRFNH...

Page 25: ...hange the setting of the z PICTURE menu according to the connected device and DVD video tape etc to be played page 33 RQ UP WKH DVSHFW UDWLR RI WKH VFUHHQ DQG LPDJH z Select the optimum aspect ratio page 35 Positioning the image KHQ VHWWLQJ XS WKH SURMHFWRU IRU WKH UVW WLPH RU VHWWLQJ XS DW D QHZ SODFH RX PXVW SHUIRUP WKH IROORZLQJ RSHUDWLRQV 1 Adjust the vertical angle of the projector Place the ...

Page 26: ...ted by Wireless Manager from computer through network page 47 VIDEO J Press button Press the VIDEO button to cycle through the options S VIDEO Signal input to S VIDEO IN terminal VIDEO Signal input to VIDEO IN terminal If INPUT GUIDE under the ON SCREEN DISPLAY in the DISPLAY OPTION menu is set to DETAILED page 38 RX FDQ FRQ UP WKH VHOHFWHG LQSXW terminal in the graphical input terminal guide at t...

Page 27: ...button increases the volume z z button decreases the volume Projecting an image in INDEX WINDOW mode You can project an image split in 2 windows as an INDEX WINDOW One is frozen and stored in PHPRU DQG GLVSOD HG RQ WKH VFUHHQ V OHIW VLGH ZKLOH displaying subsequent image continues on the right Press button Press the RETURN button to escape The image being projected when the INDEX WINDOW button is ...

Page 28: ...the DIGITAL ZOOM mode will be cancelled While the z DIGITAL ZOOM is activated the AUTO SETUP 5 8 7 INDEX WINDOW and 81 7 21 except when AV MUTE is assigned buttons are not available Using an assigned function You can select a useful function from the list and assign it to the 81 7 21 button for a short cut Press button Press the MENU button of the control 1 panel or remote control to display the o...

Page 29: ...LB90NTE only 1 5HPDUNV Press the z MENU or RETURN button to return to the previous menu Press repeatedly to escape from the menu mode and return to the projection Some items and functions may not be adjusted or z available depending on the selected input signals Some settings are adjustable without any signals z Called up item will disappear after 5 seconds z without any operation and return to th...

Page 30: ...GUAGE DISPLAY OPTION PROJECTOR SETUP SECURITY NETWORK PT LB90NTE only Select the required sub menu item and press ENTER to display the detailed menu PICTURE J S VIDEO VIDEO RGB Q Moving image YPBPR signal is input 1 Sub menu item Default Page PICTURE MODE STANDARD 32 CONTRAST 0 32 5 71 66 0 32 COLOR 0 32 TINT 0 32 6 531 66 0 32 COLOR TEMPERATURE 8 7 32 7 9 AUTO 33 STILL MODE 2 2 33 NOISE REDUCTION...

Page 31: ...DO DQG WKH VSHFL F VHWWLQJ PROJECTOR SETUP J Sub menu item Default Page STATUS 41 12 6 1 6 87 2 DISABLE 41 INITIAL START UP LAST MEMORY 41 INSTALLATION 5217 6 41 7 78 02 2 41 STANDBY MODE ECO 42 LAMP POWER NORMAL 42 LAMP RUNTIME 42 EMULATE 8 7 42 81 7 21 87721 STATUS 43 AUDIO SETTING 43 TEST PATTERN 44 INITIALIZE ALL 44 SECURITY J Sub menu item Default Page PASSWORD 2 45 3 66 25 1 45 TEXT DISPLAY ...

Page 32: ...ou can adjust the contrast of the projected image Lower LJKHU 5 71 66 You can adjust the brightness of the projected image DUNHU Brighter COLOR You can adjust the colour saturation of the projected image Available with signals of S VIDEO VIDEO RGB Moving image YPBPR only Lighter DUNHU TINT You can adjust the skin tone in the projected image Available with signals of S VIDEO VIDEO RGB Moving image ...

Page 33: ...ic noise reduction Note NOISE REDUCTION z is set active when the selected input signal has less noise Applying noise reduction may affect the image quality if so set to 2 TV SYSTEM When the video signal is changed the setting switches automatically You can switch the setting manually to match the video data Available with signals of S VIDEO VIDEO only Change setting Change setting AUTO NTSC NTSC4 ...

Page 34: ...ll affect the z aspect ratio and the size of the image 6 7 SHIFT H V 0 0 RUL RQWDO 3UHVV ŻŹ EXWWRQV WR PRYH WKH LPDJH horizontally 9HUWLFDO 9 3UHVV Ÿź EXWWRQV WR PRYH WKH LPDJH vertically 5HPDUNV The image cannot be moved while network signals z are input 3UHVV ŻŹŸź EXWWRQV WR PRYH WKH LPDJH z 6 7 9 Available with signal of network only while ASPECT is set to 7 3UHVV ŻŹ EXWWRQV WR PRYH WKH LPDJH Y...

Page 35: ...image in the most optimal aspect ratio 4 3 J When a standard signal 1 is input it is projected in 4 3 aspect ratio Input signal XGA z Image 16 9 J When a standard signal 1 is input it is projected in 16 9 aspect ratio When a wide signal 2 is input it is projected in the current input aspect ratio Input signal 1 080 60i z Image Panel 7 J When a standard signal 1 is input it is projected without cha...

Page 36: ...he image may distort or some portions may be cropped Select an aspect ratio 4 3 which preserves the intention of the image creator 5HPDUNV The order of z ASPECT W SHV LV GH QHG QRW RQO E the input method but also by the input signals If you project a copyrighted image enlarged or z distorted by using ASPECT function in commercial use in a public place such as a restaurant or hotel you might infrin...

Page 37: ...u and then display the sub menu 6HOHFW WKH UHTXLUHG ODQJXDJH ZLWKŸźEXWWRQV z and press the ENTER button to set Remote control Control panel PICTURE POSITION DISPLAY OPTION PROJECTOR SETUP SECURITY NETWORK LANGUAGE PICTURE POSITION DISPLAY OPTION PROJECTOR SETUP SECURITY NETWORK LANGUAGE The set language is highlighted ...

Page 38: ...mmand Panasonic NEC DELL EPSON Acer HP SHARP TOSHIBA FUJITSU Apple lenovo SONY 5HPDUNV The key commands are depending on the z manufacturers Please refer to the instructions which were provided with the computers for more detailed information OSD DESIGN J You can change the background of the on screen menu OSD TYPE1 Semi transparent black TYPE2 Solid blue TYPE3 Semi transparent dark blue WARNING M...

Page 39: ...utomatic AUTO SETUP adjustment system Change setting Change setting AUTO When the projector detects a COMPUTER signal automatically set the setting of 6 7 DOT CLOCK and 2 3 6 in the POSITION menu BUTTON Only when the AUTO SETUP button is pressed automatically set the 6 7 DOT CLOCK and 2 3 6 in POSITION menu for COMPUTER signals page 27 6 1 6 5 You can turn off the auto signal detecting system Chan...

Page 40: ...cture While the image is frozen the audio sound through the projector will stop Press the RETURN button to escape AV MUTE J If you will not be using the projector for some time you can stop the projection and audio sound temporarily Press the RETURN button to escape INDEX WINDOW J For details see INDEX WINDOW display page 27 DIGITAL ZOOM J DIGITAL ZOOM 0 Ź EXWWRQ RRPV LQ Ż EXWWRQ RRPV RXW Press th...

Page 41: ...hange setting LAST MEMORY Projector starts from the last image before the mains plug was disconnected STANDBY Projector starts in the standby mode ON Projector starts immediately INSTALLATION When installing the projector select the projection method according to the projector position page 18 Change setting Change setting 5217 DESK 6HWWLQJ RQ D GHVN ÀRRU DQG projecting from front 5217 CEILING Mou...

Page 42: ... relevant matter for lamp replacement timing See Replacing the Lamp unit page 50 Check the lamp unit replacement time z page 50 5HPDUNV If the lamp runtime has reached 2 800 hours z the red time indicator and grey marks appear alternately to notify you of the lamp replacement time The lamp life varies with its condition of use number z of power on times etc EMULATE When the projector is controlled...

Page 43: ...setting for Audio J VOLUME You can adjust the volume of the built in monaural speaker and VARIABLE AUDIO OUT terminal 1 1 BALANCE J You can adjust to hear the sound played equally through both right and left external stereo speakers or shift the balance so more sound plays through the left or right side Left Right IN STANDBY MODE J You can turn ON or OFF the audio output in the standby mode Change...

Page 44: ...d settings in the MENU to the factory defaults If the z ENTER button is pressed in the INITIALIZE ALL menu INITIALIZE ALL will display Select OK and press the ENTER button NOW INITIALIZING is displayed Then POWER 2 is displayed Select OK and turn off the power according to the instruction All other buttons are deactivated The z INITIAL SETTING menu screen will display when the power is connected p...

Page 45: ...ntrols will be disabled except the POWER button 3 66 25 1 You can change the password operation to your original 3UHVVŸźŻŹEXWWRQV WR FKDQJH WKH 1 password Up to eight button operations can be set Press the ENTER button 2 Input the password again and press 3 the ENTER button 5HPDUNV The entered password operations will appear as z asterisks in the box If a series of button operation is incorrect yo...

Page 46: ...d is set as AAAA Change your password regularly Do not use a z simple password that is too easy to guess To reset the password to the initial password see z MENU LOCK PASSWORD page 56 CONTROL DEVICE SETUP You can enable disable the button operations of the control panel and remote control Change setting Change setting J CONTROL PANEL ENABLE Enable the button operations DISABLE Disable the button o...

Page 47: ...e network connection you must turn this function ON 3 66 25 1 J You can change the password for the network connection NETWORK CONTROL J When controlling the projector with a computer on the network you must turn this function ON LIVE MODE CUT IN J Set this function to ON to allow other users to connect to live mode while the projector is operating in the live mode of the network 20387 5 6 5 J You...

Page 48: ... unit page 50 5HPDUNV If the z LAMP LQGLFDWRU VWLOO OLJKWV RU ÀDVKHV DIWHU WKH DERYH UHPHG FRQWDFW DQ XWKRULVHG 6HUYLFH HQWUH J TEMP indicator Indicator Illuminating red while projecting and the alert will be displayed z Flashing red and power is turned off z Problem The temperature inside and or outside the projector is abnormally high The projection may becomes darker than usual z The internal f...

Page 49: ... surface of the lens cover glass It will be enlarged and projected onto the screen Wipe off dirt and dust gently with a lint free cloth Do not wipe the lens cover with a cloth which has collected dust Note Clean the lens cover with special care Giving a shock may cause serious damage z J LU OWHU I WKH DLU OWHU LV H FHVVLYHO GLUW WKH LQWHUQDO WHPSHUDWXUH RI WKH SURMHFWRU LQFUHDVHV WKH TEMP indicato...

Page 50: ...tly under the projector or put your face close to the projector and pull out the lamp horizontally Note Prior to replacing the lamp unit allow it to cool down to prevent the risk of burns damage and other hazards z 5HPDUNV Do not attempt replacement with an unauthorised lamp unit z Lamp unit replacement time J When the lamp is consumed the brightness may decrease over time 3 000 hours of use is th...

Page 51: ...jector page 24 ZDLW IRU DW OHDVW KRXU DQG FKHFN LI WKH ODPS XQLW ERWWRP LV cooled 8VH D 3KLOOLSV KHDG VFUHZGULYHU WR ORRVHQ WKH ODPS XQLW FRYHU LQJ VFUHZV RQ WKH 2 EDFN RI WKH SURMHFWRU XQWLO WKH VFUHZV WXUQ ORRVH DQG UHPRYH WKH ODPS XQLW FRYHU Lamp unit cover LQJ VFUHZV Lamp unit cover 8VH D 3KLOOLSV KHDG VFUHZGULYHU WR ORRVHQ WKH ODPS XQLW LQJ VFUHZV 3XOO WKH 3 used lamp unit gently from the pro...

Page 52: ...UHVVŸźEXWWRQV WR VFUROO WR 8 the PROJECTOR SETUP menu Press the ENTER button to select the PROJECTOR SETUP menu and 9 SUHVVŸźEXWWRQV WR VHOHFW 03 5817 0 3UHVV DQG KROG WKH 17 5 EXWWRQ IRU DSSUR LPDWHO VHFRQGV 10 The z LAMP RUNTIME FRQ UPDWLRQ VFUHHQ LV GLVSOD HG LAMP RUNTIME LAMP RUNTIME RESET OK CANCEL PRESS ANY OTHER BUTTON PRESS BUTTON Note If any button other than the z POWER button is pressed...

Page 53: ... 15 The remote control does not operate The batteries may be weak z The batteries may not have been inserted correctly z 16 The remote control signal receptor on the projector may be obstructed z 16 The remote control unit may be out of the operation range z 16 REMOTE CONTROLLER z in the PROJECTOR SETUP menu is invalidated 46 7KH UHPRWH FRQWURO LV XQGHU D VWURQJ OLJKW VXFK DV ÀXRUHVFHQW z 16 The c...

Page 54: ...85 1 56 3 A MAC 832 624 49 7 74 6 57 3 A XGA 1 024 768 39 6 50 1 51 9 AA 1 024 768 48 4 60 65 AA 1 024 768 56 5 70 1 75 AA 1 024 768 60 75 78 8 AA 1 024 768 68 7 85 94 5 AA MXGA 1 152 864 64 71 2 94 2 A 1 152 864 67 5 74 9 108 A 1 152 864 76 7 85 121 5 B MAC 1 152 870 68 7 75 1 100 A MSXGA 1 280 960 60 60 108 A SXGA 1 280 1 024 64 60 108 A 1 280 1 024 80 75 135 B 1 280 1 024 91 1 85 157 5 B SXGA60...

Page 55: ...e 9 600 bps X parameter None Parity None S parameter None Basic format J STX Command Parameter ETX Start byte 02 h 1 byte 3 bytes 1 byte 4 bytes End 03 h The data streaming from the computer will start with STX and proceed to Command Parameter and end with ETX You can add the required parameter Note The projector can not receive any command for 10 seconds after the lamp is switched on Wait for 10 ...

Page 56: ...ly Q S Lamp condition query Call back 0 Standby 1 Lamp on control active 2 Lamp on 3 Lamp off control active 26 AV mute Turning off the projection and sound temporarily Send the command to switch between off and on page 26 Do not send the command consecutively 0 Off 1 On 5HPDUNV If z STANDBY MODE is set to ECO only PON and Q S command can be used in the standby mode LAN terminal Name and function ...

Page 57: ...M 3URMHFWLRQ VL H 33 300 838 2 mm 7 620 mm 2SWLFDO D LV HG Throw distance 1 1 m 11 4 m 3 7 37 4 Screen aspect ratio 4 3 Installation FRONT DESK FRONT CEILING REAR DESK REAR CEILING Menu selection method 6SHDNHU 1 piece 4 cm 2 cm 1 5 8 3 4 0D XVHDEOH YROXPH RXWSXW 1 0 W Monaural Terminals S VIDEO IN Single line Mini DIN 4p 9 S S 9 S S ȍ VIDEO IN Single line RCA pin jack 9 S S ȍ COMPUTER Dual line D...

Page 58: ...battery 2 Operating range Approx 15 m 49 2 when operated directly in front of signal receptor Weight Approx 117 g 4 2 ozs including batteries Dimensions Width 48 mm 1 7 8 z Length 163 mm 6 3 8 z Height 24 5 mm 1 not including surface projection parts z Options HLOLQJ EUDFNHW ET PKB80 Average value Each product has an individual variability in weight 3 HLOLQJ PRXQW EUDFNHW VDIHJXDUGV QVWDOODWLRQ ZR...

Page 59: ...OCK PASSWORD 46 56 Menu Navigation 29 N Navigating through the MENU 29 NETWORK menu 47 NOISE REDUCTION 33 NO SIGNAL SHUT OFF 41 O ON SCREEN DISPLAY 38 ON SCREEN MENU 30 OTHER FUNCTIONS 40 OVER SCAN 35 P PASSWORD 45 PASSWORD CHANGE 45 PICTURE menu 32 PICTURE MODE 32 Positioning the image 25 POSITION menu 34 POWER indicator status 22 POWER LOCK indicator status 22 Projection method 18 Projector body...

Page 60: ...V VGA and XGA are trademarks of International Business Machines Corporation z S VGA is a registered trademark of the Video Electronics Standards Association z 0 WKH 0 ORJR DQG LJK H QLWLRQ 0XOWLPHGLD QWHUIDFH DUH WUDGHPDUNV RU UHJLVWHUHG WUDGHPDUNV RI z HDMI Licensing LLC The font used in the on screen displays is a Ricoh bitmap font which is manufactured and sold by Ricoh z Company Ltd All other ...

Reviews: