Note:
·
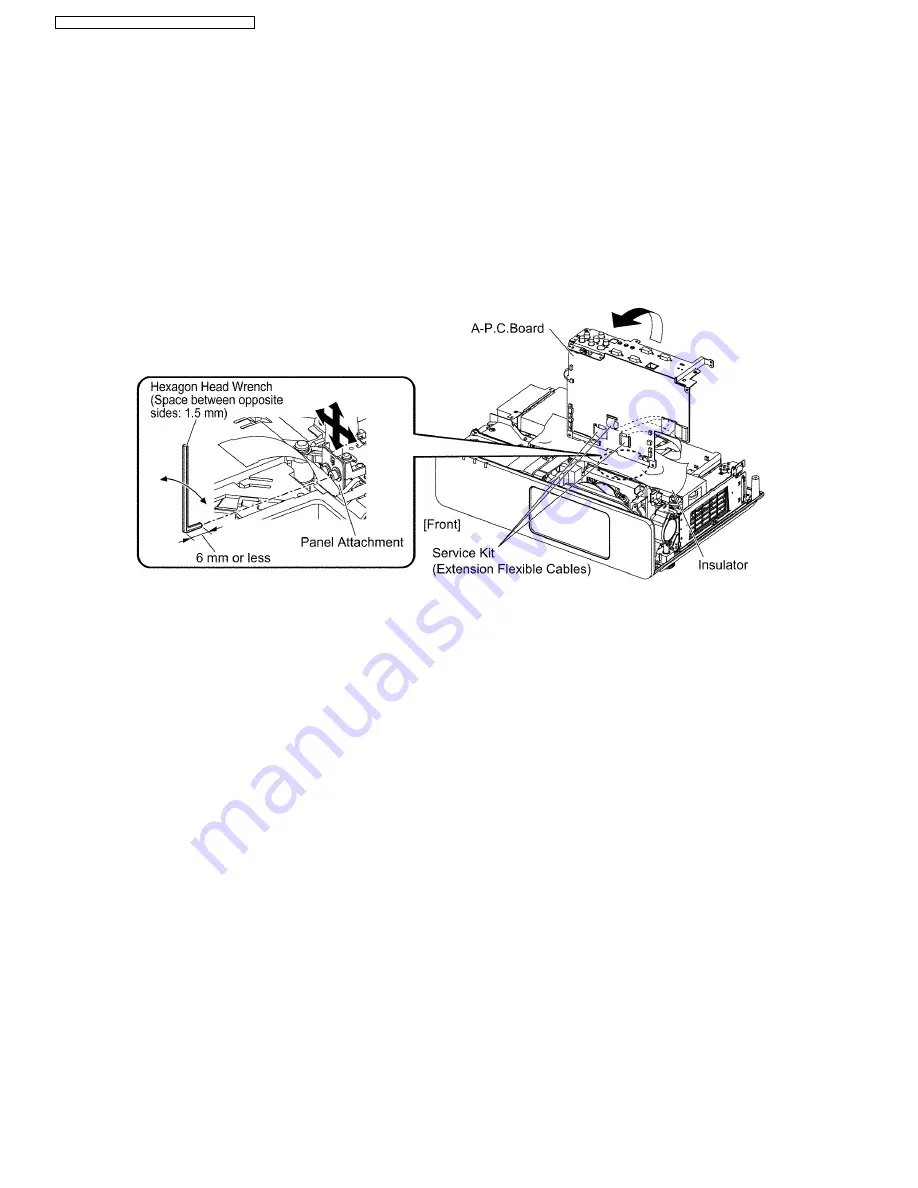
See figures in the section 7.19. "Replacement of LCD Panel (B)" for 2 screws fixing the panel adjuster and 2 screws
fixing the panel attachment.
2. Reassemble the projector in the reverse order of disassembling, but leave the upper case and the screws fixing the A-
P.C.Board block as they are removed.
3. Disconnect the connector between L-P.C.Board and A-P.C.Board (A26).
4. Connect the service kit (extension flexible cables).
·
Each flexible cable of LCD Panels (R/G/B) - Connectors (A1/A2/A3) on A-P.C.Board
5. Covering with an insulator (cloth or the like) to prevent a short circuit, set the A-P.C.Board block on the main unit.
Note:
·
Handle with care not to apply external force to connecting parts which connect the main unit and A-P.C.Board.
8.4.3. Adjustment Procedure
Prepare 2 pieces of thick black paper (23 mm × 100 mm) that can be shaded.
·
Cover and shade LCD panels (R) and (G) with the paper.
1. Display the green crosshatch pattern and adjust the lens focus.
2. Display green and blue crosshatch patterns.
3. Adjust focus by shifting the panel adjuster for LCD panel (B) back and forth, then tighten the 2 screws.
4. Adjust the LCD panel (B) position so that the vertical center of blue crosshatch pattern is overlapped with the vertical center of
green crosshatch pattern.
5. Adjust the LCD panel (B) position so that the horizontal center of blue crosshatch pattern is overlapped with the horizontal
center of green crosshatch pattern.
6. Correct the tilt of the blue crosshatch pattern by adjusting the LCD panel (B) position.
7. Display green, red and blue crosshatch patterns and confirm the convergence. If it is necessary, fine adjust the convergence
so that the blue crosshatch pattern is overlapped with green one.
24
PT-FW100NTU / PT-FW100NTE / PT-FW100NTEA
Summary of Contents for PT-FW100NTE
Page 2: ...2 PT FW100NTU PT FW100NTE PT FW100NTEA ...
Page 3: ...3 PT FW100NTU PT FW100NTE PT FW100NTEA ...
Page 9: ...3 2 Self Check Display and Contents 9 PT FW100NTU PT FW100NTE PT FW100NTEA ...
Page 31: ...9 Troubleshooting 31 PT FW100NTU PT FW100NTE PT FW100NTEA ...
Page 32: ...32 PT FW100NTU PT FW100NTE PT FW100NTEA ...
Page 33: ...33 PT FW100NTU PT FW100NTE PT FW100NTEA ...
Page 34: ...34 PT FW100NTU PT FW100NTE PT FW100NTEA ...
Page 35: ...35 PT FW100NTU PT FW100NTE PT FW100NTEA ...
Page 36: ...36 PT FW100NTU PT FW100NTE PT FW100NTEA ...
Page 37: ...37 PT FW100NTU PT FW100NTE PT FW100NTEA ...
Page 38: ...38 PT FW100NTU PT FW100NTE PT FW100NTEA ...
Page 39: ...39 PT FW100NTU PT FW100NTE PT FW100NTEA ...
Page 40: ...40 PT FW100NTU PT FW100NTE PT FW100NTEA ...
Page 41: ...41 PT FW100NTU PT FW100NTE PT FW100NTEA ...
Page 42: ...42 PT FW100NTU PT FW100NTE PT FW100NTEA ...
Page 43: ...43 PT FW100NTU PT FW100NTE PT FW100NTEA ...
Page 44: ...44 PT FW100NTU PT FW100NTE PT FW100NTEA ...
Page 51: ...12 Schematic Diagram PT FW100NTU PT FW100NTE PT FW100NTEA 51 ...
Page 66: ...PT FW100NTU PT FW100NTE PT FW100NTEA 66 ...
Page 67: ...14 Terminal guide of ICs and transistors PT FW100NTU PT FW100NTE PT FW100NTEA 67 ...
Page 68: ...15 Exploded Views PT FW100NTU PT FW100NTE PT FW100NTEA 68 ...
Page 69: ...PT FW100NTU PT FW100NTE PT FW100NTEA 69 ...
Page 70: ...PT FW100NTU PT FW100NTE PT FW100NTEA 70 ...
Page 71: ...PT FW100NTU PT FW100NTE PT FW100NTEA 71 ...
Page 86: ......
Page 87: ......
Page 88: ......
Page 89: ......
Page 90: ......
Page 91: ......
Page 92: ......
Page 93: ......
Page 94: ......
Page 95: ......
Page 96: ......
Page 97: ......
Page 98: ......
Page 99: ......
Page 100: ......
Page 101: ......


