background image


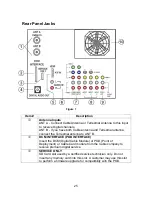
Description 

Item # 

4


DIGITAL AUDIO OUT 

5.1 Dolby Digital surround sound optical output. 

Note: 

All sound processed in the receiver is converted to digital and

output via this jack for 5.1 channel Dolby Digital Surround application.


5


HDMI (High Definition Multimedia Interface) 

Input that accepts uncompressed digital signal and multi-channel 
digital audio signal. 

Note:

 A unit that has a DVI output may also be connected to this input 

via an HDMI-DVI conversion cable (TY-SCH03DH) available on the 
Panasonic Website: 

http://www.panasonic.com

6


AUDIO IN 

Use these audio inputs when a DVI device is connected to the HDMI 
input using the DVI to HDMI adaptor. RCA jacks are used for the 
analog DVI audio. The digital audio output is PCM. 

7


COMPONENT VIDEO (Y-PB-PR) INPUTS 

Use these jacks for connecting devices such as a DVD player or Set 
Top Box. 

8


INPUTS 1, 2 and 3 

Composite inputs for connecting VCR and other devices. 

9


PROG OUT 

Terminals that output fixed audio and NTSC composite video. 

Note:

 Unlike other projection televisions, this unit does not contain a 

variable audio output. 


Cooling fan 
Note:

 Older Panasonic CRT based projection television receivers do 

not have fans. 

Tab


le 4 


26 

Summary of Contents for PT-53TWD63

Page 1: ...Technical Guide High Definition Projection Television P9 Chassis PT 47WXD63 PT 53WXD63 PT 53TWD63 PT 56TWD63 Technology Troubleshooting Adjustments Panasonic Services Company National Training Center ...

Page 2: ... public It does not contain warnings or cautions to advise non technical individuals of potential dangers in attempting to service a product Products powered by electricity should be serviced or repaired only by experienced professional technicians Any attempt to service or repair the product or products dealt with in this service information by anyone else could result in serious injury or death ...

Page 3: ...RD INSERTION CHECKLIST 12 FREQUENTLY ASKED QUESTIONS 13 CLOSED CAPTIONING INFORMATION 14 TROUBLESHOOTING DIGITAL CABLE 15 REMOTE CONTROL OPERATION 23 REAR PANEL JACKS 25 CABLE ANTENNA CONNECTION 27 FIRST TIME SETUP 29 AUTO SCAN 29 SET UP PROCEDURE 30 HDMI INPUT CONNECTION 33 ABOUT HDMI HIGH DEFINITION MULTIMEDIA INTERFACE 33 COMPATIBLE FORMATS 33 CONNECTION DIAGRAM 34 DIGITAL AUDIO OUT CONNECTION ...

Page 4: ... 63 NTSC AND 480I SIGNAL PROCESS 65 480P AND 1080I SIGNAL PROCESS 66 HORIZONTAL OUTPUT CIRCUIT 69 POWER SUPPLY EXPLANATION 71 STANDBY POWER SUPPLY 71 MAIN POWER SUPPLY 72 POWER SUPPLY PROTECTION 74 THE 20V AND 20V SOURCES 75 THE 140V SOURCE 75 THE AUDIO 20V AND 20V SOURCES 76 THE 20V SOURCE 76 T BOARD 10V SOURCE 76 T BOARD 30V SOURCE 76 B VOLTAGES TABLE 77 PROTECTION CIRCUIT 79 PROTECTION CIRCUIT ...

Page 5: ...he OpenCable technology that interfaces between the cable service provider and the customer for subscription purposes The High End models contain a PhotoViewerTM that allows the viewing of digital pictures taken with a digital camera The information provided in this document is designed to assist the technician in determining the defective component or board while performing repair The troubleshoo...

Page 6: ...2 ...

Page 7: ...X model design 2004 new short focus design TW model design with bottom storage space Sound enhancement BBE BBE Viva Audio power 15W x 2 4 speakers 60W 6 speakers Line up model PT 47WXD63 PT 53WXD63 PT 53TWD63 PT 56TWD63 Table 1 Model Comparison 3 ...

Page 8: ...4 ...

Page 9: ...og RF tuner Digital tuner ATSC QAM CableCARD Yes Picture mode 3 picture mode 3 picture mode w synchronized color temp Video Format 480i 480p 1080i 480i 480p 1080i Digital Audio Out Yes Audio Output FAO VAO FAO Sound enhancement BBE BBE VIVA TW models Audio Power 15W x 2 4 speakers 60W 6 speakers TW models Back to default feature Convergence Self explanatory user convergence menu Firmware upgrade M...

Page 10: ...merican cable operators to Provide next generation digital cable ready devices Encourage supplier competition Create a common platform for advanced interactive cable services and Create a retail hardware platform One of the OpenCable project s goals has been to standardize the cable network interface which will help to enable a retail market for competitively priced digital cable products e g inte...

Page 11: ...ractive sports game shows Web access features such as e mail chat instant messaging Interactive games and services such as shopping television commerce or T Commerce home banking and personal video recorders PVR Clear Digital Picture The unit incorporates a cable ready tuner that allows cable subscribers to receive crisp digital TV signals without the need of a set top box It would also tune in ov...

Page 12: ... air digital Panasonic Set Top Box TU DST52 Open Cable Two major sys m Scientific Atlanta SA system ince there are two major cable systems Cable Boxes have to be specifically ade for each of the systems Figure 1 te s Motorola system S m Figure 2 8 ...

Page 13: ...CableCARD elevision receivers using CableCARDs are designed to work for both systems T Figure 3 9 ...

Page 14: ...able Module Info the message Cable Module Not present will be displayed on the screen To receive the features offered by your cable company you may have to subscribe to those services Note Please contact your cable company regarding the availability of the DCM Digital Cable Module The cable module is needed to receive premium digital services where available through the cable input You may also be...

Page 15: ... a typical HOST diagnostic screen when a CableCARD erted Diagnostic screen Frequency 78 00 MHz Lock Status Locked Rate 1 544Mbps Mode 256 QAM Frequency 657 00 MHz Lock Status Locked SNR 35 dB 6dBm Elapsed time 4 days 3 hr 6 min ROM 8192 KB RAM 32768 KB Video Channel Status PCR Status Locked Type Digital PCR pid 0x0021 Video pid 0x0021 Audio pid 0x0022 POD Status Present x 0 Authorization status 0x...

Page 16: ...creen and select cable channels an be obtained from the letters shown defined quency M Number of channels with non FAT Modulation Mode iagnostic Sections nostic sections on the screen S 2 SYSTEM 3 FAT STATUS 4 VIDEO CHANNEL STATUS Each section will be described later in this document The following portion outlines th hecklist screen on nformation needed to o cti hannel map that the POD Status is P...

Page 17: ...cklist cover the things that are needed to get di services a The Mode is correct 64 b The Frequency is correct c The Lock Status indicates Locked Under the Video Channel Status section verify that a The PCR Status indicates Locked b The PCR Video and Audio PIDs are numeric values If the P values are N A it indicates that PIDs have not been set Under the System section note the value of Authorizati...

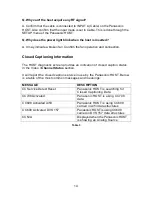
Page 18: ...n operation and connection ptioning Information iagnostic screen provides an indicatio he Video Channel Status section the closed caption service in use by the Panasonic HOST Below the most common messages and meanings MESSAGE DESCRIPTION CC Service Detect Reset Panasonic HOST is searching for Closed Captioning Data CC708 Activated Panasonic HOST is using CC708 data CC608 Activated A 53 Panasonic ...

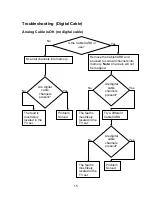
Page 19: ... into not be mapped Yes memory Note Channels will Are digital cable channels present Are digital cable channels prese Yes nt Problem Solved The fault is ely located in the TV set most lik No The fault is most likely located in the TV set Yes No Try a different CableCARD Are digital cable channels present The fault is most likely located in the TV set No Yes Problem Solved 15 ...

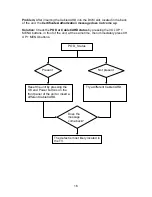
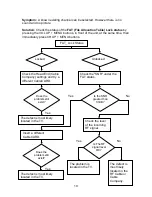
Page 20: ...he Certificate Authorization mess Solution Check the POD or CableCARD statu MENU buttons in front of the unit at the same ti U POD_ Status Present Reset the unit by pressing the OK and P ttons on front panel of the unit or insert a different CableCARD ower bu the Try a different CableCARD Do m es th essag come ba e e ck The defect is most likely located in the TV Not present 16 ...

Page 21: ...s Locked Unlocked Check the Head End Cable ompany settings or try a ifferent CableCARD C d Check the Frequency under FDC status Does the problem still exist The defect is most likely located at the cable company Does the frequency belong to the cable operator Yes C ck the SNR signal ratio level under FDC status No he to noise Insert a different CableCARD Check the RF signal The problem is not the ...

Page 22: ...e problem still exist The defec likely t is most located in the TV Check the level of the RF signal Is the RF signal leve OK l The defec most lik located in t TV t is ely he Yes No The ect is most likely located in the RF Cable or Cable Compan def y Continued from last page ...

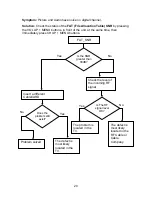
Page 23: ...ked d Check the Head End Cable om settings ifferent CableCAR C pany and try a D d Check the SNR under the FAT status Does problem exist the still The defect is most likely located in the TV Is the SNR greater than 30dB Yes Insert a different ableCARD No C 19 Check the level of the incoming RF signal The problem is located in the TV Is The RF signal level OK Yes Does the problem still exist The def...

Page 24: ...e then immediately press CH UP MENU buttons FAT_SNR Is the SNR greater than 30dB Yes Insert a different CableCA No RD Check the level of the incoming RF signal The prob located i TV lem is n the Is The RF signal level OK Does the problem still exist The defect is most likely located in the TV Yes No The defect is most likely located in the RF Cable or Cable Company Problem solved Yes No 20 ...

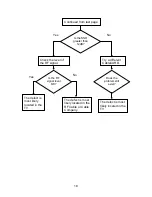
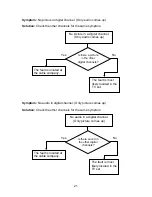
Page 25: ...nnels for the same symptom in a digital channel Only audio comes up Is there a p in the oth icture er digital channels Yes The fault is located at the cable company o The fault is most likely located in TV se the t No audio in a digital channel Only picture comes up Is there sound in the other digital channels No The fault is located at the cable company The fault is most likely located in the TV ...

Page 26: ...22 ...

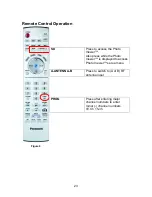
Page 27: ...access the Photo Viewer Also press while the Photo Viewer is displayed to access Photo Viewer set up menu PROG Press after entering major channel numbers to enter minor channel numbers IE Ch 15 35 A ANTENNA B Press to switch to A or B RF antenna input ...

Page 28: ...24 ...

Page 29: ...Terrestrial antenna to ANT B 2 DCM INTERFACE POD INTERFACE Insert the DCM Digital Cable Module or POD Point of Deployment or Cable Card module from the Cable company to receive premium digital service 3 SERVICE ONLY SD Card slot used by a certified service technician only Do not insert any memory card into this slot A customer may use this slot to perform a firmware upgrade for compatibility with ...

Page 30: ...on the Panasonic Website http www panasonic com 6 AUDIO IN Use these audio inputs when a DVI device is connected to the HDMI input using the DVI to HDMI adaptor RCA jacks are used for the analog DVI audio The digital audio output is PCM 7 COMPONENT VIDEO Y PB PR INPUTS Use these jacks for connecting devices such as a DVD player or Set Top Box 8 INPUTS 1 2 and 3 Composite inputs for connecting VCR ...

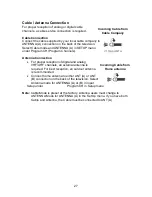
Page 31: ...c Antenna mode for ANTENNA A or B in Input up u Program CH in Setup menu No ctory Antenna users must change to ANT both Cab pro reception of analog or d cable service connection is required nection nec e cable supplied by your local cable company to TEN A connection on the back of the television ram CH Program Channels onnection nect home antenna to either ANT A or ANT onnection on the back of the...

Page 32: ...28 ...

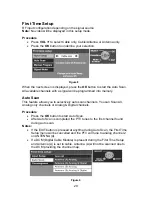
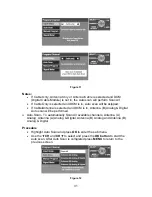
Page 33: ...eature allows you to selectively auto scan channels You can Scan All Analog only channels or Analog Digital channels Procedure Press the OK button to start Auto Scan After Auto Scan is completed the PTV tunes to the first channel found during auto scan Notes If the EXIT button is pressed at anytime during Auto Scan the First Time Setup menu will be cancelled and the PTV will tune to analog channel...

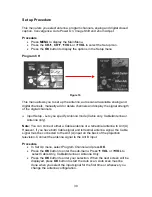
Page 34: ...OK button to enter your selection When the next screen will be displayed press OK button to start the Auto scan Auto scan must be done when you select the input signal for the first time or whenever you change the antenna configuration caption Convergence Auto Power On Image Shift a Procedure Press MENU to display the Main Menu Press the CHc CHd eVOL or fVOL to select P This menu allows you to set...

Page 35: ...ed If Cable Antenna is selected and DCM is in Antenna B Analog Digital Auto scan will be Auto Scan To automatically Scan All available channels Antenna A Analog Antenna A Analog Digital Antenna B Analog and Antenna B Analog Digita Procedure Highlight Auto Scan and press OK to enter the sub menu Use the dCH and CH dto select and press the OK button to start the auto scan After Auto Scan is complete...

Page 36: ...rocedure Highlight Signal Meter and press the OK button to enter the sub menu the RF Input field select either Antenna A or Antenna B No l signal for a good reception Red Very poor signal strength Figure 13 In Select the channel number using the eVOL or fVOL buttons Press the OK button to display the Signal Strength Figure 14 te The color of the signal bar indicates the strength of the received si...

Page 37: ...ital form The HDMI input terminal is not intended to be used ith personal computers This PTV i ble with 1080i 480p and 480i rmats Select the output of the signal source to match that of the PTV No HDMI HDCP High Definition Multimedia Interface High Bandwidth EIA CEA 861 Profiles compliance covers profiles for transmission of pressed digital video including high bandwidth digital content Co p This ...

Page 38: ... ce set top box or DVD player to the Audio In jacks below the HDM nnot display the picture because your Digital Set Top Box does Notes 3 HDMI DVI conversion cable TY SCH03DH available on Panasonic Website http www panasonic com The connector on the PTV is HDMI Type A connector Figure 15 Procedure Connec tput from th HD ton on the rem p connec If the e V is HDMI Ty has DVI out cable Out si xternal ...

Page 39: ... surround right plus a LFE Low Frequency Effect subwoofer channel For a full Home Theater sound experience an external Dolby Digital decoder and a multi channel amplifier must be connected to the Digital Audio Out jack on the PTV Pro Note t jac w LPCM Figure 16 cedure Connect the Digital Audio cable from the Digital Audio Out jack on the PTV to theDigital Audio In connection on the Dolby Digital d...

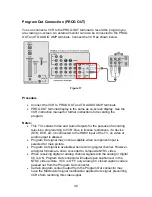
Page 40: ... composite NTSC video When receiving digital or analog channel signals and the analog or digital CC is ON Program Out connector will output open caption text in the NTSC video picture If CC is OFF only analog CC closed caption code is passed out from the Program Out connector Certain program content output from the Program Out connector may have the Macrovision signal modification applied to its s...

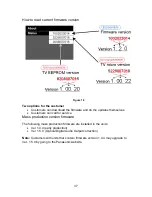
Page 41: ...he updates themselves Customers can call for service Mass production version firmware The following mass production firmware are installed in the units Ver 1 4 4 early production Ver 1 5 0 Optical Digital Audio Output correction Customers with units that contain firmware version 1 4 4 may upgra 1 5 0 by going to the Panasonic website 37 ...

Page 42: ...38 ...

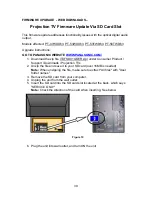
Page 43: ... TXFSD01GSER zip under Consumer Product Support Downloads Projection TVs 2 Unzip the file and save it to your SD card over 16MB is needed Note When unzipping the file make sure to extract All files with User folder names 3 Remove the SD card from your computer 4 Unplug the unit from the wall outlet 5 Insert the SD card into the SD card slot located at the back which says SERVICE ONLY Note Check th...

Page 44: ...rmware storage One is a backup and is non upgradeable The television factory uses it to set up default parameters for the television set to operate If the unit fails to upgrade after performing the firmware upgrade process the unit will continue to operate using the factory settings in the backup memory location as default parameters Press OK to start the firmware upgrade to begin NOTE DO NOT TURN...

Page 45: ...LTER MOTION ADP 3D Y C HEC VEC X BOTH X NEW Y X NR VM X DIGITAL V A NORM X BOTH X CO R TEMP X LO AIP X PRESET INPUT LABELING X VIDEO PICTURE MEMORY X DIGITAL SCAN RATE 1080i 540p NTSC LINE DOUBLER 540p PROGRESSIVE NEW MTS SAP DBX X BUILT IN AUDIO POWER 15Wx2 10 No OF SPEAKERS 4 BASS BALANCE TREBLE CONTROL X AI SOUND X SURROUND X SPATIALIZER BBE BBE A V IN REAR FRONT 4 3 1 A V PROGRAM OUT X AUDIO O...

Page 46: ...Non Serviceable Boards Figure 22 42 ...

Page 47: ...d B Deflection Circuit Horizontal and Vertical FBT Flyback Transformer Convergence amplifier H Board TNP2AA134S Input Output jacks Fan Sub tuner analog TV micro EEPROM Convergence EEPROM Low B regulator Audio Circuit Audio Processor BBE viva Audio amplifier T Board TNP2AA136S Stand by power supply Figure 23 43 ...

Page 48: ...o Selection Picture process Global core digital VDJ Sub picture process RGB processor DV Board TNP2AA133S HDMI interface HD OM verter MI converter EDID EEPR YUV con LG Board TNP2AA146ABS Green Output Signal Drive Velocity Modulator G Board eo Inputs TNP2AA150S Front Audio Vid R Board TNPA0615ABS IR sensor Blue Output Signal Drive Velocity Modulator LR Board TNP2AA145ABS Red Output Signal Drive Vel...

Page 49: ...KEYBOARD PANEL JG BOARD TNP2AA140 SD PC JPEG VIEWER LB BOARD TNP2AA147AB BLUE PRT LG BOARD TNP2AA146AB GREEN PRT LR BOARD TNP2AA145AB RED PRT R BOARD TNPA0615AB IR SENSOR T BOARD TNP2AA136 SUB W PO ER Table 7 OTE When ordering a replacement board assembly append an S to the oard number XAMPLE the A Board the replacement board is TNP2AH051ABS DC Board DG Board DV Board DT Board and JG Board are non...

Page 50: ...46 ...

Page 51: ...P MPEG TIFF etc cannot be viewed Compatible memory cards that can be viewed with Photo Viewer Card type Maximum Size SD MMC Multi Media Card Smart Media Compact Flash Memory Stick xD Picture Card Flash ATA Memory Stick Pro These cards require standard PCMCIA adaptor Some PC card adaptors will not be compatible Note Photo Viewer is not compatible with hard disk type cards such as Micro Drive SD 512...

Page 52: ...o select the desired thumbnail and r se the eVOL or VO tton to exit Photo Viewer mode hoto Viewer Thumbnail mode al entry screen from th shows the d Filename folder number and the number of date the pict icture lay the Main m con by using th WARNING As with any small object SD cards can be swallowed by young children Do not allow children to handle the SD card Please remove the SD card immediately...

Page 53: ...rs that can be displayed 100 Maximum file size 3000 Any folder or files larger than th will not be displayed Picture reso sampling 4 2 2 or 4 2 0 If the image is imported from a PC it must follow the EXIF Exchangeable Image File format 2 0 2 1 2 2 in addition to the DCF Design rule for Camera File system format or it will not be displayed If the JPEG is modified using a PC it will not be displayed...

Page 54: ...Repeat press the CHc button to select Start and then press OK to start the Slide Show Rotate Allows you to rotate the image Zoom Lets you select the magnification of the Single Slide display Figure 26 Slide Show Allows you to start the slide show by pressing the OK button while Start is highlighted Press the OK button to stop the Slide Sho When you are in the Slide Show mode you can change the Asp...

Page 55: ...the slide in normal magnification When inserting Card No card or Card is not inserted Correctly Insert card correctly Check the terminal of the card If the JPEG file is corrupted and cannot be decoded This type of image is not supported It is not JPEG image JPEG image is corrupted If the card is not formatted with FAT 12 or FAT 16 or if it is not DCF standard This type of format is not supported F...

Page 56: ...play It will take a lon are lots of image g time to s or if th display if there e file size is big Table 9 Notes dis age e will be activated to prevent image retention The image on screen will zoom in and zoom out in 4 four d el n top the Image S tion show th or more nutes T e will be shifted horizontally left or rig e increments Image shift feature will not activate if it is turned off If thumbna...

Page 57: ... the test Download The unit displays the JPEG Program Download menu Using the CH cd keys select option No 6 to access the JPEG Program Download menu oftware Upgrade 1 With t owere panel slot A download m menu doesn t he receiver p insert the SD ser the fro ill appear automatically If the downl vice card in Auto Test 2 5 The unit performs an auto test from option No 2 through No 5 SDRAM Test The un...

Page 58: ...connect the AC plug from the outlet then remove the SD service card from the slot Connect the AC plug to the outlet again and turn the power ON Press both the OK and POWER buttons on the receiver s front panel to access the self check screen and wait for a few seconds If the JPEG module is working accordingly JPEG OK and the last upgrade version of the JPEG viewer software sign will appear on the ...

Page 59: ...C6513 and converted into luminance and chrominance data IC6512 rmation for the operation of the viewer 6514 is a 64Mb SDRAM used as a temporary storage location for processing deo output of IC6513 is then converted to nalog by IC6516 and output to the DG Board via the connector JG3 DG7 On on is selected and processed as any ther video input Figure 27 th d contains the algorithmic firmware info IC ...

Page 60: ...sion without the use of a set top box roadcast and the 16VSB DVB cable television The RF input of the DT Board is ntenna A and the type of reception desired is selected during the customer etup operation of the PTV If a cable line is used without a CableCard the unit roceeds to scan all available analog and digital channels If a CableCard is sed the scanning process is bypassed since all cable rel...

Page 61: ...he output from the Digital Audio Out jack will be Dolby Digital But if NTSC channel is selected the output will be LPCM All TV related OSD information is generated by IC8024 Channel numbers program channels etc are generated within this IC IC8024 is used as temporary storage location for the process of de packetizing the AC3 audio IC8018 contains the algorithmic firmware information for the operat...

Page 62: ...oards are removed before powering the unit If the unit powers up and operation is restored the DT Board is possibly defective Figure 29 C8031 converts the digital OSD outpu I DG Board via pins 25 27 and 29 of connector JK8007 A41 IC8035 converts the digital SD or HD video output of IC8024 to analog Y Pb and Pr video signals The component video signals are amplified by IC8037 and utput to the DG Bo...

Page 63: ...igh bandwidth Digital Content Protection HDCP high definition picture source to the HDMI terminal of this PTV is displayed on the screen in its digital form Plug and Play The HDMI HDCP1 input can be connected to an EIA CEA 8612 compliant consumer electronic device such as a set top box or a DVD player equipped with an HDMI or DVI output connection ecurity HDCP at uses the Digital ideo Interface DV...

Page 64: ... set of secret device keys has been compromised it places the keys on a revocation list and provides the authorized devices with a new set of keys which is called renewability During authentication the transmitter checks the revocation list before sending any content Backward compatible with DVI c a shared secret value that is designed to prevent eave the content After authentication the content i...

Page 65: ... B HDCP High bandwidth Digital Content Protection Silicon Image IC IC5003 EDID Extended Display Identific 61 ation Data Data to identify the product Serial number Model number Product name Etc Written in EEPROM IC5001 ...

Page 66: ...put The Analog Audio IN jack is used for DVI audio input The selected audio is output to the A Board via pins 2 and 4 of the connector DV1 A51 Note If the external device has DVI output only use a DVI to HDMI adaptor cable to connect to the HDMI jack on the PTV Also connect the Audio Out signal from the external device set top box or DVD player to the Audio In jacks below the HDMI input An HDMI DV...

Page 67: ...ous viewing of two signals It is also equipped with four NTSC Video inputs and three S Video inputs The digital tuner produces audio a p Picture mode Composite video output of the digital tuner is applied to the A board via pin 3 and subsequently to the DG Board via pin 14 of the connector A32 DG2 Vide produced by the sub tuner NTSC is applied directly to the DG B p PhotoViewer is applied directly...

Page 68: ...ns 10 12 and 14 of the connector JK8007 A41 and subsequently to the DG Board via pins 26 28 and 30 of the connector A32 DG2 The component video signals from the H Board are also input to IC3002 via the connector DG3 H1 The HDMI component signals of the DV Board are also applied to IC3002 via the connector A32 DG2 IC3002 selects between NTSC Component and DVI video input signals The selected main a...

Page 69: ...ready Y Pb Pr separated simply bypasses the comb filter and chroma demodulator circuits IC4001 outputs the data to the global core IC IC4002 IC4002 contains a line doubler circuit that halves the horizontal line period doubling the horizontal frequency to 31 468KHz Using IC4015 as a temporary storage area IC4002 then converts the digital signal scan format from interlaced to progressive and sends ...

Page 70: ...rocess the incoming video is in the 480p and 1080i format the main Y signal is re converted to 540p while the 1080i signal imply passes through the IC The remaining process is the same as NTSC and enhancement and digital to analog conve Figure 35 If converted to digital by IC4351 and output to IC4002 The A D converter inside IC4001 converts the color signals to digital The data of the color signal...

Page 71: ... to 31 468KHz Using IC4015 as a temporary storage area IC4002 then converts the digital signal scan format from interlaced to progressive and sends the 10 bit signal to IC4501 The remaining process is the same as NTSC and 480i located inside the Sub Global Core IC4002 converts the sub picture video signals to digital The data is then applied to a comb filter where luminance and chrominance are sep...

Page 72: ...68 ...

Page 73: ...e horizontal output circuit is greatly diminished as only one frequency is processed at all times The 33 75KHz horizontal drive pulse from the DG Board passes through the A Board without alteration and enters the base of Q513 via pin 3 of the connector A2 D2 Transistors Q513 and Q512 amplify the Horizontal drive signal to the level required to drive transistor Q501 The horizontal drive signal is t...

Page 74: ...70 ...

Page 75: ...e AC output at pin 2 of the transformer is rectified and applied to pin 4 of the IC IC2803 and IC2804 provide the feedback for voltage regulation The output voltage at the collector of IC2804 is monitored at pin 2 of IC2801 to control the oscillation and maintain a steady output of the power supply Current and transformer sensing are achieved through pin 1 of the IC Note This power supply goes int...

Page 76: ...bsides a DC voltage developed at the secondary of the lied to 01 via the resistor R862 The voltage on pin 7 of the IC causes it to AC is routed through RL801 and surge resistor R800 to the rectifier circuit D8 When the unit is turned on an inrush of current occurs as capacitors are charge and other components reach the desired voltage level The resistor R800 i to absorb the initial excess current ...

Page 77: ...f T802 ee figure 39 As the transistor Q801 switches on and off energy is built and leased from th er ote The operation of the power supply is the same as that of power supplies troduced by Panasonic in earlier chassis such as the P2 Chassis For more formation on its operation visit the Panasonic Technical Resource web site p s re e transform N in in 73 ...

Page 78: ...are handled via the following inputs 1 The voltage feedback is applied to pin 9 of IC801 via the opto coupler IC IC811 2 Current feedback is applied via pin 4 of IC801 3 Over Voltage Protection OVP is provided via pin 8 of IC801 4 Under Voltage Lock Out UVLO is sensed at pin 7 of IC801 74 ...

Page 79: ...140V source The 140V source supplies power to the horizontal output and velocity modulation circuits of the TV It is also used to provide voltage feedback for the power supply regulator The diode D825 converts the AC supplied by the secondary windings of the transformer T801 to 140Vdc 20V and 20V sources are used to power the conv 20V and 20V sources are used to power the conv put circuits of the ...

Page 80: ...t ICs and the audio BBE IC use these voltages The diode D827 converts the AC supplied by the secondary windings of the transformer T801 to 20Vdc T Board 10V source The 10V source of the T Board is primarily used by the DT Board It is also regulated to 7 7V standby voltage for use by the DG and DT boards The diode D2813 converts the AC supplied by the secondary windings of the transformer T2801 to ...

Page 81: ...oltages able Preparation Set the following controls Picture to Normal Procedure 1 Apply a NTSC COLOR BAR pattern 2 Connect the negative lead of the digital voltmeter to TPGND1 cold ground Connect the positive lead of the digital voltmeter to each test point and 77 ...

Page 82: ...78 ...

Page 83: ... OR VERTICAL 2 times SOS2 MPU 58 pin L SOS IC1006 DG BOARD 3 times SOS3 MPU 69 pin H SOS CONVERGENCE DC BOARD 4 times HHS MPU 56 pin H SOS HHS FLYBACK 5 times GC2M IIC ACK error GC2M DG BOARD 6 times GC2S IIC ACK error GC2S DG BOARD 7 times GC2V IIC ACK error GC2V DG BOARD 8 times FAN SOS MPU 55 pin H SOS FAN Table 10 IC1002 MPU 58 57 56 55 69 51 A31 SOS3 53 7 SOS HHS A14 H1 IC1006 3 3V reg SOS2 F...

Page 84: ...e as com The or turns o s outp le Boa n 15 of th ctor D co g the MPU to activate shutdown and turn off the AC Relay L8 DG BOARD A Board 140V SOS Norm D Board SOS A31 53 D2 A2 15 15 Figure 42 ses the op acro 57 and R858 to increas As a result the pared to its emitter transist n and it ut goes high This DC vel enters the DG rd via pi e conne 2 A2 and pin 53 of the R nnector A31 causin 01 80 ...

Page 85: ...Pump Up pulse is rectified by the diode D407 The resulting DC voltage charges the capacitor C413 As long as the charge is sufficient the transistor Q406 remains on A loss of or a drop in the charge level causes Q406 to turn off This sends the voltage at its collector to the DG Board via the diode D409 pin 15 of the connector D2 A2 and pin 53 of the connector A31 causing the MPU to activate shutdow...

Page 86: ... As long as the charge is sufficient IC1006 remains on and a High is output A loss of or a drop in e level causes IC1006 to turn off and its output to become low The voltage at its output enters pin 58 SOS2 of DG Board Figure 44 the charg the MPU IC1002 causing it to activate shutdown and turn off the AC Relay RL801 82 ...

Page 87: ...nd R7064 The DC level at the node of R7063 and R7064 causes D7060 to conduct This voltage enters the DG Board via pin 11 of the connector D2 A2 and pin 51 of the connector A31 causing the MPU to activate shutdown and turn off the AC Relay RL801 Convergence Amps IC7101 IC7002 SOS Norm DG BOARD A Board A31 51 A2 D2 11 SOS3 11 D Board Figure 45 T causes the voltage drop across R7060 to increase When ...

Page 88: ...lse 521 The DC sample is applied to a sensing circuit inside IC701 on the D his output voltage is input to the DG Board via pin 5 of the connector D4 A4 and pin 7 of the connector A31 This causes the MPU to activate shutdown and turn off the AC Relay RL801 Board via the resistor R1509 IC701 monitors the DC sample at its pin 3 and compares it to the reference voltage at pin 2 An undesired voltage i...

Page 89: ...This causes the MPU to activate shutdown and turn off the AC Relay RL801 DG BOARD DG3 A 13 A 11 A 14 H Board SOS Norm FAN_SOS ON 7 7V Figure 47 eiver is n IMPORTANT If the fan is disconnected accidentally damaged and does not tu ON when the module is inserted the PTV will automatically be set in protection mode and it will shut down Connect the fan correctly or replace it with a new one 4 A sign o...

Page 90: ...volts source to ground This effectively provides a path for the discharge of vision receiver is turned off During the operation of the unit the 20V ectified AC voltage of pin G1 of the C Q303 When this transistor is on Q301 turns off allowing the capacitor e to the full potential of the 220Vdc source Wh lts line goes away and the transistor Q303 turns off causin high This high causes transistor Q3...

Page 91: ...f button to adjust the sleep timer to 30 minutes or higher k Press the Menu Action button as many times as needed to exit the timer mode l Tune the set to channel 124 m Using the front control panel of the PTV press and hold the Volume Down button until CHK is displayed in red in the upper left hand corner of the screen n Select an active channel or video source To toggle between aging and service...

Page 92: ...88 ...

Page 93: ...n press the OK button on the remote control to enter Press VOL right left to select one of the following options then press OK Select ALL to copy all main EEPROM data Select ADJ to copy only adjustment data Select FIX to copy only fix data 2 To copy data from the main EEPROM to the jig select IN EX DAC and press the OK button on the remote 3 To copy data from the jig to the main EEPROM select EX I...

Page 94: ...ith OK option is selected the copy process begins CURRENT convergence a ALL To copy all data Note The stated Default Factory Preset contains the factory DATA Use this option when data is lost or when adjustment is completely lost 7 Once an 8 Once finished the receiver shuts down for a moment to reinitialize 9 Remove the jig from connector A10 90 ...

Page 95: ...91 Trouble h s ooting ...

Page 96: ...No Video 92 ...

Page 97: ...No Sound 93 ...

Page 98: ...No Power 94 ...

Page 99: ...DC STATUS Forward Data Channel Status POD Point Of Deployment PCR Program Clock Reference PID Packet Identification HDMI High Definition Multimedia Interface Interface that supports every uncompressed digital format as well as all existing multi channel audio format on a single cable JPEG Joint Photographic Experts Group A system used for compressing decoding color still pictures MPAA Motion Pictu...

Reviews: