background image

Supplying Power 

(Battery Pack) 

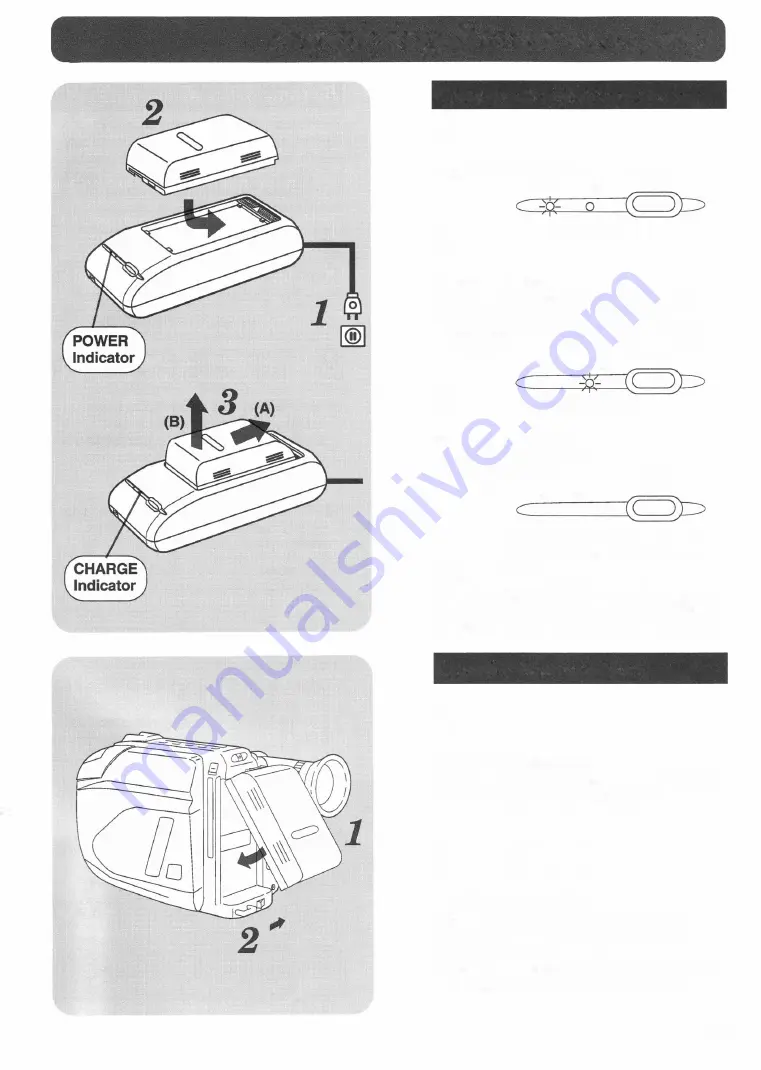
Charge the Battery Pack 

Plug  in the AC Adaptor. 

POWER  CHARGE 

BATIERY 
REFRESH 

Power Indicator lights up. 

Insert the  Battery 

Slide the top of the Battery forward, then 
press down and release. 

• 

The Battery Pack should charge in about 

1 hour. 

BATIERY 

POWER 

CHARGE 

REFRESH 

Charge Indicator lights up. 

Remove the  Battery 

(A) 

Slide Battery forward. 

(B) 

Lift up and out. 

POWER  CHARGE 

BATIERY 
REFRESH 

Charge Indicator goes out when 
charging is complete. (About one 

Note: 

hour.) 

After recharging the Battery Pack about 5 
times, use the BATTERY REFRESH button 
on the AC Adaptor as explained on page 10. 

Use the Battery Pack 

To Attach the Battery 

Align the battery with the top of the mounting 
surface and press it firmly into place. 

[gill] 

To Remove  the  Battery 

While sliding the BATTERY RELEASE 
button, pull the Battery out and off the 
mounting surface. 

• 

With a fully charged Battery Pack,  you will 

have about 1 hour of continuous use. 

Summary of Contents for Palmcorder PV-23-K

Page 1: ...llustration is PV 43 K PV 23 K PV 43 K IVl ISI Consists of PV 230 K PV A16 K Consists of PV 430 K PV A16 K Before attempting to connect operate or adjust this product please read these instructions completely VOTW0442 ...

Page 2: ...cording on your VHS VCR using the VHS PlayPak supplied This Palmcorder is equipped with the HQ System to provide excellent video pictures and is compatible with standard VHS equipment 2 CAUllON TO REDUCE THE RISK OF B ECTRIC SHOCK DO NOT REMOVE COVER OR BACK NO USER SER 1CEAELE PARTS INSIDE REFER SERVICING 10 QUAL IRED SERVICE PEASOHNEL Date of Purchase Dealer Purchased From Dealer Address Dealer ...

Page 3: ...es This video unit should be operated only from the type of power source indicated on the marking label If you are not sure of the type of power supply to your home consult your appliance dealer or local power company For video units intended to be operated from battery power or other sources refer to the operating instructions 11 Grounding or Polarization This video unit may be equipped with eith...

Page 4: ...inct change in performance this indicates a need for service 20 Replacement Parts When replacement parts are required be sure the service technician has used replacement parts specified by the manufacturer or have the same characteristics as the original part Unauthorized substitutions may result in fire electric shock or other hazards 21 Safety Check Upon completion of any service or repairs to t...

Page 5: ... 23 Variable Speed Power Zoom High Speed Shutter 24 Focusing 25 White Balance 26 Backlight Button 27 VHS Index Search System Book Mark Search 28 Digital Colour Fade only PV 43 K 29 Digital Zoom only PV 43 K 30 Electronic Image Stabilization System E l S only PV 43 K 31 Still Strobe Wide only PV 43 K 32 Copying your Tapes dubbing 33 Dubbing over Recordings Dubbing over Audio 35 Dubbing over Video 3...

Page 6: ...6 Battery Pack optional PV BP17 K Shoulder Strap supplied VYCW0028 7b Record and Playback Compact Video Cassette Tape optional NV TC20P NV TC30P VHS PlayPak supplied optional PV P1 K 7b Enhance your Recording For Special Effects SW Colour Video Corrector optional PV CCSO K Enhancement Light Telephoto Lens optional PV LS K optional PV LT49 K 7b Copy your Tapes and for Dubbing Over the Audio and or ...

Page 7: ...e strap from the Buckle Catch 3 Thread the strap ends through the Strap Attachment Rings Then re hook them onto the Buckle Catch 4 Snap the clasp shut to lock the strap in place Adjust the Length Pull a loop of the strap loose from the buckle then pull the strap firmly through the buckle to adjust the length 7 ...

Page 8: ...ke up Wheel in the direction of the arrow until there is no slack in the tape prior to use 2 TAPE EJECT w I Slide the TAPE EJECT switch to open the tape door 3 3 Hold the cassette vertically with the window facing away from the Palmcorder body 4 Press the Door Close Area to close the door Erase Protection Tab Cassettes have a record tab to ensure that recordings are not accidentally erased To prev...

Page 9: ...d B Lift up and out POWER CHARGE 0 0 BATIERY REFRESH Charge Indicator goes out when charging is complete About one Note hour After recharging the Battery Pack about 5 times use the BATTERY REFRESH button on the AC Adaptor as explained on page 10 Use the Battery Pack 1 To Attach the Battery Align the battery with the top of the mounting surface and press it firmly into place 2 gill To Remove the Ba...

Page 10: ...feature after about every 5 charges to keep your Battery in top operating condition 1 Place the Battery into the AC Adaptor 2 BATTERY REFRESH Press the BATTERY REFRESH button The Charging indicator will flash and discharging will begin When discharging is complete the indicator will stop flashing Should you accidentally press the BATTERY REFRESH button remove the Battery Pack then re insert it to ...

Page 11: ...The Power indicator will light up Car Battery Cord Optional 1 Connect a PV C16 K Car Battery Cord to the DC Input of the Palmcorder 2 Start your car engine and then insert the Car Battery Cord plug into your cigarette lighter socket There is a fuse located in the lighter plug end of the cord Should fuse replacement be necessary use the exact current rating in amps Note This cord can only be used i...

Page 12: ...TIONAL FADE NON FUNCTIONAL EDIT SEARCH NON FUNCTIONAL CLOCK SET NON FUNCTIONAL DIGITAL COLOUR FADE NON FUNCTIONAL STILUSTROBE WIDE NON FUNCTIONAL DIGITAL ZOOM NON FUNCTIONAL BOOK MARK SEARCH NON FUNCTIONAL DATE TIME FUNCTIONAL REC REVIEW FUNCTIONAL FEATURE PREVIEW FUNCTIONAL only DATE TIME ELECTRONIC IMAGE FUNCTIONAL STABILIZATION SYSTEM Feature Preview only PV 43 K The three functions used most o...

Page 13: ...IN FIRE To Load the Battery 1 While pinching the stopper tabs together pull the tray out of the Battery Compartment 2 Insert the battery supplied into the Battery tray with the mark facing down Do not reverse the polarity 3 Replace the Battery tray so that the small triangle marks meet Note Make sure your Palmcorder is off when replacing the battery Keep the Battery out of the reach of children si...

Page 14: ...enter the desired numbers Then press SEL ect to fix that portion and move to the next Repeat until the hour minute month day and year have been entered SEL 6 D Press SEL ect again to lock in all the settings and start the clock Press DATE TIME twice to remove display from EVF DATE TIME Note o o Whenever AM 1 2 00 JAN 1 1 993 appears it indicates that the clock needs adjustment Record the Date and ...

Page 15: ...ges E P E P BATTERY will flash for several minutes and then E P and BATTERY will flash for several seconds prior to automatic power shut off A battery recharge is now necessary Tape Warning Indications END This indicator flashes when the tape is about to end in REC mode TAPE If the record tab is missing this indicator will flash and recording will not start DEW If excessive moisture condenses in t...

Page 16: ... into place 2 lc JI LIGHT Press Light button ON RELEASE JOO00 To remove the Light Press the LIGHT RELEASE button and slide the Light off CAUTION This light becomes hot during operation Replacing the Bulb 1 Turn screw counterclockwise on the underside of the reflector casing and remove 2 Turn reflector casing counter clockwise only as far as shown in the diagram and pull it off the bulb housing 3 P...

Page 17: ... POWER switch to CAMERA A Fully extend viewfinder B Adjust the Vision Adjustment Ring to your eyesight SPEED 3 SP SLP ITIIlIIJ Slide TAPE SPEED Selector for SP or SLP 4 B Press RECORD PAUSE to start recording The Tally Light is lit during recording If covered slide the Record Button Cover wnward B Press RECORD PAUSE again to pause recording Helpfitl Notes To remove the cassette EVF SP Palmcorder g...

Page 18: ...sy Editing Use this feature to prevent gaps on unwanted overlaps in your recording after the tape has been removed then re inserted or has been in the Easy Edit Standby Mode for more than 24 hours POWER G l D 1 VCR OFF CAMERA Set the POWER switch to VCR 2 Press REWIND to go back a few seconds on the tape 3 PLAY Then press PLAY to review the picture on the Viewfinder STILL 8 Now press STILL at the ...

Page 19: ... Do not reverse the polarity 3 Replace the Battery tray For Battery replacement set the Remote Power switch to OFF Remote Control Operation Select the REMOTE ON position on the Remote Controlled Functions V Jti CAMt HA MODE MODE REC PAUSE 0 T telephoto Zoom 0 0 W wide anqle Zoom 0 0 PLAY 0 FF SEARCH 0 REW SEARCH 0 STOP 0 STILL 0 After 5 minutes in the Rec Pause mode the Palmcorder will go into Sta...

Page 20: ... then press FAST FORWARD or REWIND to start a rapid visual search Press again or press PLAY to resume normal speed playback View a Still Picture Press STILL to view a freeze frame picture Press STILL or PLAY to resume normal playback Tracking Control Auto Tracking continuously analyzes the signal to adjust for optimum picture quality for each recording Manual Tracking reduce playback noise Manual ...

Page 21: ...g the cassette in the PlayPak 2 lilllllllllli J Slide the RELEASE button to open the PlayPak door 3 Insert the IVl IS ij cassette with the window facing up and to the left Gently close the PlayPak door Let the Load Detector fully retract before using the PlayPak in your standard VHS VCR Be sure the cassette reel area under the PlayPak is free to turn while loading Remove Cassette 1111111111111 J S...

Page 22: ...Pack AC Adaptor or Car Battery cord POWER 2 aJD VCR OFF CAMERA Set the POWER switch to VCR to playback a tape Or set to CAMERA to monitor what your Palmcorder is recording 3 Turn the TV ON and set it to LINE INPUT Check your TV operating instructions for further information Note If your TV has no VIDEO or AUDIO IN Jacks select CH 3 or 4 on your TV to match the RF Adaptor CH 3 4 switch and set the ...

Page 23: ...splay Tape Counter Memory Counter Lap Time Counter Tape Remaining A reading is displayed for any position on the tape Press the RESET button to reset display to 0000 The Palmcorder will stop during Rewind Fast Forward Video Dubbing Audio Dubbing and AN Dubbing whenever it reaches the point where the Tape Counter was previously set to MOOOO The elapsed time during a recording is displayed Press the...

Page 24: ...photo or the W Wide Angle side of the POWER ZOOM switch Zoom quickly by applying more pressure High Speed Shutter Digital Auto Shutter In AUTO H S S mode displayed in EVF the Palmcorder automatically adjusts the shutter speed from 1 60 to 1 250 according to the brightness of the subject The speed does not appear in the EVF AUTO H S S is automatically selected when the AUTO LOCK switch is set to AU...

Page 25: ...subject into focus even during zooming Press the FOCUS button so that the letters MF do not appear in the EVF Manual Focus NORMAL 1 AUTOLOCK Set the AUTO LOCK switch to NORMAL 2 FOCUS AIM Press FOCUS so that MF Manual Focus appears in the EVF 3 JJ MF Press and hold the T side of the POWER ZOOM switch until the subject to be recorded is at maximum zoom in Turn the oo FAR NEAR ring until the picture...

Page 26: ..._ Manual White Balance Use under the conditions described below 1 NORMAL AUTOLOCK_j Set the AUTO LOCK switch to NORMAL WB 2 D Press WHITE BALANCE repeatedly to select one of the following settings EVF Indication Select 0 OUTDOOR when recording outdoor scenes from indoors or outdoors with an amber filter Select Ca INDOOR when recording indoor scenes from outside or indoors with a blue filter White ...

Page 27: ...the desired position while recording BACK LIGHT 2 When lighting conditions return to normal press BACKLIGHT again to disengage Indication appears in the EVF Indication disappears BacklightButton PV 43 K Use when recording a subject that is darker than the surrounding scene in a shadowed area or when the light source is in back of your subject Make sure the AUTO LOCK switch is set to NORMAL 1 BACK ...

Page 28: ... Pause Book Mark Search You can go directly to a blank portion of tape just where the recording you have done so far ends 1 NORMAL AUTOLOCK Set the AUTO LOCK switch to NORMAL 2 FF 8 REW Press the REW and FF buttons at the same time in the CAMERA mode I SEARCH I The Palmcorder will advance or rewind and then stop at the begining of a blank section of tape 3 PLAY J Press PLAY to cancel this function...

Page 29: ...d fade effect Other than BLACK the mode selected will appear in the EVF COLOR 3 CJ Press COLOR repeatedly to select the desired Colour for Digital Fade effects other than Black and White FADE 4 _ _ Hold the FADE button down while recording until the picture fades out Release to fade back in To create even more special effects Other than the BLACK WHITE and RANDOM modes you may also partially fade ...

Page 30: ...ater increase Because the image is enlarged digitally the picture may become distorted when the higher magnification levels are used 3 Press and hold the T side of the POWER ZOOM switch Digital Zoom engages when the Power Zoom reaches its maximum position of x1 0 The zoom level is displayed in the EVF Press the T or W side of the POWER ZOOM switch to control the digital zoom level When the level f...

Page 31: ...0 to 1 250 according to the brightness of the subject EIS 2 Press EIS again to cancel You may also use the High Speed Shutter function from 1 1 00 to 1 1 0000 The shutter speed you select remains active even after you cancel the E l S function Be sure that the E l S is turned off when not needed E l S may not function when Palmcorder movement is too extreme recording a subject with distinct horizo...

Page 32: ...ll images in 1 6 of a second intervals Press STILUSTROBE twice Press once more to return to normal recording Wide Screen Use this feature to fill the entire screen of your Wide Screen TV Hold down STILUSTROBE more than 3 seconds while in Strobe mode Press once again to return to the normal sized picture recording Note Playback must occur on a wide screen 1 6X9 aspect ratio television or the pictur...

Page 33: ... record tab into the editing recording unit 2 PLAY Press PLAY on the Playing Palmcorder 3 Press STILL when the tape reaches the point you want to start dubbing Press PLAY and REC together then immediately press STILL on the editing recording unit STILL 5 JJ OD Press STILL on the source Palmcorder and PAUSE STILL on the editing recording unit to begin copying your tape STOP 6 0 Press STOP on both u...

Page 34: ...r Camcorder Synchro Edit Cord optional Synchro Edit Remote Jack Synchro Edit Copying The Synchro Edit feature simultaneously releases the Pause mode on both units so copying is fast and easy 1 Follow steps 1 to 4 on page 33 2 Press PAUSE on the recording unit to release the Pause mode on both units and start copying the tape 3 Press PAUSE again when copying is complete to put both units in Play Pa...

Page 35: ...3 2 O A DUB 0 V DUB 0 REW FF EJ 3 SEARCH 4 Dubbing over Audio Your own sound track may be substituted onto a tape using an external microphone or the built in microphone on your Palmcorder POWER 1 a l D VCR OFF CAMERA Set the POWER switch to VCR PLAY STILL 2 J 8 Press PLAY Then press STILL where you want dubbing to begin 0 A DUB 3 c o Press AUDIO DUB to put the Palmcorder in the Audi o Dub Pause m...

Page 36: ... to locate the starting point for dubbing Then press STILL where dubbing is to begin To preset the stopping point of your replacement segment see the Memory Stop Editing section below O V DUB 3 0 Press VIDEO DUB to put the Palmcorder in Video Dub Pause mode 4 STILL or Press RECORD PAUSE or STILL to start taping a replacement video segment 5 t IO P Press STOP to stop dubbing Memory Stop Editing You...

Page 37: ... 4 3 Dubbing over Audio Vzdeo Use this feature to replace existing audio and video segments with exceptionally clean and precise edits using Flying Erase Head technology 1 Follow steps 1 and 2 on page 35 O A DUB O V DUB 2 c o 0 Press AUDIO DUB and VIDEO DUB together to put the Palmcorder in the Audio Video Dub Pause mode STILL 3 or Press RECORD PAUSE or STILL to start taping an AUDIONIDEO replacem...

Page 38: ...light should be provided Fluorescent light will degrade the picture quality This feature requires ample light More light is required for the fastest shutter speeds The Auto Focus system may not operate properly under insufficient light when you are using the High Speed Shutter 38 Copying your Tapes P 33 Source tapes recorded on other VCRs must be recorded in SP or SLP mode for Palmcorder playback ...

Page 39: ...5 500 OUTDOOR Average sunlight in clear 5 000 Blue lamp for photography weather AUTO Sunlight 2 hours after sunrise 4 500 Fluorescent lamp White Whitish and before sunset 4 000 Normal flash bulb 3 500 Fluorescent lamp Off white Tungsten lamp for INDOOR Sunlight 40 min after sunrise 3 200 photography and before sunset Halogen lamp Sunlight 30 min after sunrise 2 800 Iodine lamp Blue Filter and befo...

Page 40: ...Lens Cap See page 47 DC Input Connector See pages 1 1 33 34 35 37 Synchro Edit Remote Jack See page 34 RECORD PAUSE Button See pages 1 7 1 8 36 37 Record Button Cover See page 1 7 Video Output Connector See pages 22 33 34 35 37 DC Output Connector for the RF Adaptor See page 22 Hand Strap This strap can be adjusted to the size of your hand Tripod Mounting Hole ...

Page 41: ...ATE TIME Button See page 14 BACKLIGHT Button See page 27 HIGH SPEED SHUTTER Button See page 24 Remote Control Switch only PV 43 K See page 1 9 WHITE BALANCE Clock Battery Tray See page 1 3 TAPE REMAINING Switch See page 23 STILUSTROBE SET Button Tracking Control See pages 14 20 Button See page 32 TAPE SPEED Selector See pages 8 1 7 DIGITAL ZOOM See page 31 SEL Button SELECT Button COLOUR Button Se...

Page 42: ...23 36 STILL Button See pages 1 8 20 33 35 36 STOP Button See pages 20 33 34 35 36 37 TAPE EJECT Switch See pages 8 1 7 Vision Adjustment Ring See page 1 7 Electronic Viewfinder EVF See pages 1 5 38 Bright Control Focus Control POWER Switch See pages 1 7 1 8 20 22 35 36 Note These controls have been set at the factory It is not necessary to adjust these controls under normal circumstances But shoul...

Page 43: ... POWER Switch See page 1 9 RECORD PAUSE Button See page 1 9 f tllr FAST FORWARD SEARCH Button See page 1 9 STILL Button See page 1 9 Battery Charging Compartment See page 9 CAUTION This unit will operate on 1 1 0 120 220 240V AC An AC plug adaptor may be required for voltages other than 1 20V AC Please contact either a local or foreign electrical parts distributor for assistance in selecting an al...

Page 44: ...icateur INDEX 28 Indication d enregistrement 1 5 Indication de lecture 1 5 Indication de l obturateur a pose ultra breve 24 Indication de charge du bloc batterie 15 Indication de condensation 1 5 Indications dans le viseur electronique 1 5 lnterieur o 26 Languette 8 Lecture a effets speciaux 20 38 Lecture 20 Mesures de securite 2 Mise en attente de montage automatique 1 8 Mise au point en plan rap...

Page 45: ...ystem 1 track Sequential colour difference field reverse system One integral colour filter Charge Coupled Device CCD 1 0 1 zoom lens f1 4 with auto iris control Focal length 5 8mm 58mm Power zoom function Lens filter diameter 49mm 2 3 inch Electronic Viewfinder 1 Lux F1 4 0 1 footcandles 70dB 4 7K ohms unbalanced M3 connector 0 C 40 CF 32 F 1 04 1 0 75 Compact VHS Palmcorder 0 94kg 2 0 lbs PV 23 K...

Page 46: ...cts from the performance Batteries are not covered by this warranty WARRANTY SERVICE IN WARRANTY service can be obtained by bringing your product to an authorized Panasonic Servicentre To locate the authorized Panasonic Servicentre refer to your dealer A purchase receipt or other proof of date of original purchase will be required before warranty service is performed FOR YOUR PROTECTION Complete t...

Page 47: ... the still picture where the normal speed motion was motion or blurred action particularly rapid may produce this effect This is normal If the top of your playback picture waves Because the playback signal is not as stable as an off the air TV back and forth excessively signal the top of your TV screen may be bent or unstable when the tape is played back This symptom is more noticeable when a pre ...

Page 48: ...Panasonic Matsushita Electric of Canada Umlted 5770 Ambler Drive Mississauga Ontario L4W 2T3 Printed in Japan VOTW0442 ...

Reviews: