background image

Pre-shooting setup (2)

4

AG-HPX500
Pre-shooting setup

P2HD

X

AG-HPX500

PRACTICAL GUIDEBOOK

9

Battery setup

For the AG-HPX500 battery bracket, attachment of an Anton bracket 

(Gold Mount) for professional-quality batteries is standard. The battery 

menu also lists items made by other companies, and their compatible 

V-mount batteries (at the automatic default setting, 12 varieties are 

listed), so any professional-quality batteries in general use can be 

used. Also, the camera has full compatibility with info lithium batteries, 

so if one selects battery from the menu, the battery information 

(display of quantity remaining, etc.) will be returned via the viewfinder.

(Note that the camera is not compatible with the small battery used in 

the AG-HVX200.)

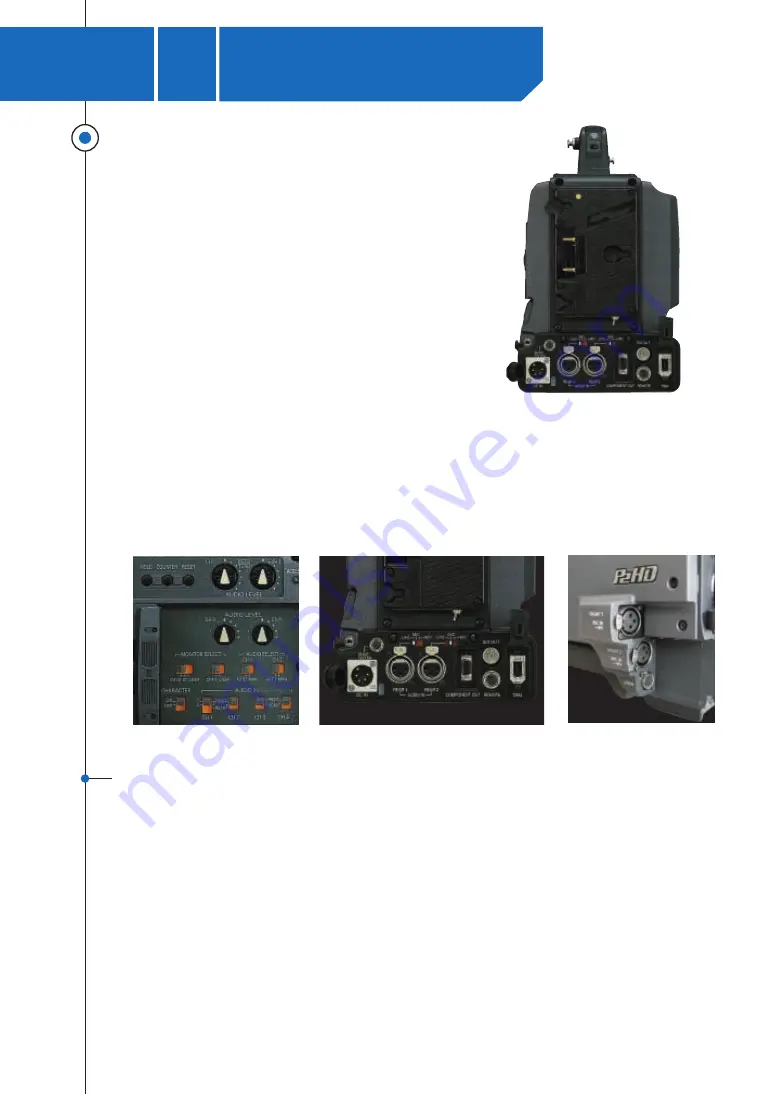
Audio setup

Another very useful feature on AG-HPX500 is the four independent 

audio channels. Levels can be set independently and can be isolated 

for checking.  All inputs can be su48 Volts Phantom power if 

desired. The rear channels can also take in line level inputs if desired.  

This is the first camera to sport 4 independent inputs.

 (*No slot-in wireless function)

Lens, iris and image quality adjustment

The lens may be one of the most difficult parts of the camera to understand, but when compared with the AG-HVX200, the 

lack of auto-focus is the only substantial difference. Otherwise, it can be used in much the same way. The focus must be 

adjusted manually, but setting the focus in advance makes this easy. First, zoom in the object you want to shoot, rotate the 

focus ring adjust it, and then adjust zoom as you want..

Iris adjustment may be done automatically, but there is also an easy way to do it manually. Turn on the zebra pattern inside 

the VF (viewfinder), and then adjust the iris ring so that the zebra pattern does not appear on the object you wish to shoot 

(for example, on the skin of a person you are shooting.) The zebra pattern setting (within Camera Setup) should be 100% (or 

95%). The VF and LCD monitor of the AG-HPX500 do not respond to HD signals, so when capturing on a site where you 

require a more severe focus, use an SD connection to an external monitor such as the optional 7.9 inch/multi-format monitor 

in order to confirm that the image has HD picture quality.

Setup for shooting: Gain / Iris / WB

 Back end of camera with two line inputs

Control panel inside LCD area 

Front side of camera, 2 inputs 

Summary of Contents for P2HDXAG-HPX500

Page 1: ...P2HDXAG HPX500 PRACTICAL GUIDEBOOK ...

Page 2: ... of the SD memory cards that provide the basic technology for P2 cards it is obvious that record times will only become longer and longer Looking at the development roadmap for the future of P2 the capacity is slated to double each year while the cost per unit of capacity will continue to decline For instance with the 32 GB P2 card planned for release at the end of 2007 it will be possible to shoo...

Page 3: ... Pre shooting setup 5 Hot Swap feature of the P2 system Method of back up various data 6 Special Effect Variable Frame Rate 7 Special Recording Pre REC One Shot Loop REC Interval REC 8 Using P2 Cards 9 From P2 to non linear editing workstation 10 Editing of Advanced mode pA Frame rate converter Software 11 Method of operating P2Viewer 12 P2 data back up and creating archives 13 P2 compatible non l...

Page 4: ...oting with the AG HPX500 set it to 59 94Hz NTSC or 50Hz PAL 2 Setting the recording format Next under REC FORMAT recording format select 1080 720 or 480 576 setting 3 Recording format SCENE FILE setting VIDEOCAM mode and FILMCAM mode Selecting 1080 or 720 at this stage will result in HD recording while selecting 480 576 will result in SD recording for details see pp 5 6 Exclusive features of each ...

Page 5: ...rent shooting scenarios and expand your creative abilities Included are Cine Like Gamma which gives recordings the characteristic warm tone of film recordings and a News Gamma that s designed especially for news gathering For Cinema shooting recommend to select CINE LIKE_D or CINE LIKE_V and adjust chroma level etc so that you can get film like tone footage as you want Your original setting can be...

Page 6: ...times are those when four 16GB P2 cards are used When one card is used recording time will be 1 4 of that shown In addition to image format and codec the function setting and number of cuts may also affect recording time Setting at SD Setting at HD Operation of the P2 system begins with deciding what to shoot and how to shoot it tone recording format AG HPX500 recording codec Image formats and cod...

Page 7: ...pull down removal in Final Cut Pro Movies for theatrical release etc Also known as normal 2 3 pull down recording Commercials music videos CG synthesis Blu Ray HD DVD content Commercials music videos CG synthesis video for public urban broadcast Blu Ray HD DVD content Web video mobile terminal video etc 720 24p over 60p might be used for Movies for theatrical release 720 24 p over 60p Checking the...

Page 8: ...utput from the IEEE 1394 interface to DVCPRO HD is possible during recording and when recording for extended periods FS 100 data storage or DVCPRO HD tape storage in the AJ HD1400 etc is possible For undercrank and overcrank shooting as long as special effects are not required shooting in native mode 30pN 25pN 24pN is recommended in order to save space on the P2 card About standard recording over6...

Page 9: ...58B The above list shows compatible lens varieties as of May 2007 The range of compatible lenses is expected to grow in the future 2 3 inch mount compatible HD cine lenses such as Carl Zwiss Digiprimes may also be attached Note It may be possible to use some high performance SD lenses but when using lenses other than those endorsed by the maker please be aware that there is a risk of adverse effec...

Page 10: ...uts No slot in wireless function Lens iris and image quality adjustment The lens may be one of the most difficult parts of the camera to understand but when compared with the AG HVX200 the lack of auto focus is the only substantial difference Otherwise it can be used in much the same way The focus must be adjusted manually but setting the focus in advance makes this easy First zoom in the object y...

Page 11: ...nge back F B distance using a chart such as the one attached Selecting a tripod It is assumed that the AG HPX500 will rarely be swung around freely in the manner of the AG HVX200 and even when shooting the same scene the AG HPX500 has different requirements It may be necessary to set Gamma to adjust the black level to boost reproduction of dark areas and during extremely slow zoom in zoom out or f...

Page 12: ...n the Hot Swap feature is the greatest blessing of a P2 card system camera With tapes other types of hard disks or Blu Ray disks replacing the media while the camera is operating or recording and continuing to capture is of course impossible With the P2 system however if one has at least 2 cards and a PC or a P2 data storage device such as P2 Store or P2 Gear etc it is possible to capture continua...

Page 13: ...rol connected backup device using the camera START STOP button Recording operations cannot be carried out within the camera itself when in this mode BOTH Record simultaneously onto both the camera and the connected backup device CHAIN Connected backup device begins to record automatically when recording capacity of the P2 cards fall to a low point during recording OTHER FUNCTIONS 1394 CMD SEL REC_...

Page 14: ...ng This is a type of slow motion effect known as High Speed HS In Progressive mode when the recording format is set to 24 fps 24p 24pN 25 fps 25p 25pN or 30 fps 30p 30pN you can shoot slow motion video by setting a higher than original frame rate up to a maximum of 2 5 times the original rate 60 fps set in 24p mode Undercrank shooting This is the opposite of the overcrank concept By setting a lowe...

Page 15: ...itor checking is not possible 14 RECORDING SETUP REC FORMAT Select any of 720p modes SCENE FILE FRAME RATE Select frame rate Frame rates between 12 and 60 50 can be set CAMERA MENU SCENE FILE OPERATION TYPE Select the FILMCAM Procedure for using VFR required settings 1 Set the camera mode to FILMCAM 3 Set the frame rate to one of rates between 12 and 60 50 2 Set the recording mode to 720p VFR effe...

Page 16: ...inute or more of remaining recording time 3 Recording stops when either P2 card is removed One shot recording This mode records certain frames by setting This mode is like a still camera mode Loop Recording If you are inserting 2 or more P2 cards into the slots this mode lets you record indefinitely by successively switching cards until you are ready to stop This is especially effective for shooti...

Page 17: ... 1 Select VIDEOCAM in the menu of scene file 4 Select a setting for the Interval time or One shot time 2 Select one of the following recording formats Settings for special recording modes Interval Recording Interval Recording records a single frame at set intervals This feature can be used for applications such as recording shots of a set location over long periods of time Pre REC 3 RECORDING SETU...

Page 18: ...procedure below to select which of the four P2 card slots on the AG HPX500 will be used for playback Select MCR mode by pressing mode button Press MENU button to display thumbnail menu MENU buttons are located under inside of LCD and front side of the camera Use the or button to select a thumbnail The yellow frame indicates the selected thumbnail Press the MENU button on the thumbnail screen In th...

Page 19: ...screen press the or button to select OPERATION and then press the or button Select FORMAT select the slot 1 4 or the SD card in the card selection screen and then press the button Select whether or not to proceed with formatting Select the clip you want to delete in the thumbnail screen and press the MENU button In the menu press the or button to select OPERATION and then press the or button Selec...

Page 20: ...ktop Application Utilities Disk Utility as shown in the screenshot In the left column select the P2 card marked with gray then click Mount 2 Press the camera s MENU button twice to exit from the menu mode 3 Press the function mode button to turn the MCR lamp on Press and hold the button for more than 2 seconds to enter the PC mode DEVICE CONNECT is displayed P2 card is mounted with its icon appear...

Page 21: ...lder specified under Scratch Disks File Import Panasonic P2 As seen in the example right list of data on the P2 card is automatically displayed in the browse section Select a data in the browse section to preview As in the same manner as handling a magnetic tape medium you can specify in out time for capturing To capture the clip being previewed press the Add clip to the queue button To capture on...

Page 22: ...n on the screen capture image below Importing from Panasonic P2 and select Settings Import settings window appears as shown below select the checkbox To capture P2 data recorded using advanced mode such as 24pA into Final Cut Pro you must first remove advanced pulldown 2 3 3 2 pulldown to delete unnecessary frame fields so that 24 fps 23 98 to be more precise progressive video can be handled corre...

Page 23: ...lug in is included in the Final Cut Pro 5 1 or Final Cut Studio installation disk In the case of native mode recording 24pN 25pN and 30pN you can directly edit the captured data Writing AJ HD1400 via IEEE1394 connection Writing to a professional HD deck via PCI card video interface such as Decklink by Blackmagic or Cona by AJA capable of HD SDI output Tapeless lossless direct data conversion using...

Page 24: ... program to manage data exclusively for P2 card and other P2 compatible equipment You can use this software to copy multiple cards into one folder or copy selected clips The composition of the main window greatly divides into four areas Archiving of P2 cards In the pulldown menu select Show Show Primary Bin All P2 cards to show all clips in the P2 cards currently inserted Bin area View area Memo a...

Page 25: ... on the lower section On the screen capture image below D testP2 is the newly created folder On the screen capture image below D testP2 is the newly created folder Next select the storing destination In the pulldown menu select Tool Configuring Virtual P2 card In the Virtual P2 card configuration window click the registration button to newly create a folder on the hard drive where the data is stor...

Page 26: ... HPX500 with an IEEE1394 cable and then turn on the HDD 2 In the Setup menu 3 Press the MENU button twice to exit menu mode 4 Use the operation mode button to turn on the MCR lamp and then hold the button down for at least 2 seconds The PC lamp lights and the camera switches to PC mode 6 When formatting ends use the or button to select COPY TO HDD and press the button 5 If the HDD has not been for...

Page 27: ...m AG HPX500 to a HDD Backing up data onto a HDD using an OS Creating archives using FCP From the pulldown menu select File Import Panasonic P2 From within the Panasonic P2 import screen press the hierarchy list display button A Select the P2 volume to copy and click the pulldown menu B to select Create an archive folder You will copy the entire content of the P2 card into a newly created folder on...

Page 28: ...llowing URL 1080 size Data size Pixel ratio Interlace 280 x 1080 pixels 1 5 odd number fields are prioritized 720 size Data size Pixel ratio 960 x 720 pixel 1 33 PAL mode 50p 25p 1080 size Data size Pixel ratio Interlace 1440 x 1080 pixels 1 33 odd number fields are prioritized When displaying images on Adobe Photoshop set the horizontal vertical pixel ratio to 1 5 for accuracy If you are preparin...

Page 29: ...S 28 The latest P2 equipment P2 store AJ PCS060G P2 drive AJ PCD20 P2 mobile AJ HPM100 16GB AJ P2C016RG 32GB AJ P2C032RG Will be released at the end of 2007 8GB AJ P2C008H P2 Gear AG HPG10 AG HPX500 AG HVX200 P2 card ...

Page 30: ...e to display clip thumbnails in P2Viewer and some nonlinear editing programs 1 The clip thumbnail list cannot be displayed on an external monitor connected to the camera DSP DSP stands for digital signal processor a type of specialized microprocessor for manipulating digital signals The AG HPX500 is equipped with a high performance DSP that performs 14 bit A D conversion and 19 bit inner processin...

Page 31: ...d during or after recording It is possible to display only marked clips when mounting video data on a PC using P2Viewer Span Files Span files are created when a video file is recorded spanning two or more P2 cards When P2Viewer or a nonlinear editing NLE system supporting P2 is used a set of span files is treated as a single video file rather than as multiple files Text Memo By pressing the Text M...

Page 32: ...P2HDXAG HPX500 PRACTICAL GUIDEBOOK Edit Direction by Shinjusya Inc DVJAPAN 30K706MM 1 Printed in Japan SP HPX500GDB ...

Reviews: