background image

-126-

ENGLISH

2

1

0:00.00

AUTO

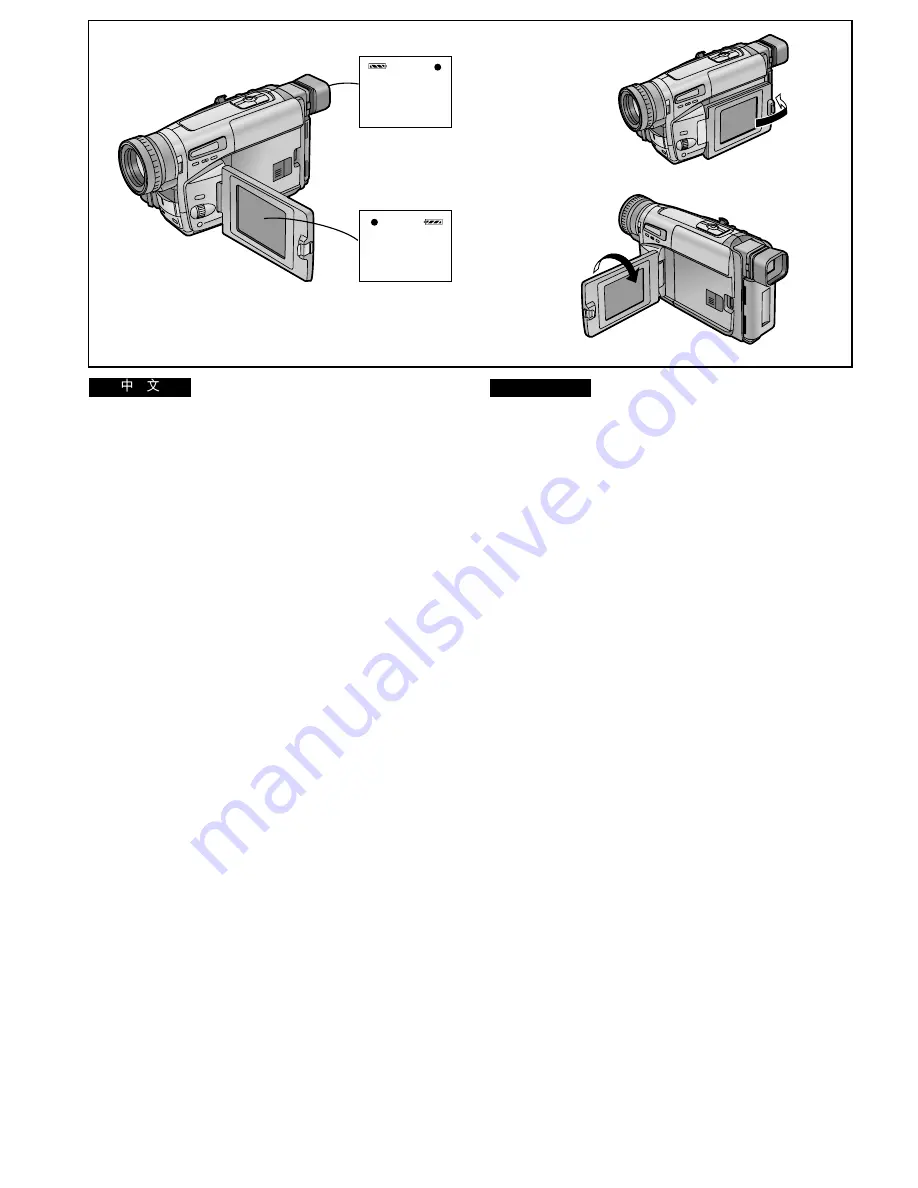
Mirror Mode

When recording yourself with the LCD Monitor facing forward,
the picture shown on it the way it is being recorded may be
difficult to get used to.
This is because we usually look at ourselves in the mirror, so
we see a mirror-image and this feels more natural. This Movie
Camera features the Mirror Mode which displays the picture
as a mirror-image.
However, even if you have selected in the Mirror Mode, the
picture is recorded in the normal way.

It is not possible to display and record the Date, Time and/or
Title Indication in the Mirror Mode.

In the Mirror Mode, only the following indications can be
displayed on the LCD Monitor and in the Finder:

[

¥

]:

Recording Mode Indication

[

]:

Recording Pause Mode Indication

[

x

]: Remaining Battery Indication

[

°

]:

General Warning/Alarm Indication

(In addition to these four indications, the Counter Indication
and the Programme AE Mode Indications can also appear in
the Finder.)
When you want to confirm other indications, return the LCD
Monitor to position 

1

 or 

2

 shown in the illustration above.

Especially when the [

°

] Indication is displayed, be sure to

return the LCD Monitor to position 

1

 or 

2

 so that you can

confirm the actual Warning/Alarm Indication.

If you turn the LCD Monitor so that it faces forward, the
Finder also automatically turns on. However, in the following
cases, the Finder turns off:

Changing from the Camera to the VCR Mode.

Closing the LCD Monitor with the screen facing outward (as
shown above 

1

).

 !

 !"#$%&'()*+,-./01*234#$56

 !"#$%&'()*+,

 !"#$%&'()*+,-./)012345678

 !"#$%&'()*+,-./01()234567

 !

 !"#$%&'()*+, -./0123456*7

 !"#$%&'()*+,-./01234(5/

L

 !"#

 !"#$%&#'()*+,-)./-)01234

 !"#

x

µ

z

 !"#

x

;

µ

z

 !"#$%

x

x

z

 !"#

x

°

z

 !

L

 !


Q

 !"#$%&'()*+,-./( 012

^b

 !"#

 !"#$%&'()*+,-.'/0123456'7

1

2

 !"

x

°

z

 !"#$%&'()*+,-

1

2

 !"#$%&'()

L

 !"

 !"#$%&'()*+,-./0*1234)56

 !"#$%&'()*'%+,-./0123

0

 !"#$%&'(!"#$)

0

 !"#$%&'()*+,-

 !

1


Summary of Contents for NV-VS50EN

Page 1: ...S VHS C Movie Camera VQT9094 Before use please read these instructions completely Model No NV VS50EN A NV VS70EN A Operating Instructions qOGA U d b q d U c q UJ U U pJsepJ...

Page 2: ...nstructions are the sole responsibility of the user These Operating Instructions are for the two Movie Camera models NV VS50 and NV VS70 Please note that the actual controls and components etc of your...

Page 3: ...KKKKKKKKKKKKKKKKKKKKKKKKKKKKKKKKKKKKKKKKKKKKKKKKK OS KKKKKKKKKKKKKKKKKKKKKKKKKKKKKKKKKKKKKKKKKKKKKKKKKKKKKKKKKKKKKKKKKKKK OU KKKKKKKKKKKKKKKKKKKKKKKKKKKKKKKKKKKKKKKKKKKKKKKKKKKKKKKKKKKKKKKKKKKKKKKKKKK...

Page 4: ...n Special Situations Programme AE 112 L KKKKKKKKKKKKKKKKKKKKKKKKKKKKKKKKKKKKKKKKKKKKKKKKKKKKKKKKKKKKKKKKKKKKKKKKKK TQ KKKKKKKKKKKKKKKKKKKKKKKKKKKKKKKKKKKKKKKKKKKKKKK TS KKKKKKKKKKKKKKKKKKKKKKKKKKKKKKK...

Page 5: ...0 KKKKKKKKKKKKKKKKKKKK NOQ KKKKKKKKKKKKKKKKKKKKKKKKKKK NOU KKKKKKKKK NPO KKKKKKKKKKKKKKKKKKKKKKKKKKK NPQ KKKKKKKKKKKKKKKKKKKKKKKKKKKKKKKKKKK NPQ KKKKKKKKKKKKKKKKKKKKKKKKKKKKKKKKKKKKKKKKKKKKKKKKKKKK N...

Page 6: ...To supply power to the Movie Camera 04 Cassette Adaptor and Battery l 66 05 Shoulder Strap l 16 06 AV Cable l 72 160 162 To connect the Movie Camera to the video input and audio input sockets on a TV...

Page 7: ...tion Dial 34 MF TRACKING l 28 68 110 15 Menu Button MENU l 28 16 Auto Exposure Selector Button PROG AE l 54 106 110 112 17 Digital Image Store Button STORE l 132 150 Digital Image Superimposer Button...

Page 8: ...on and does not affect the recorded picture 27 Cassette Compartment Lock Button LOCK l 40 28 DC Input Socket DC IN l 18 29 Finder l 46 72 Due to limitations in LCD production technology there may be s...

Page 9: ...r W T l 60 88 Volume Adjustment Lever sVOLr l 62 45 Eyepiece Corrector Lever l 46 46 Shoulder Strap Holders Pull one end of the Shoulder Strap through the Shoulder Strap Holder 1 Fold the end of the S...

Page 10: ...t the other end of the cable to the DC OUT Socket on the AC Adaptor 3 Connect the AC Mains Lead to the AC Adaptor and to an AC mains socket A Australia and New Zealand Before connecting the DC Input L...

Page 11: ...Step 1 above 4 Insert the Battery with its top so that the arrow points upward into the top Battery Holder and press the bottom of it toward the Movie Camera until it locks with a click Removing the...

Page 12: ...generate electricity Therefore the actual recording time per Battery may be approximately 30 50 shorter than listed above When first charging a Battery that is completely discharged as a result of be...

Page 13: ...functions all of which consume power Therefore the actual available recording time from the Battery is approximately 30 50 shorter than listed l 22 When the Ambient Temperature Is Extremely Low or Ex...

Page 14: ...is securely closed before closing the LCD Monitor Opening the LCD Monitor automatically turns the Finder off However when you turn the LCD Monitor so that is faces forward the Finder turns on again W...

Page 15: ...he SET Button to display the selected sub menu 6 Turn the 34 Dial to select the item to be set 7 Press the SET Button to set the selected item to the desired mode Exiting the Menu Press the MENU Butto...

Page 16: ...ect SHUTTER EFFECT l 76 5 Top Side Recording Button TOP REC BUTTON l 56 76 90 92 94 6 Returning to the Main Menu RETURN If you set RETURN to YES the menu changes back to the Main Menu 1 CAMERA SETUP P...

Page 17: ...ng to the Main Menu RETURN TITLE SETUP PRESS MENU TO EXIT DATE TITLE SIZE WHITE COLOUR DATE TIME TITLE LANGUAGE TITLE FOR TITLE NORMAL LARGE HOLIDAY RETURN YES ENGLISH 2 3 7 8 9 DIGITAL EFFECT PRESS M...

Page 18: ...set S VHS ET on the OTHER FUNCTIONS Sub Menu to ON REC SPEED is automatically set to SP Even if you later set S VHS ET to OFF REC SPEED remains set to SP Therefore to use the LP Mode when recording i...

Page 19: ...oise Reduction DNR l 64 DIGITAL EFFECT Sub Menu 2 l 138 3 Digital Effect On Off EFFECT l 138 All other items on the DIGITAL EFFECT Sub Menu are the same as those on the DIGITAL EFFECT Sub Menu of the...

Page 20: ...Finder 1 Press the SET Button to select the item that you want to adjust 2 Turn the 34 Dial to increase or decrease the vertical bars of the Bar Indication The Bar Indication is divided into 8 steps...

Page 21: ...Cassette Compartment by pressing the LOCK Button If the AC Adaptor or Battery is used to supply power it is possible to insert or eject the cassette without turning on the Movie Camera If a cassette w...

Page 22: ...ing the Remaining Tape Time During recording and playback the Remaining Tape Time Indication 3 is automatically displayed so you always know how much time you have left on the cassette However to ensu...

Page 23: ...layback video equipment However with some equipment playback may not be possible In that case connect this Movie Camera directly to the TV l 72 If you want to record and play back with highest possibl...

Page 24: ...noise occurs on the Finder screen 3 If you block off the light this phenomenon disappears after a few minutes and does not affect the recorded picture If a subject with strong contrast or a menu is d...

Page 25: ...move the button type battery use a pointed object The internal clock works even when the Movie Camera is turned off and it consumes power from the button type battery CAUTION Danger of explosion if ba...

Page 26: ...menu disappear If you select the DATE TIME SETUP Sub Menu when the button type battery is not inserted into the Movie Camera or is exhausted the Main Menu disappears and the 0 Indication flashes inste...

Page 27: ...to make the Date Time Title Indication disappear After turning the Movie Camera off and then on again the previously selected Date Time Title Indication is no longer displayed To make it appear again...

Page 28: ...amp 2 lights 2 Press the PROG AE Button repeatedly until the AUTO Indication 3 appears The initial setting is AUTO 3 Press the Recording Start Stop Button to start recording Recording starts and the I...

Page 29: ...ing angles it may be more convenient to use the REC Button 2 as the Recording Start Stop Button To be able to use the REC Button as the Recording Start Stop Button set TOP REC BUTTON on the CAMERA SET...

Page 30: ...ra Search Function This function makes it easy to search for a point in a previously recorded scene or cassette from which you want to start recording a new scene In addition it ensures smooth scene t...

Page 31: ...ovie Camera s lens To activate the Voice Zoom Function set VOICE ZOOM on the OTHER FUNCTIONS Sub Menu of the CAMERA FUNCTIONS Main Menu to ON l 28 The V ZOOM Indication 1 appears The Voice Zoom Functi...

Page 32: ...ack 4 Press the Button Adjusting the Sound Volume Push the jVOLi Lever 4 toward i to increase the volume or push it toward j to decrease the volume The VOLUME Indication appears and the number of bars...

Page 33: ...Cue Review or Still Playback Mode When using the Camera Search or Recording Check Function When adjusting the tracking When playing back an unrecorded part on the tape When you play back a cassette wi...

Page 34: ...sh the Battery Compartment Cover upward and remove it 2 Insert the supplied battery and then re attach the Battery Compartment Cover 3 Slide the Open Lever in the direction of the arrow 4 Insert the r...

Page 35: ...s Movie Camera adjusts the tracking automatically With certain cassettes however the tracking adjustment may not be precise In this case adjust the tracking manually Press the FOCUS SET Button briefly...

Page 36: ...Playback Modes horizontal noise bars 1 appear in the picture or the picture may become black and white or distorted The picture reproduced on the LCD Monitor contains less noise than the picture in t...

Page 37: ...he AC Adaptor or remove the Battery Cleaning the Finder If dust has entered the Finder Push the Buttons on both sides of the Finder and remove it in the direction of the arrow Remove dust with a blowe...

Page 38: ...Approximately 3 4 seconds later release the FADE Button Fading Out 2 Fading out lets you make the picture and sound disappear gradually at the end of a recording 4 During recording keep the FADE Butto...

Page 39: ...ture is recorded for approximately 7 seconds Shutter Effect Mode If you set SHUTTER EFFECT on the CAMERA SETUP Sub Menu to ON the screen blinks briefly like an SLR photo camera when you press the SNAP...

Page 40: ...and then set it to CAMERA again the indication of the selected digital effect flashes for a few seconds to inform you of the selected setting If you have set EFFECT2 on the DIGITAL EFFECT Sub Menu to...

Page 41: ...as a stroboscope like effect Since the strobe pictures are recorded from the digital image memory the picture quality is slightly inferior to that of normally recorded pictures When recording under fl...

Page 42: ...re is inserted and displayed inside the normal picture Mix Mode MIX l 96 It gradually fades out one scene while fading in the new scene over it Wipe Mode WIPE l 96 With this function you can change ov...

Page 43: ...white 5 Digital Fade 1 Mode D FADE1 l 98 The picture fades in starting at the centre and extending toward the edges and fades out in reverse direction 6 Digital Fade 2 Mode D FADE2 l 98 The picture fa...

Page 44: ...Press the SET Button to select SIS or SISrD ZOOM The and or Lamp lights 3 Press the MENU Button to exit the menu The and or D ZOOM Indication appear Cancelling the Super Image Stabilizer Function Set...

Page 45: ...Lever toward T or W to zoom in or out as desired When using the Digital Zoom Function the picture quality is somewhat reduced Within the digital zoom range 23k 550k it is not possible to adjust the wh...

Page 46: ...utton If you press the MULTI Button again another sequence of 9 still pictures is captured and displayed Cancelling the Multi Image Mode Set EFFECT1 on the DIGITAL EFFECT Sub Menu to OFF If you press...

Page 47: ...Function to start Sequences of 9 still pictures are continuously displayed until you press the MULTI Button again Erasing the 9 Still Pictures After pressing the MULTI Button to stop the capturing and...

Page 48: ...ure Mode Set EFFECT1 on the DIGITAL EFFECT Sub Menu to OFF The small picture is recorded with slightly inferior picture quality compared to that of normal moving pictures If you press the MULTI Button...

Page 49: ...cording the next scene The last picture of the previous scene is gradually replaced by the new scene Cancelling the Mix or Wipe Function Set EFFECT1 on the DIGITAL EFFECT Sub Menu to OFF All subsequen...

Page 50: ...ecording Pause Mode keep the FADE Button pressed The picture disappears gradually with the selected digital fade effect 4 When the picture has completely disappeared press the Recording Start Stop But...

Page 51: ...TDBY Indication appears Approximately 1 second after the Movie Camera s Motion Sensor has detected movement in the picture recording automatically starts Approximately 10 seconds after movement in the...

Page 52: ...ssible to manually start recording by pressing the Recording Start Stop Button or to activate the Recording Check or Camera Search Function When you use the AC Adaptor to power the Movie Camera the Mo...

Page 53: ...manually adjusted white balance setting It is not possible to use any of the Programme AE Modes when the 0 Lux Night View Mode is activated When using the 0 Lux Night View Function the subject should...

Page 54: ...ess the W B Button In the following cases the 1 Indication flashes During manual adjustment of the white balance If the surroundings are dark and the white balance cannot be adjusted the 1 Indication...

Page 55: ...lance adjustment and therefore natural colours in the recorded pictures when using the Full Auto Mode For light sources outside this range adjust the white balance manually l 106 Also additional light...

Page 56: ...zoom out as desired Cancelling the Manual Focus Mode Press the FOCUS Button 4 once to make the MF Indication disappear Or press the PROG AE Button repeatedly until the AUTO Indication appears Subject...

Page 57: ...Mode To record subjects under spotlights party theatre etc 5 Surf Snow Mode To record subjects in brightly lit surroundings ski slopes beach etc During recording it is not possible to change the recor...

Page 58: ...ntly lit the 5 Indication flashes When using this mode for recording indoors the playback picture may flicker Portrait Mode When using this mode for recording indoors the playback picture may flicker...

Page 59: ...E l 74 98 148 6 Colour Selector Button for Digital Fade D FADE COLOUR l 98 148 7 Digital Image Store Button STORE l 132 150 Digital Image Superimposer Button OFF ON l 132 150 8 Colour Selector Button...

Page 60: ...ts 2 l 138 Selection Button SELECT To select the desired playback digital effect l 138 Store Button STORE To store a still picture in memory for the Wipe or Mix Function l 146 Off On Button OFF ON To...

Page 61: ...n of the Remote Controller The distance to the Movie Camera must not be more than 5 metres The Transmitter Window 1 on the Remote Controller or the Remote Control Sensor 2 on the Movie Camera must not...

Page 62: ...he battery with its poles correctly aligned Do not short circuit the battery When you do not use the Remote Controller for a long time take out the battery and store it in a cool dry place CAUTION Dan...

Page 63: ...tripod and use the Remote Controller you can also take part in the action that you are recording and check the picture from the front on the LCD Monitor 1 Slide the 3OPEN Lever to the left and simult...

Page 64: ...de Indication Recording Pause Mode Indication x Remaining Battery Indication General Warning Alarm Indication In addition to these four indications the Counter Indication and the Programme AE Mode Ind...

Page 65: ...FAMILY _ PARTY _ THE END _ CONGRATULATIONS _ MERRY CHRISTMAS _ HAPPY MEMORIES _ HAPPY NEW YEAR _ HOLIDAY _ 4 Turn the 34 Dial to select COLOUR 3 5 Press the SET Button to select the desired colour You...

Page 66: ...Time Title Indication l 52 the title itself l 128 the size of the title or the colour of the title l 128 When the Movie Camera s Digital Still Picture Terminal is connected to a computer by using the...

Page 67: ...ant to capture a small title use the Macro Close up Function l 60 As the title picture is automatically cropped on all four sides aim the Movie Camera so that there is sufficient empty space around th...

Page 68: ...ncelled when you store a new title The title stored in the digital image memory may be automatically cancelled or it may be missing partially when the Battery is removed the AC Adaptor is disconnected...

Page 69: ...You can select the desired language title colour and size on the TITLE SETUP Sub Menu When the Movie Camera s Digital Still Picture Terminal is connected to a computer by using the Personal Computer C...

Page 70: ...ct The Lamp lights Repeatedly pressing the SELECT Button changes the selected digital effect in the order 1 to 8 Suspending the Playback Digital Effect Temporarily You can suspend and re activate the...

Page 71: ...ss the MENU Button to exit the menu 5 Start playback and when you reach the scene that you want to capture and display in the Strobe Multi Picture Mode press the MULTI Button A sequence of 9 still pic...

Page 72: ...exit the menu 5 Start playback and press the MULTI Button Sequences of 9 still pictures are continuously displayed 6 Press the MULTI Button again at the point where you want to capture Making the Mul...

Page 73: ...I Button again another small picture is displayed Cancelling the Picture in Picture Mode Set EFFECT1 on the DIGITAL EFFECT Sub Menu to OFF The small picture is displayed with slightly inferior picture...

Page 74: ...displayed MIX or WIPE Indication disappear Operating the Wipe Function and the Mix Function during playback is only possible with the Remote Controller If you press the OFF ON Button while the Wipe or...

Page 75: ...Fading In 2 During playback keep the FADE Button pressed The picture disappears gradually with the selected digital fade effect 3 Release the FADE Button at the point where you want to fade in Fading...

Page 76: ...mage memory remains on the screen Selecting the Desired Colour for the Title 2 While the title is displayed press the COLOUR Button repeatedly until the desired colour appears The colours for the titl...

Page 77: ...nlarged part of the picture Cancelling the Playback Zoom Function Press the P B ZOOM Button on the Remote Controller In the Playback Zoom Mode it is not possible to adjust the sound volume Turning the...

Page 78: ...ape time that has elapsed from that point After displaying the DISPLAY SETUP Sub Menu l 28 1 Turn the 34 Dial to select DISPLAY 2 Press the SET Button to select ALL 3 Turn the 34 Dial to select C RESE...

Page 79: ...Mode and then back to the Camera Mode ALL is automatically selected for the Tape Counter Indication 4 OFF No Counter Indication In this mode only the Operation Mode Indications and Warning Alarm Indi...

Page 80: ...ding is finished Set the CAMERA OFF VCR Switch to VCR 5 Press the 5 or 6 Button The tape automatically stops approximately at the position at which you reset the counter to zero During High Speed Rewi...

Page 81: ...riginal recording Stop recording on the VCR 7 Stop playback on the Movie Camera As the picture quality on the dubbed cassette is slightly reduced we recommend that you select the standard speed SP Mod...

Page 82: ...2 MB or more recommended Free hard disk space At least 16 MB Disk drive CD ROM drive Ports RS 232C D sub 9 pin Other requirements Mouse Windows is a trademark or registered trademark of Microsoft Corp...

Page 83: ...facing down Do not aim the lens or Finder directly at the sun the lens collects light and the resulting heat could deform internal precision parts and cause irreparable damage to the Movie Camera Do n...

Page 84: ...ttery temporarily out of operation Do not throw the Battery into a fire This could cause it to explode Precautions for Storing the Battery Avoid the following places as they could shorten the service...

Page 85: ...y wait about 1 more hour To Prevent Condensation from Forming When bringing the Movie Camera from a very cold to a warm place keep it in a tightly closed plastic bag or something similar for 1 to 2 ho...

Page 86: ...he front of the Movie Camera with the colour stored in memory and selects the setting for the most similar tint Be careful not to cover the White Balance Sensor l 12 with your hand etc Manual White Ba...

Page 87: ...Indications 8 Recording Mode large indication l 54 9 Recording Mode small indication l 54 Tape Movement during Recording l 54 Recording Pause Mode large indication l 54 Recording Pause Mode small indi...

Page 88: ...J Title large indication l 130 K Full Auto Mode l 54 L Recording Speed Mode l 34 M Zoom Magnification l 60 N Manual White Balance Mode l 106 O Manual Recording Mode l 106 110 P Sports Mode l 112 Q Por...

Page 89: ...Picture in Picture Mode l 94 144 c Mix Mode l 96 146 d Wipe Mode l 96 146 e Negative Mode l 84 138 f Solarisation Mode l 84 138 g Sepia Mode l 84 138 h Black White Mode l 84 138 i Digital Fade Mode l...

Page 90: ...N and then exiting the menu Pressing a button or displaying a menu temporarily suspends the Demonstration Mode However if you leave the Movie Camera in this condition without activating any function f...

Page 91: ...3 Battery Pack Lithium Ion 14 Battery Pack Lithium Ion 15 Car Battery Charger 16 Filter Kit 17 Tele Conversion Lens 18 Wide Conversion Lens 19 Tripod 10 Cassette Adaptor 11 IR Video DC Light Halogen I...

Page 92: ...lumination 1 400 lx Operating Temperature 0oC 40oC Operating Humidity 10 80 Weight Approx 850 g without Battery Dimensions Approx 88 W k118 H k231 D mm AC Adaptor NV VS50 Information for your safety P...

Page 93: ...the cassette Wait until the Condensation Indication disappears approximately 2 3 hours l 168 Cassette P1 The Remaining Tape Time Indication is not correct S1 Is the tape length of the inserted cassett...

Page 94: ...back an E55 type cassette As picture distortion tends to occur with this type of cassette we recommend that you use cassettes other than type E55 for recording l 54 P3 The playback picture is not in c...

Reviews: