Editing Mode
-35-
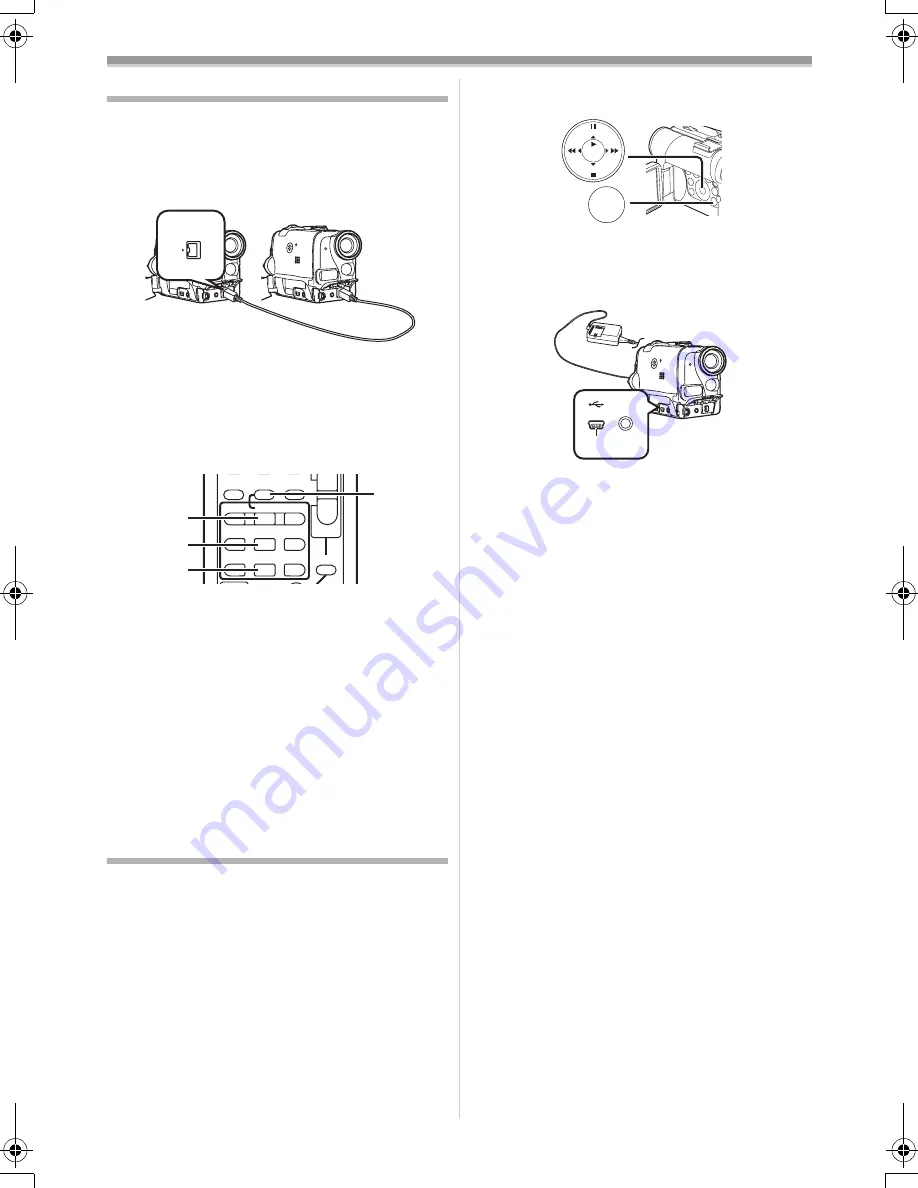
Using the DV Cable for Recording
(Digital Dubbing)
By connecting this Movie Camera to other digital
video equipment that has a DV Input/Output
Terminal with a DV Cable VW-CD1E (optional)
1
, dubbing can be done in the digital format.
≥
Only the NV-GS33 can be used as a Recorder.
Player/Recorder:
1
Insert the Cassette and set to Tape
Playback Mode.
Player:
2
Press the [
1
] Button
(72)
to start playback.
Recorder:
3
While pressing the [REC] Button
(54)
, press
the [PLAY] Button
(72)
.
Or while pressing the [REC] Button
(7)
,
press the [BACK LIGHT] Button
(8)
on the
Movie Camera.
≥
Recording starts.
To Stop Dubbing
Press the [
;
] Button
(69)
or the [
∫
] Button
(70)
.
≥
For other notes concerning this item, see
-41-
.
Using as a Web Camera or with DV
STUDIO
If the Movie Camera is connected to your
Personal Computer, you can send video from the
Movie Camera to other parties via the network.
≥
Do not connect the USB Cable until the USB
driver or Web Camera driver is installed.
1
Install the supplied USB driver or Web
Camera driver.
2
Set the Mode Dial to Tape Recording Mode
(or Tape Playback Mode when using with
DV STUDIO).
3
When using as a Web Camera:
Set [CAMERA] >> [USB FUNCTION] >>
[WEB CAMERA].
When using with DV STUDIO:
1
DV
INDEX
INDEX
STOP
K
L
∫
V
/REW
STILL ADV
T
W
s
VO
L
r
¥
REC
MULTI/
P-IN-P
A.DUB
PLAY
PAUSE
FF/
W
STILL ADV
6
1
5
;
E
D
P.B. ZOOM
(54)
(72)
(69)
(70)
Set [CAMERA] >> [USB FUNCTION] >>
[DV STUDIO].
≥
It enters WEB CAMERA Mode or DV
STUDIO Mode.
4
Connect the supplied USB Cable to Socket
(27)
.
5
Start the Windows Messenger or DV
STUDIO.
≥
When using as a web camera, it is not possible
to record on a tape or display a title.
≥
For more details on the operating environment,
installation, connections, and procedures,
please refer to USB Connection Kit’s operating
instructions.
MENU
STILL
ENTER
FADE
i
s
(14)
S-VIDEO
OUT
(27)
33B-ENG.book 35 ページ 2004年2月4日 水曜日 午前11時55分
Summary of Contents for NV-GS22
Page 50: ... 50 ...
Page 51: ... 51 ...


