31
Playing Back on Your TV
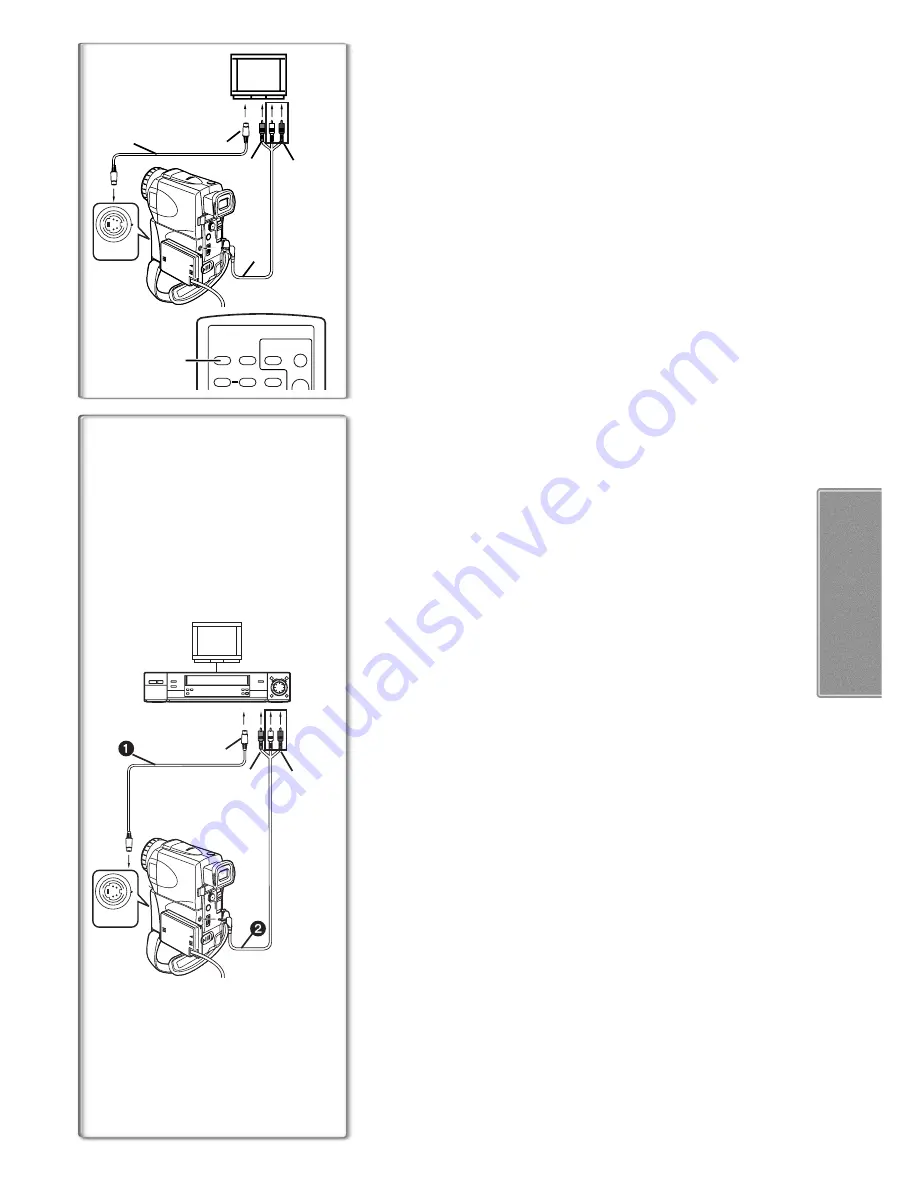
By connecting your Movie Camera with your TV, the recorded scenes can be
viewed on your TV screen.
≥
Before connecting them, turn off the power of both the Movie Camera and
TV.
1
Connect the [AV OUT] Socket of the Movie Camera and the
Video and Audio Input Sockets of the TV.
≥
Using the AV Cable
1
, make a connection with the TV. If the TV has
an S-Video Socket, connect the S-Video Cable
2
, too.
To Make the Indications Appear on the TV Screen
Press the [OSD] Button
3
on the Remote Controller.
≥
If you set [AV JACK] on the [AV IN/OUT SETUP] Sub-Menu to [IN/OUT],
nothing will be shown on the TV screen except during playback.
≥
For other notes concerning this item, see page 48.
~~~~~~~~~~~~~~~~~~~~~~~~~
Copying on an S-VHS (or a VHS) Cassette
(Dubbing)
After connecting the Movie Camera and the VCR as illustrated at left
A
,
start the following procedures.
≥
Be sure to press the [OSD] Button
(
l
8)
on the Remote Controller prior to
copying so that no indications are visible. Otherwise, the displayed tape
counter and function indications are also copied.
Movie Camera:
1
Insert the recorded Cassette.
VCR:
2
Insert an unrecorded Cassette with an erasure prevention
tab.
≥
If various setups (such as external input, tape speed, etc.) are required,
please refer to the operating instructions of your VCR.
Movie Camera:
3
Press the [
1
] Button to start playback.
VCR:
4
Start recording.
5
Press the Pause or Stop Button to stop recording.
Movie Camera:
6
Press the [
∫
] Button to stop playback.
1
S-Video Cable
2
AV Cable
~~~~~~~~~~~~~~~~~~~~~~~~~
Recording the Contents of Other Equipment
After connecting the Movie Camera and the other equipment as
illustrated at left
B
, start the following procedures.
Movie Camera:
1
1
1
1
Set [VCR FUNCTIONS] >> [AV IN/OUT SETUP] >> [AV JACK]
>> [IN/OUT].
2
2
2
2
Insert an unrecorded Cassette.
Other Equipment:
3
3
3
3
Insert a recorded Cassette and start playback.
Movie Camera:
4
4
4
4
While pressing the [REC] Button, press the [PLAY] Button.
(Both are on the Remote Controller.)
5
5
5
5
Press the [
;
] Button or [
∫
] Button to stop recording.
Other Equipment:
6
6
6
6
Press the [
∫
] Button to stop playback.
≥
For other notes concerning this item, see page 49.
1
2
[VIDEO IN]
[AUDIO IN]
[S-VIDEO IN]
1
ZOOM
OSD
COUNTER
DATE/
TIME
RESET
TITLE
T
W
MULTI/
PHOTO
SHOT
START/
STOP
3
S-VIDEO
IN/OUT
[S-VIDEO IN]
[S-VIDEO OUT]
[AUDIO IN]
2, 4, 5
3, 6
[VIDEO IN]
1, 3, 6
1, 2, 4, 5
S-VIDEO
IN/OUT


