background image

- 3 -

1.

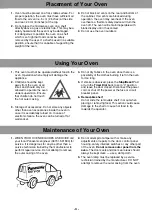
Oven must be placed on a flat, stable surface. For
proper operation, the oven must have sufficient air
flow to the air vent i.e. 5 cm (2 inches) at the side
and rear; 20 cm (8 inches) at the top.

2.

Do not place the microwave oven on a shelf
directly above a gas or electric hob. This may be a
safety hazard and the oven may be damaged.
It is dangerous to position the oven on a shelf
which is so high that food cannot be safely
removed by the user. If a shelf is used in a suitable
position, ensure that it is capable of supporting the
weight of the oven.

3.

Do not block air vents on the rear and bottom of
the cabinet. If air vents are blocked during
operation, the oven may overheat. If the oven
overheats, a thermal safety device will turn the
oven off. The oven will remain inoperable with
blank display until it has cooled.

4

. Do not use the oven outdoors.

1.

This oven must not be operated without food in the
oven. Operation when empty will damage the
appliance.

2.

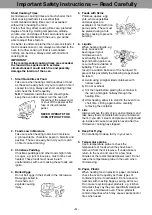
Children should be kept
away from the oven at all
times and should only be
allowed to operate the oven
under supervision. Ensure
that children do not touch
the hot outer casing.

3.

Storage of accessories. Do not store any objects
other than oven accessories inside the oven in
case it is accidentally turned on. In case of
electronic failure, the oven can be turned off at
wall socket.

4.

Do not dry fabrics in the oven since there is a
possibility of the clothes burning if left in the oven
for too long.

5.

If smoke is observed, press the 

Stop/Reset

Pad

or turn the 

Timer Dial

back to zero “0” position

and leave the door closed. Disconnect the power
cord, or shut off the power at the fuse or circuit
breaker panel.

6. Removable shelf

Do not slide the removable shelf in or out when
placing or removing food. This action could cause
damage to the shelf or cause hot food to tip
towards the operator.

1.

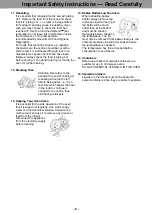
WHEN YOUR OVEN REQUIRES A SERVICE call
your local Panasonic engineer (08701-591590) for
service. It is dangerous for anyone other than a
service technician trained by the manufacturer to
perform repair service. Do not attempt to remove
the outer casing of the oven.

2.

Do not attempt to tamper with or make any
adjustments or repairs to the door, control panel
housing, safety interlock switches or any other part
of the oven. 

Do not remove outer panel from the

oven.

The door seals and door seal areas should

always be kept clean –– use a damp cloth. 

3.

The oven lamp must be replaced by a service
technician trained by the manufacturer. DO NOT
attempt to remove the outer casing from the oven.

Maintenance of Your Oven

Using Your Oven

Placement of Your Oven

Summary of Contents for NE-1540

Page 1: ...3280 NE 2180 NE 1880 NE 1540 3200 2100 1800 1500 Watts Microwave Oven R Please read these instructions completely before operating this oven and keep for future reference ProΙΙ ProΙΙ A B 1 2 3 4 5 6 7 8 A PROG FOR COMMERCIAL USE ...

Page 2: ...13 2 or 3 stages heating 14 D Program Lock 14 15 E Beep Tone 15 16 F Program List 16 G Cycle Counter 16 Self Diagnostics Failure Code 17 Care of Your Microwave Oven 17 Cooking Instructions 18 19 Cooking Defrosting Guide 20 21 Technical Specifications 22 This product is an equipment that fulfills the European standard for EMC disturbances EMC Electromagnetic Compatibility EN 55011 According to this...

Page 3: ...eal The appliance should be inspected for damage to the door seals and door seal areas and if these areas are damaged the appliance should not be operated until it has been repaired by service technician trained by the manufacturer 5 Removal of protective film A protective film is used to prevent scratching of the outer case during transportation Peel this film off before installation or use 6 Att...

Page 4: ...ven accessories inside the oven in case it is accidentally turned on In case of electronic failure the oven can be turned off at wall socket 4 Do not dry fabrics in the oven since there is a possibility of the clothes burning if left in the oven for too long 5 If smoke is observed press the Stop Reset Pad or turn the Timer Dial back to zero 0 position and leave the door closed Disconnect the power...

Page 5: ...icrowave Raw eggs boiled in their shells can explode causing injury 5 Foods with Skins Potatoes apples egg yolk whole vegetables and sausages are examples of food with non porous skins These must be pierced using a fork before cooking to prevent bursting 6 Liquids When heating liquids e g soup sauces and beverages in your microwave oven overheating the liquid beyond boiling point can occur without...

Page 6: ... e it is a rest time which allows the heat in the food to continue to conduct to the centre thus eliminating cold spots 13 Keeping Your Oven Clean It is essential for the safe operation of the oven that it is wiped out regularly Use warm soapy water or a food sanitizer solution Squeeze the cloth out well and use it to remove any grease or food from the interior Disconnect the appliance from the el...

Page 7: ...ll be absorbed by food They penetrate to a depth of about 1 5 cm Microwave energy excites the molecules in the food especially water fat and sugar molecules and causes them to vibrate at a rate of 2 450 000 000 times per second This vibration causes friction and heat is produced just as you will feel heat produced if you vigorously rub your hands together The internal heating of larger foods is do...

Page 8: ...nd 1 minute later the display window will go blank When you press the Start Button with door open 0 will appear in the display in all cases Even after setting the heating time you can still change the power level If you wish to change the heating time during heating simply adjust the timer to desired minutes and seconds The microwave oven can also be turned OFF by turning the Timer Dial to the lef...

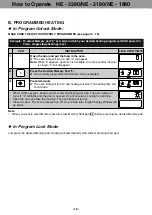
Page 9: ...tch Example 99999 times PROG C BEEP TONE To Cancel Beep INSTRUCTION PAD PROG 2 Press Buzzer Switch bEEP and first stage heating indicator 1 will appear in Digital Display Window BUZZ 3 Press Buzzer Switch again 0 bEEP will appear in Digital Display Window BUZZ 1 Press Program Entry Switch The door may be open or closed at this stage 4 Press Program Entry Switch again PROG will stop blinking You ha...

Page 10: ...1 A B C D E F A B 2 3 PROG Digital Display Window Power Level Indicator Display Power Level Selector Pad Memory Shift Pad Memory Pads Stop Reset Pad Start Pad Timer Dial Oven Lamp Cover Door Handle Control Panel Air Filters Program Entry Switch behind Air Filters Buzzer Switch behind Air Filters Program Lock Switch behind Air Filters Middle Shelf 16 15 A B A Program Display B Memory Area Code Disp...

Page 11: ...ting will start Power Level Indicator will start to blink and heating time will count down 1 1 When all time expires beep tone will sound and heating will stop The oven lamp will turn off 0 will blink until the door is opened One minute later cooling fan will stop Open the door and take the food out The oven lamp will turn on Digital Display Window will show the originally selected time and power ...

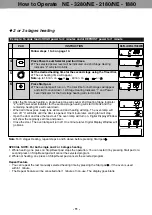
Page 12: ...lamp will turn off 0 will blink until the door is opened One minute later cooling fan will stop Open the door and take the food out The oven lamp will turn on Digital Display Window will show the originally set time and power Close the door The oven lamp will turn off One minute later Digital Display Window will go blank 2 Note For 3 stages Heating repeat steps 4 and 5 above before pressing Start ...

Page 13: ... door and take the food out The oven lamp will turn on Close the door The oven lamp will turn off One minute later Digital Display Window will go blank In Program Lock Mode Just press the desired Memory pad Heating will automatically start without pressing Start pad Example To select Memory pad 5 at A side in which your desired heating program at HIGH power for 3 min single stage heating is set 1 ...

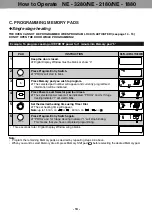
Page 14: ... as desired by repeating steps 2 6 above When you want to select Memory Area B press Memory Shift pad before selecting the desired Memory pad A B 3 Press Memory pad you wish to program The selected pad number will appear and currently programmed information will be indicated 5 1 A PROG C PROGRAMMING MEMORY PADS Single stage heating INSTRUCTION DIGITAL DISPLAY WINDOW PAD 2 Press Program Entry Switc...

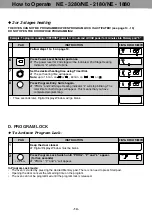
Page 15: ...ng Indicator 2 will start to blink 1 A 2 PROG 7 Set the desired heating time using Timer Dial The set heating time will appear Note up to 15 min on or 60 min on or 1 A 2 PROG 8 Press Program Entry Switch again PROG and 2nd Stage Heating Indicator 2 will stop blinking The total time for both stages will appear This means that you have completed programming PROG 1 A 2 PROG Three seconds later Digita...

Page 16: ... length of beep tone 3 beeps will be indicated Note Repeatedly pressing the Buzzer Switch will lower the loudness level all the way to silent 3bEEP loudest 2bEEP middle 1bEEP quietest and 0bEEP silent BUZZ 1 PROG 3 Press Program Entry Switch again PROG will stop blinking That means that you have completed program Three seconds later the display window will go blank when the door is closed 1 PROG P...

Page 17: ...ing Buzzer Switch press Program Entry Switch The display shows the total cumulative number of times the oven has been used PROG To Read Total Cumulative Times That The Oven Has Been Used BUZZ 1 B PROG 2 INSTRUCTION DIGITAL DISPLAY WINDOW PAD 4 Follow step 1 3 on page 15 1 PROG 5 Within three seconds after pressing Program Entry Switch at step 3 press Buzzer Switch PROG will start to blink and 2nd ...

Page 18: ...sparks Wipe up all spills with a damp cloth Kitchen detergent may be used if the oven gets very dirty Do not use harsh detergents or abrasives 3 The outside surface of this Microwave Oven should be cleaned with soap and water then dried with a soft cloth Make sure that water does not get into the back ventilation opening since this can damage the unit 4 The window of the door should be washed with...

Page 19: ...g kitchen towels or napkins They may burn if heated too long 4 Do not try to boil eggs in the oven 5 When you cook an egg be sure to pierce the yolk membrane prior to placing into the oven to prevent the egg bursting 6 To achieve a more even cooking result give the dish a half turn or turn the food over DEFROSTING FROZEN FOODS 1 If you try to completely defrost frozen food in the Microwave Oven un...

Page 20: ...rs may crack or warp under similar conditions GENERAL GUIDELINES FOR HEATING IN A PANASONIC MICROWAVE OVEN For specific time see each food category for appropriate heating techniques plus necessary pre preparation of foods HEATING FOODS FROM REFRIGERATED TEMPERATURE Foods stored in the refrigerator 5 C should be covered before reheating with the exception of breads pastries or any breaded product ...

Page 21: ...n 6 min 40 s 6 min 40 s 8 min 8 min 1 min 05 s 1 min 05 s 1 min 15 s 1 min 15 s 1 min 40 s 1 min 40 s 2 min 2 min 25 s 25 s 30 s 30 s Cooking from Chilled Raw Food Scrambled Egg Broccoli Fish Fillets Bacon Chicken Portions 2 eggs 2 tbsp milk 500 g 500 g 2 rashers 500 g 13 17 s 22 25 s 26 30 s 30 40 s 1 min 40 s 3 min 3 min 30 s 4 min 20 s 2 min 20 s 4 min 4 min 45 s 4 min 50 s 25 s 40 s 50 s 1 min...

Page 22: ...d for consumption Multi Portions and Large Quantities Power Level Function Food Weight Approx Time NE 3280 NE 2180 NE 1880 NE 1540 Defrosting Composite dish Multi Portion Apple Pie 1 36 kg whole 1 kg 17 min 17 min 20 min 20 min 17 min 17 min 20 min 20 min Cooking from Chilled Raw Food Jacket Potatoes 10 oz 290g Mixed Vegetables x 1 x 2 x 3 x 4 2 5 kg 1 min 20 s 2 min 30 s 3 min 30 s 4 min 30 s 3 m...

Page 23: ...ect to change without notice Front View Side View Side View with Opened Door 650 mm 471 mm 630 mm 10 mm 10 mm 55 mm 526 mm 501 mm 455 mm 25 mm 850 mm 480 mm NE 1540 HI 3200 W MED 1600W LOW 340 W DEF 170 W STAND 0 W NE 1880 NE 2180 NE 3280 5220 W 22 3 A 3670 W 16 0 A 3400 W 14 8 A 2700 W 12 3 A HI 1800 W MED 900W LOW 340 W DEF 170 W STAND 0 W HI 2100 W MED 1050W LOW 340 W DEF 170 W STAND 0 W HI 150...

Page 24: ...Matsushita Electric Industrial Co Ltd Cooking Systems Division 800 Tsutsui cho Yamatokoriyama City Nara 639 1188 Japan http www panasonic co jp global A00033A43BP F0701 1064 Printed in Japan ...

Reviews: