31
TEMPERATURE RECORDER (OPTION)
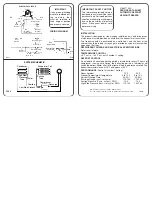
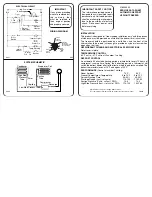
Starting recording and setting the time:
Turn the power switch ON. The pen will move inward on
the circular recording paper and stop temporarily at the 0%
position (equivalent to the 40
o
C line). Then the pen will
move to the position which indicates the measured
temperature. (Fig. 3)
Time setting Method:
Place the recording paper at a position slightly in front of the
desired time (the chart is rotated to the left). Set the time
by using the fast feed button to quickly rotate the chart.
The fast feed button can be used to accurately set the time.
When the recording paper speed is set to thirty two
days:
The center of the recording paper is divided into thirty two
equal sections. The lines extending from these lines serve
as the thirty two day time scale. (Fig. 4)
Stopping recording:
1.
Turn OFF the power switch.
2.
When recording is stopped for a prescribed period, place
the caps back on the ink pen to prevent the ink from
evaporating.
Replacing the recording paper:
1.
Slightly raise the end of the ink pen lifter and remove from the ink pen lifter stopper. Rotate the tip of
the ink pen clockwise until it rests on top of the ink pen lifter.
2.
Remove the chart hub cover, and then replace the recording paper.
3.
Place the chart hub cover. Remove and dispose of the piece of recorder paper. Confirm that the new
recorder paper is inside of the chart guides.
4.
Set the correct time.
Fig. 4
Fig. 3
Hour
Temperature
Ink pen
0 % position
equivalent to
40
o
C line