background image

Preparation

22

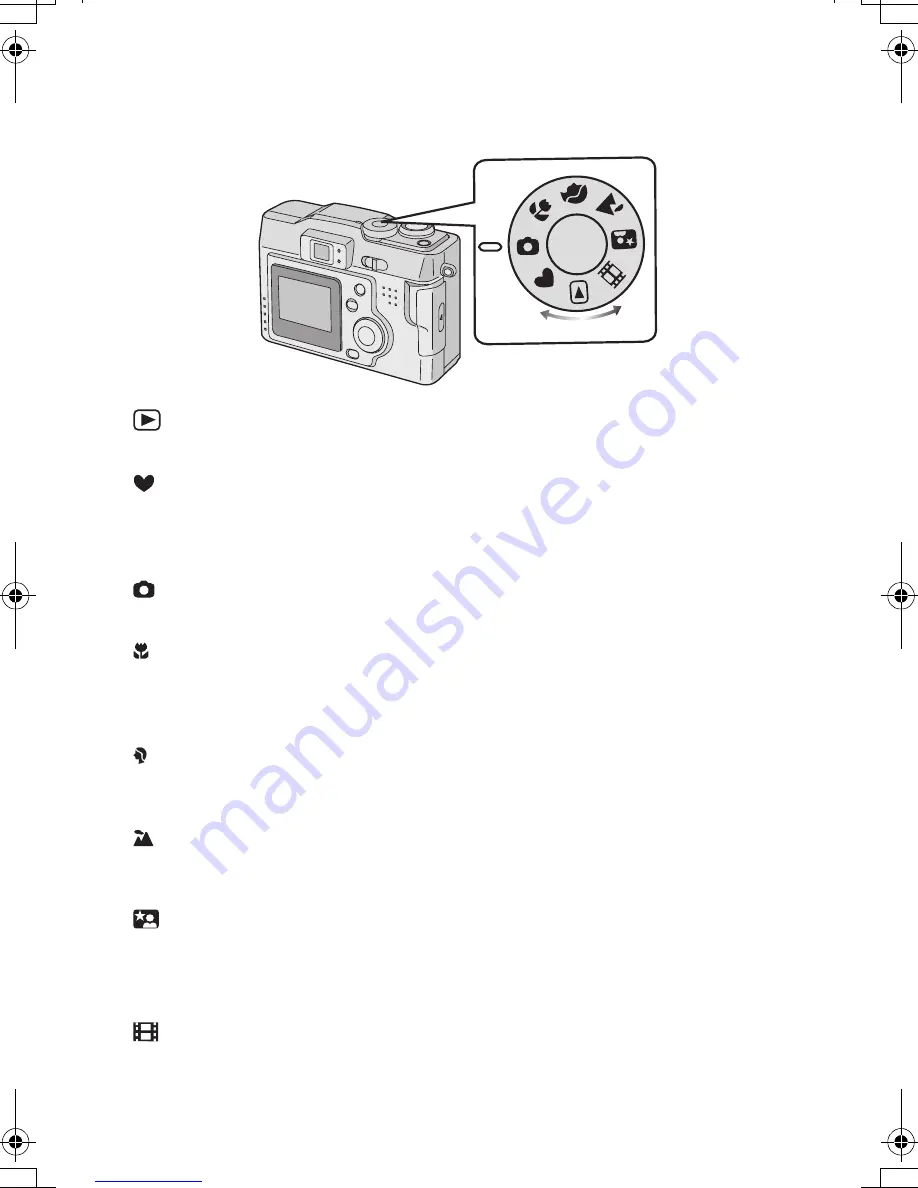
The Mode Dial 

You can choose a desired mode by the mode dial.

 : Playback (P52)

Playback recorded images.

: Simple mode (P27)

Menu options are minimized and many settings are preset. This is a fast and easy 
way for beginners to start using the camera and become familiar with its many 
features.

: Normal Picture (P25)

The shutter speed and the aperture value are automatically adjusted.

: Macro mode (P38)

When you take pictures from a distance closer than 1.64 feet (50 cm), set the 
camera in macro mode. This allows you to get closer to the subject up to 1.64 feet 
(50 cm) (Tele), 0.33 feet (10 cm)(Wide).

: Portrait mode (P39)

This mode allows you to easily achieve the depth of focus effect. The subject stands 
out in front of an unfocused background.

: Landscape mode (P40)

You can capture sharp and crisp landscape photos easily. Please note that this 
mode is suitable for landscape farther than 32.8 feet (10 m) away and in daylight.

: Night portrait mode (P41)

When you take pictures of, for example, your friends in front of beautiful night 
illumination scenery, this mode allows you to get the appropriate exposure for your 
subject as well as the background, using flash and slow shutter.

: Motion images  mode (P29)

Use this mode when recording motion images.

KC52-PP.book  22 ページ  2003年3月13日 木曜日 午後2時29分

Downloaded from 

www.Manualslib.com


manuals search engine


Summary of Contents for Lumix DMC-LC33PP

Page 1: ...ng Instructions Model No DMC LC33PP VQT0D36 For USA assistance please call 1 800 272 7033 or send e mail to digitalstillcam panasonic com For Canadian assistance please call 1 800 561 5505 or visit us at www panasonic ca Downloaded from www Manualslib com manuals search engine ...

Page 2: ...mes printed in these instructions are trademarks or registered trademarks of the companies concerned WARNING TO REDUCE THE RISK OF FIRE OR SHOCK HAZARD AND ANNOYING INTERFERENCE USE ONLY THE RECOMMENDED ACCESSORIES AND DO NOT EXPOSE THIS EQUIPMENT TO RAIN OR MOISTURE DO NOT REMOVE THE COVER OR BACK THERE ARE NO USER SERVICEABLE PARTS INSIDE REFER SERVICING TO QUALIFIED SERVICE PERSONNEL Notice Thi...

Page 3: ...n for help FCC Caution To assure continued compliance follow the attached installation instructions and use only shielded interface cables with ferrite core when connecting to computer or peripheral devices Any changes or modifications not expressly approved by the party responsible for compliance could void the user s authority to operate this equipment Trade Name Panasonic Model No DMC LC33 Resp...

Page 4: ...rtrait Mode 39 Taking Pictures using Landscape Mode 40 Taking Pictures using Night Portrait Mode 41 Using the Color Effect Mode 42 Taking Pictures using Spot Mode 43 Compensating the Exposure 44 Taking Pictures using Auto Exposure AE Bracket 45 Using the AF AE Lock 46 Adjusting the Color Tone or the Contrast Picture Adjustment 47 Setting the White Balance 48 Setting ISO Sensitivity 50 Taking Pictu...

Page 5: ...ications 93 Digital Camera Accessory System 95 Digital Camera Accessory Order Form 96 Request for Service Notice For USA Only 97 Limited Warranty For USA Only 98 Customer Services Directory For USA Only 100 Index 101 Spanish Quick Use Guide Guía española para el uso rápido 102 Standard Accessories Before using your camera check the contents 1 SD Memory Card 16MB RP SD016B In the text it is indicat...

Page 6: ...ode Button P51 Back View 12 Optical Finder P25 13 Status Indicator P18 14 Flash Access Indicator P18 15 DISPLAY Button P20 16 Power Switch P18 17 LCD Monitor P8 P25 18 MENU Button P23 19 Delete Button P28 P57 20 2 Self timer Button P34 21 4 REVIEW SET Button P28 22 1 Flash Mode Button P32 23 3 Exposure Compensation Button P44 Auto Bracket Button P45 1 2 3 4 5 6 7 8 9 1011 12 16 13 14 15 23 22 21 2...

Page 7: ...et P78 26 DC IN Socket P83 27 Terminal Door P83 Right View 28 Strap Eyelet P19 29 Memory Card Door P16 30 Memory Card Slot P16 Bottom View 31 Tripod Receptacle 32 Battery Door P11 24 25 26 27 28 29 30 31 32 Downloaded from www Manualslib com manuals search engine ...

Page 8: ...elf timer mode P34 14 Card access indication P17 15 AF area P25 16 Aperture indication Shutter speed indication P25 17 Exposure compensation P44 18 Auto bracket P45 19 Current date and time P24 It is displayed for about 5 seconds after turning on the power or setting the clock 20 Spot AF area P43 21 Spot metering target P43 22 Focus indication P25 23 Burst mode P51 24 Color Effect mode P42 H 1 2 3...

Page 9: ...yback mode 2 DPOF P60 White DPOF setting for printing Green DPOF setting for Slide Show Green with DPOF number DPOF setting for printing and Slide Show 3 Protected image P63 4 Image with audio P66 5 Picture size P36 6 Quality data compression ratio P37 In motion image mode In simple mode ENLARGE 4qk6q 10k15cm INTERNET 7 Battery indicator P14 8 Folder File number 9 Page Total images 10 REC data It ...

Page 10: ...f the and polarities 3 Close the battery door 4 Slide the door to the direction of the arrow to open the Memory Card door 5 Insert the Card into the camera P16 6 Close the Memory Card door Recording 7 Set the power switch to ON P18 8 Set date time P24 9 Set the mode dial to Normal picture mode P22 10 Take a picture Playback 11 Set the mode dial to playback 12 Press 2 1 to select the picture you wa...

Page 11: ...ries are inserted in the camera for more than 3 hours the clock setting is memorized by the camera for about 3 months even after the batteries are removed The time may be shorter if the batteries are not charged sufficiently When the clock setting is cancelled please set the date time again P24 When the card is being accessed do not remove the batteries CAUTION Danger of explosion if battery is in...

Page 12: ...aining battery time may not be displayed accurately Camera may turn off prematurely Data written to Memory Card can be damaged resulting in the loss of photos If Nickel Manganese batteries are used due to temperature variations the battery display may not accurately display the remaining battery life The camera may prematurely turn off even if there is sufficient battery life The available time be...

Page 13: ...Serious damage or injury can result Do not mix new batteries and old batteries All batteries should be of the same brand size capacity Avoid mixing batteries If you will not be using the camera for a long time remove the batteries Following prolonged use it is normal for the battery to be warm As the ambient temperature decreases the battery capacity and performance will decrease This is normal In...

Page 14: ...efore each use Once batteries have reach full charge avoid over charging them Do not peel off or damage the covered seal Read the Operating Instructions for the battery charger Ni MH batteries have a limited life The battery power decreases gradually over time If available time seems much shorter purchase the new batteries The battery s life differs depending on the condition stored or used or env...

Page 15: ...ed Batteries Continuous recording playback time recordable number Supplied batteries or Panasonic Alkaline batteries Recording with LCD monitor on Approx 75 min equal to 150 still pictures Recording with LCD monitor off Approx 5 h equal to 600 still pictures Playback time Approx 3 h Fully charged Panasonic Ni MH nickel metal hydride batteries Optional HHR 3EPA Recording with LCD monitor on Approx ...

Page 16: ...ection of the arrow to open the Memory Card door 5 Press the card to release 6 Pull the card out 7 Slide the door in the direction of the arrow to close the Memory Card door If you are using a MultiMediaCard type memory card and the Memory Card door cannot close the card may be installed backwards Remove the card and reverse it then try to close the door again If the Memory Card door cannot be com...

Page 17: ...d MultiMediaCard are small lightweight removable external cards The reading writing speed of SD Memory Card is fast The SD Memory Card is equipped with a write protection switch that can inhibit writing and formatting When the switch is moved towards the LOCK side it is not possible to write or delete data on the card and format it When the switch is unlocked these functions become available SD Me...

Page 18: ... When turning the Power switch to ON Blinks While the focus is being adjusted or the focus is not properly adjusted When the card is not inserted When no space is left on the card When the remaining battery power is low blinks slowly ª Flash Access Indicator B Lights When accessing the card When the flash fires It lights when the shutter is pressed halfway When sending data to PC Blinks When charg...

Page 19: ...taching the Strap 1 Pass the top of the strap through the strap eyelet 1 2 Pass the opposite side of the strap through its ring shaped part 3 Pull the strap 3 1 2 Downloaded from www Manualslib com manuals search engine ...

Page 20: ...CD Monitor Every time you press the DISPLAY button the display of the LCD monitor changes as shown below In recording In playback DISPLAY 2048 F 2 8 F 2 8 10 00 NOV 1 2003 Downloaded from www Manualslib com manuals search engine ...

Page 21: ...tter Button Pressing halfway Pressing fully The shutter button is activated in 2 steps pressing halfway and pressing fully Pressing halfway A Focus and exposure are locked Pressing fully B The picture is captured In motion image mode the recording starts You can adjust volume of the operational sound in the menu P73 If you press the shutter button fully in a single stroke the captured picture may ...

Page 22: ...t up to 1 64 feet 50 cm Tele 0 33 feet 10 cm Wide Portrait mode P39 This mode allows you to easily achieve the depth of focus effect The subject stands out in front of an unfocused background Landscape mode P40 You can capture sharp and crisp landscape photos easily Please note that this mode is suitable for landscape farther than 32 8 feet 10 m away and in daylight Night portrait mode P41 When yo...

Page 23: ...isplayed if you set it to the playback mode the playback menu is displayed 2 Press 1 3 Press 3 4 to choose the item 4 Press 2 1 to set the item 5 Press the MENU button The menu will disappear 2 3 4 1 5 1600 PICT SIZE QUALITY SPOT MODE REC1 3 W BALANCE SETUP SELECT SET EXIT MENU 1 2 SELECT SET EXIT MENU REC SETUP 1 3 AUTO REVIEW ECONOMY POWER SAVE MONITOR SETUP 1 3 SELECT SET EXIT MENU AUTO REVIEW ...

Page 24: ... 1 5 Press 3 4 to select M D Y D M Y or Y M D 6 Press the MENU button 2 times The menu will disappear 7 Check if the date time setting is displayed correctly after turning the camera OFF and ON When the new batteries are inserted in the camera for more than 3 hours the time and date will be held for approximately 3 months if the battery is removed If the batteries were not new the time may not be ...

Page 25: ... in the AF area 2 on the LCD monitor press the shutter button halfway When the focus is adjusted the focus indication 3 appears When the focus indication flashes the focus is not adjusted Press the shutter button halfway to adjust the focus again The shutter speed and the aperture value 4 are automatically adjusted and displayed on the LCD monitor When the subject is out of the AF area use the AF ...

Page 26: ...e value and the shutter speed on the LCD monitor becomes red In the following cases the focus may not be adjusted properly 1 Recording a scene including subjects both near and far 2 Recording a scene through a dirty lens 3 Recording an illuminated subject 4 Recording in a dark place 5 Recording a moving subject 6 Recording a subject with a little contrast 7 Recording with camera shake We recommend...

Page 27: ...s smaller file size optimized for home page and e mail use 5 Press the MENU button 6 Take a picture The burst mode is available only with the low speed P51 If the distance between the camera and the object is beyond the recordable range Tele 1 64 feet 50 cm Wide 0 33 feet 10 cm the focus may not be adjusted properly even if the focus indication 1 is lit The settings except for the clock setting of...

Page 28: ...tate it once again You can also change the position with 3 4 2 1 You can check the previous or following picture with 2 1 ª Erasing the captured picture during the review 2 Press 3 When the message DELETE THIS PICTURE is displayed press 2 1 to select YES 4 Press the 4 REVIEW SET button The picture is erased Once erased pictures cannot be recovered Multi images or all images can be deleted Read pag...

Page 29: ... Connect to a television or PC to play back audio The picture size is fixed to 320a240 pixels The remaining time displayed on the LCD monitor is an approximation You cannot record motion images without audio If using the MultiMediaCard after recording motion images the card access indication and the flash access indicator may appear for a while but this is not a malfunction After recording starts ...

Page 30: ...bject and adjust the size with the zoom lever To make subjects closer Tele Rotate towards T To make subjects wider Wide angle Rotate towards W 2 Take a picture The focus is adjusted at a distance of more than 1 64 feet 50 cm For details on macro mode simple mode read pages 27 38 The picture may be slightly distorted according to the lens The distortion will increase as you make subjects wider and ...

Page 31: ...utton The menu will disappear The zoom adjustment and recording method are the same as in Using the Optical Zoom P30 When the digital zoom is set to ON the digital zoom indication 1 appears When entering the digital zoom range the zoom bar will pause The digital zoom is cancelled when the LCD monitor turns off When using digital zoom it is normal to see a slight deterioration of the picture qualit...

Page 32: ... the left AUTO The flash fires automatically according to the lighting condition AUTO Red eye reduction The flash fires automatically according to the recording situation It reduces the red eye phenomenon When a subject s eyes appear red in flash light Use it when you take pictures of people or animals in low lighting conditions Forced ON The flash fires every time a picture is captured Use this s...

Page 33: ... setting is fixed to the Forced OFF When you set to burst mode or auto bracket only 1 picture is taken for every flash firing The flash indication becomes red when pressing the shutter button halfway When the flash access indication 2 and the flash indication blink red you cannot take a picture even when you press the shutter button fully If the battery indicator is less than or setting ECONOMY to...

Page 34: ... 2 Press the shutter button fully The self timer indicator 1 blinks and the shutter is activated after 10 seconds or 2 seconds When setting the self timer the focus and exposure are not adjusted by pressing the shutter button halfway When pressing the button fully they are automatically adjusted just before recording If you press the MENU button when the self timer is set the self timer setting is...

Page 35: ...s recorded from the built in microphone 1 of the camera 5 seconds later the audio recording is stopped automatically If you press the MENU button during the audio recording it will be cancelled Audio cannot be played back from this camera Connect to a television or PC to play back audio Using this feature will result in fewer images being able to be saved When setting to burst mode auto bracket it...

Page 36: ...he menu will disappear In motion image mode the picture size is fixed to 320a240 pixels The smaller the picture size you select the more pictures you can store on the Memory Card In addition a small data volume allows you attach the picture to an e mail or post it on a website more easily If you select a larger picture size the printed picture will be clearer especially with larger sized prints 1 ...

Page 37: ...appear Picture size Quality and number of recordable pictures 16MB 64MB SD Memory Card The numbers shown in the table are approximate numbers The number of recordable pictures changes depending on the subject It may happen that pictures appear like a mosaic depending on the scene characteristics Remaining frame which is displayed on the LCD monitor may not correspond with recorded frames however t...

Page 38: ... flash range is about 1 64 feet 50 cm 4 59 feet 140 cm Tele 0 98 feet 30 cm 7 87 feet 2 4 m Wide When setting to ISO100 When the camera shake alert is displayed within the available flash range we recommend using the flash When the camera lens is at a distance over the available range from the subject focus may not be adjusted even if the focus indication appears When selecting the macro mode opti...

Page 39: ...er and allowing for proper distance between subject and background Please note that this mode is suitable for outdoor situations under sunlight 1 Set the mode dial to Portrait mode 2 Take a picture AUTO setting in W BALANCE works best when recording outdoors in the daytime When using indoors the color balance can change You can change the white balance setting P48 2 1 2048 Downloaded from www Manu...

Page 40: ...eeding 32 8 feet 10 m 1 Set the mode dial to Landscape mode 2 Take a picture Flash is set to Forced OFF The focus is adjusted at a distance of 32 8 feet 10 m Tele 9 84 feet 3 m Wide AUTO setting in W BALANCE works best when recording outdoors in the daytime When using indoors the color balance can change You can change the white balance setting P48 2 1 2048 Downloaded from www Manualslib com manua...

Page 41: ...hould be positioned within the available flash range Tele 1 64 feet 50 cm 4 59 feet 140 cm Wide 0 98 feet 30 cm 7 87 feet 2 4 m We recommend setting the zoom lever towards W 1 Set the mode dial to Night portrait mode 2 Take a picture When flash is set to Forced OFF you can capture night illumination scenery with slower shutter speed Max about 8 seconds When taking a picture in a dark place noise m...

Page 42: ...ECT 3 Press 2 1 to select OFF COOL WARM or B W COOL The picture becomes bluish WARM The picture becomes reddish B W The picture becomes black and white 4 Press the MENU button The menu will disappear The indication 1 will appear 2 3 1 4 SELECT SET EXIT MENU REC2 3 SETUP COOL WARM B W COL EFFECT D ZOOM SENSITIVITY AUDIO REC OFF OFF 2 3 COOL WARM B W 4 2048 Downloaded from www Manualslib com manuals...

Page 43: ...s 3 4 to select SPOT MODE 3 Press 2 1 to set to ON 4 Press the MENU button The menu will disappear The spot AF area 1 and spot metering target 2 appears 5 Center the subject in the spot AF area 6 Take a picture When the subject is dark the focus may not be adjusted properly Background may become dark or whitish depending on the subject If the subject is out of the spot AF area use the AF AE lock P...

Page 44: ...is an abbreviation of Exposure Value and it is the amount of light given to the CCD by the aperture value and the shutter speed The compensation state may be different from the recorded picture Confirm the playback picture 3 Press the 4 REVIEW SET button The compensation window will close The compensation state is not reflected by the brightness of the LCD monitor The exposure compensation indicat...

Page 45: ... EV step 3 Press the 4 REVIEW SET button The compensation window will close The auto bracket indication 1 appears 4 Take a picture Once you take a picture auto bracket will be cancelled automatically When flash fires you can take only 1 picture Auto bracket setting cannot be cancelled When setting auto bracket you cannot take a still picture with audio Depending on the brightness of the subject th...

Page 46: ...re Preparation Set the mode dial except for P22 1 Aim the camera at the subject on which you want to adjust the focus to enter the AF area 2 on the LCD monitor and then keep pressing the shutter button halfway AF AE lock When the focus is adjusted the focus indication 1 appears 2 Move the camera keeping the chosen composition and press the shutter button all the way Before pressing the shutter but...

Page 47: ...CT ADJ 3 Press 2 1 to select NATURAL STANDARD or VIVID NATURAL The picture becomes softer VIVID The picture becomes sharper 4 Press the MENU button The menu will disappear When using Vivid mode in low light situations it is possible that a slight increase in color noise will be seen Proper lighting is recommended 2 3 1 4 REC3 3 SETUP PICT ADJ VIVID STANDARD STANDARD SELECT SET EXIT MENU 2 3 Downlo...

Page 48: ...right day Cloudy for recording under a cloudy and shady sky Halogen for recording under halogen lighting White set for manual setting Read the following page where the manual setting is explained in detail 4 Press the MENU button The menu will disappear The setting of the white balance is applied to the other recording modes In simple mode or motion image mode the white balance is fixed to AUTO Wh...

Page 49: ...er 1 or similar object so that it completely fills the frame to white on the screen and press the shutter button all the way White balance is set 6 Press the MENU button The menu will disappear When taking a picture with the flash after setting the white balance manually the white balance may not be properly adjusted We recommend setting the white balance to AUTO when using the flash 5 2 3 4 1 6 R...

Page 50: ...ss 2 1 to select the sensitivity AUTO The ISO sensitivity is automatically adjusted If your picture is still too dark please use the flash ISO50 ISO100 ISO200 ISO400 4 Press the MENU button The menu will disappear In motion image mode or simple mode ISO sensitivity is fixed to AUTO When you take a picture in high ISO sensitivity picture noise appears and the picture quality deteriorates 1 4 2 3 RE...

Page 51: ...e to record 4 frames in 1 second in burst mode at a shutter speed higher than 1 60 but the flash does not fire simultaneously If the flash fires it is possible to record only 1 frame In simple mode the shutter speed is fixed to the low speed P27 You cannot take still pictures with audio in the burst mode Burst mode will not perform as described if a MultiMediaCard is used in place of SD Memory Car...

Page 52: ...ding to the current file number is displayed This camera is based on the DCF standards Design rule for Camera File system which were established by the Japan Electronics and Information Technology Industries Association JEITA The file format that can be played back with this camera is JPEG There are also pictures that cannot be played back in JPEG format When playing back still pictures that have ...

Page 53: ...elect the file with audio icon 1 3 Press the 4 REVIEW SET button to play back the audio Audio cannot be played back from this camera Connect to a television to play back audio 2 3 1 2048 PLAY AUDIO 11 11 10 00 NOV 1 2003 10 0 0 OV 2003 3 0 11 N Downloaded from www Manualslib com manuals search engine ...

Page 54: ...rotate the zoom lever towards Multi playback 9 frames starts 2 Press 3 4 2 1 to select images To return to the normal indication rotate the zoom lever towards The image with the file number colored in yellow is displayed 2 1W T 1 2 3 4 5 6 7 8 9 10 11 12 13 14 SELECT CANCEL SELECT CANCEL Downloaded from www Manualslib com manuals search engine ...

Page 55: ...tates towards the more the zoom magnification ratio decreases Use 3 4 2 1 to change the area to be enlarged ª To delete a picture during the playback zoom Press the button When this message is displayed DELETE THIS PICTURE press 2 1 to select YES and press the 4 REVIEW SET button P57 The more the zoom magnification increases the more the picture quality deteriorates The playback zoom may not opera...

Page 56: ...gain to cancel pause Audio cannot be played back from this camera Connect to a television or PC to play back audio The play back zoom cannot be used while playing back motion images The file format that can be played back with this camera is QuickTime Motion JPEG It could happen that the Motion JPEG file recorded by a PC or other equipment cannot be played back with this camera When playing back m...

Page 57: ...en an image is protected it cannot be deleted Cancel the protect setting P63 Delete single image 1 Press 2 1 to select the image to be deleted 2 Press 3 Press 2 to select YES 4 Press the 4 REVIEW SET button The selected image is deleted 1 3 4 2 DELETE SINGLE DELETE THIS PICTURE YES NO SET SELECT MULTI ALL 2 3 Downloaded from www Manualslib com manuals search engine ...

Page 58: ...led The indication blinks red if the selected image is protected Cancel the protect setting P63 5 Press 6 When this message is displayed DELETE THE PICTURES YOU MARKED press 2 to select YES 7 Press the 4 REVIEW SET button The selected multi images are deleted all at once 1 5 2 3 4 6 7 MULTI ALL DELETE MULTI DELETE ALL DELETE SELECT SET CANCEL 2 7 8 9 10 11 MULTI DELETE SELECT MARK UNMARK DELETE EX...

Page 59: ...W SET button Images that are protected or out of DCF standards P52 are not deleted Do not turn the power switch off or remove the card during deleting When the remaining power is low or many pictures are deleted use new batteries or the AC adaptor optional DMW AC1 MULTI ALL DELETE MULTI DELETE ALL DELETE SELECT SET CANCEL 2 SELECT SET ALL DELETE DELETE ALL PICTURES YES NO 3 Downloaded from www Man...

Page 60: ... select DPOF PRINT and then press 1 3 Select SINGLE and then press 1 4 Press 2 1 to select 1 image 5 Press 3 4 to select the number of sheets The number of sheets can be set from 1 to 999 6 Press the MENU button 2 times The menu will disappear To cancel Set the number of sheets to 0 in step 5 of the Single copy setting 1 6 2 3 4 5 SINGLE MULTI CANCEL INDEX SETUP PLAY1 2 SELECT SET EXIT MENU 2 3 PR...

Page 61: ...ts to 0 in step 5 of the Multi copy setting If the file is not based on the DCF standard the DPOF setting cannot be set DCF is abbreviation of Design rule for Camera File system stipulated by JEITA Japan Electronics and Information Technology Industries Association When using the DPOF feature this camera will overwrite any previous DPOF settings made by other products 2 3 4 5 1 6 SINGLE MULTI CANC...

Page 62: ... INDEX and then press 1 4 When this message is displayed SET INDEX PRINT press 2 to select YES When the index is already set the message A SET CANCEL INDEX PRINT is displayed Press 2 1 to select SET CANCEL or NO 5 Press the 4 REVIEW SET button All images are set cancelled 6 Press the MENU button The menu will disappear 1 6 2 3 4 5 SETUP PLAY1 2 SINGLE MULTI INDEX CANCEL SELECT SET EXIT MENU 2 3 PR...

Page 63: ... all settings 1 The method is the same as in Writing the Print Information to the Card DPOF Setting P60 P62 Formatting the card will erase all the data on the card even if you protect the images in this procedure When trying to delete a protected file these messages are displayed THIS PICTURE IS PROTECTED or PROTECTED PICTURES REMAIN UNDELETED If you want to delete this file cancel the protect set...

Page 64: ...and 5 seconds AUDIO It can be set to ON or OFF By setting it to ON it is possible to play back the still pictures with audio in slide show DPOF SET Only when setting to DPOF You can select the pictures you want to set to the Slide Show CANCEL ALL Only when setting to DPOF You can cancel the Slide Show setting 5 Press 3 4 to select START 6 Press 1 The slide show starts By pressing the MENU button i...

Page 65: ...ack audio When editing with the supplied software SD Viewer for DSC recorded on the CD ROM you can play back in SD slide show with this camera P90 Images that are set DPOF with the supplied software SD Viewer for DSC recorded on the CD ROM cannot be played back in DPOF slide show with this camera Set DPOF slide show on this camera When using the DPOF feature this camera will overwrite any previous...

Page 66: ... DATA Then press 2 1 to select YES and press the 4 REVIEW SET button to start audio recording 5 Press the 4 REVIEW SET button to stop audio recording Even if you do not press the 4 REVIEW SET button after about 10 seconds the audio recording stops automatically 6 Press the MENU button 2 times The menu will disappear Adding audio will use additional memory Using this feature will result in fewer im...

Page 67: ...n this message is displayed DELETE ORIGINAL PICTURE press 2 1 to select YES or NO 7 Press the 4 REVIEW SET button 8 Press the MENU button 2 times The menu will disappear It is not possible to resize pictures in a size lower than equal to 640a480 or with an aspect ratio that is not 4 3 It may not be possible to resize the pictures recorded with other equipment It is not possible to resize a motion ...

Page 68: ... and then press 1 3 Press 2 1 to select the picture and then press 4 4 Rotate the zoom lever towards to make subject appear closer and towards to make subjects appear further away 5 Press 3 4 2 1 to shift pictures 6 Press the shutter button to set 2 3 5 7 8 4 6 1 9 W T 2 SETUP PLAY2 2 SELECT SET EXIT MENU TRIMMING FORMAT TRIMMING MENU EXIT 4 5 6 2048 ZOOM TRIM SHUTTER TRIMMING 2048 SELECT SET MENU...

Page 69: ...tures in a size lower than 640a480 or with an aspect ratio that is not 4 3 You cannot operate trimming on pictures recorded with other equipment Trimming is not possible for a motion image still picture with audio The picture size of the trimmed pictures may become smaller than that of the original one depending on the cut size The picture quality of the trimmed picture becomes inferior TRIMMING D...

Page 70: ... the 4 REVIEW SET button The card is formatted After formatting recorded images and any other data cannot be recovered When formatting use the batteries which the remaining power is enough or AC adaptor optional DMW AC1 During formatting do not turn the power off If the card cannot be formatted consult your dealer 1 2 3 4 SETUP PLAY2 2 SELECT SET EXIT MENU 2 TRIMMING FORMAT DELETE ALL DATA ON THE ...

Page 71: ...MENU button The menu will disappear In simple mode LCD monitor brightness is fixed to 0 Adjusting the LCD monitor will not lighten or darken the actual photograph Adjusting the LCD monitor to brighten the image may incorrectly display the scene to be brighter than the actual photo will be In most cases the default setting will produce the best performance and closest reproduction of the actual sce...

Page 72: ...ss 2 1 to select 1SEC or 3SEC 5 Press the MENU button The menu will disappear Even when setting the auto review to 1SEC 3SEC it is not available in motion image mode When recording in burst mode auto bracket still picture with audio modes the recorded picture is automatically displayed In simple mode the auto review setting becomes ON 2 seconds or OFF 2 3 4 1 5 SETUP 1 3 SELECT SET EXIT MENU REC M...

Page 73: ...to open the setup menu In simple mode skip this step 3 Press 3 4 to select BEEP 4 Press 2 1 to adjust the operational sound volume 5 Press the MENU button The menu will disappear In simple mode the setting becomes ON or OFF 1 5 2 3 4 3 4 SELECT SET EXIT MENU SETUP 2 3 REC RESET CLOCK SET NO RESET BEEP Downloaded from www Manualslib com manuals search engine ...

Page 74: ...y 5 Press the MENU button The menu will disappear If you want to cancel the power save mode turn the power switch to ON again after turning it to OFF or press the shutter button When using AC adaptor optional DMW AC1 recording the motion image playing back the motion image during slide show the power save mode is not available In simple mode the power save is fixed to 2 MIN 2 3 4 1 5 SETUP 1 3 SEL...

Page 75: ...1 to open the setup menu 3 Press 3 4 to select ECONOMY 4 Press 1 to select ON 5 Press the MENU button The menu will disappear The message MONITOR OFF flashes for a few seconds before LCD monitor display is turned off The LCD monitor turns on when pressing any button When using AC adaptor optional DMW AC1 recording the motion image the economy mode is not available The economy mode does not work wh...

Page 76: ...g from the file number 0001 Preparation Set the mode dial except for P22 1 Press the MENU button 2 Press 1 to open the setup menu 3 Press 3 4 to select NO RESET and then press 1 4 When this message is displayed RESET FILE NO IN THE CAMERA press 2 to select YES 5 Press the 4 REVIEW SET button 6 Press the MENU button The menu will disappear 2 3 4 5 1 6 NO RESET 3 SELECT SET EXIT MENU SETUP 2 3 REC R...

Page 77: ...ct YES 5 Press the 4 REVIEW SET button The message REC SETTING RESET COMPLETED is displayed for about 2 seconds 6 When this message is displayed RESET SETUP PARAMETERS press 2 to select YES 7 Press the 4 REVIEW SET button to set The clock setting is not reset 8 Press the MENU button The menu will disappear 2 3 4 5 6 7 1 8 NO RESET RESET 3 SELECT SET EXIT MENU SETUP 2 3 REC CLOCK SET BEEP RESET RES...

Page 78: ... dial to playback The image is displayed on the television ª Viewing images in other countries When setting VIDEO OUT on the menu you can view images on a TV in other countries regions which use the NTSC or PAL system Even if you set menu selection for VIDEO OUT to PAL the output signal is still NTSC When connecting to a TV use new batteries or the AC adaptor optional DMW AC1 Do not use any other ...

Page 79: ...ter folder If it is the first time you are connecting the camera to a PC the required driver is installed automatically so that the camera can be recognized by the Windows Plug and Play then it is shown on the My Computer folder Macintosh The drive is shown on the screen The flash access indicator lights during access When the battery power is lost during access the data may be destroyed The batte...

Page 80: ... printer operating instructions too 1 Insert the Memory Card into the camera and turn the power switch to ON 2 Turn on the printer 3 Connect the camera to the printer via the supplied USB cable 1 When connecting to a printer use the batteries which the remaining power is enough or AC adaptor 2 optional DMW AC1 Disconnect the USB connection cable and DC cable after printing A V OUT DC IN USB 1 2 1 ...

Page 81: ...or 2 seconds 3 Press 3 and press 2 1 to set the number of sheets and then press the 4 REVIEW SET button 4 Press 2 to select YES The message PLS CHECK THE PRINTER START PRINTING is displayed 5 Press the 4 REVIEW SET button Printing starts Press the MENU button and you can stop printing 1 1 2 3 4 5 1600 2048 SINGLE PICTURE DIRECT PRINT DIRECT PRINT SELECT SELECT SET PRINT DIRECT PRINT PLEASE SELECT ...

Page 82: ...K THE PRINTER START PRINTING is displayed 3 Press 2 to select YES and then press the 4 REVIEW SET button Printing starts Press the MENU button and you can stop printing When the number of total images is more than 255 the number of remaining images will be displayed as 2 1 3 2048 DIRECT PRINT DIRECT PRINT SINGLE PICTURE SELECT SET SELECT SET PLS CHECK THE PRINTER START PRINTING YES NO DIRECT PRINT...

Page 83: ...an the optional one DMW AC1 The camera becomes warm during use however this is not a malfunction The battery cannot be charged in the camera with the AC adaptor connected When disconnecting connecting the AC adaptor with the power switch turned on using the batteries the data in the card may be destroyed or operation may be impossible Be sure to disconnect connect the AC adaptor after turning the ...

Page 84: ... the optional soft case for protection 1 Turn the power switch to OFF P18 2 Eject the card P16 3 Remove the batteries If you will not be using the camera for a long time remove the batteries When you insert the batteries again set the date time 2 3 OFF ON 1 Downloaded from www Manualslib com manuals search engine ...

Page 85: ...1 2 3 4 SELECT SET EXIT MENU SELECT SET EXIT MENU 2048 PICT SIZE QUALITY SPOT MODE REC1 3 W BALANCE SETUP 16 17 15 13 10 11 REC2 3 AUDIO REC SENSITIVITY 50 100 200 400 SETUP SELECT SET EXIT MENU SELECT SET EXIT MENU REC3 3 SETUP PICT ADJ VIVID STANDARD STANDARD SELECT SET EXIT MENU REC SETUP 1 3 AUTO REVIEW ECONOMY 12 POWER SAVE MONITOR SELECT SET EXIT MENU SETUP 2 3 REC RESET CLOCK SET NO RESET 1...

Page 86: ...P68 26 FORMAT P70 27 VIDEO OUT P78 19 OFF BEEP ON AUTO REVIEW PICT MODE CLOCK SET ENLARGE 4 k6 10k15cm SELECT SET EXIT MENU 20 21 22 26 23 24 25 27 SETUP PLAY2 2 SELECT SET EXIT MENU PLAY SETUP 2 2 SELECT SET EXIT MENU PLAY1 2 PROTECT DPOF PRINT SLIDE SHOW AUDIO DUB SETUP TRIMMING RESIZE SELECT SET EXIT MENU PLAY SETUP 1 2 SELECT SET EXIT MENU FORMAT MONITOR POWER SAVE BEEP CLOCK SET NTSC ENG LANG...

Page 87: ...ersely affected Do not spray insecticides or volatile chemicals onto the digital camera If the digital camera is sprayed with such chemicals the camera body may be damaged and the surface finish may peel off Do not keep rubber or plastic products in contact with the digital camera for a long period of time When you use the digital camera on a beach or similar place do not let sand or fine dust get...

Page 88: ...o remove the batteries from the digital camera If they are left attached to the digital camera a minute amount of current is consumed even when the digital camera power is off If the batteries are left attached to the digital camera for a long time discharge takes place Dispose of unusable batteries The batteries have a limited life Do not throw the batteries into fire because it may cause an expl...

Page 89: ... summer Extremely high or low temperatures will shorten the life of batteries If the batteries are kept in smoky or dusty places the terminals may rust and cause malfunctions Do not allow the battery terminals to come in contact with metal objects such as necklaces hairpins etc This can result in a short circuit or heat generation and if you touch the battery in this condition you may be badly bur...

Page 90: ...start the SD slide show Select NO and press the 4 REVIEW SET button to start normal playback ª Folder Composition When a Memory Card with data recorded on it is inserted into a PC the folders shown below will be displayed In the 100_PANA folder it is possible to record up to 999 images In the MISC folder it is possible to record the files that have been set with DPOF settings Extremely high precis...

Page 91: ...essage is displayed when you use the camera for the first time or you do not use the camera for a long time Set the clock again THIS PICTURE IS PROTECTED After cancelling the protect setting you can delete or overwrite the image THIS PICTURE CAN T BE DELETED SOME PICTURES CAN T BE DELETED If the image is not based on the DCF standard it is not possible to delete selected pictures NO ADDITIONAL DEL...

Page 92: ...ght 6 The flash mode is set to forced OFF Change the flash mode 7 The display or images on the LCD monitor are not focused 7 Set the mode dial to the mode corresponding to the distance to the subject 8 The image will not play back 8 1 Is the Memory Card inside 8 2 There is no image in the Memory Card 8 3 The mode dial is not set to playback 9 The image is not displayed on the television 9 1 Is the...

Page 93: ...0 200 400 Shutter speed 8 1 2 000 Motion image mode 1 30 1 2 000 White balance AUTO Daylight Cloudy Halogen White set Exposure AE Program AE Exposure compensation 1 3 EV Step j2 i2 EV Metering mode Multi Spot Spot mode LCD monitor 1 5z low temperature polycrystalline TFT LCD 114 000 pixels field of view ratio 100 Optical finder Real image zoom finder Flash Flash range ISO100 Approx 0 98 feet 30 cm...

Page 94: ...audio NTSC PAL Composite Audio line output monaural Terminal USB 5 pin Mini USB Analog video audio Ø 2 5 mm jack DC IN EIAJ type 1 jack Dimensions W a H a D 3 4 5qa2 1 2qa1 1 3q 96a65 5a34 mm excluding the projection part Weight Approx 6 oz 170 g excluding Memory Card and battery Approx 7 58 oz 215 g with Memory Card and battery Operating Temperature 32 oF 104 oF 0oC 40oC Operating Humidity 10 80 ...

Page 95: ...y Description Figure BN SDABPU 1B SD PC Card Adaptor compatible with MultiMediaCard BN SDCAPU 1B SD USB Reader Writer compatible with MultiMediaCard RP SD064B RP SD032B RP SD016B 512 MB SD Memory Card 256 MB SD Memory Card 128 MB SD Memory Card 64 MB SD Memory Card 32 MB SD Memory Card 16 MB SD Memory Card RP SD128B RP SDH256 RP SDH512 DMW AC1 AC Adaptor Downloaded from www Manualslib com manuals ...

Page 96: ... Kent WA 98032 Ship To Mr Mrs Ms First Last Street Address City State Zip Phone Day Night 4 Shipping information UPS delivery requires complete street address Please photocopy this form when placing an order 3 Method of payment check one Check of Money Order enclosed NO C O D SHIPMENTS VISA MasterCard Make Check or Money Order to PANASONIC ACCESSORIES Please do not send cash 2 Items Ordered Quanti...

Page 97: ...ce USA Only Please photocopy this form when making a request for service notice In the unlikely event this product needs service Please include your proof of purchase Failure to due so will delay your repair To further speed your repair please provide an explanation of what wrong with the unit and any symptom it is exhibiting Please write the displayed above Self Diagnostic number here Downloaded ...

Page 98: ...h a new or refurbished product The decision to repair or replace will be made by the warrantor During the Labor warranty period there will be no charge for labor During the Parts warranty period there will be no charge for parts You must carry in or mail in your product during the warranty period If non rechargeable batteries are included they are not warranted This warranty only applies to produc...

Page 99: ... WARRANTY COVERAGE THE WARRANTOR IS NOT LIABLE FOR INCIDENTAL OR CONSEQUENTIAL DAMAGES RESULTING FROM THE USE OF THIS PRODUCT OR ARISING OUT OF ANY BREACH OF THIS WARRANTY As examples this excludes damages for lost time travel to and from the servicer loss of media or images data or other memory content The items listed are not exclusive but are for illustration only ALL EXPRESS AND IMPLIED WARRAN...

Page 100: ...nquiries please contact 1 800 272 7033 Monday Friday 8 30am 8pm EST As of January 2002 Service in Puerto Rico Matsushita Electric of Puerto Rico Inc Panasonic Sales Company Factory Servicenter Ave 65 de Infanteria Km 9 5 San Gabriel Industrial Park Carolina Puerto Rico 00985 Phone 787 750 4300 Fax 787 768 2910 Accessory Purchases MAIL TO Centralized Factory Servicenter Panasonic Services Company 1...

Page 101: ...cape Mode 40 LCD Monitor Brightness 71 M Macro Mode 38 Motion Image 29 Multi Playback 54 MultiMediaCard 17 N Night Portrait Mode 41 O Operational Sound 73 Optical Zoom 30 P Picture Size 36 Play Back 52 Playback Zoom 55 Portrait Mode 39 Power Save Mode 74 Q Quality 37 R Resize 67 Review 28 S SD Memory Card 17 SD Slide Show 90 Self timer 34 Slide Show 64 Spot Mode 43 T Trimming 68 U USB Direct Print...

Page 102: ...do en la dirección de las polaridades y 3 Cierre la tapa de la batería 4 Para abrir la tapa de la tarjeta de memoria desplace la tapa en la dirección de la flecha 5 Introduzca la tarjeta en la cámara 6 Cierre la tapa de la tarjeta de memoria Grabación 7 Ponga el interruptor de alimentación a ON P18 8 Defina la fecha hora 9 Ajuste el disco del modo a la imagen normal 10 Saque una imagen Reproducció...

Page 103: ...103 Memo Downloaded from www Manualslib com manuals search engine ...

Page 104: ...nic Way Secaucus NJ 07094 Panasonic Sales Company PSC Division of Matsushita Electric of Puerto Rico Inc Ave 65 de Infanteria Km 9 5 San Gabriel Industrial Park Carolina Puerto Rico 00985 Panasonic Canada Inc 5770 Ambler Drive Mississauga Ontario L4W 2T3 P Downloaded from www Manualslib com manuals search engine ...

Reviews: