background image

20

Preparations/Basics

DVQX1409 (ENG)


 Formatting the card (initialization)

 Format the card before recording a picture with this unit.

 Since data cannot be recovered after formatting, make sure to back up 
necessary data in advance.


 →   [Setup] → [Format]


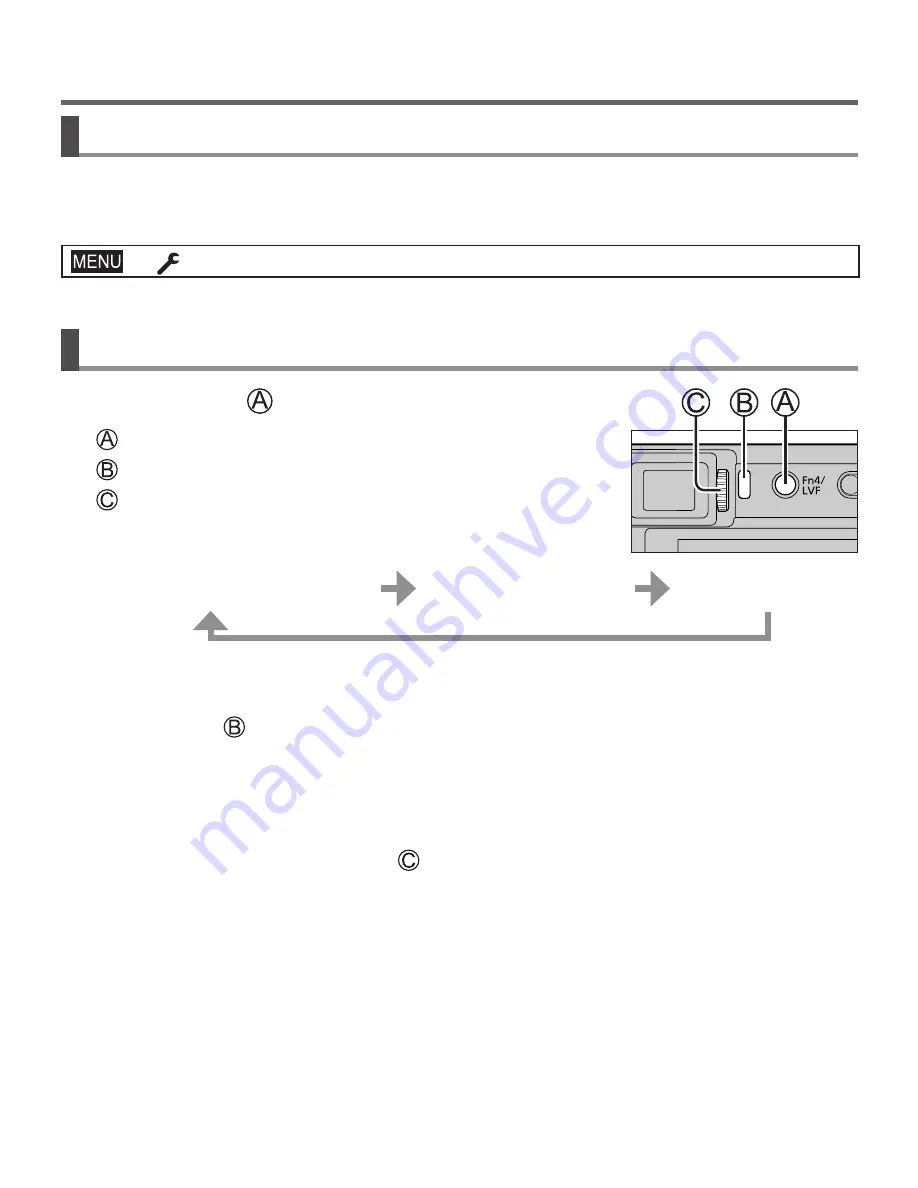
  [LVF] button (Recording pictures using the viewfinder)

 1

 Press [LVF] ( ) button


 [LVF] button


 Eye Sensor


 Diopter adjustment dial


 Automatic switching between 

viewfinder and monitor


 Viewfinder display


 Monitor display


 Automatic switching between viewfinder and monitor

 The eye sensor ( ) automatically switches the display to viewfinder when your eye 
or an object moves close to the viewfinder. When the eye or object moves away 
from the viewfinder, the camera returns to monitor display.


 About diopter adjustment

 Rotate the diopter adjustment dial ( ) to adjust until you are able to clearly see the 
characters displayed in the viewfinder.


 If [LVF Display Speed] is set to [ECO 30fps] when the viewfinder is used, 
the camera can be operated for a longer period since battery drainage is 
reduced.

Summary of Contents for Lumix DC-ZS200

Page 1: ...e this manual for future use More detailed owner s manual is available in Owner s Manual for advanced features PDF format To read it download it from the website 68 Register online at http shop panaso...

Page 2: ...d From Model No Dealer Address Serial No Please note that the actual controls and components menu items etc of your Digital Camera may look somewhat different from those shown in the illustrations in...

Page 3: ...t to rain moisture dripping or splashing Use the recommended accessories Do not remove covers Do not repair this unit by yourself Refer servicing to qualified service personnel The socket outlet shall...

Page 4: ...d Regulations and press MENU SET Contains FCC ID VPYLB1JS955 This transmitter must not be co located or operated in conjunction with any other antenna or transmitter This equipment complies with FCC r...

Page 5: ...iving antenna Increase the separation between the equipment and receiver Connect the equipment into an outlet on a circuit different from that to which the receiver is connected Consult the dealer or...

Page 6: ...oes not show that any health problems are associated with using low power wireless devices There is no proof however that these low power wireless devices are absolutely safe Low power Wireless device...

Page 7: ...it off thoroughly with water If any electrolyte should come into contact with your eyes never rub the eyes Rinse eyes thoroughly with water and then consult a doctor CAUTION Danger of explosion if ba...

Page 8: ...unit as far away as possible from electromagnetic equipment such as microwave ovens TVs video games etc If you use this unit on top of or near a TV the pictures and or sound on this unit may be disrup...

Page 9: ...or the coating may peel off Do not leave the camera with the lens facing the sun as rays of light from the sun may cause it to malfunction Always use the supplied cords and cables Do not extend the su...

Page 10: ...emperature 15 C to 25 C 59 F to 77 F Recommended humidity 40 RH to 60 RH Do not store the battery for a long time while fully charged When storing the battery for a long period of time we recommend ch...

Page 11: ...etting the menu 27 Recording Taking pictures with automatic settings Intelligent Auto Mode 28 Recording with the 4K Photo function 29 Adjusting the focus after recording Post Focus Focus Stacking 33 R...

Page 12: ...waterproof Avoid using the camera in places with excessive dust or sand or where water can come into contact with the camera Condensation When the lens the monitor or viewfinder is fogged up Condensat...

Page 13: ...s The following SD standard based cards can be used SD Memory Card 512 MB to 2 GB SDHC Memory Card 4 GB to 32 GB SDXC Memory Card 48 GB to 128 GB Depending on recording conditions the required card di...

Page 14: ...14 Preparations Basics DVQX1409 ENG Names and Functions of Main Parts 20 21 22 23 24 25 26 27 28 29 17 12 33 32 31 30 35 18 19 34 1 2 3 4 6 8 9 12 13 14 15 16 7 5 10 11...

Page 15: ...ome of the menu items and set them during recording 23 4K photo mode button 29 Fn1 button 26 24 Playback button 40 25 Cursor button 24 26 MENU SET button Confirmation of setting contents etc is perfor...

Page 16: ...the battery all the way firmly and check that it is locked by lever Card Insert the card all the way firmly until it clicks Do not touch the terminal 3 Close the door Slide the release lever to the LO...

Page 17: ...socket This terminal is located at the bottom when the camera is in an upright position Always check the direction of the socket and hold the plug straight to insert or remove it If the cable is inse...

Page 18: ...mputer Flashing Charging error 61 Charging time When using the AC adaptor supplied Approx 190 min The charging time indicated above is the time required for charging in case when the battery is comple...

Page 19: ...he language and press MENU SET The Please set the clock message appears 4 Press MENU SET 5 Press to select the items year month day hour minute and press to set 6 Press MENU SET 7 When The clock setti...

Page 20: ...tor Viewfinder display Monitor display Automatic switching between viewfinder and monitor The eye sensor automatically switches the display to viewfinder when your eye or an object moves close to the...

Page 21: ...s Aperture Priority AE Mode Determine aperture then take pictures Shutter Priority AE Mode Determine shutter speed then take pictures Manual Exposure Mode Determine aperture and shutter speed then tak...

Page 22: ...focus is not aligned flashing If the aperture value and shutter speed are shown in red and flashing you do not have the appropriate exposure unless you are using the flash 2 Press the shutter button f...

Page 23: ...oom Set the i Zoom in the Rec menu to ON You can use the camera s intelligent resolution technology to increase the zoom ratio up to 2x 2 higher than the original zoom ratio with limited deterioration...

Page 24: ...s in succession while the shutter button is pressed 4K PHOTO 29 Post Focus 33 Self Timer To cancel drive mode select Single or Focus mode AF Focus is set automatically when the shutter button is press...

Page 25: ...re adjustment 4 Shutter speed adjustment 5 1 When Manual Focus is set the control ring is assigned to focus adjustment 2 Press to switch between shutter speed adjustment and aperture adjustment 3 When...

Page 26: ...ng screen You can assign frequently used functions to particular buttons or icons with Fn Button Set 46 in Custom Operation menu Touch screen Touch operations Touch To touch and release the touch scre...

Page 27: ...the menu item and press MENU SET 4 Press to select the setting and press MENU SET The setting methods vary depending on the menu item 5 Press Q MENU button repeatedly until the recording or playback s...

Page 28: ...ching between Intelligent Auto Plus Mode and Intelligent Auto Mode Select Intelligent Auto Mode in Intelligent Auto menu Press to select or and press MENU SET allows you to adjust some settings such a...

Page 29: ...ssed and held Recording will start approximately 0 5 seconds after you press the shutter button fully Therefore press the button fully slightly in advance Press and hold Recording is performed 4K Burs...

Page 30: ...opped halfway through Wait until the camera cools down When 4K Pre Burst is set the battery drains faster and the camera temperature rises to protect itself the camera may switch to 4K Burst Select 4K...

Page 31: ...scene selection When is touched the marker operation screen appears 32 3 Drag to select the frame you want to save as a picture To continuously rewind forward the scene or frame by frame touch and hol...

Page 32: ...arking function 1 Marker operation screen 1 The camera automatically sets markers on scenes in which a face or the movement of a subject is detected Up to 10 markers are displayed for each file Exampl...

Page 33: ...alfway Auto Focus activates and automatically detects the focus point on the screen If there is no focus point on the screen the Focus indicator blinks and you cannot record From halfway pressing the...

Page 34: ...and press 2 Touch the focus point If there are no pictures with the focus on the selected point a red frame will be displayed and pictures cannot be saved The edge of the screen cannot be selected To...

Page 35: ...e picture Range Merging Combine the pictures with the selected focus position into one picture When selecting Range Merging 3 Touch the focus point Select positions at two or more points Focus points...

Page 36: ...e Video Mode 2 Press the motion picture button again to end recording To record 4K motion pictures use a UHS Speed Class 3 card When you record 4K motion pictures the angle of view will be narrower th...

Page 37: ...uality size of FHD or HD Files are split into smaller motion picture files for recording and playback when the file size exceeds 4 GB You can continue to record motion pictures without interruption Mo...

Page 38: ...ition Hold the camera firmly in place while recording A motion picture will be recorded at FHD 20M 30p under MP4 Pan Zoom in When you want to zoom in out set different angles of view for the cropping...

Page 39: ...Elapsed recording time Set operating time Immediately release the motion picture button or the shutter button after pressing it When the set operating time has elapsed recording automatically ends To...

Page 40: ...traction is set to ON the lens barrel is retracted after approx 15 seconds as the camera is switched to the playback screen from the recording screen Viewing motion pictures This unit was designed to...

Page 41: ...combining method and press MENU SET Composite Merging Selecting frames to combine Drag the slide bar or use to select the frames to combine Press MENU SET The selected frames are remembered and the di...

Page 42: ...ing Select the frame of the last picture and then press MENU SET 3 Select Yes at the confirmation screen and press MENU SET The picture will be saved in JPEG format Sequence Composition Select multipl...

Page 43: ...s to combine Press MENU SET The selected frames are remembered and the display goes to the preview screen Use to select items and press MENU SET to perform the following operations Next Lets you selec...

Page 44: ...layed in each recording mode Intelligent Auto Intelligent Auto Mode iHandheld Night Shot iHDR Creative Video Exposure Mode High Speed Video 4K Live Cropping Custom Mode You can select your preferred c...

Page 45: ...the Rec menu list only Aspect Ratio Picture Size Quality AFS AFF AFC Sensitivity AF Mode Photo Style Filter Settings Color Space Metering Mode Highlight Shadow i Dynamic i Resolution Flash Red Eye Rem...

Page 46: ...Hor Loop Movement Focus Frame AF Area Display AF MF MF Assist MF Assist Display Operation Fn Button Set Q MENU Ring Dial Set Operation Lock Setting Touch Settings Dial Guide Zoom lever Monitor Display...

Page 47: ...n Language Version Disp Folder File Settings No Reset Reset Reset Network Settings Level Gauge Adjust Demo Mode Format Setup My Menu Setting My Menu You can register frequently used menus Slide Show P...

Page 48: ...cting the camera to a smartphone compatible with Bluetooth Low Energy Pairing connection setup 51 Turning on off the camera with a smartphone 54 B Bulb recording Transferring recorded images to a smar...

Page 49: ...lamp so that it will not light flash Wi Fi button In this Owner s manual a function button to which Wi Fi is assigned is referred to as the Wi Fi button At the time of purchase Wi Fi is assigned to F...

Page 50: ...e type of smartphone being used For the latest information on the Image App refer to the support site below http panasonic jp support global cs dsc This site is available in English only When download...

Page 51: ...e first time only When pairing is set up a Wi Fi connection is made automatically On the camera Setup Bluetooth Bluetooth SET Pairing The camera enters pairing standby mode and displays its device nam...

Page 52: ...played after the Wi Fi function is turned off and on When you need to change the connected device follow the on screen message to change the setting 7 Start Image App The paired smartphone will be reg...

Page 53: ...unction in the setting menu 2 Select the SSID displayed on the screen of the camera 3 Start Image App When the connection confirmation screen appears on the camera select Yes and press MENU SET Only w...

Page 54: ...the camera with a smartphone Wireless connectivity required Bluetooth Wi Fi This function allows you to turn on the camera from a distant location and take pictures or view images on the camera even...

Page 55: ...When Remote Wakeup is set to ON the Bluetooth function continues to operate even after the camera is turned off thus causing the battery to drain Operating the shutter button of the camera using a sm...

Page 56: ...s Wireless connectivity required Wi Fi 1 Connect to a smartphone 50 2 Operate the smartphone If the camera is already connected to the smartphone via Bluetooth select Remote operation iOS devices When...

Page 57: ...about information such as the operating environment or operating method refer to the Owner s manual for advanced features PDF format or the operating instructions of PHOTOfunSTUDIO PDF format SILKYPI...

Page 58: ...of picture effects Filter Card displayed only during recording XXhXXmXXs Elapsed recording time 1 Simultaneous recording indicator When taking still pictures while recording a motion picture Automati...

Page 59: ...r low illumination Focus Starlight AF Wi Fi connection status Bluetooth connection status 52 Location Logging Histogram Name 2 Travel elapsed days 3 Age in years months 2 Location 3 Current date time...

Page 60: ...Miniature Effect One Point Color Sunshine Picture effect Filter adjustment display Picture effects ON or OFF Picture effects Filter Aperture value Shutter speed ISO sensitivity 1 h m and s indicate h...

Page 61: ...e computer is low Focus not aligned correctly Subject outside of focus range Focus Release Priority is set to RELEASE 46 Shutter AF is set to OFF 46 AF Lock is set inappropriately If there are fingerp...

Page 62: ...o waves get disconnected Use within the communication range of the wireless LAN network If any device such as microwave oven cordless phone etc that uses 2 4 GHz frequency are used nearby this unit si...

Page 63: ...sensor total pixel number 20 900 000 pixels Primary color filter Lens Optical 15x zoom f 8 8 mm to 132 mm 35 mm film camera equivalent 24 mm to 360 mm Max Wide F3 3 to F8 0 Max Tele F6 4 to F8 0 Image...

Page 64: ...lected 1 30th of a second to 1 16000th of a second Other than the above Exposure AE Program AE P Aperture priority AE A Shutter priority AE S Manual exposure M Exposure Compensation 1 3 EV steps 5 EV...

Page 65: ...AVCHD Progressive AVCHD MP4 Audio compression format AVCHD Dolby Audio 2 ch MP4 AAC 2 ch Interface HDMI Micro HDMI Type D USB CHARGE USB 2 0 High Speed USB 2 0 Micro B Dimensions Approx 111 2 mm W 66...

Page 66: ...oth Ver 4 2 Bluetooth low energy BLE Frequency range used central frequency 2402 MHz to 2480 MHz AC adaptor Panasonic SAE0012A Information for your safety Input 110 V 240 V 50 60 Hz 0 2 A Output 5 V 1...

Page 67: ...ion 2 0 GPL V2 0 4 the software licensed under the GNU LESSER General Public License Version 2 1 LGPL V2 1 and or 5 open source software other than the software licensed under the GPL V2 0 and or LGPL...

Page 68: ...200 dest P Click the desired language Confirming URLs and QR codes with the camera Setup Online Manual Settings URL display QR Code display The URL or QR code will be displayed on the camera monitor Y...

Page 69: ...roduct or c refund your purchase price The decision to repair replace or refund will be made by the warrantor Product or Part Name Parts Labor Digital Camera 1 Year 1 Year All included Accessories Exc...

Page 70: ...SALES RECEIPT PROOF OF PURCHASE INDICATING DATE OF PURCHASE AMOUNT PAID AND PLACE OF PURCHASE CUSTOMER WILL BE CHARGED FOR THE REPAIR OF ANY UNIT RECEIVED WITHOUT SUCH PROOF OF PURCHASE Limited Warra...

Page 71: ...ANTABILITY ARE LIMITED TO THE PERIOD OF THE LIMITED WARRANTY Some states do not allow the exclusion or limitation of incidental or consequential damages or limitations on how long an implied warranty...

Page 72: ...ies Parts for your Camera Phone A V products TV Computers Networking Personal Care Home Appliances Headphones Batteries Backup Chargers more Customer Services Directory For Product Information Operati...

Page 73: ...ir replace or refund will be made by Panasonic Canada Inc Digital Camera One 1 year parts and labour Digital Camera Peripherals One 1 year parts and labour Digital Camera Accessories Ninety 90 days pa...

Page 74: ...arranted for ninety 90 days from date of original purchase THIS EXPRESS LIMITED WARRANTY IS IN LIEU OF ALL OTHER WARRANTIES EXPRESS OR IMPLIED INCLUDING ANY IMPLIED WARRANTIES OF MERCHANTABILITY AND F...

Page 75: ...registered in the U S and other countries iPad iPhone iPod and iPod touch are trademarks of Apple Inc registered in the U S and other countries App Store is a service mark of Apple Inc Android and Goo...

Page 76: ...tion of North America Two Riverfront Plaza Newark NJ 07102 5490 http shop panasonic com Panasonic Canada Inc 5770 Ambler Drive Mississauga Ontario L4W 2T3 www panasonic com Panasonic Corporation 2018...

Reviews: