background image

5

Before Operating the PS

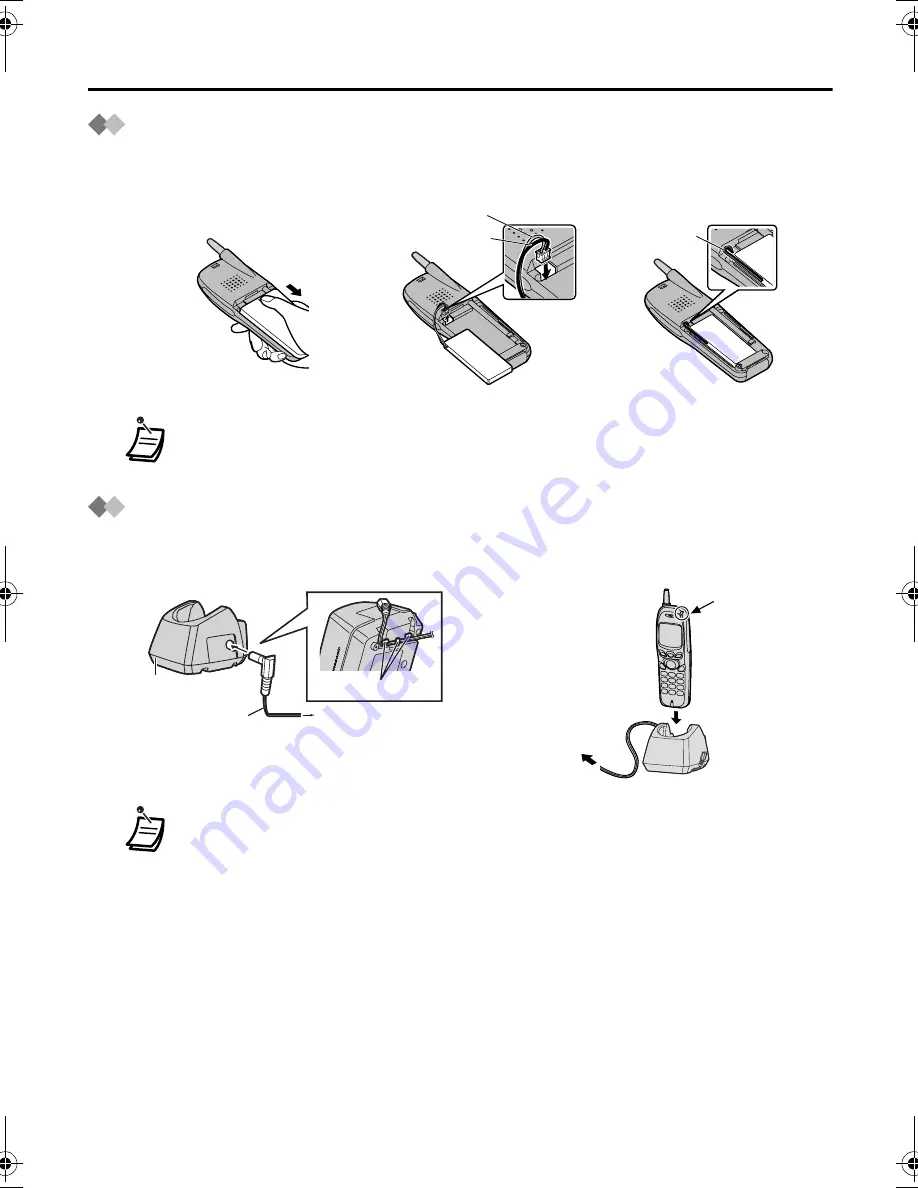
Setting Up

Charging

1

Open the battery cover.

2

Connect the cord and 
install the battery.

3

Close the cover.

• Insert the battery cord into the groove next to the battery to prevent the battery 

cover from pinching it.

1

Connect the charger to a power outlet 
using the AC adaptor.

2

Charge the battery for about 6 hours.

• When the battery has been completely charged, the charge indicator will change 

from red to green.  Refer to “Battery Information” on page 44.

• It is normal for the PS and charger to get warm while the battery is charging.
• Keep devices sensitive to magnetic fields away from the charger.

Cords

Cord (Red)

Cord (Black)

Panas

onic

Charger 

Cord holder

To power outlet

AC adaptor

Charger

Charge
indicator

To power
outlet

TD7690.book  Page 5  Wednesday, December 3, 2003  9:42 AM

Summary of Contents for KXTD7690 - BTS 2.4 GHZ WIRELESS

Page 1: ...ng this product and save this manual for future use This manual is designed to be used with your Portable Station and a Panasonic KX TDA series Business Telephone System Charge the battery for about 6...

Page 2: ...elephone System and assigned an extension number before initial use Accessories included optional Charger ETYKM288SM One AC adaptor KX TCA1 One Battery N4HUGLB00001 One Screws and Washers Two Operatin...

Page 3: ...Calls 14 Calling Another Extension 14 Calling an Outside Party 14 Using the Call Log 15 Making Calls Using the Directories 16 Receiving Calls 18 Intercom Calls Outside Calls Group Calls 18 During a C...

Page 4: ...te of use NAVIGATOR key Used to adjust the ringer receiver volume or move the cursor to select a desired item To select an item press the arrow repeatedly CANCEL POWER button Used to end calls exit th...

Page 5: ...outlet using the AC adaptor 2 Charge the battery for about 6 hours When the battery has been completely charged the charge indicator will change from red to green Refer to Battery Information on page...

Page 6: ...ct the AC adaptor to the charger 2 Drive the included screws into the wall using the wall template below 3 Mount the charger securely on the screws Back view Pull the strap Panasonic Cord holder To po...

Page 7: ...Standby mode is the state of the PS when it is not performing any operations and is awaiting calls Press POWER for about 2 seconds and KX TD7690 will be displayed Press POWER for about 2 seconds The d...

Page 8: ...ook Status Off hook Status for Intercom calls PS Programming Mode Incoming Call Log notification Message Waiting Weak Out of range Strong When using the navigator key only the displayed arrows can be...

Page 9: ...lay Selects the highlighted item Allows you to change the current setting Clears digits or characters Stores the entered setting Displays the edit mode Deletes the highlighted item Used to store a new...

Page 10: ...LOG GRP PS PROGRAM ANSWER SETTING RING PATTERN INT RING PATTERN CO RING PATTERN GRP VIBRATION RING QUICK ANSWER AUTO ANSWER AUTO ANS DELAY CALL GROUP ANY KEY ANSWER DISPLAY SETTING BACKLIGHT BACKLIGHT...

Page 11: ...nnot handle calls and will be displayed If the PS is not operated for 5 seconds the display returns to the previous display KEY INTERCOM Used to make or receive intercom calls CONFERENCE Used to estab...

Page 12: ...eature Guide To select a key press its key number or press to highlight the desired key then press The following keys can also be selected by pressing Single Line Trunk Group Loop Line EXT GDN One Tou...

Page 13: ...en pressing in standby mode to change the current ringer setting the ringer will not sound This allows you to turn the ringer off without making any noise The ringer can be set to both vibrate and rin...

Page 14: ...an entire number while predialing press and hold If flashes move closer to the Cell Station and try dialing again To cancel dialing press extension no Dial extension number Press CANCEL Talk Press TAL...

Page 15: ...utside phone numbers you have received INCOMING LOG Outgoing Call Log Incoming Call Log You can make a call using the phone numbers that incoming call distribution groups have received INCOMING LOG GR...

Page 16: ...number Press S1 ENTR ICD Group extension no Description Feature QUICK DIAL Display PS DIALER Quick Dialing PS Dialing Directory System Speed Dialing Directory PBX SYS DIALER Extension Number Director...

Page 17: ...or Quick Dialing and PS Dialing Directory To enter characters see pages 28 and 29 You can also store names and phone numbers for Quick Dialing See page 22 Talk Select the desired item Press TALK Selec...

Page 18: ...range or when the nearest Cell Station is busy Press CANCEL Talk Press TALK Select INTERCOM KEY Press S2 Press 1 OR Press S1 SEL Press CANCEL Press CANCEL Talk F CO Press S3 Talk Select the CO key Pr...

Page 19: ...on stored in the system See page 39 When receiving a call you can toggle between the two settings by pressing To display caller information a line access number must be stored See TRUNK ACCESS CD on p...

Page 20: ...Regular Hold Exclusive Call Hold Ask your manager what the current mode is When you hold several outside line calls assign the CO buttons Single Line Trunk Group Loop Line GDN as necessary beforehand...

Page 21: ...uring a conversation the call will be disconnected except when having a hands free or monitor call F CO Press S3 Select the CO key Press the CO key number OR Press S1 SEL Select INTERCOM KEY Press S2...

Page 22: ...to 100 names phone numbers and group numbers in the PS If you store an outside party s number you should first store a line access number All directory items are stored in alphabetical order PS DIALER...

Page 23: ...or right press or respectively Select QUICK DIAL Press S1 Select MODIFY Press S1 Edit the name max 14 characters phone no name Press S1 Press S1 Select the desired item Name Phone Number Select the na...

Page 24: ...first store a line access number in front of the phone number Select PS DIALER Press S1 NEW Select NAME Press S1 ENTR name Select PHONE NO Press S1 ENTR phone no Select GROUP 0 Select group number 0...

Page 25: ...eft or right press or respectively Press S1 ENTR name Select the phone number Press S1 ENTR phone no Select the group number Press S1 SEL Edit the phone number max 32 digits Edit the name max 16 chara...

Page 26: ...PS DIALER Select the desired item Press S1 EDIT Select MODIFY Press S1 SEL DEL Press S3 Select YES Press S1 SEL Select PS DIALER Select YES Select DELETE Press S1 SEL Press S1 SEL Press S1 EDIT name D...

Page 27: ...t be identical to the PS s TRUNK ACCESS CD setting SYSTEM SETTING See page 40 Select COPY TO PS BOOK Select PBX SYS DIALER Select the desired item Press S1 EDIT Enter a few of the first letters of the...

Page 28: ...ys different charac ters as shown in the following tables To toggle between the two tables press or at any time while you are entering characters ABC A a B b C c 2 1 2 3 1 4 5 6 7 8 9 2 3 4 5 6 7 8 9...

Page 29: ...stake press to highlight the character press to delete it then enter the correct character To clear an entire line press and hold To move the cursor to the left or right press or respectively Times Bu...

Page 30: ...dle extension To answer from an idle outside line outside phone no system speed dial no 3 digits To dial SEL F CO To store Select the idle F CO key within 5 seconds desired no MENU Select PBX PROGRAM...

Page 31: ...the new party Talk with multiple parties C Tone SEL SEL SEL Feature Operation Useful Features Call Forwarding Busy Cancel No answer Busy No answer CO line access no All calls extension no outside pho...

Page 32: ...gits To page To answer Wait for an answer Disregard this step if both parties are extensions Announce OR C Tone C Tone Tone To set cancel for outside calls To set cancel for intercom calls No call 0 1...

Page 33: ...e waiting indication extension no When the called extension is busy or does not answer To call back Select the key assigned as a MESSAGE button KEY Select the key assigned as a MESSAGE button KEY OR F...

Page 34: ...RAM Press S1 SEL BACK PS Program Menu Layout RING PATTERN INT RING PATTERN CO RING PATTERN GRP VIBRATION RING QUICK ANSWER AUTO ANSWER AUTO ANS DELAY CALL GROUP ANY KEY ANSWER BACKLIGHT BACKLIGHT TIME...

Page 35: ...and 4 melodies are available Setting no 11 12 13 VIBRATION RING Select whether to have the PS vibrate when ringing OFF Ring VIB Ring and vibrate at the same time VIB Vibrate for 5 seconds then ring RI...

Page 36: ...ringer LED vibration and display backlight settings for the group selected above to the default settings CO GRP BLINK 6 s RING PATTERN Select a ring pattern for the group selected above When set to C...

Page 37: ...display backlight will illuminate when a key is pressed or a call is received Select IN RECEIVING to have the dial buttons and backlight illuminate only when a call is received 15 s ON BACKLIGHT TIME...

Page 38: ...M 24H DATE DD MM YY LCD CONTRAST Select one of 12 levels of contrast for the display STANDBY DISPLAY Select whether the PS will show its extension number and or the system number on the display when i...

Page 39: ...e PS PASSWORD is automatically set to ENABLE using the password you entered here 2 Setting no 41 ENABLE ON DISABLE SECURITY SETTING 42 OFF PS PASSWORD Select whether to password protect your DIRECTORY...

Page 40: ...ssword is not the same as the one set under PS PASSWORD 53 ENABLE DISABLE ACCESS SYSTEM Select which system the PS will access if registered to more than one Business Telephone System 2 CHANGE PIN Bef...

Page 41: ...D Fwd DND Both MESSAGE FLASH RECALL AUTO ANSWER CONFERENCE F CO NONE 4 Press S1 Setting no 61 1 INTERCOM 2 CONFERENCE 3 FLASH RECALL 4 MESSAGE 5 Fwd DND Both 6 AUTO ANSWER 7 F CO 8 HOLD KEY EDIT FCO L...

Page 42: ...r try again later The radio channel is busy or a radio communication error occurred Try again later You cannot dial The number which you dialed is restricted by the Business Telephone System Consult y...

Page 43: ...ting Up on page 5 The display does not show a strong radio signal even though you are near the CS Obstacles such as walls or partitions are interfering with the radio waves sent between the PS and the...

Page 44: ...Before replacing the batteries turn the power off to prevent memory loss Please charge the new batteries for 6 hours Not following this procedure will result in improper Battery Strength metering Plea...

Page 45: ...nter when the following conditions occur A When the power supply cord or plug is damaged or frayed B If liquid has been spilled into the unit C If the unit has been exposed to water D If the unit does...

Page 46: ...llation If this device does cause harmful interference to radio or television reception which can be determined by turning the device off and on the user is encouraged to try to correct the interferen...

Page 47: ...h care facilities if any regulations posted in the area instruct you not to do so Hospitals or health care facilities may be using unit that could be sensitive to external RF radio frequency energy Ro...

Page 48: ...sd Copyright This material is copyrighted by Panasonic Communications Co Ltd and may be reproduced for internal use only All other reproduction in whole or in part is prohibited without the written co...

Reviews: