6. Fax
39
L
To program other items, repeat steps 2 to 3.
4
{
MENU
}
Note:
L
A hyphen or a space entered in a telephone number
counts as 2 digits.
6.2.3 Editing a stored item
1
{
DIRECTORY
}
2
Press
{V}
or
{^}
repeatedly to display the desired
item.
i
{
MENU
}
i
{*}
3
Edit the name if necessary. For further details, see
the storing procedure on page 38.
i
{
SET
}
4
Edit the telephone number if necessary. For further
details, see the storing procedure on page 38.
i
{
SET
}
6.2.4 Erasing a stored item
1
{
DIRECTORY
}
2
Press
{V}
or
{^}
repeatedly to display the desired
item.
i
{
MENU
}
i
{#}
L
To cancel erasing, press
{
STOP
}
.
3
{
SET
}
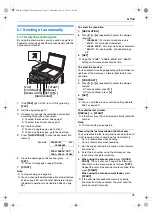
6.3 Sending a fax using one-
touch dial feature and navigator
directory
Before using this feature, store the desired names and
telephone numbers into one-touch dial feature and
navigator directory (page 38).
L
Make sure that the
{
FAX
}
light is ON.
6.3.1 Using the scanner glass
1
Set the original (page 17).
2
If necessary, change to the desired resolution (page
37) and the desired contrast (page 37).
3
Enter the fax number.
Using stations 1–7:
Press the desired station key.
Using stations 8–14:
Press
{
LOWER
}
, then press the desired station key.
Using navigator directory:
Press
{
DIRECTORY
}
, then press
{V}
or
{^}
repeatedly to display the desired item.
L
To send a single page, skip to step 6.
L
To send multiple pages, go to the next step.
4
Press
{
QUICK SCAN
}
to scan the document into
memory.
5
Place the next page.
i
{
SET
}
L
To send more pages, repeat this step.
6
{
START
}
To search for a name by initial
Example: “
LISA
”
1.
{
DIRECTORY
}
2.
Press
{V}
or
{^}
to initiate the navigator directory.
3.
Press
{
5
}
repeatedly to display any name with the
initial
“
L
”
(see page 64 for character entry).
L
To search for symbols, press
{*}
.
4.
Press
{V}
or
{^}
repeatedly to display
“
LISA
”
.
L
To stop the search, press
{
STOP
}
.
Fax auto redial
If the line is busy or if there is no answer, the unit will
automatically redial the number.
Note:
L
To stop sending, see page 65.
6.3.2 Using the auto document feeder
1
Set the original (page 17).
2
If necessary, change to the desired resolution (page
37) and the desired contrast (page 37).
FLB881-PFQX2732ZA-OI-en.book Page 39 Wednesday, July 18, 2007 11:22 PM
Summary of Contents for KXFLB881 - Network Multifunction Laser Printer
Page 101: ...101 Notes FLB881 PFQX2732ZA OI en book Page 101 Wednesday July 18 2007 11 22 PM ...
Page 102: ...102 Notes FLB881 PFQX2732ZA OI en book Page 102 Wednesday July 18 2007 11 22 PM ...
Page 103: ...103 Notes FLB881 PFQX2732ZA OI en book Page 103 Wednesday July 18 2007 11 22 PM ...
Page 104: ...PFQX2732ZA CM0707CK0 CD FLB881 PFQX2732ZA OI en book Page 104 Wednesday July 18 2007 11 22 PM ...

