Panasonic KX-TS730C, Operating Instructions Manual
The Panasonic KX-TS730C telephone, an exceptional communication device, comes with a detailed Operating Instructions Manual to ensure seamless usage. This comprehensive manual is available for free download directly from our website, providing users with easy access to all the information they need to get the most out of their phone.
Share
Download


Reviews:
No comments
Related manuals for KX-TS730C

FW391C
Brand: Magnavox Pages: 26

System 10
Brand: DayTronic Pages: 414

Anya
Brand: EAW Pages: 9

mPress
Brand: Radial Engineering Pages: 12

RTC105
Brand: Hach Pages: 504
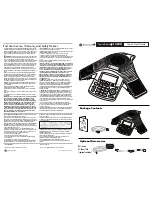
SoundStation 1725-30955-001
Brand: Polycom Pages: 2

ARIES 34
Brand: Nakamichi Pages: 32

SF4
Brand: Sena Pages: 10

GAC2570
Brand: Grandstream Networks Pages: 177

OCTO21A
Brand: LSS Pages: 14

DCX-313
Brand: DC-Connex Pages: 16

NHX SYSTEM series
Brand: Aiphone Pages: 12

e-Sense Actilume
Brand: Fagerhult Pages: 9

iMach III P1B
Brand: vistaCNC Pages: 7

Bell'O Digital BDSW-1650-BLK
Brand: Twin-Star International Pages: 20

CAPXL
Brand: Chamberlain Pages: 28

IRIDIUM CERTUS 100
Brand: Lars Thrane Pages: 4

SD-SG11H
Brand: Sharp Pages: 68


