background image

Useful Info

rmation

Answering

 System

Preparatio

n

63

Special Features

T

e

lephone System

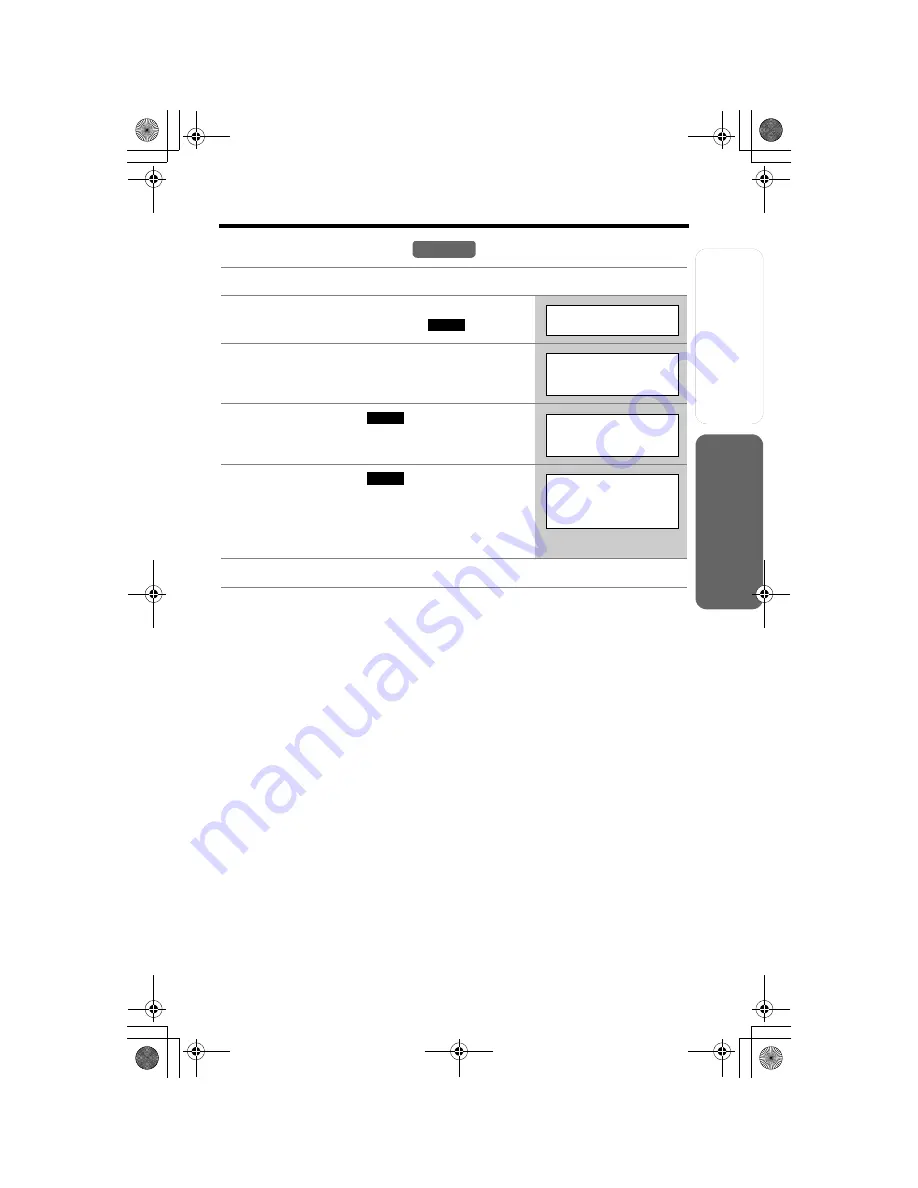
To turn the dial lock off 

1

Press 

[MENU]

.

2

Scroll to “

Dial lock

” by pressing 

[

d

or 

[

B

]

, then press the soft key (

).

3

Enter the password set when the dial lock 
was turned on.

4

Press the soft key (

).

5

Press the soft key (

).

Dial lock off

” is displayed.

If you entered the wrong password, the handset 
beeps 3 times and “

Save error

” is displayed. 

Enter the correct password.

6

Press 

[OFF]

.

Handset

SELECT

Dial lock

Enter password

:_


_


_


_

SAVE

Enter password

:

;;;;

YES

Turn Dial lock

off?

TG5240AL.fm  Page 63  Friday, June 11, 2004  5:22 PM

Summary of Contents for KX-TG5240AL

Page 1: ...ions Model No KX TG5240AL The unit is Caller ID compatible To display the caller s phone number you must subscribe to Caller ID service PLEASE READ BEFORE USE AND SAVE Charge the battery for 6 hours before initial use TG5240AL fm Page 1 Friday June 11 2004 5 22 PM ...

Page 2: ...uded When you subscribe to Caller ID services from your telephone operator this telephone will display the caller s phone number When available from your telephone operator this telephone will also display the number of the second call or call waiting AAC Adaptor p 12 one ATelephone Line Cord p 12 one ATelephone Plug p 12 one AHandset Cover p 13 one ABattery p 13 one ABelt Clip p 77 one AWall Moun...

Page 3: ...handset is pre registered at the factory and assigned the extension number 1 After purchasing accessory handsets you must register each to the base unit Please read the accessory handset s Installation Manual The model number of the accessory handset is KX TGA520AL A charger is included with each accessory handset Up to 3 accessory handsets can be added KX TG5240AL KX TGA520AL TG5240AL fm Page 3 F...

Page 4: ...ng the Caller List 37 Viewing the Caller List 37 Calling Back from the Caller List 38 Editing the Caller s Phone Number 39 Storing Caller Information in the Phone Book 40 Erasing Caller Information 40 Phone Book 41 Storing Names and Numbers 41 Dialling from the Phone Book 43 Chain Dial 44 Editing an Item in the Phone Book 45 Erasing an Item in the Phone Book 45 Copying Items in the Phone Book 46 S...

Page 5: ...74 Voice Menu 75 Direct Remote Operation 76 Belt Clip 77 Optional Headset 77 Wall Mounting 78 Direct Commands 81 Cancelling Registration Re registration 83 Cancelling the Handset Registration 83 Re registering the Handset 84 If the Following Appear on Your Display 85 Safety Instructions 94 Important Information 96 Specifications 98 Answering System Useful Information Troubleshooting 88 Important T...

Page 6: ... radio waves For maximum distance and noise free operation the recommended base unit location is Note If you use the handset near a microwave oven which is being used noise may be heard from the receiver or the speaker Move away from the microwave oven and closer to the base unit If you use the handset near another cordless phone s base unit noise may be heard Move away from the other cordless pho...

Page 7: ...Charge Contacts p 14 Speaker Navigator Key B d H G p 9 PROGRAM Button p 48 AUTO Button p 48 IN USE Indicator p 33 MUTE Button p 58 RECALL CALL WAIT Button p 59 60 LOCATOR INTERCOM TRANSFER Button and Indicator p 49 REDIAL PAUSE Button p 32 58 Display p 11 STOP Button p 69 GREETING REC Record Button p 24 MEMO Button p 71 ERASE Button p 25 70 ANSWER ON Button and Indicator p 66 MAILBOX Buttons p 67 ...

Page 8: ...ton p 15 Microphone p 29 Charge Contacts p 13 Antenna Display p 10 OFF Button p 15 29 HOLD INTERCOM Button p 30 49 REDIAL Button p 30 Soft Keys p 9 Receiver RECALL CALL WAIT Button p 59 60 Navigator Key d B p 9 Ringer Message Alert Indicator p 28 33 Back side Speaker TG5240AL fm Page 8 Friday June 11 2004 5 22 PM ...

Page 9: ...y is indicated by the arrows d or B Throughout these Operating Instructions the base unit navigator key is indicated by the arrows d B H or G How to use the soft keys navigator keys Handset soft keys Three soft keys are used to select functions displayed directly above each key Functions displayed above each key will change depending on the state of use On this sample display and C are displayed a...

Page 10: ...cons on the bottom line indicate the functions of the corresponding soft keys which are located directly below the display p 9 Ex The soft key below C phone book icon is used when storing or viewing phone book items p 41 43 9 D extension icon and extension numbers are displayed ex base unit 0 handset 1 1 a during an intercom call p 49 or a conference call p 55 b while monitoring a room p 57 Off in...

Page 11: ...in all mailboxes If the recording time is set to Greeting only will be displayed p 26 the selected volume level while you are adjusting the speaker volume p 25 32 when PROGRAM is pressed to store a phone number p 48 when your greeting message or memo message was not recorded correctly p 24 71 5 If there are new messages in a mailbox its icon will flash If there are only old messages the icon will ...

Page 12: ...aptor KX TG5240AL is not designed to be used with rotary pulse dialling services If the unit is connected to a telephone line with ADSL service you may hear noise from the receiver or speaker during conversations or the unit may not display caller s phone number properly We recommend connecting a noise filter contact your ADSL service provider to the telephone line between the base unit and the te...

Page 13: ... hours Battery Charge Place the handset on the base unit for 6 hours before initial use The unit beeps once the CHARGE indicator lights and Charging is displayed When the battery is fully charged Charge completed is displayed if there are no new calls in the Caller List Battery strength You can confirm the battery strength on the handset display Battery strength is indicated by the icons shown in ...

Page 14: ...n the handset is in TALK mode and how often it is in Standby mode As preventative maintenance clean the handset and base unit charge contacts with a soft dry cloth once a month Clean more often if the unit is subject to grease dust or high humidity Otherwise the battery may not charge properly If the battery is fully charged you do not have to place the handset on the base unit until Recharge batt...

Page 15: ... message will be displayed p 85 87 and or error beeps will sound Make sure the handset and base unit are not being used The handset must be operated near the base unit and while off the base unit 1 Press MENU The main menu is displayed p 16 2 Scroll to the desired item by pressing d or B 3 Press the soft key to select the desired item 4 If the item has a sub menu select the menu item p 16 Repeat s...

Page 16: ...Handset Ringer volume Ringer tone Incoming call Set answering LCD contrast Key tone Auto talk Room monitor Set dial mode Registration HS registration Deregistration Message alert Set recall time Set line mode Incoming call Room monitor Talk Caller ID Ringer tone Main menu Sub menu I Ringer setting Date and time Dial lock Initial setting Sub menu II Voice enhancer Copy 1 item Copy all items Copy ph...

Page 17: ...press B or d to move the cursor to the incorrect number Enter the correct number 4 Select AM or PM by pressing 5 Press the soft key The date and time are set and E disappears from the base unit display If the handset beeps 3 times the date and time were not set correctly Start again from step 3 6 Press OFF The date and time may be incorrect after a power failure When E flashes on the base unit dis...

Page 18: ...me while an outside call is ringing Press d or B while the handset is ringing Temporary ringer off While the handset is ringing for an outside call you can turn the ringer off temporarily by pressing OFF The handset will ring again as normal the next time a call is received 1 Press MENU 2 Press the soft key at Ringer setting 3 Press the soft key at Ringer volume 4 Select the desired volume by pres...

Page 19: ...o Tone 3 are bell ringer patterns Melody 1 to Melody 4 are melody patterns The factory preset is Tone 1 You cannot change the ringer tone for intercom calls If you select one of the melody ringer patterns the ringer will continue to sound for several seconds if the caller hangs up before you answer the call or another person answers the call using another phone connected on the same line Handset r...

Page 20: ...7 1 to 3 Bell ringer patterns 4 to 7 Melody patterns 1 Press MENU 2 Scroll to Initial setting by pressing d or B then press the soft key 3 Scroll to Set base unit by pressing d or B then press the soft key 4 Press the soft key at Ringer tone 5 Select the desired ringer tone by pressing d or B When selecting the ringer tone the base unit will ring If the base unit ringer volume has been turned off ...

Page 21: ...roll to Initial setting by pressing d or B then press the soft key 3 Scroll to Auto talk by pressing d or B then press the soft key 4 Select On or Off by pressing d or B 5 Press the soft key then press OFF 1 Press MENU 2 Scroll to Initial setting by pressing d or B then press the soft key 3 Scroll to LCD contrast by pressing d or B then press the soft key 4 Select the desired contrast by pressing ...

Page 22: ...ress the soft key in step 4 press the soft key and press OFF 1 Press MENU 2 Scroll to Initial setting by pressing d or B then press the soft key 3 Scroll to Set area code by pressing d or B then press the soft key 4 Enter your area code of up to 8 digits To delete a digit press the soft key To erase all of the digits press and hold the soft key 5 Press the soft key then press OFF Handset SELECT In...

Page 23: ...line by pressing d or B then press the soft key 4 Scroll to Set line mode by pressing d or B then press the soft key 5 Select A or B by pressing d or B 6 Press the soft key then press OFF 1 Press MENU 2 Scroll to Initial setting by pressing d or B then press the soft key 3 Scroll to Set tel line by pressing d or B then press the soft key 4 Press the soft key at Set dial mode 5 Select Tone by press...

Page 24: ...your call Please leave a message after the beep Thank you N To instruct callers to leave a message in a specific mailbox Mailbox 1 Mailbox 2 or Mailbox 3 for mailboxes see page 64 Hello this is your name and or number Sorry we cannot take your call If you have a message for John press and 1 for Jane press and 2 for Jack press and 3 before the beep Or just stay on the line and leave a message after...

Page 25: ...depending on the caller s recording time p 26 To review the pre recorded greeting press GREETING CHECK A pre recorded greeting will be played as follows N When the recording time is set to 1 minute 2 minutes or 3 minutes Hello we are not available now Please leave your name and phone number after the beep We will return your call If recording time runs out the unit will automatically switch to the...

Page 26: ... d or B then press the soft key 5 Select the recording time by pressing d or B You can also select the recording time by pressing 1 2 3 or 0 Greeting only 6 Press the soft key then press OFF If you select Greeting only the unit will answer a call with the greeting message and then hang up The unit will not record any incoming messages The base unit will display instead of the number of messages Ha...

Page 27: ...umber of rings by pressing d or B You can also select the number of rings by pressing 0 Toll saver or 2 to 7 The unit will announce a caller s name after the 2nd ring Talking Caller ID p 34 35 To listen to the name announcements do not select 2 6 Press the soft key then press OFF Toll saver When you call the unit from a remote location the number of rings will tell you if there are any new message...

Page 28: ... a call is received whether this feature is on or off Battery operating time may be shortened when using this feature p 14 1 Press MENU 2 Scroll to Initial setting by pressing d or B then press the soft key 3 Press the soft key at Set answering 4 Scroll to Recording mode by pressing d or B then press the soft key 5 Select the recording mode by pressing d or B You can also select the recording mode...

Page 29: ...one conversation 1 Press s SP phone is displayed 2 Dial a phone number The dialled number is displayed After a few seconds the display will show the length of the call 3 When the other party answers talk into the microphone 4 To hang up press OFF or place the handset on the base unit Hands free Digital Duplex Speakerphone For best performance please note the following Talk alternately with the oth...

Page 30: ...ired number by pressing d or B You can also scroll down through the list by pressing REDIAL To exit the list press OFF 3 Press C or s To erase an item scroll to the item then press the soft key If No items stored is displayed the list is empty To put a call on hold 1 Press HOLD INTERCOM during a conversation Press extension to transfer is displayed To transfer the call to the base unit or another ...

Page 31: ... interference During an outside call this feature will be turned on automatically when necessary This feature will turn off when you hang up put a call on hold or make a conference call It will not turn off automatically during a call You can also turn this feature on or off manually 1 Press MENU during an outside call 2 Press 2 to select 2 Booster on or 2 Booster off You can also select 2 Booster...

Page 32: ... to the call press SP PHONE The handset users can also take the call by pressing C or s If another phone is connected on the same line p 12 you can also take the call by lifting its handset If a call is kept on hold for 6 minutes an alarm tone will start to sound After 4 additional minutes on hold the call will be disconnected 1 Press SP PHONE The indicator lights 2 Dial a phone number If you misd...

Page 33: ...a call by pressing any button except d B or OFF 2 To hang up press OFF or place the handset on the base unit Auto Talk If the Auto Talk feature is turned on p 21 you can answer a call by simply lifting the handset off the base unit or the charger for accessory handset users p 3 1 Press SP PHONE 2 Talk into the MIC 3 To hang up press SP PHONE To transfer the call to another extension see page 52 To...

Page 34: ...er stored with a different name each handset will display the name stored in its own phone book If the unit does not receive Caller ID information one of the following will be displayed Depending on radio communications with the base unit the handset may not display Caller ID information immediately after the ring If your unit is connected to a PBX which does not support Caller ID you cannot acces...

Page 35: ...ayed on the other extension handsets 2 to 4 if the name is stored differently in each phone book If the unit does not receive Caller ID information the unit will announce Call from out of area or Call from private caller If the ringer volume of the handsets and base unit is off caller names will not be announced The announcement is heard at the handset or base unit ringer volume p 18 19 If this fe...

Page 36: ...alk Caller ID by pressing d or B then press the soft key 3 Select Off or On by pressing d or B 4 Press the soft key then press OFF 1 Press MENU 2 Scroll to Initial setting by pressing d or B then press the soft key 3 Scroll to Set base unit by pressing d or B then press the soft key 4 Scroll to Talk Caller ID by pressing d or B then press the soft key 5 Select Off or On by pressing d or B 6 Press ...

Page 37: ... as missed If you do not press any buttons for 60 seconds the unit will exit the Caller List 1 The handset display will show the number of calls you missed 2 Press the soft key d or B to review other calls logged in the Caller List If there are no items in the Caller List will not be displayed After viewing the missed call entries missed calls will disappear from the display 1 Press the soft key d...

Page 38: ...viewing a caller s information 2 to 9 will be replaced with Calling Back from the Caller List In some cases you may have to edit the number before dialling p 39 If a phone number is not displayed in the caller information you cannot call that caller back from the Caller List 1 Press the soft key d or B to enter the Caller List 2 Scroll to the desired caller by pressing d or B 3 Press C or s The ph...

Page 39: ...e a digit press 3 To make a call to the edited number press C or s To store the edited number in the phone book press the soft key 1 Press the soft key d or B to enter the Caller List 2 Scroll to the desired caller by pressing d or B 3 Press the soft key 4 Add or erase digits to the beginning of the number as desired To add a digit enter a number To erase a digit press the soft key or 5 To make a ...

Page 40: ...ng steps 1 enter the name p 42 2 press d and 3 press the soft key If a name is not required press d then press the soft key To continue storing other items repeat from step 2 To exit programming mode press OFF Handset C I D SAVE SAVE SAVE Handset 1 Press the soft key d or B to enter the Caller List 2 Scroll to the desired caller by pressing d or B 3 Press the soft key Erased is displayed To erase ...

Page 41: ...p to 32 digits To delete a digit press the soft key To erase all of the digits press and hold the soft key 5 Press d If you want to change the name press the soft key The display returns to step 3 Change the name If you want to change the number press B The display returns to step 4 Change the number 6 Press the soft key To continue storing other items repeat from step 2 7 Press OFF When the dial ...

Page 42: ...hown below For example to enter Tom 1 Press 8 four times 2 Press 6 three times then press the soft key to move the cursor 3 Press 6 once If you make a mistake while entering a name or number 1 Press the soft key or to move the cursor to the incorrect character 2 Press the soft key to delete the character Each time you press the soft key a character is erased To erase all characters press and hold ...

Page 43: ...next alphabetical index will be displayed 3 Press d repeatedly until the desired name is displayed Index table 1 Press the soft key C The display shows the number of stored items You can press the soft key to view the first item 2 Scroll to the desired item To scroll down press d To scroll up press B 3 Press C s or the soft key The phone number is dialled Keys Index Keys Index 1 Symbols 1 6 M N O ...

Page 44: ...er and your PIN when storing in the phone book p 41 1 Search and dial from the phone book 18000123456 Calling card access number The voice guidance may be announced 2 Search and dial from the phone book 1234 Calling card PIN 3 Search and dial from the phone book 15550123456 Destination Number 1 While you are on a call Press MENU 2 Press the soft key at 1 Phone book or press 1 3 Search for the desi...

Page 45: ...5 Edit the phone number then press d If you do not need to change the number press d then go to step 6 To delete a digit press the soft key To delete all of the digits press and hold the soft key 6 Press the soft key To continue editing other items repeat from step 2 7 Press OFF 1 Press the soft key C 2 Scroll to the desired item by pressing d or B To search for the item by initial see page 43 3 P...

Page 46: ... copy one phone book item to another handset Make sure the destination handset is not in use 1 Press MENU 2 Scroll to Copy phone book by pressing d or B then press the soft key 3 Press the soft key at Copy 1 item 4 Select the destination extension number 1 to 4 by pressing d or B You can also select the extension number by pressing 1 to 4 5 Press the soft key 6 Scroll to the desired phone book ite...

Page 47: ...or B then press the soft key 4 Select the destination extension number 1 to 4 by pressing d or B You can also select the extension number by pressing 1 to 4 5 Press the soft key When all items have been copied Complete is displayed The destination handset displays Phone book Receiving then Phone book Received To continue copying items to another extension repeat from step 3 6 Press OFF SELECT Copy...

Page 48: ... Press PROGRAM then press AUTO 2 Press the memory station number 0 to 9 for the phone number to be erased A long beep sounds and the phone number is erased Dialling a Stored Phone Number Speed dial numbers stored in the base unit can only be dialled from the base unit You cannot dial stored phone numbers if the dial lock is turned on p 62 1 Press PROGRAM The IN USE indicator flashes and is display...

Page 49: ...ll ring for 1 minute To stop paging press OFF 3 When the paged party answers start talking You can switch to the speaker by pressing s To switch back to the receiver press C 4 To disconnect the intercom press OFF 1 Press LOCATOR INTERCOM TRANSFER The LOCATOR INTERCOM TRANSFER and SP PHONE indicators light 2 To page all handsets press 0 To page a specified handset press its extension number 1 to 4 ...

Page 50: ...ne p 61 and the IN USE indicator on the base unit will flash rapidly To answer the call if using the handset press OFF then press C or s if using the base unit press SP PHONE twice 1 Press C s or HOLD INTERCOM You can also answer a page by pressing any button except d B or OFF 2 To disconnect the intercom press OFF 1 Press SP PHONE or LOCATOR INTERCOM TRANSFER 2 To disconnect the intercom press SP...

Page 51: ...press OFF It is not possible to specify which handset s will hear the voice announcement The announcement is heard at the handset ringer volume p 18 1 Press LOCATOR INTERCOM TRANSFER The LOCATOR INTERCOM TRANSFER and SP PHONE indicators light 2 To make a voice announcement to all handsets press 5 You will hear a ringback tone two short beeps and the SP PHONE indicator flashes 3 When the SP PHONE i...

Page 52: ...press OFF 1 Base unit 1 During a call press LOCATOR INTERCOM TRANSFER The call is put on hold 2 To page a specified handset press its extension number 1 to 4 To page all handsets press 0 Wait for the handset user to answer then you can announce the transfer OR To make a voice announcement to all handsets press 5 then speak into the MIC when the SP PHONE indicator stops flashing If the paged party ...

Page 53: ... allow the caller to leave a message perform the following three steps 1 Tell the caller to press the pound sign and the mailbox number of the person they want to leave a message for after you end the call p 64 2 Press HOLD INTERCOM 3 Press 9 to transfer the caller to the Answering System greeting p 72 The caller will hear the greeting and can select the appropriate mailbox 1 During a call press H...

Page 54: ...t press SP PHONE to return to the outside call If the paged party does not answer within 60 seconds after you hang up your phone will ring and the call will be returned to your phone You may speak to the caller again by pressing C s or SP PHONE If you do not answer the call within 4 minutes the call will be disconnected After speaking to the caller you may also transfer the caller to a mailbox by ...

Page 55: ...HONE A maximum of four parties including the outside party can take part in a conference call Call Share This feature allows the base unit or the handset to join an existing outside call To prevent other users from joining your conversation turn the Call Privacy feature on p 58 To join a conversation Call Share Press C or s Conference is displayed Press SP PHONE A maximum of four parties including...

Page 56: ...o prevent your handset from being monitored select Off in step 4 To turn Room Monitor on for the base unit to allow other users to monitor through your base unit To prevent your base unit from being monitored select Off in step 4 1 Press MENU 2 Scroll to Initial setting by pressing d or B then press the soft key 3 Scroll to Room monitor by pressing d or B then press the soft key 4 Select On by pre...

Page 57: ...the destination handset is off or the handset is on the base unit busy tones will sound 1 Press HOLD INTERCOM then press the soft key 2 To call the base unit press 0 To call another handset press its extension number 1 to 4 To monitor from the speaker press s If the handset is placed on the base unit monitoring will be stopped Accessory handset users p 3 can place the handset on the charger and co...

Page 58: ...versation While the Call Privacy feature is turned on other users cannot join the conversation Call Privacy will turn off after you hang up the call Using the PAUSE Button For PBX Line Long Distance Calls We recommend you press the soft key on the handset or press REDIAL PAUSE on the base unit if a pause is required for dialling with a PBX or to make a long distance call is displayed on the handse...

Page 59: ... second caller s information will not be displayed when the answering system is recording someone s message Please contact Telstra or your service provider for details and availability in your area Using Caller ID Type II When you receive a second call during a conversation you will hear a signal tone following the call waiting tone and the conversation will be interrupted or muted for a short per...

Page 60: ...consult your PBX supplier for the correct settings You can access Telstra s EASY CALL service by having the recall time set at 100 ms this is the factory default setting and then follow Telstra s EASY CALL instructions to operate this service 1 Press MENU 2 Scroll to Initial setting by pressing d or B then press the soft key 3 Scroll to Set tel line by pressing d or B then press the soft key 4 Scr...

Page 61: ... call tone Base unit incoming call tone 1 Press MENU 2 Press the soft key at Ringer setting 3 Scroll to Incoming call by pressing d or B then press the soft key 4 Select On Off or 2 by pressing d or B 5 Press the soft key then press OFF 1 Press MENU 2 Scroll to Initial setting by pressing d or B then press the soft key 3 Scroll to Set base unit by pressing d or B then press the soft key 4 Scroll t...

Page 62: ...numbers in the phone book before using this feature 1 Press MENU 2 Scroll to Dial lock by pressing d or B then press the soft key 3 Enter a 4 digit password This password is required when turning the dial lock off If more than 4 digits are entered the last 4 digits are the password 4 Press the soft key 5 Press the soft key Dial lock on is displayed 6 Press OFF If you make a call while the dial loc...

Page 63: ... 3 Enter the password set when the dial lock was turned on 4 Press the soft key 5 Press the soft key Dial lock off is displayed If you entered the wrong password the handset beeps 3 times and Save error is displayed Enter the correct password 6 Press OFF Handset SELECT Dial lock Enter password ____ SAVE Enter password YES Turn Dial lock off TG5240AL fm Page 63 Friday June 11 2004 5 22 PM ...

Page 64: ...or Jack press and 3 before the beep Or just stay on the line and leave a message after the beep Thank you Callers wait until the greeting ends then they can leave a message Messages will be automatically recorded into Mailbox 1 if no mailbox is specified Useful information You can leave a memo message for other users in a mailbox with the base unit p 71 You can transfer a call to one of the mailbo...

Page 65: ...and press OFF You can access the mailbox without entering the password 1 Press MENU 2 Scroll to Initial setting by pressing d or B then press the soft key 3 Press the soft key at Set answering 4 Scroll to Set mailbox2 3 by pressing d or B then press the soft key 5 Select the mailbox by pressing B Mailbox 2 or d Mailbox 3 6 Enter a 2 digit password 00 99 If you entered the wrong password re enter t...

Page 66: ... the Answering System remotely from an outside phone p 76 If you subscribe to Caller ID p 34 Caller ID information automatically adjusts the date and time when a call is received provided you have already set the date and time manually p 17 Monitoring Incoming Calls While a caller is leaving a message you can monitor the call through the base unit speaker To increase the speaker volume while monit...

Page 67: ...1 Press MAILBOX 2 or MAILBOX 3 Enter Mailbox password will be heard 2 Enter the Mailbox password p 65 The unit announces Mailbox No and the number of new messages in the mailbox then plays back the new messages If the mailbox also contains old messages only new messages will be played back When the mailbox has no new messages the unit announces Mailbox No and No new messages All message playback t...

Page 68: ...s are played p 71 MEMO is displayed When the mailbox has no messages the unit announces Mailbox No and No messages During playback you can turn the Answering System on or off To turn the system on press 8 during playback To turn off press 0 1 Press the soft key A beep sounds and Please select Mailbox will be heard from the speaker To switch to the receiver press C To switch back to the speaker pre...

Page 69: ... 1 Press the soft key The unit stops playback If you need to edit the phone number to call back see page 39 2 Press the soft key C or s The unit dials the phone number To adjust the speaker volume To increase press B To decrease press d You can also adjust the receiver volume on the handset To repeat a message Base unit Press H Handset Press the soft key or 1 If pressed within the first 5 seconds ...

Page 70: ...essages in the mailbox All recorded messages except the greeting message can be erased at one time Information in the Caller List will not be erased To erase caller information see page 40 1 Press ERASE while the base unit is not being used To erase all messages please select Mailbox is heard 2 Within 10 seconds press the MAILBOX button MAILBOX 1 MAILBOX 2 or MAILBOX 3 You can also select the mail...

Page 71: ...Press MEMO Please select Mailbox is heard 2 Within 10 seconds press a MAILBOX button MAILBOX 1 MAILBOX 2 or MAILBOX 3 You can also select a mailbox by pressing the mailbox number 1 to 3 After the long beep talk clearly 20 cm away from the MIC The base unit display shows the elapsed recording time If the elapsed recording time exceeds 99 seconds the counter continues from 00 to indicate 100 seconds...

Page 72: ...dset Press HOLD INTERCOM during a call The call is put on hold 2 Press 9 to hang up the call The caller will then hear the greeting p 24 and while that message is playing the caller can press and the mailbox number 1 to 3 Then the caller will hear Please leave your message The caller can leave a message in the mailbox OR If the caller does not specify the mailbox the caller can leave a message in ...

Page 73: ...ssages Call your unit from a touch tone phone Enter the remote code p 74 during or after the greeting Mailbox 1 and the number of new messages of Mailbox 1 are heard and the new messages will be played To access Mailbox 2 or 3 press and the mailbox number 2 or 3 after entering the remote code The mailbox number and the number of new messages in the mailbox are heard and the new messages will be pl...

Page 74: ...en finished press OFF 1 Press MENU 2 Scroll to Initial setting by pressing d or B then press the soft key 3 Press the soft key at Set answering 4 Scroll to Remote code by pressing d or B then press the soft key 5 Enter a 2 digit remote code 00 99 6 Press the soft key If the handset beeps 3 times the entered remote code is the same as the password p 65 and cannot be used Start again from step 5 and...

Page 75: ... disconnected Press 1 to play back all messages Press 2 for other functions All Message Playback All recorded messages in the mailbox are played back At the end of the last message End of final message is heard Press 1 to play back new messages Press 2 for other functions New Message Playback Only new messages in the mailbox are played back At the end of the last message End of final message is he...

Page 76: ...of the greeting and you can start recording your message after the long beep 4 Plays back new messages 5 Plays back all messages 1 Repeats the current message If pressed within the first 5 seconds of playback the previous message will be played 2 Skips the current message 9 Stops the current operation To resume enter a direct command within 15 seconds or the voice menu will start p 75 7 Records a ...

Page 77: ...ly the Panasonic KX TCA88AL headset Connecting the optional headset Open the headset jack cover and insert the headset plug into the headset jack as shown below Only telecommunications compliance labelled headsets should be plugged into the headset jack on the handset To switch to the speakerphone while using the headset Press s To return to the headset press C B A While pressing the top of the cl...

Page 78: ...adaptor 2 Tuck the telephone line cord inside the wall mounting adaptor A Connect the telephone line cord B 3 Insert the hooks on the wall mounting adaptor into the holes A and B on the base unit To Power Outlet 1 2 A B A B TG5240AL fm Page 78 Friday June 11 2004 5 22 PM ...

Page 79: ...o place 5 Install screws using the wall template below Connect the telephone line cord Mount the unit then slide down Raise the antennas 6 To charge the handset battery Place the handset on the base unit The unit beeps once and the CHARGE indicator lights To Telephone Plug connected to Socket 8 3 cm Screws not included Wall Template 8 3 cm TG5240AL fm Page 79 Friday June 11 2004 5 22 PM ...

Page 80: ...Wall Mounting 80 To remove the wall mounting adaptor While pushing down the RELEASE LEVERS A remove the adaptor B 2 1 1 RELEASE LEVERS TG5240AL fm Page 80 Friday June 11 2004 5 22 PM ...

Page 81: ...er ID Handset 9 1 On 0 Off p 35 Copy phone book Copy 1 item 1 Go to Step 4 on page 46 Copy phone book Copy all items 2 Go to Step 4 on page 47 LCD contrast 0 1 1 6 Level 1 6 p 21 Key tone 0 2 1 On 0 Off p 59 Auto talk 0 3 1 On 0 Off p 21 Set area code 0 4 Go to Step 4 on page 22 Set dial mode 0 5 1 2 Tone p 23 Set recall time 0 5 2 1 700 ms 2 600 ms 3 400 ms 4 300 ms 5 250 ms 6 110 ms 7 100 ms 8 9...

Page 82: ... 0 6 5 Go to Step 5 on page 65 Room monitor Handset 0 9 1 On 0 Off p 56 Message alert 0 1 On 0 Off p 28 Ringer tone Base unit 0 1 1 3 Tone pattern 1 3 4 7 Melody pattern 1 4 p 20 Incoming call tone Base unit 0 2 1 On 2 Twice 0 Off p 61 Room monitor Base unit 0 3 1 On 0 Off p 56 Talking Caller ID Base unit 0 4 1 On 0 Off p 36 Handset registration 0 0 1 Go to Step 5 on page 84 Handset deregistration...

Page 83: ...ng steps 5 and 6 on page 84 1 Press MENU 2 Scroll to Initial setting by pressing d or B then press the soft key 3 Scroll to Registration by pressing d or B then press the soft key 4 Scroll to Deregistration by pressing d or B then press the soft key 5 Press 3 3 5 to delete the registration memory If you enter a wrong code re enter 3 3 5 6 Press the soft key The registration memory will be erased o...

Page 84: ...it p 83 start from step 5 1 Handset Press MENU 2 Handset Scroll to Initial setting by pressing d or B then press the soft key 3 Handset Scroll to Registration by pressing d or B then press the soft key 4 Handset Press the soft key at HS registration 5 Base unit Press and hold LOCATOR INTERCOM TRANSFER for 3 seconds The CHARGE indicator flashes After the CHARGE indicator starts flashing the rest of...

Page 85: ...tery p 14 Charge for 6 HRS The battery has been discharged The handset will not work Fully charge the battery p 14 No link to base Move closer to base and try again The handset has lost communication with the base unit Walk closer to the base unit and try again Confirm the base unit s AC adaptor is plugged in Raise the base unit antennas The handset s registration may have been cancelled Re regist...

Page 86: ...unit Walk closer to the base unit and try again Phone book full When you tried to store an item in the phone book the phone book memory was full Press OFF to exit programming mode To erase other items from the phone book see page 45 Incomplete Tom Jones 0987654321 Phone book full The name number is an example When the displayed item was sent to the destination handset the phone book memory was ful...

Page 87: ...nit The handset you tried to call has not been registered to the base unit Register the handset p 84 steps 5 and 6 Error 4 handsets have already been registered 4 handsets have already been registered to the base unit To cancel a handset s registration see page 83 You may have registered one of your handsets to another base unit without deleting its registration to this base unit Erase the handset...

Page 88: ... telephone line with ADSL service We recommend connecting a noise filter contact your ADSL service provider to the telephone line between the base unit and the telephone line jack The base unit and or handset does not ring The ringer volume is turned off Set to high medium or low p 18 19 If more than one other user is using the handset and or base unit the handset base unit may not ring Users will...

Page 89: ... pressing OFF The handset you called is too far from the base unit You cannot make an outside call when the dial lock is turned on To turn the mode off see page 63 Set the dialling mode to Tone p 23 You cannot redial If the last number dialled was more than 48 digits long the number will not be redialled correctly The REDIAL PAUSE button on the base unit functions as either redial or pause It will...

Page 90: ...oise filter contact your ADSL service provider to the telephone line between the base unit and the telephone line jack The handset and or base unit does not announce the displayed caller s name The handset and or base unit ringer volumes are turned off Set to high medium or low p 18 19 The Talking Caller ID feature is turned off Turn it on p 35 The handset and or base unit does not announce the di...

Page 91: ...ox from the base unit or the handset If more than one other user is using the handset and or base unit you may not be able to access the mailbox Try again later If another user is listening to messages or the Answering System is handling a call you cannot access the mailbox Try again later You cannot access a mailbox from a touch tone phone Make sure you entered the correct remote code p 74 If Ent...

Page 92: ...unit Press PROGRAM MUTE and 9 0 0 0 Please note that the following settings will return to the factory preset with the Mailbox 2 and 3 passwords You cannot reset the above settings to the factory preset if the dial lock is turned on p 62 If you forget your password of dial lock consult your nearest Panasonic service centre Problem Cause Remedy Function Factory preset Date time Recall time 100ms Li...

Page 93: ...curs the date and time setting may be erased Set the date and time again p 17 Recharge battery is displayed 3 flashes or the handset beeps intermittently Fully charge the battery p 13 Charge for 6 HRS and 4 are displayed and the handset does not work The battery has been discharged Fully charge the battery p 14 You charged the battery fully but Recharge battery is still displayed and or 3 continue...

Page 94: ...illed into the unit Do not subject this unit to excessive smoke dust mechanical vibration or shock 3 Place the unit on a flat surface For best performance 1 If noise prevents the conversation from being understood at the handset approach the base unit to lessen the noise 2 The handset should be used at the HIGH volume setting when the reception audio is difficult to hear 3 The handset should be fu...

Page 95: ... working phone operates properly do not reconnect the unit to the telephone line until the fault has been repaired If the known working phone does not operate properly consult your telephone company This equipment has been tested and found to comply with AS NZS 3548 1995 limits for electromagnetic interference Any modifications to any part of the system or to any peripherals may void the EMC compl...

Page 96: ... existing telephone you must first remove its plug from the line socket You can then insert the plug of your Permitted Attachment into the socket and use your equipment If the plug of your existing telephone cannot be readily removed you will have to remove the screw securing it To do this proceed as follows 1 Loosen screw A sufficiently to remove the socket cover See Fig 1 2 Remove screw B and wi...

Page 97: ...before you call for service Disconnect the Permitted Attachment and try using the service with the normal telephone If the telephone service then operates satisfactorily the fault is in your Permitted Attachment Leave the Permitted Attachment disconnected and report the fault to its supplier or agent to arrange for repair If when using the telephone the service is still faulty report the fault to ...

Page 98: ...curity Codes 1 000 000 N Base Unit Power Supply AC adaptor 230 240 V AC 50 Hz Power Consumption Standby Approx 2 5 W Maximum Approx 6 0 W Frequency 5 76 GHz 5 84 GHz Dimensions H x W x D Approx 107 mm x 251 mm x 135 mm Mass Weight Approx 480 g N Operating Environment 5 C 40 C Specifications are subject to change without notice TG5240AL fm Page 98 Friday June 11 2004 5 22 PM ...

Page 99: ...TG5240AL fm Page 99 Friday June 11 2004 5 22 PM ...

Page 100: ...1 Garigal Road Belrose NSW 2085 Australia Manufacturer Panasonic Communications Co Ltd 1 62 4 chome Minoshima Hakata ku Fukuoka 812 8531 Japan 2004 Panasonic Communications Co Ltd All Rights Reserved PQQX14275YA S0504 1064 N52 TG5240AL fm Page 100 Friday June 11 2004 5 22 PM ...

Reviews: