background image

Preparation

8

Displays

Display icons

Various icons appear on the handset display 
to indicate the current status of the unit.
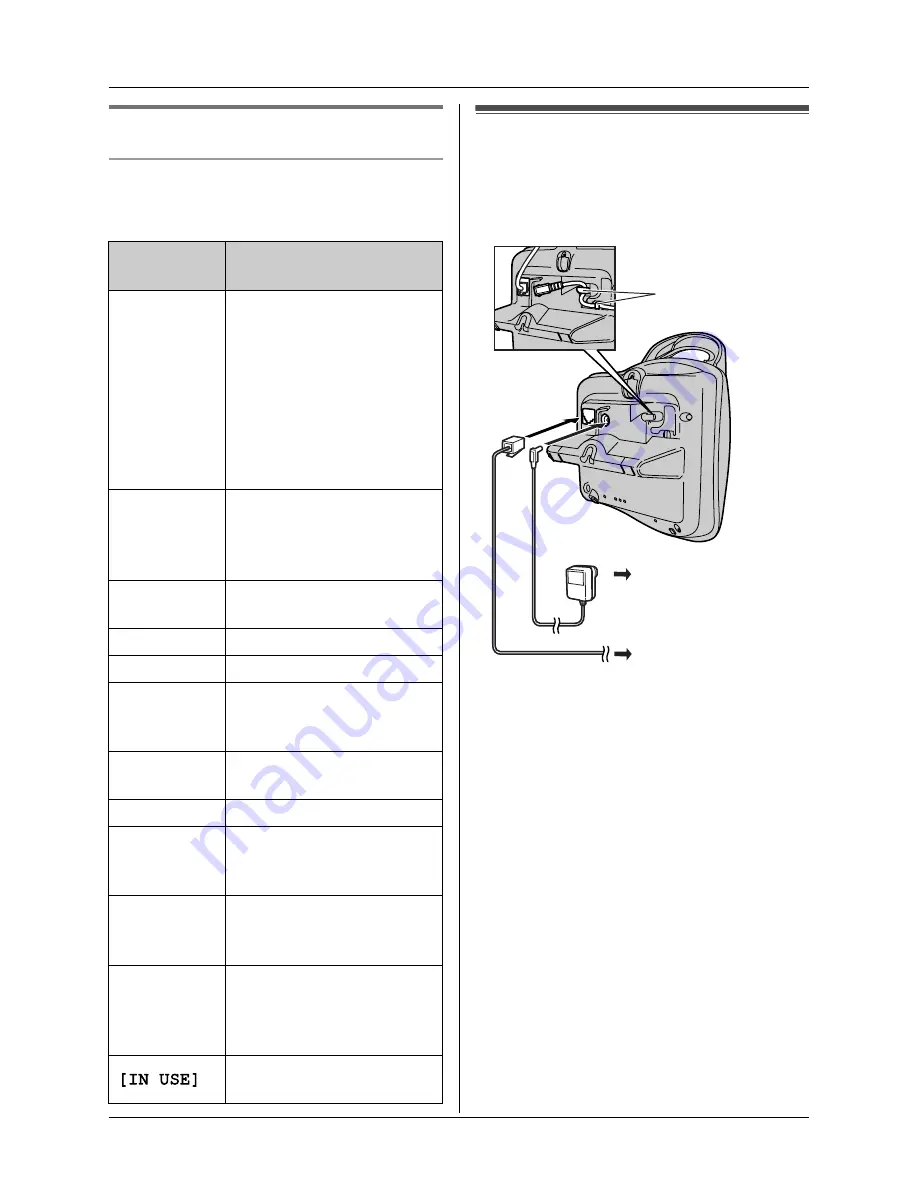
Connections

When the AC adaptor is connected, a short 
beep will be heard. If it is not heard, check 
the connections.

Important:

L

Use only the AC adaptor and telephone 
line cord supplied with this unit.

Note:

L

After connection, you must charge the 
batteries to make or answer calls (page 
9).

L

Never install telephone wiring during a 
lightning storm.

L

The AC adaptor must remain connected 
at all times. (It is normal for the adaptor to 
feel warm during use.)

L

The AC adaptor should be connected to a 
vertically oriented or floor-mounted AC 
outlet. Do not connect the AC adaptor to a 
ceiling-mounted AC outlet, as the weight 
of the adaptor may cause it to become 
disconnected.

Display 
icon

Meaning

w

Within range of a base 
unit

L

When flashing: 
Handset is searching 
for base unit. (out of 
range of base unit, 
handset is not 
registered to base unit, 
no power on base unit)

L

Handset is accessing 
base unit. (intercom, 
paging, changing base 
unit settings, etc.)

k

Handset is on an outside 
call.

o

Call bar is on. (page 22)

5

Battery strength

[VE]

Voice enhancer is set to 
high or low tone. (page 
13)

[N]

Night mode is on. (page 
20)

[X]

Key lock is on. (page 13)

[2]

Handset number: The left 
icon shows handset 2 
example. (page 21)

-2-

Base unit number: The 
left icon shows base unit 
2 example. (page 21)

0

New call minder 
message received (call 
minder users only; page 
31)

Line is being used by 
another handset.

(220

240 V, 50 Hz)

To telephone 
network

Hooks

Summary of Contents for KX-TG1810NZ

Page 1: ...mber you must subscribe to Caller ID service Charge the batteries for about 7 hours before initial use Please read these operating instructions before using the unit and save them for future reference Operating Instructions Model No KX TG1810NZ Digital Cordless Phone ...

Page 2: ...one For your future reference Attach or keep original receipt to assist with any repair under warranty Note L In the event of problems you should contact your equipment supplier in the first instance Serial No found on the bottom of the base unit Date of purchase Name and address of dealer ...

Page 3: ...ge 15 can help you identify who is calling by using different ringtones for different categories of callers page 29 Night mode Night mode allows you to select a block of time during which the handset base unit will not ring useful if you do not want to be disturbed for example while sleeping Night mode can be set independently for the handset page 20 and base unit page 25 Polyphonic ringtones for ...

Page 4: ...Guide to handset settings 18 Time settings 19 Ringer setup 19 Night mode 20 Display setup 21 Call options 22 Other options 22 Base Unit Settings Guide to base unit settings 24 Ringer setup 25 Call options 26 Other options 28 Caller ID Service Using Caller ID service 29 Caller list 30 Call minder 31 Multi unit Operation Operating additional units 32 Registering a handset to a base unit 32 Intercom ...

Page 5: ...rectly in all respects with another item of Telepermitted equipment of a different make or model nor does it imply that any product is compatible with all of Telecom s network services Important Notice Under power failure conditions this telephone may not operate Please ensure that a separate telephone not dependent on local power is available for emergency use AC adaptor PQLV19AL Telephone line c...

Page 6: ...installed near the unit and is easily accessible Warning L To prevent the risk of electrical shock do not expose this product to rain or any other type of moisture Location L For maximum distance and noise free operation place your base unit Away from electrical appliances such as TVs radios personal computers or other phones In a convenient high and central location Battery caution L We recommend...

Page 7: ...o return to the previous screen or move the cursor to the left G s Speakerphone H R Recall I Receiver J Display K R Redial Pause L ih Off Power M C T Clear Mute N INT Intercom O Microphone Note L Up to 3 menu items can be displayed at a time To select a menu item not shown on the current page scroll up or down by pressing the navigator key e or v respectively Base unit A x Page B Charge contact C ...

Page 8: ...et Do not connect the AC adaptor to a ceiling mounted AC outlet as the weight of the adaptor may cause it to become disconnected Display icon Meaning w Within range of a base unit L When flashing Handset is searching for base unit out of range of base unit handset is not registered to base unit no power on base unit L Handset is accessing base unit intercom paging changing base unit settings etc k...

Page 9: ...warm during charging L It takes 7 hours to fully charge the batteries however you can use the handset before the batteries are fully charged L Clean the charge contacts page 7 of the handset and base unit with a soft dry cloth once a month otherwise the batteries may not charge properly Clean more often if the unit is exposed to grease dust or high humidity Battery strength Note L When 7 flashes r...

Page 10: ...hargeable batteries noted on page 5 If you install non rechargeable batteries and start charging the batteries may leak electrolyte L Do not mix old and new batteries 1 Press the notch on the handset cover firmly and slide it in the direction of the arrow 2 Remove the old batteries positive S terminal first and install the new ones See page 9 for battery installation Turning the power on off Power...

Page 11: ...ng 2 digits for each L You can select AM PM or 24 hour time entry by pressing repeatedly Example 3 30 PM Press 0 3 3 0 then press repeatedly until 03 30 PM is displayed 7 Press j OK 8 Press ih Note L To correct a digit press or to move the cursor then make the correction L The date and time may be incorrect after a power failure In this case set the date and time again ...

Page 12: ...gits max can be redialled To redial the last number dialled Press R then press C or s L If s is pressed the unit will redial automatically if the other party s line is engaged Note L You can also press C or s before pressing R To make a call using the redial list The last 10 phone numbers dialled are stored in the redial list 1 Press R L The last number dialled will be displayed 2 Press e or v rep...

Page 13: ...ct Save then press 8 Press ih Other features Voice enhancer You can change the tone quality of the receiver while you are on a call 3 settings are available 1 Press j OK during a call 2 Select the desired setting then press Note L If you select High Tone or Low Tone VE is displayed Mute You can mute your voice during a conversation While mute is turned on you will be able to hear the other party b...

Page 14: ...ou hear a dial tone 1 Press 0 2 Press R 3 Dial the phone number then press C or s Note L Pressing R 1 time creates 1 pause Press R repeatedly to create longer pauses To change pause length see page 26 Answering calls 1 Lift the handset and press C or s when the unit rings L You can also answer a call by pressing any dial key from 0 to 9 or INT Any key answer feature 2 When finished talking press i...

Page 15: ...mbers or characters Categories Categories can help you find entries in the phonebook quickly and easily When adding an entry to the phonebook you can assign it to the desired category You can change the names of categories assigned for phonebook entries Friends Family etc and then search for phonebook entries by category Additional category features are available for Caller ID subscribers page 29 ...

Page 16: ...lect Edit then press 3 Edit the name if necessary 16 characters max see page 37 for character entry then press j OK 4 Edit the phone number if necessary 24 digits max then press j OK 5 Select the desired category then press 6 Select Save then press 7 Press ih Erasing entries from the phonebook Erasing an entry 1 Find the desired entry page 15 then press j OK 2 Select Erase then press 3 Select Yes ...

Page 17: ...y to select the desired entry L To search by first character index search see page 15 To search by category see page 16 3 Press to dial the number Copying phonebook entries to other handsets Phonebook entries page 15 can be copied from the handset to the phonebook of a compatible Panasonic handset Copying one entry 1 Find the desired entry page 15 then press j OK 2 Select Copy then press 3 Enter t...

Page 18: ...nu Sub menu Sub menu 2 Default setting Page Time Settings Set Date Time page 10 Alarm Off page 19 Ringer Setup Ringer Volume Maximum page 19 Ext Ringtone Ringtone 1 page 19 Int Ringtone Ringtone 1 page 19 Night Mode Start End 23 00 06 00 page 20 On Off Off page 20 Ring Delay 60 sec page 20 Select Category page 21 Display Setup Standby Display Off page 21 Select Language English page 21 Contrast Le...

Page 19: ...r intercom mode the alarm will not sound until the call has ended L The alarm will sound at the set time even when the ringer volume is turned off L If you select Once the setting will change to Off after the alarm sounds Ringer setup Ringer volume 1 Press j OK 2 Select Handset Setup then press 3 Select Ringer Setup then press 4 Select Ringer Volume then press 5 Press e or v repeatedly to select t...

Page 20: ... to start this feature by selecting 2 digits for each L If you use 12 hour time entry select AM or PM by pressing repeatedly before entering the time 7 Enter the desired hour and minute you wish to end this feature by selecting 2 digits for each L If you use 12 hour time entry select AM or PM by pressing repeatedly before entering the time 8 Press j OK 9 Press ih Turning night mode on off 1 Press ...

Page 21: ...the current date and time are displayed 1 Press j OK 2 Select Handset Setup then press 3 Select Display Setup then press 4 Select Standby Display then press 5 Select the desired setting then press 6 Press ih Note L If Base Number is selected and the current base unit number is 2 2 is displayed L If Handset Number is selected and the current handset number is 2 2 is displayed Changing the display l...

Page 22: ...then press 3 Select Call Options then press 4 Select Auto Talk then press 5 Select On or Off then press 6 Press ih Other options Changing the handset PIN Personal Identification Number For security the handset PIN must be entered when changing certain settings The default PIN is 0000 Important L If you change the PIN please make note of your new PIN The unit will not reveal the PIN to you If you f...

Page 23: ...press 4 Select Reset Handset then press 5 Enter 0000 default handset PIN L If you changed the PIN enter it page 22 6 Select Yes then press 7 Press ih Note L The following items will be deleted or reset to their default settings Settings listed on page 18 Redial list Voice enhancer Category names Category ringtones L The following items will be retained Phonebook entries category names and ringtone...

Page 24: ... the current page scroll up or down by pressing the navigator key e or v respectively Base unit settings menu Sub menu Sub menu 2 Default setting Page Ringer Setup Ringer Volume Medium page 25 Night Mode Start End 23 00 06 00 page 25 On Off Off page 25 Ring Delay 60 sec page 25 Call Options Recall 600 msec page 26 Pause Length 3 sec page 26 Emergency No 111 911 999 page 26 ARS Settings Area Code p...

Page 25: ...Select Start End then press 7 Enter the desired hour and minute you wish to start this feature by selecting 2 digits for each L If you use 12 hour time entry select AM or PM by pressing repeatedly before entering the time 8 Enter the desired hour and minute you wish to end this feature by selecting 2 digits for each L If you use 12 hour time entry select AM or PM by pressing repeatedly before ente...

Page 26: ...ress j OK 2 Select Base Unit Setup then press 3 Enter 0000 default base unit PIN L If you changed the PIN enter it page 28 4 Select Call Options then press 5 Select Pause Length then press 6 Select the desired setting then press 7 Press ih Storing changing emergency numbers These settings determine which phone numbers can be dialled while the call bar feature is on page 22 1 Press j OK 2 Select Ba...

Page 27: ...ational Call to other areas of the South Island Setting call restriction You can restrict selected handsets from dialling certain numbers You can assign up to 6 phone numbers to be restricted and select which handsets will be restricted Storing area codes here will prevent the restricted handsets from dialling any phone number in that area code If a restricted number is dialled the call will not b...

Page 28: ...lt base unit PIN L If you changed the PIN enter it 4 Select Other Options then press 5 Select Base Unit PIN then press 6 Enter the new 4 digit base unit PIN then press j OK 7 Press ih Resetting the base unit to its default settings 1 Press j OK 2 Select Base Unit Setup then press 3 Enter 0000 default base unit PIN L If you changed the PIN enter it page 28 4 Select Other Options then press 5 Select...

Page 29: ... is received and it matches a phone number stored in the unit s phonebook The stored name will be displayed and logged in the caller list The handset will use the ringtone assigned to the caller s category L If the unit is connected to a PBX system you may not receive the caller information L When the caller dialled from an area which does not provide Caller ID service Out of Area will be displaye...

Page 30: ...g back The caller s telephone number which is sent to your telephone from your local telephone exchange includes 0 and an area code prefix For local calls 0 and the area code prefix can be omitted 1 Press j OK 2 Select Caller List then press 3 Press e or v repeatedly to display the desired entry 4 To add a number Press the dial key 0 to 9 L The number you pressed is added to the top of the current...

Page 31: ...r you when you are unavailable to answer the phone or when your line is busy Messages are recorded by the service provider not your telephone When you have new messages 0 will be displayed on the handset Please consult your service provider for details of this service Note L If 0 still remains on the display even after you have listened to new messages turn it off by pressing and holding C T for 2...

Page 32: ... calls and call transfers are only possible between handsets in the same radio cell Registering a handset to a base unit To register an additional handset to a base unit easy registration The included handset and base unit are preregistered After purchasing an additional handset register it to the base unit Ensure that the additional handset is switched on If it is not on press and hold ih for few...

Page 33: ...y use any available base unit it is registered to When a specific base unit is selected the handset will make and receive calls using that base unit only If the handset is out of range of that base unit no calls can be made 1 Press j OK 2 Select Handset Setup then press 3 Select Select Base then press 4 Select the desired base unit number or Auto then press L The handset starts searching for the b...

Page 34: ... page 33 Increasing the range of the base unit You can increase the range of the base unit by using a DECT repeater Please use only the Panasonic DECT repeater noted on page 5 Consult your Panasonic dealer for details Important L Before registering the repeater to this base unit you must turn the repeater mode on Turning the repeater mode on off 1 Press j OK 2 Select Base Unit Setup then press 3 E...

Page 35: ...o return to the outside call 2 Handset 2 Press C or s to answer the page L Handset 2 can talk with handset 1 3 Handset 1 To complete the call transfer press ih To establish a conference call press 3 Transferring a call without speaking to the other handset user 1 During an outside call press INT then press the desired handset number L The other handset rings if it is within range of the base unit ...

Page 36: ...ake sure the screws are securely fastened to the wall L Do not pinch the telephone line cord and AC adaptor cord between the base unit and the wall L Use the following wall template to position the screws before drilling 60 mm Screws Hooks 60 mm ...

Page 37: ...ry screen Press or to move the cursor Press dial keys to enter characters and numbers Press C T to erase the character or number highlighted by the cursor Press and hold C T to erase all characters or numbers Press to switch between uppercase and lowercase To enter another character located on the same dial key press to move the cursor to the next space then press the appropriate dial key Characte...

Page 38: ...ormation 38 Extended 1 character table N L The following are used for both uppercase and lowercase Extended 2 character table O L The following are used for both uppercase and lowercase Cyrillic character table P ...

Page 39: ...on w is flashing L The handset is not registered to the base unit Register it page 32 L The handset is too far from the base unit Move closer L The AC adaptor is not connected Check the connections The handset display is blank L The handset is not turned on Turn the power on page 10 The handset will not turn on L Make sure that the batteries are installed correctly page 9 L Fully charge the batter...

Page 40: ...the handset ringer volume page 19 and the base unit ringer volume page 25 L The night mode feature is turned on Turn it off page 20 25 The batteries should be charging but the battery icon does not change L Clean the charge contact and charge again page 9 L The AC adaptor is disconnected Plug in the AC adaptor A busy tone is heard when C is pressed L The handset is too far from the base unit Move ...

Page 41: ...ce L Your unit is connected to a telephone line with ADSL JetStream service We recommend that you contact your ADSL service provider to have an ADSL Splitter installed We do not recommend the use of generic ADSL filters While viewing caller information the display returns to standby mode L Do not pause for over 1 minute while searching I cannot register a handset to a base unit L The maximum numbe...

Page 42: ...t Keying RF transmission power Approx 250 mW Power source 220 240 V 50 Hz Power consumption Base unit Standby Approx 3 5 W Maximum Approx 9 2 W Operating conditions 5 C 40 C 20 80 relative air humidity dry Dimensions Base unit Approx 111 mm 121 mm 123 mm Handset Approx 148 mm 48 mm 32 mm Mass weight Base unit Approx 200 g Handset Approx 130 g Note L Specifications are subject to change L The illus...

Page 43: ...andby mode 21 E Emergency numbers 26 H Handset Additional handsets 32 Cancelling 33 Locator 14 PIN 22 Power on off 10 Registration 32 Resetting 23 Settings 18 I Intercom 34 K Key lock 13 Keytones 22 M Making calls 12 Missed calls 29 Mute 13 N Night mode Base unit 25 Handset 20 O One touch dial 16 P Pause 14 26 Phonebook 15 Copying 17 Editing 16 Erasing 16 Making calls 15 Storing 15 PIN Base unit 2...

Page 44: ...8 Lu Nanping Keji Gongye Yuan Zhuhai Guangdong China 519060 Copyright This material is copyrighted by Panasonic Communications Co Ltd and may be reproduced for internal use only All other reproduction in whole or in part is prohibited without the written consent of Panasonic Communications Co Ltd 2005 Panasonic Communications Co Ltd All Rights Reserved Customer Support Centre Tel No 09 272 0178 ...

Reviews: