background image

4.1  Connecting the PC

The Maintenance Console serves as an overall system programming tool for the PBX. The Maintenance
Console’s Quick Setup lets you easily configure the PBX to receive intercom and trunk calls, as well as apply
basic settings such as time and date.
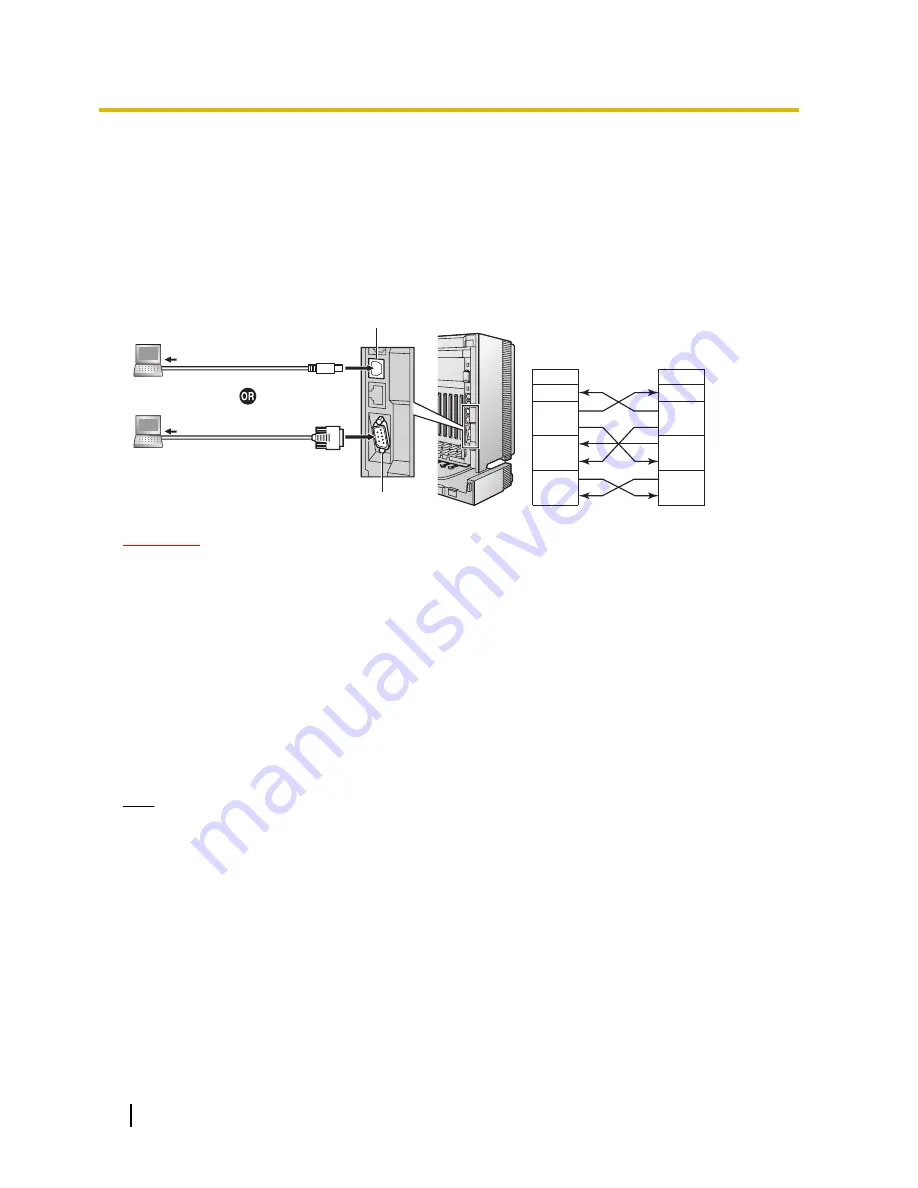
To programme the PBX, connect it to the PC with serial interface.

Serial Interface Connection

RS-232C (Cross Cable)

Pin Assignments

Pin No.

2
3
4
5
6
7
8

Pin No.

2
3
4
5
6
7
8

RS-232C Port

COM Port

PC

USB Port

To USB Port

To COM Port

RS-232C Port

PC

CAUTION

When connecting a PC to the PBX via the RS-232C port, it is necessary to keep the following in mind to
protect the system:

1.

Make sure that both connector cases (frame ground) of the RS-232C cross cable (shielded cable)/USB
cable are conductive. If they are not conductive, make sure that both connector cases of the cable are
firmly connected.

2.

If this is not possible, connect the frame of the PBX to the frame of the PC using an earthing wire in
order to prevent difference in the electrical potentials.

4.2  Installing the Maintenance Console

For the system requirements of the PC (e.g., operating system, hardware specifications), refer to
"3.3.1  Installing and Starting the Maintenance Console" in the Installation Manual.

Note

Make sure to install and use the latest version of the Maintenance Console.

To connect the PC to the PBX via USB, the KX-TDA USB driver must be installed. Follow the
instructions of the wizard to install the KX-TDA USB driver. When the PBX is first connected to the PC
via USB, you may be asked to select the appropriate USB driver. Browse for and select the KX-TDA
USB driver that was installed previously.

The contents and design of the software are subject to change without notice.

Microsoft product screen shot(s) reprinted with permission from Microsoft Corporation.

1.

Copy the setup file of the Maintenance Console to your PC.

2.

Double-click the setup file to run the installer.

3.

Follow the on-screen instructions provided by the installation wizard.

22

Getting Started

4.2 Installing the Maintenance Console

WWW.ERTEBATGROUP.COM

WWW.ERTEBATGROUP.COM

Summary of Contents for KX-TDA100D

Page 1: ...ed Thank you for purchasing a Panasonic Hybrid IP PBX Please read this manual carefully before using this product and save this manual for future use KX TDA100D PDMPR Software File Version 5 1000 or l...

Page 2: ...2 2 4 Installing the Trunk Cards 13 2 5 Installing the Extension Cards DLC8 DLC16 MCSLC16 MCSLC24 16 2 6 Connecting Extensions 16 2 7 Frame Earth Connection 17 3 Starting the PBX 19 3 1 Starting the P...

Page 3: ...Section 1 Before Installation Getting Started 3 WWW ERTEBATGROUP COM WWW ERTEBATGROUP COM...

Page 4: ...to property The notices are classified as follows according to the severity of injury or damage WARNING This notice means that misuse could result in death or serious injury CAUTION This notice means...

Page 5: ...Trunk E1 KX TDA0188 T1 KX TDA0187 E M Line E M Line E M Line E M8 KX TDA0184 DID8 KX TDA0182 PSU Installed by default OPB3 KX TDA0190 DPH4 KX TDA0161 DPH2 KX TDA0162 ECHO16 KX TDA0166 MSG4 KX TDA0191...

Page 6: ...R card 2 2 1 The type of the AC cord may vary depending on the country area of use KX TDA100DBP is supplied with 2 types of AC cord Please use whichever is appropriate for the country area 2 The large...

Page 7: ...r DSS Console The maximum length of the cable may vary depending on the type of cable and installation conditions An RS 232C or USB cable for PC connection Connectors Amphenol RJ45 BNC for trunk and e...

Page 8: ...8 Getting Started 1 3 Unpacking WWW ERTEBATGROUP COM WWW ERTEBATGROUP COM...

Page 9: ...Section 2 Installation Getting Started 9 WWW ERTEBATGROUP COM WWW ERTEBATGROUP COM...

Page 10: ...nticlockwise to loosen 2 Slide the front cover to the right until it stops then lift the front cover Closing the Front Cover 1 Hook the front cover onto the shelf line up the protrusions on the cover...

Page 11: ...l the customer data The SD Memory Card must be inserted before startup DMPR Card SD CARD 2 SD CARD 4 5 SD CARD SD Memory Card 3 1 CAUTION Do not remove the SD Memory Card while power is supplied to th...

Page 12: ...n earthing strap Make sure the screws are tightened to earth the card securely Installing the Trunk Extension Cards 1 Insert the card along the guide rails 2 Holding the card as shown below push the r...

Page 13: ...2 2 6 Installing Removing the Optional Service Cards of the Installation Manual 2 4 Installing the Trunk Cards LCOT4 LCOT8 LCOT16 CLCOT8 Card Example LCOT 16 Card Amphenol To trunk Accessories includ...

Page 14: ...or 2 BRI8 card User supplied not included RJ45 connector CAUTION Connect these optional service cards to the trunk through an NT1 do not connect to the U interface of the trunk directly Notice When c...

Page 15: ...not connect to the U interface of the trunk directly Notice When connecting the RJ45 connector attach the included ferrite core Note In some countries areas the PRI30 card must not be connected to the...

Page 16: ...2 Ferrite core 1 User supplied not included Amphenol connector Note Attach the included ferrite core to the cable 2 6 Connecting Extensions Example KX T7600 Series DPT Pin Assignments To extension ca...

Page 17: ...effects of external noise in the case of a lightning strike The earthing wire of the AC cable has an effect against external noise and lightning strikes but it may not be enough to protect the PBX A p...

Page 18: ...18 Getting Started 2 7 Frame Earth Connection WWW ERTEBATGROUP COM WWW ERTEBATGROUP COM...

Page 19: ...Section 3 Starting the PBX Getting Started 19 WWW ERTEBATGROUP COM WWW ERTEBATGROUP COM...

Page 20: ...of the DMPR card before startup Note The PBX will continue to be powered even if the power switch is turned OFF 1 Slide the System Initialise Switch to the INIT position INIT NORMAL System Initialise...

Page 21: ...Section 4 Customising the PBX Getting Started 21 WWW ERTEBATGROUP COM WWW ERTEBATGROUP COM...

Page 22: ...n earthing wire in order to prevent difference in the electrical potentials 4 2 Installing the Maintenance Console For the system requirements of the PC e g operating system hardware specifications re...

Page 23: ...onal information which includes updates to this and other manuals b Click OK to close this window 4 a Enter the Installer Level Programmer Code default INSTALLER b Click OK 5 Click Connect 6 a Select...

Page 24: ...ctions of the Quick Setup wizard and assign the basic items Quick Setup The system menu appears You may now begin programming the PBX 24 Getting Started 4 3 Programming the PBX WWW ERTEBATGROUP COM WW...

Page 25: ...menu bar 3 a Click Check to turn on the BRI card b Click OK 4 a Enter the subscriber number for the desired ports in Subscriber b Click Execute Note Network settings are automatically set c Click Che...

Page 26: ...ng 1 Under CO Incoming Call click DDI DID Table 2 Configure the settings as required 3 Click OK For ISDN trunk users MSN Setting 1 Under CO Incoming Call click DIL Table Port Settings 2 Click the DDI...

Page 27: ...5 For DPT Type set the Type to DSS and assign the Location No 6 Click OK 7 Under Extension click DSS Console 8 Select the desired pair extension number from Pair Extension 9 Assign features to flexib...

Page 28: ...28 Getting Started 4 3 Programming the PBX WWW ERTEBATGROUP COM WWW ERTEBATGROUP COM...

Page 29: ...Section 5 Confirming the Connection Getting Started 29 WWW ERTEBATGROUP COM WWW ERTEBATGROUP COM...

Page 30: ...f hook Talk Dial extension number extension no To call an outside party Off hook Talk Dial outside phone number Enter automatic line access number 9 0 outside phone no 30 Getting Started 5 1 Making Ca...

Page 31: ...S Panasonic System Networks Co Ltd declares that this equipment is in compliance with the essential requirements and other relevant provisions of Radio Telecommunications Terminal Equipment R TTE Dire...

Page 32: ...nasonic System Networks Co Ltd and may be reproduced for internal use only All other reproduction in whole or in part is prohibited without the written consent of Panasonic System Networks Co Ltd Pana...

Reviews: