background image

2.3 Installing Optional Service Cards

50

Installation Manual

2.3.8

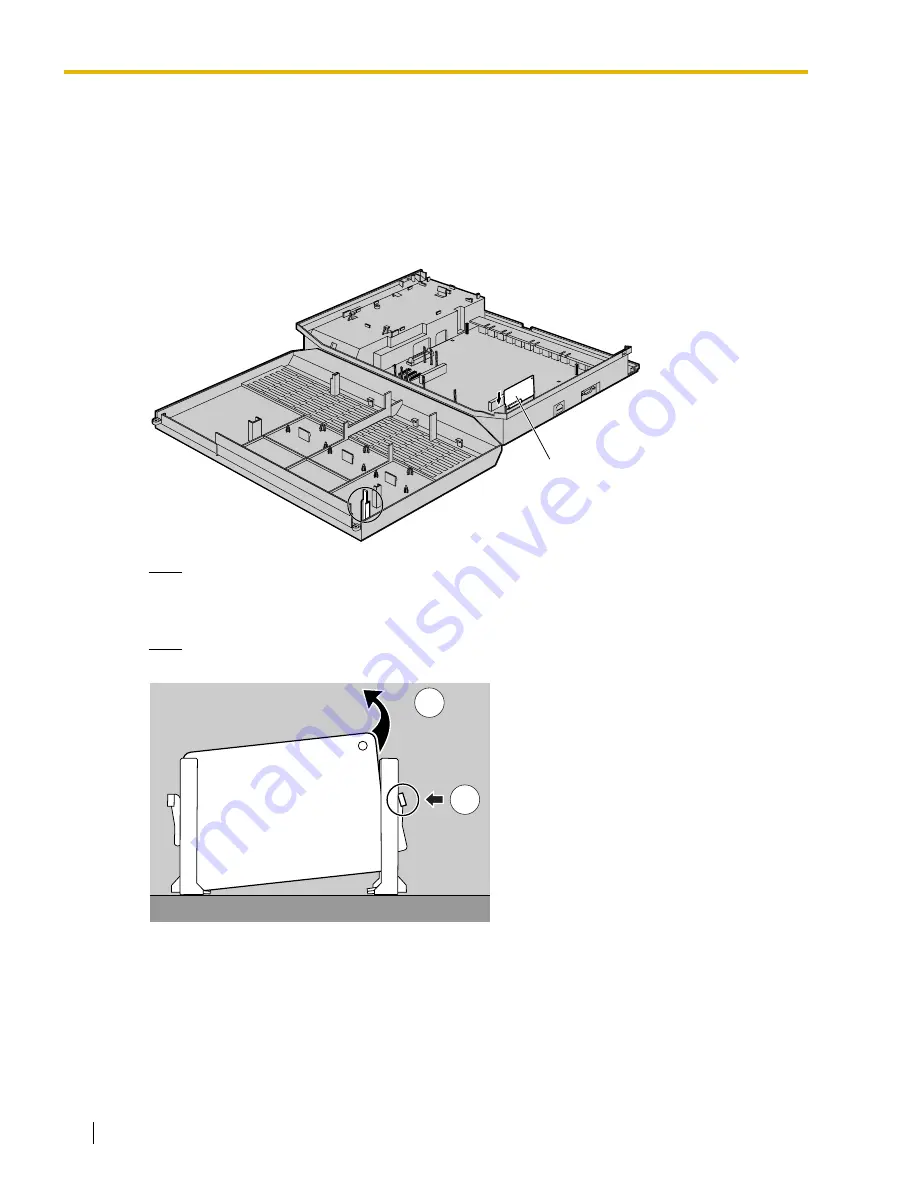
2-Channel Voice Message Card (KX-TA82492)

Function

Provides 60 minutes of recording time (2 channels) for messages using the Built-in Voice Message 
Feature.

1.

Loosen the screws and open the top and bottom front covers. (

 2.2.3 Opening/Closing Covers)

2.

Slide the card between the guiderails until it clicks, and attach the connector to it.

Note

Use extra care to make sure you do not damage the part of the case marked with a circle.

3.

Close the covers and secure the screws. (

 2.2.3 Opening/Closing Covers)

Note

To uninstall the card, follow the instructions illustrated below.

1.

Push the catch on the side of one guardrail in the direction of the arrow to release it.

2.

Lift the edge of the card while holding the catch open. (Do not touch the circuit board of the card 
during the operation.)

KX-TA82492

1

2

Summary of Contents for KX-TA82492 - Voice Message Expansion Card

Page 1: ...o KX TA824 Thank you for purchasing a Panasonic Advanced Hybrid System Please read this manual carefully before using this product and save this manual for future use Advanced Hybrid System Installation Manual ...

Page 2: ...Port Doorphone Card KX TA82470 8 Port Hybrid Extension Card KX TA82481 2 Port Analog CO Line and 8 Port Hybrid Extension Card KX TA82483 3 Port Analog CO Line and 8 Port Hybrid Extension Card KX TA82491 Message Expansion Card for DISA OGMs KX TA82492 2 Channel Voice Message Card KX TA82493 3 Port Caller ID Card Proprietary Equipment KX T30865 Doorphone Expandability of Outside CO Lines and Extensi...

Page 3: ...Installation Manual 3 Wireless PTs such as KX T7885 and KX TD7895 For the equipment that can be connected to the PBX refer to 1 2 2 System Connection Diagram ...

Page 4: ...stalled Do not bypass this safety feature by tampering with the plug 9 Do not allow anything to rest on the power cord Do not locate this product where the power cord may be stepped on or tripped on 10 To reduce the risk of fire or electric shock do not overload wall outlets and extension cords 11 Do not insert objects of any kind into this product through its slots and openings as they may touch ...

Page 5: ...h abrasive powders or with chemical agents such as benzene or thinner WARNING THIS UNIT MAY ONLY BE INSTALLED AND SERVICED BY QUALIFIED SERVICE PERSONNEL IF DAMAGE TO THE UNIT EXPOSES ANY INTERNAL PARTS DISCONNECT THE POWER SUPPLY CORD IMMEDIATELY AND RETURN THE UNIT TO YOUR DEALER UNPLUG THIS UNIT FROM THE AC OUTLET IF IT EMITS SMOKE AN ABNORMAL SMELL OR MAKES UNUSUAL NOISE THESE CONDITIONS CAN C...

Page 6: ...rence Please print record and retain the following information for future reference Note The serial number of this product can be found on the label affixed to the unit You should record the model number and the serial number of this unit as a permanent record of your purchase to aid in identification in the event of theft MODEL NO SERIAL NO DATE OF PURCHASE NAME OF DEALER DEALER S ADDRESS DEALER ...

Page 7: ...tarting the PBX About the Other Manuals The following manuals are also available Feature Manual The Feature Manual explains what the PBX can do as well as how to obtain the most of its many features and facilities Programming Manual The Programming Manual explains how to program the PBX using Panasonic proprietary telephones PTs or the KX TA Maintenance Console Operating Manual The Operating Manua...

Page 8: ...e format US ACJMF04BKX TA824 The digits represented by 04 are the REN without a decimal point e g 04 is a REN of 0 4 For earlier products the REN is separately shown on the label 3 Incidence of Harm to the Telephone Lines If this equipment causes harm to the telephone network the telephone company will notify you in advance that temporary discontinuance of service may be required But if advance no...

Page 9: ... to correct the interference by one or more of the following measures Reorient or relocate the receiving antenna Increase the separation between the equipment and receiver Connect the equipment into an outlet on a circuit different from that to which the receiver is connected Consult the dealer or an experienced radio TV technician for help CAUTION Any changes or modifications not expressly approv...

Page 10: ...ion Card KX TA82483 38 2 3 3 2 Port Analog CO Line and 8 Port Hybrid Extension Card KX TA82481 40 2 3 4 8 Port Hybrid Extension Card KX TA82470 43 2 3 5 3 Port Caller ID Card KX TA82493 45 2 3 6 4 Port Doorphone Card KX TA82461 47 2 3 7 Message Expansion Card for DISA OGMs KX TA82491 48 2 3 8 2 Channel Voice Message Card KX TA82492 50 2 4 Connecting Outside CO Lines 52 2 4 1 Connecting Outside CO ...

Page 11: ... 2 Connection 72 3 2 1 Connection 72 3 2 2 Starting KX TA Maintenance Console for the first time 75 3 2 3 Accessing PBX via Internal Modem 76 4 Troubleshooting 79 4 1 Troubleshooting 80 4 1 1 Installation 80 4 1 2 Connection 81 4 1 3 Operation 82 4 1 4 System Restart 83 4 1 5 System Reset with System Data Clear 84 Index 85 ...

Page 12: ...12 Installation Manual ...

Page 13: ...Installation Manual 13 Section 1 System Outline This section provides general information on the PBX including system capacity and specifications ...

Page 14: ...t or USB port using the KX TA Maintenance Console software Quick Setup Basic PBX parameters such as Automatic Configuration for Outside CO Line Type Country Setting can be programmed the first time the PBX is accessed with a PC using the KX TA Maintenance Console software Call Waiting Caller ID Call Waiting Caller ID allows the user to see the name or telephone number of a second caller during a c...

Page 15: ...rietary telephones PTs and single line devices such as single line telephones SLTs fax machines and data terminals One Caller ID card is installed by default to support the Caller ID feature for 3 outside CO lines To expand its capabilities the PBX can be equipped with optional components or user supplied peripherals such as door openers external speakers and an external audio source such as a rad...

Page 16: ...utomatically designated as the manager extension PTs and single line telephones SLTs can be connected in parallel 2 5 2 Connecting Extensions in Parallel Door Opener Doorbell Door Chime Doorphone BGM Music on Hold MOH Pager Amplifier Speaker Voice Processing System Remote PC PC PC Printer SLT PT DSS Console Wireless SLT Wireless PT Outside CO Line FAX Telephone Answering Machine ...

Page 17: ...pps 20 pps or Tone DTMF Intercom Path 4 Mode Conversion Pulse DTMF Ring Frequency 20 Hz 25 Hz selectable Operating Environment Temperature 0 C to 40 C 32 F to 104 F Humidity 10 to 90 non condensing Conference Call Outside CO Line 2 Music on Hold MOH 1 port Selectable MOH Internal External Tone Paging Internal 1 External 1 port Serial Interface Port RS 232C 1 USB 1 1 1 Extension Connection Cable SL...

Page 18: ...m Number of Extension Instruments per Line 1 PT or SLT in standard connection 1 PT and 1 SLT in parallel connection Ring Voltage 75 Vrms at 20 Hz 25 Hz depending on the ringing load Outside CO Line Loop Limit 1600 Ωmaximum Hookswitch Flash Recall Timing Range 24 ms 2032 ms Door Opener Current Limit 30 V DC 125 V AC 3 A maximum Paging Terminal Impedance 600 Ω MOH Terminal Impedance 10 000 Ω ...

Page 19: ... Hybrid Extension Card 1 2 Port Analog CO Line and 8 Port Hybrid Extension Card 1 8 Port Hybrid Extension Card 1 Message Expansion Card for DISA OGMs 1 4 Port Doorphone Card 1 3 Port Caller ID Card 3 2 Channel Voice Message Card 1 Doorphone 4 Door Opener 4 Pager 1 Music on Hold MOH 1 DSS Console 2 Item Max Quantity Operator 1 System Speed Dialing 100 One touch Dialing 24 per extension PT Personal ...

Page 20: ...1 3 Specifications 20 Installation Manual Extension Group 8 Message Waiting 8 per extension Message for Built in Voice Message 125 messages total 60 minutes Item Max Quantity ...

Page 21: ...s section describes how to install the PBX Detailed instructions for installing the main unit and optional service cards and cabling of peripheral equipment are provided Information on system expansion and peripheral equipment installation is included ...

Page 22: ...gases may be present such as near thermal springs 3 Areas where shocks or vibrations are frequent or strong 4 High dust areas or places the PBX may come into contact with water or oil 5 Near devices that generate high frequencies such as sewing machines or electric welders 6 On or near computers telexes or other office equipment as well as microwave ovens or air conditioners It is preferable not t...

Page 23: ... not have a grounded outlet please have one installed Do not bypass this safety feature by tampering with the plug 9 Use twisted pair cable for outside CO line connection 10 Outside CO lines should be installed with surge protectors For details refer to 2 4 1 Connecting Outside CO Lines 2 2 7 Installing Surge Protector 11 To assure good quality telephone connection it is recommended new and modifi...

Page 24: ... Manual 2 2 Installing the Advanced Hybrid System 2 2 1 Unpacking The following items are included upon shipment Main Unit 1 AC Cord 1 CD ROM Manuals 1 set Screw Wall Mounting 3 Washer Wall Mounting 3 Pager Connector 1 Audio Source Connector 1 Strap 1 Rivet 1 ...

Page 25: ... System Installation Manual 25 2 2 2 Names and Locations Side View RS 232C Port USB Port AC Inlet Protective Ground Terminal Power Switch Run Indicator Extension Modular Jacks MOH Jack Outside CO Line Modular Jacks Pager Jack Strap Hole ...

Page 26: ...l 2 2 3 Opening Closing Covers Opening Covers 1 Loosen the top cover screw 2 Remove the top front cover Note The screw cannot be removed from the cover 3 Remove the 2 bottom cover screws 4 Open the bottom front cover Top Front Cover Screw Screws Bottom Front Cover ...

Page 27: ... Closing Covers 1 Replace the bottom front cover 2 Attach the 2 bottom cover screws 3 Replace the top front cover and tighten the screw Note For safety reasons keep the front covers closed while the PBX is in operation Bottom Front Cover Screws Top Front Cover Screw ...

Page 28: ...e rivet into the hole in the strap 2 Insert the rivet and strap into the hole on the PBX 3 Wrap the strap around all of the cords 4 Close the covers 2 2 3 Opening Closing Covers 5 Tie together all of the connected cords and secure them to the wall so that they cannot be pulled out of the PBX Rivet ...

Page 29: ...2 2 Installing the Advanced Hybrid System Installation Manual 29 Note To remove the rivet use a screwdriver as shown below ...

Page 30: ... 2 main AC voltage points on the wall outlet The reading obtained should be 108 V AC to 132 V AC 3 Move one of the meter probes to the 3rd prong terminal GND Either the same reading or a reading of 0 volt should be obtained 4 If a reading of 0 volt at one terminal and a reading of 108 V AC to 132 V AC at the other terminal is not obtained the outlet is not properly grounded This condition should b...

Page 31: ... the wall to mark the 3 screw positions Note When you print out the template the distance on the paper output may deviate slightly from the indicated measurement In this case use the indicated measurement 2 Fit the washers on the screws and drive the screws into the wall 3 Affix the PBX to the screw heads Notes Do not block the openings of the cabinet Leave at least 20 cm 8 in of space above and 1...

Page 32: ...al on the wall to mark the 3 screw positions Note When you print out the template the distance on the paper output may deviate slightly from the indicated measurement In this case use the indicated measurement 2 Drill holes in the wall as marked and fit the anchor plugs not included into the holes 3 Fit the washers on the screws and drive the screws into the anchor plugs 4 Affix the PBX to the scr...

Page 33: ...nings of the cabinet Leave at least 20 cm 8 in of space above and 10 cm 4 in to the sides of the PBX for ventilation Make sure that the wall behind the cabinet is flat and free of obstacles so that the openings on the back of the cabinet will not be blocked Be careful not to drop the cabinet ...

Page 34: ... connected equipment To protect the PBX from electrical surges we strongly recommend connecting the PBX to a surge protector that meets the following specifications Surge arrestor type 3 electrode arrestor DC spark over voltage 230 V Maximum peak current at least 10 kA Additionally proper grounding is very important for the protection of the PBX 2 2 5 Connecting Frame Ground Many countries areas h...

Page 35: ...ge protector for an extension is different from that for an outside CO line Installation of a Ground Rod 1 Connect the ground rod to the surge protector using a grounding wire with a cross sectional area of at least 16 AWG SLT PT Main Building Outside CO Line Outside CO Line Extn Extn Extn Extension Line Ground Another Building Extn Extn Surge Protector Terminal Board Surge Protector SLT PT PBX Su...

Page 36: ... should be as short as possible 3 The grounding wire should run straight to the ground rod Do not run the wire around other objects 4 Bury the ground rod at least 50 cm 20 in underground Notes The above figures are recommendations only The length of the ground rod and the required depth depend on the composition of the soil ...

Page 37: ...n below See System Components Table for the description of each optional service card CAUTION To protect the printed circuit boards P boards from static electricity do not touch parts on the P boards in the main unit and on the optional service cards If you must touch the P boards wear a grounding strap Note Before installing optional service cards turn off the PBX and unplug the AC cord Connector...

Page 38: ...brid extensions on the KX TA824 basic system Installing KX TA82483 to KX TA824 1 Loosen the screws and open the top and bottom front covers 2 2 3 Opening Closing Covers 2 Using cutting pliers cut the 6 parts marked with circles and remove the upper front panel as shown below 3 Cut off any excess plastic in order to make the surface smooth Lower Front Panel Upper Front Panel ...

Page 39: ...odular CO ports 2 4 1 Connecting Outside CO Lines 6 Connect the line cords to the terminal board or the modular jacks from the telephone company 7 Insert the modular plugs of the telephone line cords 2 or 4 conductor wiring into the card s modular extension jacks 2 5 1 Connecting Extensions 8 Wrap the strap around all of the cords 2 2 4 Securing Cords 9 Close the covers and secure the screws 2 2 3...

Page 40: ...nsion Card KX TA82483 3 Attach the 2 extension connectors to the main unit install the card as shown below and secure the 3 screws 4 Insert the modular plugs of the telephone line cords 2 conductor wiring into the card s modular CO ports 2 4 1 Connecting Outside CO Lines 5 Connect the line cords to the terminal board or the modular jacks from the telephone company 6 Insert the modular plugs of the...

Page 41: ...nstall the KX TA82481 on top of the KX TA82483 1 Loosen the screws and open the top and bottom front covers 2 2 3 Opening Closing Covers 2 Using cutting pliers cut the 6 parts marked with circles and remove the lower front panel or both upper and lower front panels as shown below 3 Cut off any excess plastic in order to make the surface smooth Lower Front Panel Upper Front Panel ...

Page 42: ...onnecting Outside CO Lines 6 Connect the line cords to the terminal board or the modular jacks from the telephone company 7 Insert the modular plugs of the telephone line cords 2 or 4 conductor wiring into the card s modular extension jacks 2 5 1 Connecting Extensions 8 Wrap the strap around all of the cords 2 2 4 Securing Cords 9 Close the covers and secure the screws 2 2 3 Opening Closing Covers...

Page 43: ...Attach the 2 extension connectors to the main unit install the card as shown below and secure the 3 screws 4 Insert the modular plugs of the telephone line cords 2 conductor wiring into the card s modular CO ports 2 4 1 Connecting Outside CO Lines 5 Connect the line cords to the terminal board or the modular jacks from the telephone company 6 Insert the modular plugs of the telephone line cords 2 ...

Page 44: ... KX TA82481 on 3 Port Analog CO Line and 8 Port Hybrid Extension Card KX TA82483 installed to KX TA824 2 3 3 2 Port Analog CO Line and 8 Port Hybrid Extension Card KX TA82481 3 Attach the extension connectors install the cards as shown below and secure the 3 screws 4 Insert the modular plugs of the telephone line cords 2 or 4 conductor wiring into the card s modular extension jacks 2 5 1 Connectin...

Page 45: ...screws and open the top and bottom front covers 2 2 3 Opening Closing Covers 2 Slide the card between the guiderails until it clicks and attach the connector to it Note Use extra care to make sure you do not damage the part of the case marked with a circle 3 Close the covers and secure the screws 2 2 3 Opening Closing Covers Note To uninstall the card follow the instructions illustrated below 1 Pu...

Page 46: ...2 3 Installing Optional Service Cards 46 Installation Manual Feature Manual References 1 1 30 Caller ID 1 1 78 Local Carrier based Voice Mail Service ...

Page 47: ...osing Covers 2 Attach the 4 Port Doorphone Card to the main unit connect the cord to the Doorphone Card Connector and secure the screw Note Use extra care to make sure you do not damage the part of the case marked with a circle 3 Close the covers and secure the screws 2 2 3 Opening Closing Covers Feature Manual References 1 1 46 Door Open 1 1 48 Doorphone Call Doorphone Connectors Door Opener Term...

Page 48: ...ers 2 Slide the card between the guiderails until it clicks and attach the connector to it Note Use extra care to make sure you do not damage the part of the case marked with a circle 3 Close the covers and secure the screws 2 2 3 Opening Closing Covers Note To uninstall the card follow the instructions illustrated below 1 Push the catch on the side of one guardrail in the direction of the arrow t...

Page 49: ...2 3 Installing Optional Service Cards Installation Manual 49 8 5 DISA OGM Clear Feature Manual References 1 1 41 Direct Inward System Access DISA 1 1 88 Outgoing Message OGM for DISA ...

Page 50: ...between the guiderails until it clicks and attach the connector to it Note Use extra care to make sure you do not damage the part of the case marked with a circle 3 Close the covers and secure the screws 2 2 3 Opening Closing Covers Note To uninstall the card follow the instructions illustrated below 1 Push the catch on the side of one guardrail in the direction of the arrow to release it 2 Lift t...

Page 51: ...2 3 Installing Optional Service Cards Installation Manual 51 Programming Manual References 808 BV Card Initialization 8 6 BV Card Initialization Feature Manual References 1 1 8 Built in Voice Message BV ...

Page 52: ...s Connection 1 Insert the modular plugs of the telephone line cords 2 conductor wiring into the outside CO line jacks 2 Connect the line cords to the terminal board or the modular jacks from the telephone company To Terminal Board or Modular Jacks from the Telephone Company T R T Tip R Ring TEL Jack for Outside CO Line ...

Page 53: ...ng into the modular jacks on the PBX Maximum Cabling Distance of Extension Wiring Twisted Cable 2 or 4 conductor wiring is required for each extension as listed below There are 4 pins that can be used for connection T Tip R Ring H High and L Low To Extensions T H R L H High T Tip R Ring L Low TEL Jack for Extension Cable Max Distance 26 AWG 140 m 459 ft 24 AWG 229 m 751 ft 22 AWG 360 m 1181 ft CAT...

Page 54: ...elephone or answering machine with an A A1 relay is connected to the PBX set the A A1 relay switch on the telephone or answering machine to the OFF position Telephone Wiring SLT 1 pair wire T R PT such as KX T7736 2 pair wire T R H L DSS Console 1 pair wire H L ...

Page 55: ... with a proprietary telephone PT as follows Note An answering machine fax machine or modem can be connected in parallel with a PT in the same way as an SLT can Feature Manual References 1 1 97 Paralleled Telephone To a Hybrid Port 4 Conductor Wiring Cord Connect pins T R H and L 2 Conductor Wiring Cord Connect pins T and R SLT PT Modular T Adaptor ...

Page 56: ...rrent limit 30 V DC 125 V AC 3 A maximum Installing the Doorphone KX T30865 1 Loosen and remove the screw at the bottom of the case to separate the doorphone into 2 halves 2 Pass the wires through the hole in the base cover and attach the base cover to a wall using 2 screws Cable Max Distance 26 AWG 70 m 230 ft 24 AWG 110 m 360 ft 22 AWG 150 m 492 ft CAT 5 110 m 360 ft Cable Max Distance 22 AWG 15...

Page 57: ...X T30865 Please choose the appropriate screws for your wall type 3 Connect the wires to the screws located in the front cover 4 Re attach the 2 halves and re insert and tighten the screw when a doorphone plate has been fixed to the wall when you wish to install the doorphone directly to the wall To the Terminal Box ...

Page 58: ...e appropriate terminal box 3 Connect the wires of doorphones 2 and 4 to the yellow and black screws on the appropriate terminal box Panasonic Panasonic Panasonic Panasonic Yellow Red Black Green 4 conductor wiring is required 4 conductor wiring is required Doorphone 1 Doorphone 2 Yellow Red Black Green Doorphone 3 Doorphone 4 View of Doorphone Connector Jack Doorphone 2 Doorphone 3 Doorphone 1 Doo...

Page 59: ...e terminal and insert the wire coming from the door opener into the terminal 2 Wrap the strap around all of the cords 2 2 4 Securing Cords Note We recommend using a UL1015 26 AWG to 22 AWG wire or an equivalent for wiring Feature Manual References 1 1 46 Door Open 1 1 48 Doorphone Call Door Opener 1 Door Opener 2 Door Opener 3 Door Opener 4 To the Door Openers ...

Page 60: ... the wire coming from the doorbell or door chime into the terminal You can use a standard doorbell or door chime For more details please consult your dealer Refer to 2 6 Connecting Doorphones and Door Openers for connecting doorphones KX T30865 and door openers Feature Manual References 1 1 47 Doorbell Door Chime 1 1 48 Doorphone Call Door Opener 1 Door Opener 2 Door Opener 3 Relay 1 Relay 2 Relay...

Page 61: ...nd used as the source of Background Music BGM and Music on Hold MOH Connect a cable from the audio output earphone jack headphone jack etc of the audio source to Max Distance 2 m 6 ft Max Distance 5 m 16 ft Cable Max Distance 26 AWG 10 m 32 ft 24 AWG 10 m 32 ft 22 AWG 10 m 32 ft CAT 5 10 m 32 ft Cable Max Distance 26 AWG 10 m 32 ft 24 AWG 10 m 32 ft 22 AWG 10 m 32 ft CAT 5 10 m 32 ft PC Printer PC...

Page 62: ... may be heard in the BGM and MOH The audio source used for BGM and MOH is determined by system programming To adjust the sound level of the MOH use the volume control on the external audio source Feature Manual References 1 1 7 Background Music BGM 1 1 85 Music on Hold Pager Only 1 paging device user supplied can be connected to the PBX Use an EIAJ RC 6701 A plug 2 conductor 3 5 mm 1 8 in in diame...

Page 63: ...Rules Note Use an RS 232C cross cable when connecting the PBX with a PC Pin Assignments Connection Charts For connecting a PC printer with a 9 pin RS 232C connector No Signal Name Function Circuit Type EIA CCITT 2 RD RXD Receive Data BB 104 3 4 SD TXD ER DTR Transmit Data Data Terminal Ready BA CD 103 108 2 5 6 SG DR DSR Signal Ground Data Set Ready AB CC 102 107 7 8 RS RTS CS CTS Request To Send ...

Page 64: ...printer or the PC is ready Circuit DR DSR ON does not indicate that communication has been established with the printer or the PC Request To Send RTS output This is held ON whenever DR DSR is ON Clear To Send CTS input An ON condition of circuit CS CTS indicates that the printer or the PC is ready to receive data from the PBX The PBX does not attempt to transfer data or receive data when circuit C...

Page 65: ...intenance Console software can be connected via the USB interface and used to program the system and upload download data to the PBX Pin Assignments Programming Manual References 8 1 Firmware Upgrade Feature Manual References 1 1 58 Firmware Upgrade No Signal Name 1 VBUS 2 USB D 3 USB D 4 GND 2 3 1 4 ...

Page 66: ... is protected by a factory provided lithium battery No system data will be lost except for the Camp on Saved Number Redial Last Number Redial and Call Park data The current connection automatically switches to the Power Failure Connection when the power supply stops Proprietary telephones PTs cannot be used during a power failure Therefore we recommend connecting single line telephones SLTs in par...

Page 67: ...ord 5 Perform the following operation with a proprietary telephone PT connected to JACK 01 a Press the PROGRAM button b Press c Enter 1234 d Enter 999 e Press the NEXT SP PHONE button f Press the SELECT AUTO ANS MUTE button until All Para is displayed g Press the STORE AUTO DIAL STORE button h Press the END HOLD button i Press the PROGRAM button The PBX will be initialized with the default values ...

Page 68: ...led near the equipment and is easily accessible Notes If the outside CO lines you use are not connected to the PBX outside CO line type can not be automatically detected Use only the AC cord included with the PBX If the PBX will not be used for an extended period of time set the Power Switch to the OFF position and disconnect the AC cord from the AC outlet to conserve power Programming Manual Refe...

Page 69: ...Installation Manual 69 Section 3 Guide for KX TA Maintenance Console This section explains how to connect a PC to the PBX and get started using KX TA Maintenance Console ...

Page 70: ...ible dangers if it becomes known to others 2 To avoid unauthorized access and possible fraudulent dialing maintain the secrecy of the password 3 We strongly recommend that you change the default password value to something else for reasons of system security It is best to use a password of 7 digits 4 Please change the password periodically 5 If a system password is forgotten it can be found by loa...

Page 71: ...or Windows XP Professional you must be logged in as a user in the Administrators group Programming Manual References 3 2 PC Programming Feature Manual References 1 1 99 PC Programming 1 Insert the included CD ROM into the CD ROM drive of your PC The main screen will appear automatically 2 Click Maintenance Console 3 Double click the setup file to run the installer Its icon is shown here on the lef...

Page 72: ...imum cabling distance refer to 2 8 Connecting Peripherals When connecting the KX TA Maintenance Console to the PBX using an RS 232C cable assign the following values to the Serial Interface RS 232C port of the PBX through system programming 800 SMDR RS 232C Parameter Baud Rate 9600 bps Word Length 8 bits Parity Bit None Stop Bit 1 bit Installing the USB Driver CAUTION Installing the USB driver may...

Page 73: ... restart the PC Windows Me 1 Connect the PC to the PBX with a USB cable The Add New Hardware Wizard will appear 2 Select Specify the location of the driver Advanced then click Next 3 Select Search for the best driver for your device Recommended 4 Select Specify a location then click Browse 5 Specify the folder containing the USB driver CD ROM Drive USB driver WinMe then click OK 6 Click Next 7 Cli...

Page 74: ...anced then click Next 3 Select Search for the best driver in these locations 4 Select Include this location in the search then click Browse 5 Specify the folder containing the USB driver CD ROM Drive USB driver WinXP then click OK 6 Click Next 7 Click Continue Anyway 8 Click Finish Programming Manual References 4 1 Software Modes 6 1 Connect Feature Manual References 1 1 99 PC Programming ...

Page 75: ...ing assignment for each outside CO line either all extensions or a specific extension Note The screenshots shown here are for reference only and may differ from the screens displayed on your PC Note Software features design and system requirements are subject to change Programming Manual References 4 1 Software Modes 6 1 Connect 8 2 Quick Setup 1 Start the KX TA Maintenance Console software from t...

Page 76: ...K The PC will connect to the PBX Notes The number of pause symbols to be inserted differs depending on the PC modem used Auto Pulse Dial Type cannot be used When the mode of the PBX outside CO line that will be accessed is Normal 1 For Dial Number enter the pause symbol 2 Select Manual for Dial Type 3 Click Initialize 4 Click OK 5 Click OK 6 Dial the telephone number assigned to the outside CO lin...

Page 77: ... required to configure the modem to communicate with the PBX depending on the modem The AT command to dial without waiting for a dial tone may be required to configure the modem to communicate with the PBX depending on the modem The AT command to set the Result Code format to text beginning with CONNECT when a connection is established may be required to configure the modem to communicate with the...

Page 78: ...3 2 Connection 78 Installation Manual ...

Page 79: ...Installation Manual 79 Section 4 Troubleshooting This section provides information on troubleshooting and resetting the PBX ...

Page 80: ...ngle line telephones SLTs do The H and L pins of extension jacks may have shorted Turn the Power Switch to the OFF position Fix the shorted part then turn the Power Switch to the ON position Noise heard through external pager loudspeaker If using an amplifier noise may be being introduced through the cable connecting the PBX and the amplifier or loudspeaker Use a shielded cable to connect the PBX ...

Page 81: ...H L H T R L H T R L PBX PBX PBX Extension CAUSE The T R pins are connected to the H L pins SOLUTION Use the correct cord the inner 2 wires are for T R H T R L T R Extension CAUSE The T and R pins are crossed over SOLUTION Reverse the connections of the T R pins H T R L T R Extension Can you dial an extension No Yes Telephone cord connecting an outside CO line and the PBX CAUSE The outside CO line ...

Page 82: ...ct an outside CO line Program the CO buttons Refer to 1 1 61 Flexible Buttons in the Feature Manual An SLT set to tone dialing mode cannot make calls There may be something wrong with the DTMF receiver 1 Select Enable for DTMF receiver 1 and Disable for DTMF receiver 2 through system programming 107 DTMF Receiver Check 2 Try to make a call using a tone type SLT connected to one of extension jacks ...

Page 83: ...estarted Calls on Hold are terminated Calls on Exclusive Hold are terminated Calls in progress are terminated Automatic Callback Busy Camp on is cleared Call Park is cleared Last Number Redial is cleared Saved Number Redial is cleared No other data is cleared by System Restart 1 To restart the PBX turn the Power Switch to the OFF position then turn the Power Switch back to the ON position Note If ...

Page 84: ...ch to the NOR position before the power indicator stops flashing The power indicator will flash for about 5 seconds CAUTION Before touching the System Clear Switch and Reset Button put on a grounding strap Notes After pressing the Reset Button make sure to return the System Clear Switch to the NOR position before the power indicator stops flashing otherwise the system data will not be cleared The ...

Page 85: ...Installation Manual 85 Index ...

Page 86: ...g KX TA Maintenance Console 71 Installing KX TA Maintenance Console on a PC 70 Installing Optional Service Cards 37 Installing Surge Protector 34 Installing the Advanced Hybrid System 24 Installing the USB Driver 72 L Location of Optional Service Cards 37 M Main Unit 15 Maximum Cabling Distance of Extension Wiring Twisted Cable 53 Maximum Cards and Terminal Equipment 19 Message Expansion Card for ...

Page 87: ... beforehand Hook the unit onto the screw heads 1 2 3 236 mm 9 5 16 in 118 mm 4 5 8 in 185 mm 7 5 16 in 169 mm 6 5 8 in 92 5 mm 3 5 8 in Install a screw here Install a screw here Install a screw here Make sure to set the print size to correspond with the size of this page If the dimensions of the paper output still deviate slightly from the measurements indicated here use the measurements indicated...

Page 88: ...iel Industrial Park Carolina Puerto Rico 00985 http www panasonic com csd Copyright This material is copyrighted by Panasonic Communications Co Ltd and may be reproduced for internal use only All other reproduction in whole or in part is prohibited without the written consent of Panasonic Communications Co Ltd 2005 Panasonic Communications Co Ltd All Rights Reserved PSQX3400ZA KK0405PY0 ...

Reviews: