background image

37

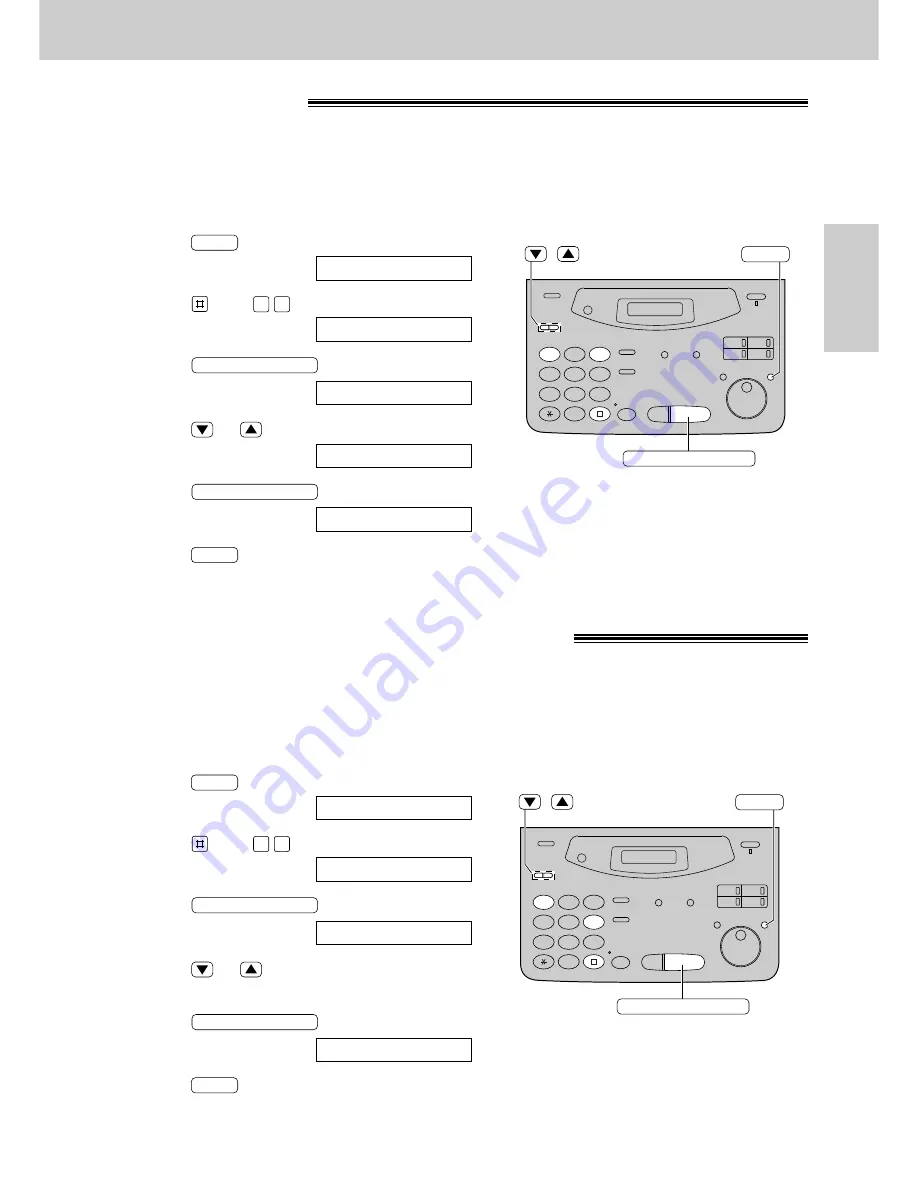
This feature is set to “TONE” as a pre-selected setting.
If you cannot dial, change the dialing mode setting to “PULSE” by following the instructions below.

1

Press

.

Display:

2

Press 

, then 

.

3

Press 

.

4

Press 

or 

to select “PULSE”.

5

Press 

.

6

Press 

.

MENU

SETUP ITEM [  ]

START/SET/COPY

MODE=PULSE

▼▲

MODE=TONE

▼▲

START/SET/COPY

DIALING MODE

1 3

1.SYSTEM SET UP

MENU

1

2

3

4

5

6

7

8

9

0

/

START/SET/COPY

MENU

Making and Answering Calls

T

elephone

Dialing mode

(touch tone or pulse)

1

Press 

.

Display:

2

Press 

, then 

.

3

Press 

.

4

Press 

or 

to select the desired setting.

5

Press 

.

6

Press 

.

MENU

SETUP ITEM [  ]

START/SET/COPY

A4

▼▲

START/SET/COPY

PAPER SIZE

1 6

1.SYSTEM SET UP

MENU

1

2

3

4

5

6

7

8

9

0

/

START/SET/COPY

MENU

The recording paper size is selected by programming and should match the size of the paper on the paper
tray.
A4:

The recording paper width is 210 mm (8

1

/

4

" ) (pre-selected setting).

LTR/LEGAL: The recording paper width is 216 mm (8

1

/

2

" ), letter or legal size paper.

Setting the recording paper size

Summary of Contents for KX-FM131BX

Page 1: ...d please read the Quick Start section p 4 11 Compact Plain Paper FAX Model No KX FP105BX KX FP105CX OPERATING INSTRUCTIONS Please read these Operating Instructions before using the unit and save for future reference Multi Function Plain Paper FAX Model No KX FM131BX KX FM131CX The pictured model is KX FP105 ...

Page 2: ...ion when disposing of the used film cartridge Do not rub or use an eraser on the printed side as the print may smear Copyright This manual is copyrighted by Kyushu Matsushita Electric Co Ltd KME and its licensee Under the copyright laws this manual may not be reproduced in any form in whole or part without the prior written consent of KME and its licensee Kyushu Matsushita Electric Co Ltd 1999 Not...

Page 3: ...hen service is required Opening or removing covers may expose you to dangerous voltages or other risks Incorrect reassembly can cause electric shock when the unit is subsequently used 13 Unplug this unit from the wall outlet and refer servicing to an authorized servicenter when the following conditions occur A When the power supply cord or plug is damaged or frayed B If liquid has been spilled int...

Page 4: ...ar forward and hold open while inserting the paper Insert the two tabs on the paper tray into the slots on the back of the unit 2 A4 paper guides p 24 Install the A4 paper guides 3 Paper stacker p 25 26 Remove the shipping tape and install paper stacker Cover open button Leaflet Shipping tape B Open the cover remove the leaflet under the film cartridge and close the cover Film cartridge For furthe...

Page 5: ... To the single telephone line To the power outlet 220 240 V 50 60 Hz Power cord 3 A Connect to the unit B Connect to a power outlet Answering machine not included For further details see page 63 KX FP105 only EXT jack is only for KX FP105 To connect an answering machine remove the stopper with your finger and connect the cord to the EXT jack Stopper For further details see page 28 ...

Page 6: ...king replace the handset For further details see page 35 If you are having trouble see page 112 Voice calls making answering Voice calls making 1 Lift the handset 3 When finished talking replace the handset 2 Dial the number For further details see page 34 If you are having trouble see page 112 ...

Page 7: ...cument feeder tray Insert the document until a single beep is heard and the unit grabs the document Adjust the width of the document guides to the size of the document 1 2 3 Press START SET COPY Dial the fax number 4 5 For further details see page 44 If you are having trouble see page 113 ...

Page 8: ...nt reception is required a fax calling tone slow beep is heard or no sound is heard press START SET COPY For further details see page 62 You can select the way to receive calls according to your needs See pages 58 and 59 for KX FP105 See pages 60 and 61 for KX FM131 If you are having trouble see page 113 ...

Page 9: ...SET COPY Open the document feeder tray Insert the document until a single beep is heard and the unit grabs the document Make sure the handset is on the cradle Adjust the width of the document guides to the size of the document 1 2 3 4 5 6 For further details see page 88 If you are having trouble see page 114 ...

Page 10: ...fax messages automatically For further details see page 90 1 2 Make sure the display shows the following message Press The AUTO ANSWER light comes on AUTO ANSWER AUTO ANSWER TAD FAX ON ON TAD FAX MODE If the display does not show this message the setting needs to be changed to the TAD FAX mode p 68 ...

Page 11: ...en the PLAY MESSAGES indicator flashes PLAY MESSAGES PLAY MESSAGES Press All messages will be played When the PLAY MESSAGES indicator lights PLAY MESSAGES Press while listening to the message you want to erase ERASE Erasing a specific message 1 Press after listening to all of the messages ERASE STOP 2 Press Erasing all the messages 3 Press again START SET COPY START SET COPY To stop erasing press ...

Page 12: ...tone or pulse 37 Setting the recording paper size 37 Storing names and telephone numbers in the One Touch Dial 38 Making a voice call using the One Touch Dial 39 Storing names and telephone numbers in the EASY DIAL directory 40 Making a voice call using the EASY DIAL directory 42 Talking to the caller after fax transmission or reception 43 Fax Copy Sending Faxes Sending a fax manually 44 Sending a...

Page 13: ... Setup Greeting Playing Messages Recording Remote Operation Options TAD FAX mode using the built in answering device and receiving voice and fax calls automatically 90 Pre recorded greeting messages 91 Recording your own greeting messages 92 Checking your own recorded greeting messages 93 Erasing your own recorded greeting messages 93 Recording time for the TAD FAX greeting message 94 Listening to...

Page 14: ...ilm or film cartridge 122 Document feeder 125 Thermal head and black bar 126 General Information Print Reports Fax Voice Guidance Display Contrast Original Mode Reset Specifications Index Features Summary Printing the feature settings telephone numbers journal printer test list and broadcast list 127 Fax voice guidance KX FM131 only 128 Changing the display contrast 129 Setting the original mode 1...

Page 15: ...als for future shipping and transportation of the unit To use this unit with your PC KX FM131 only A RS232C cable less than 3 meters long DB9 Female DB25 Male is required to connect to a personal computer Please purchase at any computer supply store For KX FM131 only Accessory order information Note The film is not reusable Do not rewind and use the film again Model No Description Specifications K...

Page 16: ...wing items are available 1 How to program your unit 2 How to store names in the EASY DIAL directory and how to dial them 3 Help with problems receiving faxes 4 How to use the copier function 5 List of available reports 3 Press PRINTING START SET COPY 5 REPORTS 4 COPIER 3 FAX RECEIVING 2 EASY DIAL 1 HOW TO SET UP PRESS SET HELP START SET COPY HELP For KX FP105 ...

Page 17: ...ice guide 2 How to program your unit 3 How to store names in the EASY DIAL directory and how to dial them 4 Help with problems operating answering device 5 Help with problems receiving faxes 6 How to use the copier function 7 List of available reports 3 Press PRINTING START SET COPY 7 REPORTS 6 COPIER 5 FAX RECEIVING 4 TAD OPERATION 3 EASY DIAL 2 HOW TO SET UP 1 SEND GUIDE PRESS SET HELP START SET...

Page 18: ...adjust volumes p 33 To select feature settings during programming To scan and store a document into memory and then transmit or copy the stored document p 52 88 To select a resolution p 44 To redial the last number dialed p 34 44 To insert a pause during dialing p 36 To dial without lifting the handset To stop an operation or cancel programming To change from pulse to tone during dialing p 36 To i...

Page 19: ...cters during programming p 31 To select the basic features during programming p 135 To select an enlargement reduction rate in the copy mode p 88 89 To initiate or exit programming To confirm a stored telephone number p 42 To select stations 4 6 for the One Touch Dial p 38 39 45 To keep the telephone number secret p 38 40 To insert one character or one space p 30 31 To insert a hyphen p 31 38 To t...

Page 20: ...umes p 33 To select feature settings during programming To scan and store a document into memory and then transmit or copy the stored document p 52 88 To select a resolution p 44 To redial the last number dialed p 34 44 To insert a pause during dialing p 36 For speakerphone operation For slow playback p 97 For quick playback p 97 To stop an operation or cancel programming To change from pulse to t...

Page 21: ...r a stored name p 42 46 To select characters during programming p 31 To select the basic features during programming p 137 To skip and or repeat recorded messages in the answering device p 97 To select an enlargement reduction rate in the copy mode p 88 89 To initiate or exit programming To confirm a stored telephone number p 42 To select stations 4 6 for the One Touch Dial p 38 39 45 To keep the ...

Page 22: ...rophone KX FM131 only To talk with the other party when using the speakerphone To record greeting messages and memo messages Serial interface connector KX FM131 only To connect your PC with a RS232C cable For system requirements see the PANA LINK Software Guide Note The document and recording paper will be ejected from the front of the unit Install the unit on a desk or floor with a smooth surface...

Page 23: ...essing the cover open button 3 Lift the film cartridge remove the leaflet and replace the film cartridge 4 Close the cover securely by pushing down on the dotted area at both ends Dotted area Cover open button Leaflet Film cartridge 1 Remove the shipping tape Shipping tape ...

Page 24: ...hem 1 Insert the bottom tab on the A4 paper guide left into the lower slot Press the guide into the upper slot If the A4 paper guide cannot be installed make sure the paper tray has been installed correctly B A A4 paper guide left Upper slot Lower slot Bottom tab B A Paper tray 2 Insert the bottom tab on the A4 paper guide right into the lower slot Press the guide into the upper slot B A A4 paper ...

Page 25: ...et up to prevent it being bent by the paper stacker while inserting the paper stacker into the side slots Paper stacker Shipping tape Side slots Bottom Aluminum sheet 3 Confirm that the paper stacker is locked into the center slots and slide back Center slots Paper stacker 4 Slide the paper stacker forward until it stops Paper stacker Setup ...

Page 26: ...sheets of 75 g m2 20 lb paper You may use 60 g m2 to 90 g m2 16 lb to 24 lb paper 1 Fan the stack of paper to prevent a paper jam 1 Press the dotted area on the paper stacker extender Paper stacker extender Dotted area 2 Open the paper stacker extender Paper stacker extender Using legal size paper ...

Page 27: ...djust the paper or the paper may jam Incorrect Correct Stack of paper Paper tray Upper limit Tension bar Tab Note Avoid paper with a cotton and or fiber content that is over 20 such as letterhead paper or paper used for resumes Do not use different types or thicknesses of paper in the paper tray at the same time This may cause a paper jam Avoid extremely smooth or shiny paper that is highly textur...

Page 28: ...ord Connect to LINE 28 Setup Connections 1 Connect the handset cord 2 Connect the telephone line cord 3 Connect the power cord Note When you operate this product the power outlet should be near the product and easily accessible If you want to connect an answering machine to the unit see page 63 KX FP105 only ...

Page 29: ...te by selecting 2 digits for each using the dial keypad Press to select AM or PM Example 3 15PM 1 Press 2 Press until PM is displayed TIME 03 15PM TIME 03 15AM 1 5 0 3 TIME 12 00AM START SET COPY M 08 D 10 Y 99 0 0 1 9 8 9 M 01 D 01 Y 99 START SET COPY SET DATE TIME 0 1 1 SYSTEM SET UP MENU 7 Press 8 Press MENU SETUP ITEM START SET COPY 1 2 3 4 5 6 7 8 9 0 STOP START SET COPY MENU EASY DIAL Note Y...

Page 30: ... 0 2 1 SYSTEM SET UP MENU 1 2 3 4 5 6 7 8 9 0 STOP START SET COPY MENU INSERT HYPHEN Delete EASY DIAL To correct a mistake Press or to move the cursor to the incorrect character and make the correction To delete a character Move the cursor to the character you want to delete and press STOP To insert a character 1 Press or to move the cursor to the position to the right of where you want to insert ...

Page 31: ...order of characters EASY DIAL Capital alphabet Lower case alphabet Number Symbol Rotating to the right Rotating to the left 1 2 3 4 5 6 7 8 9 0 EASY DIAL Setup Initial Preparation 31 Keys Characters 1 2 3 4 5 6 7 8 9 0 1 2 STOP 1 _ A B C a b c 2 D E F d e f 3 G H I g h i 4 J K L j k l 5 M N O m n o 6 P Q R S p q r s 7 T U V t u v 8 W X Y Z w x y z 9 0 HYPHEN key To insert a hyphen INSERT key To in...

Page 32: ...Y MENU HYPHEN EASY DIAL To correct a mistake Press or to move the cursor to the incorrect number and make the correction To delete a number Move the cursor to the number you want to delete and press STOP Note You can enter your facsimile telephone number by rotating If using press to move the cursor The button replaces the digit with a and the button replaces it with a space Example using the dial...

Page 33: ...l not ring and will display the following Handset receiver volume 3 levels high to low are available While using the handset press or Monitor Speaker volume 8 levels high to low are available While using the monitor speakerphone press or Fax voice guidance volume KX FM131 only 9 levels high to off are available While listening to the fax voice guidance press or Answering device volume KX FM131 onl...

Page 34: ...ing a telephone conversation using the handset Display The other party cannot hear you but you can hear them 2 To resume the conversation press again For KX FM131 You can also mute your voice to the other party when using DIGITAL SP PHONE MUTE HANDSET MUTE MUTE MUTE HANDSET MUTE WAITING REDIAL DIGITAL SP PHONE MONITOR REDIAL PAUSE Hints for the speakerphone operation KX FM131 only Use the speakerp...

Page 35: ...u and the other party speak at the same time parts of your conversation will be cut off To switch to the handset lift the handset To switch back to the speakerphone press DIGITAL SP PHONE To mute your voice to the other party 1 Press during a telephone conversation using the handset Display The other party cannot hear you but you can hear them 2 To resume the conversation press again For KX FM131 ...

Page 36: ...an overseas transmission add two pauses at the end of the telephone number REDIAL PAUSE REDIAL PAUSE 9 PAUSE Line access code Telephone number International access code Country code PAUSE PAUSE Telephone number Note TONE FLASH and PAUSE can be stored into a telephone number in the One Touch Dial and the EASY DIAL directory 1 2 3 4 5 6 7 8 9 0 TONE FLASH REDIAL PAUSE FLASH button The button functio...

Page 37: ...NU Making and Answering Calls Telephone Dialing mode touch tone or pulse 1 Press Display 2 Press then 3 Press 4 Press or to select the desired setting 5 Press 6 Press MENU SETUP ITEM START SET COPY A4 START SET COPY PAPER SIZE 1 6 1 SYSTEM SET UP MENU 1 2 3 4 5 6 7 8 9 0 START SET COPY MENU The recording paper size is selected by programming and should match the size of the paper on the paper tray...

Page 38: ...ese functions cannot be used at the same time For the broadcast function see pages 53 to 55 1 Press Display 2 For stations 1 3 Press one of the One Touch Dial keys Press to go to the next prompt For stations 4 6 Press then press one of the One Touch Dial keys 3 Enter the station name up to 10 characters following the instructions on page 31 Example 4 Press Example 5 Enter the telephone number up t...

Page 39: ...ead of using the handset DIGITAL SP PHONE MONITOR EASY DIAL Making a voice call using the One Touch Dial Before using this feature program the desired names and telephone numbers into the One Touch Dial p 38 1 Llift the handset Display Check that there are no documents in the document feeder tray 2 For stations 1 3 Press the desired One Touch Dial key For stations 4 6 Press then press the desired ...

Page 40: ...Press To program other items repeat steps 3 to 6 7 Press to exit the program DIRECTORY PROGRAM NAME REGISTERED START SET COPY HYPHEN NO 5552233 NO START SET COPY NAME Alice NAME EASY DIAL USE EASY DIAL PRESS STATION DIRECTORY PROGRAM 1 2 3 4 5 6 7 8 9 0 HYPHEN START SET COPY STOP SECRET DIRECTORY PROGRAM EASY DIAL Note When the following message is displayed in step 6 you can only store 5 more ite...

Page 41: ...For further details see page 40 7 Press REGISTERED START SET COPY Erasing a stored name and number 1 Rotate until the desired name is displayed Example 2 Press 3 Press to select DELETE If you do not want to erase the item press 4 Press The stored name and number are deleted DELETED START SET COPY STOP YES PRESS SET DELETE OK EDIT DELETE DIRECTORY PROGRAM Smith EASY DIAL 1 2 3 4 5 6 7 8 9 0 START S...

Page 42: ...the other party answers For KX FM131 You can press instead of using the handset DIGITAL SP PHONE MONITOR Note If the desired name has not been stored press and dial the number manually STOP To search for a name by initial Example If you want to search for the name Lisa 1 Rotate until any name is displayed Example 2 Press repeatedly until any name with the initial L is displayed see the character t...

Page 43: ...h a distinctive ring after all of the documents have been transmitted If you initiate voice contact during reception the unit will call you with a distinctive ring after the current page of the document is received Receiving a request for voice contact 1 If the other party initiates voice contact your unit will sound a distinctive ring and the following will be displayed Display 2 Lift the handset...

Page 44: ...d characters For originals with small printing For originals with minute printing For originals containing photographs shaded drawings etc Sending a fax manually 1 Open the document feeder tray 2 Adjust the width of the document guides to the size of the document 3 Insert the document up to 15 pages FACE DOWN until a single beep is heard and the unit grabs the document Display 4 If necessary press...

Page 45: ...Helpful hints You can confirm the stored items on the display p 42 or on the telephone number list p 127 You can use the EASY DIAL directory to select the station name instead of using the One Touch Dial keys Rotate until the desired name is displayed then press The connecting tone will be heard during dialing to tell you the status of the other party s machine p 57 START SET COPY EASY DIAL Fax au...

Reviews: