background image

EN

EN

- 11 - 


EN

EN

[Battery Pack]
For Appropriate Use of Bat­

tery Pack

Li­ion Battery Pack

• For optimum battery life, store the Li-ion bat-

tery pack following use without charging it.

• When  charging  the  battery  pack,  confirm 

that  the  terminals  on  the  battery  charger 

are free of foreign substances such as dust 

and  water  etc.  Clean  the  terminals  before 

charging the battery pack if any foreign sub-

stances are found on the terminals. 

  The life of the battery pack terminals may be 

affected by foreign substances such as dust 

and water etc. during operation.


• When  battery  pack  is  not  in  use,  keep  it 

away  from  other  metal  objects  like:  paper 

clips,  coins,  keys,  nails,  screws,  or  other 

small  metal  objects  that  can  make  a  con-

nection from one terminal to another.

  Shorting the battery terminals together may 

cause sparks, burns or a fire.

• 

When operating the battery pack, make sure 

the work place is well ventilated.

• 

When the battery pack is removed from the 

main  body  of  the  tool,  replace  the  battery 

pack  cover  immediately  in  order  to  prevent 

dust  or  dirt  from  contaminating  the  battery 

terminals and causing a short circuit.

Battery Pack Life

The rechargeable batteries have a limited life. 

If the operation time becomes extremely short 

after recharging, replace the battery pack with 

a new one.

Battery Recycling

ATTENTION:

A  Li-ion  battery  that  is  recyclable  powers 

the product you have purchased.

Please  call 

1­800­8­BATTERY

  for  infor-

mation on how to recycle this battery.

[Battery Charger]
Charging

Read the operating manual for Panasonic bat-

tery charger for the battery pack before charg-

ing.

Before  charging  the  bat­

tery

Charge  the  battery  at  a  temperature  of  5°C 

(41°F) to 40°C (104°F).
The  battery  pack  cannot  be  charged  at  a 

tem perature  of  less  than  5°C  (41°F).  If  the 

tem perature  of  the  battery  pack  is  less  than 

5°C (41°F), fi rst remove the battery pack from 

the charger and allow it to sit for an hour in a 

location where the temperature is 5°C (41°F) 

or  warmer.  Then  charge  the  battery  pack 

again.

VI.

 MAINTENANCE

Use only a dry, soft cloth for wiping the unit. 

Do not use a damp cloth, thinner, benzine, or 

other volatile solvents for cleaning.

Summary of Contents for EYFGB1N

Page 1: ...ant la première utilisation de ce produit et conservez ce manuel pour les utilisations futures IMPORTANTE Este manual tiene información de seguridad Lea todo el manual antes de usar este producto por primera vez y guarde el manual para poderlo consultar en el futuro Operating Instructions Instructions d utilisation Manual de instrucciones Cordless Screwdriver Tournevis sans fil Destornillador inal...
Page 2: ...AL DESCRIPTION DESCRIPTION DES FONCTIONS DESCRIPCIÓN FUNCIONAL Clutch setting handle and battery are not included La poignée de réglage de l embrayage et la batterie ne sont pas incluses La empuñadura de ajuste de embrague y la batería no están incluidos D M A E F G L K C B H I J ...

Page 3: ... inversion marche avant marche arrière Palanca de avance marcha atrás F Alignment mark Marques d alignement Marcas de alineación G Control panel Panneau de commande Panel de control H LED light on off button Bouton Marche Arrêt de la lumière DEL Botón ENCENDIDO APAGADO de luz LED I Battery indication lamp Témoin indicateur de la batterie Lámpara de indicadora de la batería J Display Affichage Viso...

Page 4: ...ric shock Personal Safety 1 Stay alert watch what you are doing and use common sense when operating a power tool Do not use a power tool while you are tired or under the influence of drugs alcohol or medication A moment of inattention while operating power tools may result in personal injury 2 Use safety equipment Always wear eye protection Safety equipment such as dust mask non skid safety shoes ...

Page 5: ...ny other battery packs may create a risk of injury and fire 4 When battery pack is not in use keep it away from other metal objects like paper clips coins keys nails screws or other small metal objects that can make a connection from one terminal to another Shorting the battery terminals together may cause burns or a fire 5 Under abusive conditions liquid may be ejected from battery avoid contact ...

Page 6: ...he collar of quick connect chuck and pull it out from the tool 2 Insert the bit into the chuck Release the collar 3 The collar will return to its original position when it is released 4 Pull the bit to make sure it does not come out 5 To remove the bit pull out the collar in the same way CAUTION If the collar does not return to its origi nal position or the bit comes out when pulled on the bit has...

Page 7: ...ive temperature increase of the tool surface do not operate the tool continuously using two or more battery packs Tool needs cool off time before switching to another pack Tightening confirmation lamp The tightening confirmation lamp can be used to check whether tightening has been completed properly Tool status Lamp display Tightening complete Normal clutch operation Green For approx 2 seconds Ti...

Page 8: ... charged or replaced with a fresh unit immediately Be sure to fully charge the battery pack in question after activation of the auto matic power off function Failure to do so may prevent the automatic power off function from being properly deactivated The tool may power off automatically under heavy work loads However the tool will be operational again after the battery is removed and reinstalled ...

Page 9: ...h setting handle by turning counterclockwise NOTE Be sure to close the shutter to prevent dust Tightening torque chart reference values Thisdataconsistsofreferencevaluesmeasured under the conditions described below During actual work values will vary based on operating conditions lock bolt target substrate method of securing the bolt in place etc Measurement conditions As defined by Panasonic 0 2 ...

Page 10: ... allow the battery pack to cool before resuming use of the tool The tool is too hot to operate Stop work and allow the tool to cool before resuming use The contacts that connect the battery pack and tool are dirty Remove any dirt The battery pack has not been properly inserted into the tool Insert the battery pack firmly into the tool The pins on either the tool or battery pack have worn down Repl...

Page 11: ...eplace the battery pack cover immediately in order to prevent dust or dirt from contaminating the battery terminals and causing a short circuit Battery Pack Life The rechargeable batteries have a limited life If the operation time becomes extremely short after recharging replace the battery pack with a new one Battery Recycling ATTENTION A Li ion battery that is recyclable powers the product you h...

Page 12: ... 48 68 in lbs 5 8 N m 0 51 0 82 kgf m 44 25 70 81 in lbs 5 10 N m 0 51 1 02 kgf m 44 25 88 51 in lbs Number of torque set ting levels 60 In approx 0 08 N m increments 60 In approx 0 08 N m increments 60 In approx 0 13 N m increments Overall length 199 mm 7 53 64 Weight with battery pack EYFB41 1 25 kg 2 76 lbs 1 3 kg 2 87 lbs Weight with battery pack EYFB42 1 5 kg 3 31 lbs 1 5 kg 3 31 lbs CAUTION ...

Page 13: ...on battery Battery voltage 14 4 V DC 3 6 V 4 cells 14 4 V DC 3 6 V 8 cells BATTERY CHARGER not included with shipment Model EY0L82 Rating See the rating plate on the bottom of the charger Weight 0 93 kg 2 05 lbs Charging time EYFB41 Usable 35 min Full 40 min EYFB42 Usable 50 min Full 60 min ...

Page 14: ...sez jamais le cordon pour transporter pour tirer ou pour débrancher l outil mécanique Gardez le cordon éloigné de la chaleur de l huile d objets aux bords coupants ou de pièces en mouvement Les cordons endommagés on emmêlés augmentent le risque d électrocution 5 Lors du fonctionnement des outils méca niques à l extérieur utilisez une rallonge adaptée à l utilisation à l extérieur L utilisation d u...

Page 15: ...r le fonctionnement de l outil mécanique S il est endommagé faites réparer l outil mécanique avant de l utiliser De nombreux accidents sont provoqués par des outils mécaniques mal entre tenus 6 Maintenez les outils de coupe affûtés et propres Les outils de coupe bien entretenus avec des lames bien affûtées ont moins de chances de gripper et sont plus faciles à contrôler 7 Utilisez l outil mécaniqu...

Page 16: ...ur peut devenir légèrement chaud Cela est nor mal NE chargez PAS la batterie pendant une longue période 6 Lorsque vous rangez ou transportez l outil mettez le levier d inversion marche avant marche arrière sur la position centrale verrouillage du commutateur 7 Ne forcez pas l outil en main tenant la gâchette de contrôle de vitesse enfoncée à moitié mode de contrôle de la vitesse de sorte que le mo...

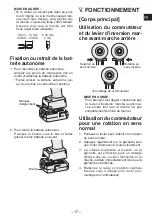
Page 17: ...vant Bouton V FONCTIONNEMENT Corps principal Utilisation du commutateur et du levier d inversion mar che avant marche arrière Rotation en sens normal Rotation en sens inverse Verrouillage de commutateur MISE EN GARDE Pour prévenir tout dégât n actionnez pas le levier d inversion marche avant mar che arrière tant que la mèche n a pas complètement ter miné de tourner Utilisation du commutateur pour ...

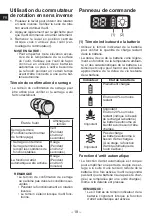
Page 18: ...ation de serrage ne s allume pas dans les conditions sui vantes Pendant le fonctionnement en rotation inverse Le témoin s éteint lorsque l outil fonc tionne Panneau de commande 1 2 1 Témoin indicateur de la batterie Utilisez le témoin indicateur de la batterie pour vérifier la quantité de charge restant dans la batterie La durée de vie de la batterie varie légère ment en fonction de la température...

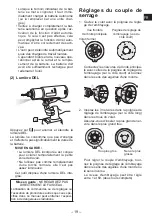
Page 19: ...isez pas comme remplacement d une torche normale elle n est pas assez lumineuse Cet outil dispose d une lumière DEL inté grée Mise en garde NE REGARDEZ PAS DIRECTEMENT LE FAISCEAU L utilisation de commandes ou de réglages ou l exécution de procédures autres que ceux spé cifiés dans ce manuel peut entraîner l exposi tion à de dangereuses radiations Réglages du couple de serrage 1 Ouvrez le volet av...

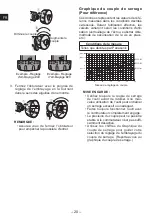
Page 20: ...e l écrou substrat cible méthode de sécurisation de la vis en place etc Conditions de la mesure Telles que décrites par Panasonic 0 2 4 6 8 10 12 53 1 106 2 in lbs 1 10 30 20 40 50 60 N m EYFGB3 EYFGB2 EYFGB1 Niveau de réglage du couple MISE EN GARDE Vérifiez toujours le couple de serrage de l outil avant de l utiliser Une mau vaise utilisation de l outil peut entraîner un serrage excessif ou inad...

Page 21: ... autonome refroidir avant de reprendre l utilisation de l outil L outil est trop chaud pour pouvoir fonctionner Arrêter le travail et laisser l outil refroidir avant de reprendre l utili sation Les contacts connectant la batterie autonome et l outil sont sales Retirer toute crasse La batterie autonome n a pas été correctement insérée dans l outil Bien insérer la batterie autonome dans l outil Les ...

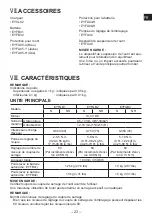
Page 22: ... Batterie Pour une utilisation correc te de la batterie autonome Batterie autonome Li ion Pour une longévité optimale de la batterie rangez la batterie autonome Li ion sans la charger après l avoir utilisée Lors de la charge de la batterie autonome assurez vous que les bornes du chargeur de batterie sont libres de tout corps étranger comme de la poussière et de l eau etc Net toyez les bornes avant...

Page 23: ...ête 12 16 mm 15 32 5 8 Vitesse sans charge Niveau 0 800 80 0 750 75 0 450 45 Portée de réglage du couple 2 5 5 N m 0 20 0 56 kgf m 17 70 48 68 in lbs 5 8 N m 0 51 0 82 kgf m 44 25 70 81 in lbs 5 10 N m 0 51 1 02 kgf m 44 25 88 51 in lbs Réglage du nombre de niveaux de couples de serrage 60 Par incréments d envi ron 0 08 N m 60 Par incréments d envi ron 0 08 N m 60 Par incréments d envi ron 0 13 N ...

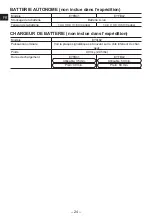
Page 24: ...atterie 14 4 V CC 3 6 V 4 piles 14 4 V CC 3 6 V 8 piles CHARGEUR DE BATTERIE non inclue dans l expédition Modèle EY0L82 Puissance nominale Voir la plaque signalétique se trouvant sur le côté inférieur du char geur Poids 0 93 kg 2 05 lbs Durée de chargement EYFB41 Utilisable 35 min Plein 40 min EYFB42 Utilisable 50 min Plein 60 min ...

Page 25: ...agua que entra en una herramienta eléctrica aumentará el riesgo de des carga eléctrica 4 No abuse del cable Nunca utilice el cable para transportar tirar de o desenchufar la herramienta eléctrica Mantenga el cable lejos de fuentes de calor aceite bordes afilados o piezas móviles Un cable dañado o enredado puede au mentar el riesgo de descarga eléc trica 5 Cuando haga funcionar una herra mienta elé...

Page 26: ... de las herramientas eléctricas Si está dañada haga reparar la herramienta eléc trica antes de utilizar Muchos accidentes se deben a her ra mientas eléctricas mal mantenidas 6 Mantenga las herramientas de corte afiladas y limpias Las herramientas de corte bien mante nidas con bordes de corte afilados tienen menos posibilidades de atascarse y son más fáciles de controlar 7 Utilice la herramienta el...

Page 27: ...en la uni dad 5 Durante la carga el cargador puede calen tarse levemente Esto es normal NO cargue la batería por períodos prolon gados 6 Cuando guarde o transporte la herramien ta coloque la palanca de avance marcha atrás en la posición central bloqueo del interruptor 7 No fuerce la herramienta apretando el gatillo de control de velocidad a la mitad modo de control de velocidad para que se pare el...

Page 28: ...otón V FUNCIONAMIENTO Cuerpo principal Funcionamiento del inte rruptor y de la palanca de avance marcha atrás Avance Marcha atrás Bloqueo del interruptor PRECAUCIÓN Para impedir que se produzcan daños no utilice la unidad de palanca de avan ce marcha atrás la broca se detiene del todo Funcionamiento del inte rruptor de rotación de avan ce 1 Empuje la palanca para que se produzca una rotación de av...

Page 29: ...s NOTA La lámpara de confirmación de apriete no se encenderá bajo las siguientes condiciones Durante la operación de rotación en reversa La lámpara se apaga cuando la herra mienta está en operación Panel de control 1 2 1 Lámpara indicadora de la bate ría Use la lámpara indicadora de la batería para verificar cuánta carga queda en la batería La vida de la batería varía levemente con la temperatura ...

Page 30: ... carga y no afectará significativamente la duración de la batería PRECAUCIÓN La luz LED integrada se ha diseñado para iluminar la pequeña área de traba jo temporalmente No lo utilice en lugar de una linterna normal ya que no tiene suficiente brillo Esta herramienta tiene una luz LED inte grada Precaución NO MIRE FIJAMENTE EL HAZ DE LUZ El uso de controles o ajustes o la realización de otros proced...

Page 31: ... real los valores variarán en función de las condicio nes de operación perno de bloqueo sustrato objetivo método de fijación del perno en su lugar etc Condiciones de medición Según lo definido por Panasonic 0 2 4 6 8 10 12 53 1 106 2 in lbs 1 10 30 20 40 50 60 N m EYFGB3 EYFGB2 EYFGB1 Nivel de ajuste del par de torsión PRECAUCIÓN Siempre verifique el par de torsión de apriete de la herramienta ant...

Page 32: ...e antes de reanudar el uso de la herramienta La herramienta está demasia do caliente para operar Detenga el trabajo y permita que la herramienta se enfríe antes de reanudar su uso Los contactos que conectan el paquete de batería y la herra mienta están sucios Remueva cualquier suciedad El paquete de batería no ha sido insertado apropiadamente en la herramienta Inserte firmemente el paquete de bate...

Page 33: ...es volá tiles de limpieza Paquete de batería Para un uso adecuado del paquete de batería Paquete de batería de Li ión Para una vida óptima de la batería guarde el paquete de batería de Li ión siguiendo el uso sin carga Cuando cargue el paquete de batería con firme que los terminales en el cargador de batería estén libres de materias extrañas tales como polvo y agua etc Limpie los ter minales antes...

Page 34: ... m 44 25 70 81 in lbs 5 10 N m 0 51 1 02 kgf m 44 25 88 51 in lbs Niveles de ajuste del nú mero del par de torsión 60 Aproximadamente in crementos de 0 08 N m 60 Aproximadamente in crementos de 0 08 N m 60 Aproximadamente in crementos de 0 13 N m Longitud total 199 mm 7 53 64 Peso con paquete de batería EYFB41 1 25 kg 2 76 lbs 1 3 kg 2 87 lbs Peso con paquete de batería EYFB42 1 5 kg 3 31 lbs 1 5 ...

Page 35: ...ón de batería 14 4 V CC 3 6 V 4 celdas 14 4 V CC 3 6 V 8 celdas CARGADOR DE BATERÍA no se incluye con el embarque Modelo EY0L82 Régimen Vea la placa de especificaciones en la parte inferior del cargador Peso 0 93 kg 2 05 lbs Tiempo de carga EYFB41 Utilizable 35 min Completa 40 min EYFB42 Utilizable 50 min Completa 60 min ...

Page 36: ...Printed in Japan Panasonic Eco Solutions North America Two Riverfront Plaza Newark NJ 07102 Panasonic Canada Inc 5770 Ambler Drive Mississauga Ontario L4W 2T3 www panasonic ca ...

Reviews: