background image

23

RQT6549

Advanced operations

Digital output

[DVD-A]


[DVD-V]

Change the settings when you have connected equipment through this
unit’s DIGITAL AUDIO OUT terminal (OPTICAL or COAXIAL).

PCM Down Conversion

Select how to output audio with a sampling frequency of 96 kHz or
88.2 kHz.

Select “Yes”  if the equipment you connect cannot process signals with a
sampling frequency of 96 kHz or 88.2 kHz.

Also make the appropriate “Digital Audio Output” setting. (

 page 21)

No (Factory preset): Output as 96 kHz or 88.2 kHz

Yes: Converted to 48 kHz or 44.1 kHz

[Note]

Signals are converted to either 48 kHz or 44.1 kHz despite the above
settings if the signals have a sampling frequency of over 96 kHz, or the
disc has copy protection.

Some equipment cannot handle sampling frequencies of 88.2 kHz, even
if they can handle 96 kHz. Read your equipment’s operating instructions
for details.

Dolby Digital, DTS Digital Surround and MPEG

§

Bitstream (Factory preset for Dolby Digital):
Select if the equipment you connected can decode the signal.

PCM (Factory preset for DTS Digital Surround and MPEG

§

):

Select if the equipment you connected cannot decode the signal.

§

For Australia and N.Z. only

IMPORTANT
If the equipment you connected cannot decode the signal, the
setting must be changed to PCM. If not, signals the equipment cannot
process will be output by this unit, causing high levels of noise which
can damage your hearing and the speakers.

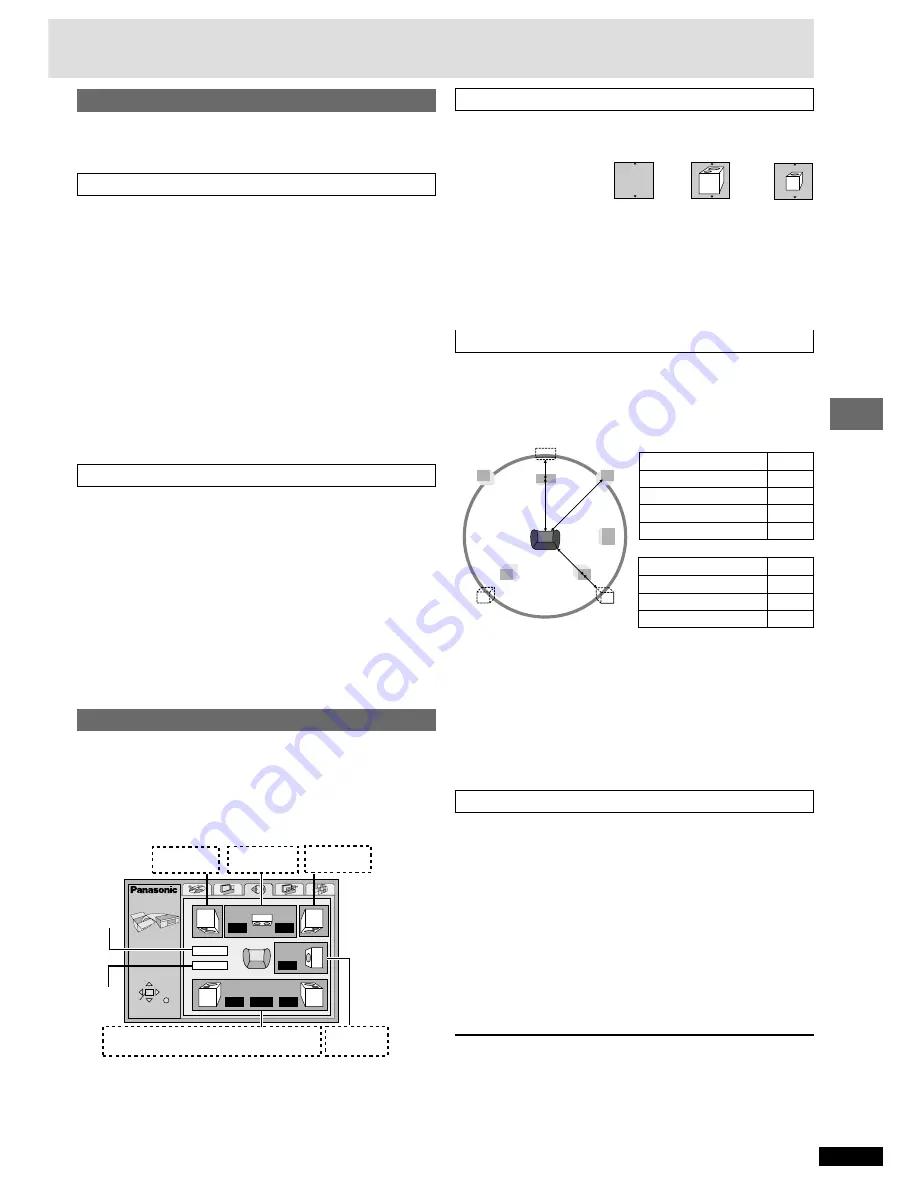
Speaker setting

Change speaker presence and size 

a

, delay time 

b

, and channel balance

c

 to suit the speakers you have connected.

These settings are not necessary when you select “2-channel” (only two
speakers are connected).

[Note]

This feature works only for analog connection (

 page 7).

Speaker presence and size (

a

)

1. Press [

3

4

2

1

] to select the item and press [ENTER].

2. Press [

3

4

] to select the setting and press [ENTER].

Icon examples:
Surround speaker (LS)

Large:

When the speaker supports low-frequency (under 100 Hz)
reproduction.

Small:

Select when the speaker does not support low-frequency
reproduction.

If the subwoofer set to No, the front speakers will automatically be set to
Large.

Delay time (

b

)

[DVD-V]

 (Dolby Digital, center and surround speakers only)

For optimum listening with 5.1-channel sound, all the speakers, except for
the subwoofer, should be the same distance from the seating position. If
you have to place the center or surround speakers closer to the seating
position, adjust the delay time to make up for the difference.

If distances 

d

 (from the center speaker) and 

f

 (from the surround

speakers) are the same as or greater than 

e

 (from the front speakers),

leave the delay time as “0”, the factory preset.
If either distance 

d

 or 

f

 is less than 

e

, find the difference in the relevant

table and change to the recommended setting.

Changing the delay time
1. Press [

3

4

2

1

] to select the delay time box and press

[ENTER].

2. Press [

3

4

] to adjust the delay time and press [ENTER].

Channel balance (

c

)

1. Press [

3

4

2

1

] to select “Test” and press [ENTER].

A test signal is output from one speaker at a time, starting with the front
left speaker and proceeding clockwise.

Front (L)

_——)

Center

_——)

Front (R)

:

;

Surround (LS)

(————=

Surround (RS)

2. While listening to the test signal, press [

3

4

] to adjust the

volume of the center and surround speakers so they are the same
apparent volume as the front speakers
 (

j

6 to 

i

6).

(The front speakers cannot be adjusted here.)

3. Press [ENTER].

The test signal stops.

No signal is output for the subwoofer. To adjust its volume, play

something, then return to this screen to adjust to suit your taste.

To finish the speaker setting
Press [

3

4

2

1

] to select “Exit” and press [ENTER].

[Note]

The unit may be unable to output as set here due to limitations imposed by
the unit itself or the disc being played. (The display’s  “D.MIX” indicator
goes out in these cases.)

Center speaker

Difference

Approx. 50 cm (1 

1

/

2

 feet)

Approx. 100 cm (3 feet)

Approx. 150 cm (5 feet)

Approx. 200 cm (6 feet)

Setting

1.3 ms

2.6 ms

3.9 ms

5.3 ms

Setting

5.3 ms

10.6 ms

15.9 ms

Surround speakers

Difference

Approx. 200 cm (6 feet)

Approx. 400 cm (12 feet)

Approx. 600 cm (18 feet)

SETUP

SELECT

ENTER  RETURN

m s

m s

d B

 0

d B

d B

L

Exit

Test

LS

R

SW

C

RS

d B

 0

 0

 0

0

 0

b   a   c

a

a

 (LS)


(RS)

a  c                b               c  a

c  a

Front (L)

  Center

Front (R)

——Surround——

Subwoofer

Exit

Test
signal

No

Large

Small

LS

LS

LS

RS

L

R

SW

f

e

d

C

Summary of Contents for DVD-RP82S Operating

Page 1: ...LL Example For Asia The region number of this player is 3 The player will play DVD Video marked with labels containing 3 or ALL Example For Australia and N Z The region number of this player is 4 The player will play DVD Video marked with labels containing 4 or ALL Example The warranty can be found on page 26 En la página 27 hay una guía de referencia rápida en español RQT6549 P For U S A only 2 4...

Page 2: ...sc information 5 Connection 6 Connection to a television 6 Home Theater Enjoying more powerful sound 7 Control reference guide 8 The remote control 8 Quick setup 9 Basic operations Basic play 10 When a menu screen appears on the television 10 Skipping items 10 Fast forward and rewind SEARCH 10 Slow motion play 10 Frame by frame viewing 10 Replaying a scene QUICK REPLAY 11 Starting play from a sele...

Page 3: ...CASE BUILT IN CABINET OR IN ANOTHER CONFINED SPACE ENSURE THE UNIT IS WELL VENTILATED TO PREVENT RISK OF ELECTRIC SHOCK OR FIRE HAZARD DUE TO OVERHEATING ENSURE THAT CURTAINS AND ANY OTHER MATE RIALS DO NOT OBSTRUCT THE VENTILATION VENTS DO NOT OBSTRUCT THE UNIT S VENTILATION OPENINGS WITH NEWSPAPERS TABLECLOTHS CURTAINS AND SIMILAR ITEMS DO NOT PLACE SOURCES OF NAKED FLAMES SUCH AS LIGHTED CANDLE...

Page 4: ... of electric shock or fire due to overheating ensure cur tains and other materials do not obstruct the unit s ventilation 2 Foreign material Ensure objects and liquids do not get into the unit Avoid exposing the unit to excessive smoke dust mechanical vibration and shock 3 Magnetism Situate the unit away from equipment and devices that generate strong magnetic fields 4 Stacking Do not place heavy ...

Page 5: ...or U S A and Canada only DVDs that can be played You can play discs with these symbols Playing DVDs and Video CDs The producer of these discs can control how they are played so you may not always be able to control play as described in these operating instructions Read the disc s instructions carefully Video systems For Asia Australia and N Z only This unit can play PAL and NTSC but your televisio...

Page 6: ...minance signal Y separately in order to achieve high fidelity in reproducing colors The description of the component video input terminals depends on the television or monitor e g Y PB PR Y B Y R Y Y CB CR Connect to terminals of the same color For U S A and Canada After making this connection change the black level for a better picture page 21 Video Black Level Control Video cable not included Te...

Page 7: ...o Output On RE MASTER Off page 21 PCM Down Conversion Yes Dolby Digital DTS Digital Surround MPEG PCM page 23 MPEG for Australia and N Z only Analog recording Connection B above You can record to a cassette deck or other recording equipment There are no limitations on recording analog signals as there are with digital signals Insert fully with this side facing up You can connect to a digital ampli...

Page 8: ...s out when the unit is turned on W Multi channel indicator MULTI CH 17 X Audio only indicator AUDIO ONLY 12 Y Re master button indicator RE MASTER 12 Z Progressive out button indicator PROGRESSIVE OUT 10 Buttons such as 2 function the same as the buttons on the remote control The actual marking of the standby on switch depends on the area Illustrations in these operating instructions use the marki...

Page 9: ... 9 A SRD CINEMA D ENH AUDIOONLY 1 3 0 4 0 5 0 6 2 0 6 RETURN SELECT SETUP QUICK SETUP Select the menu language ENTER RETURN English Français Español TV Aspect Select 4 3 regular or 16 9 widescreen to suit your television If you have a regular 4 3 television you can also select how video on some discs is shown page 21 Video TV Aspect 4 3 Pan Scan Factory preset Widescreen software is expanded to fi...

Page 10: ...UP menu and the progressive out indicator lights up when pressed When progressive output is on closed captions will not be displayed Basic play When a menu screen appears on the television DVD A DVD V VCD Press the numbered buttons to select an item To select a 2 digit number e g 23 S10 2 3 When playing DVDs you can also use 3 4 2 1 to select items Press ENTER to confirm your selection Play of the...

Page 11: ...fter 60 minutes 60 min Z Z D MIX C D B M PG RMTR TTL GRP TRCK CHAP D N R DVD AVRCD WMA MP3 A ONLY PROG SLEEP A B RND PGM A Position memorized Light as you memorize positions Resume function RAM DVD A DVD V VCD CD WMA MP3 When the elapsed play time is displayed The position you stopped play at is recorded by the unit when is flashing on the display While is flashing press 1 PLAY to start play from ...

Page 12: ...nit to standby Selecting still pictures Page Skip DVD A During play or while paused Press PAGE The page changes each time you press the button Improving CD sound RE MASTER CD Main unit only Re master digitally converts standard 44 1 kHz 16 bit CD signals to 88 2 kHz 24 bit so sound quality approaches that of DVD Audio There are 3 modes each suited for a different music type Press RE MASTER The ind...

Page 13: ...or a track CD CD text 1 Press 3 4 to select a track 2 Press 1 to show the text information Press 2 1 to select other tracks Press ENTER to play tracks selected here To return to the list screen Press RETURN Finding a track to play Enter part of a track title to make a search Although the characters are upper case the unit also searches for lower case Example search for tracks including the word LO...

Page 14: ... V WMA MP3 Press the numbered buttons to select a group DVD A WMA MP3 or a title DVD V Some items cannot be selected DVD V If you select bonus groups you will have to enter a 4 digit password page 12 DVD A 2 Press the numbered buttons to select a track DVD A VCD CD or a chapter DVD V WMA MP3 and press ENTER Repeat steps 1 and 2 to program other items Times are not displayed when programming DVD Vi...

Page 15: ...re than six You can select play lists with the numbered buttons To select a 2 digit number e g 23 S10 2 3 3 Press ENTER to start play To clear the play list screen Press PLAY LIST The unit returns to the condition it was in before you called up the play list To display information about a selected play list 1 Select the play list and press 1 2 Press 3 4 to select Contents and press ENTER Press 2 1...

Page 16: ... if it is on CINEMA RAM DVD A DVD V VCD You can change the picture quality for movie viewing Press CINEMA Each time you press the button Cinema1 Mellows images and l enhances detail in dark scenes l v l Cinema2 Sharpens images and l enhances detail in dark scenes l v Normal Normal mode Factory preset For your reference You can make finer adjustments to the picture if desired page 20 Picture Menu D...

Page 17: ...he unit is switched to standby Note Depending on the video format of the disc and current play status this feature may not work as described Menus may act or appear differently while 4 3 TV ZOOM is on Changing soundtracks subtitles and angles Some DVDs have multiple soundtracks subtitle languages and camera angles and you can change them during play or is displayed instead of the language number i...

Page 18: ...r in disc WMA MP3 i Total number of tracks on disc WMA MP3 j Current bitrate WMA MP3 k Current sampling frequency WMA MP3 l Audio mode RAM VCD page 17 LR L R J m Menu play VCD with playback control only Indicates whether menu play playback control is on or off n Still picture number DVD A Selected picture is shown during play Numbered buttons RAM DVD A DVD V VCD CD WMA MP3 On Screen Menu Icons are...

Page 19: ...when you open the disc tray or switch the unit to standby Note This feature doesn t work during program and random play All the markers are cleared when the disc tray is opened or the unit is switched to standby Display Menu e g DVD Video a 4 3 TV ZOOM RAM DVD A DVD V page 17 ON OFF b Bitrate display RAM DVD A DVD V VCD Displays the bitrate approximate values and type of picture page 25 Glossary I...

Page 20: ...0P d c Auto1 e a f g U 1 b a U 2 480P d c Auto1 a b N 480I When the progressive out indicator is off U 3 b a 480I e a f g U 2 h a i j U 1 a Current position RAM DVD A DVD V VCD CD WMA MP3 b PG Program number RAM PL Play list number RAM T Title number DVD V Track number VCD CD G Group number DVD A WMA MP3 c T Track number in group DVD A WMA MP3 C Chapter number DVD V Progress indicator Indicates ho...

Page 21: ... the setting to suit your television and preference Progressive Out Choose Enable to enable progressive output Still Mode page 25 Glossary Frame still and field still Specify the type of picture shown when paused Black Level Control 4 Change the black level of the picture if you connected a television through the COMPONENT VIDEO OUT terminals NTSC Disc Output 5 6 Choose whether PAL 60 or NTSC sign...

Page 22: ... Assamese 6583 Aymara 6588 Azerbaijani 6590 Bashkir 6665 Basque 6985 Bengali Bangla 6678 Bhutani 6890 Bihari 6672 Breton 6682 Bulgarian 6671 Burmese 7789 Language code list Byelorussian 6669 Cambodian 7577 Catalan 6765 Chinese 9072 Corsican 6779 Croatian 7282 Czech 6783 Danish 6865 Dutch 7876 English 6978 Esperanto 6979 Estonian 6984 Faroese 7079 Fiji 7074 Finnish 7073 French 7082 Frisian 7089 Gal...

Page 23: ... set to No the front speakers will automatically be set to Large Delay time b DVD V Dolby Digital center and surround speakers only For optimum listening with 5 1 channel sound all the speakers except for the subwoofer should be the same distance from the seating position If you have to place the center or surround speakers closer to the seating position adjust the delay time to make up for the di...

Page 24: ...or some other external factor Reset procedure Press POWER Í to switch the unit to the standby mode and then back to ON Alternatively press POWER Í to switch the unit to the standby mode disconnect the AC power supply cord and then reconnect it Check that the batteries are installed correctly The batteries are depleted Replace them with new ones Point the remote control at the remote control signal...

Page 25: ...these fields one after the other to create frames A still is shown when you pause a moving picture A frame still is made up of two alternating fields so the picture may appear blurred but overall quality is high A field still is not blurred but it has only half the information of a frame still so picture quality is lower Interlace and progressive output NTSC the video signal standard has 480 inter...

Page 26: ...al use of the product service by anyone other than a Factory Servicenter or other Authorized Servicer or damage that is attributable to acts of God THERE ARE NO EXPRESS WARRANTIES EXCEPT AS LISTED UNDER LIMITED WARRANTY COVERAGE THE WARRANTOR IS NOT LIABLE FOR INCIDENTAL OR CONSEQUENTIAL DAMAGES RESULTING FROM THE USE OF THIS PRODUCT OR ARISING OUT OF ANY BREACH OF THIS WARRANTY As examples this e...

Page 27: ...ión o durante la pausa Pulse o 9 Avance rápido y rebobinado SEARCH Durante la reproducción Pulse 6 o 5 Reproducción a cámara lenta RAM DVD A DVD V VCD Durante la pausa Pulse 6 o 5 Visión cuadro a cuadro RAM DVD A DVD V VCD Durante la pausa Pulse 2 o 1 Pulse 1 PLAY para iniciar la reproducción Conexión a un televisor Para disfrutar de vídeo progresivo Haga la conexión a los terminales de entrada de...

Page 28: ...kHz sampling 4 Hz 44 kHz 96 kHz sampling DVD Audio 4 Hz 88 kHz 192 kHz sampling CD audio 4 Hz 20 kHz 2 S N ratio CD audio 115 dB 3 Dynamic range DVD linear audio 102 dB CD audio 98 dB 4 Total harmonic distortion CD audio 0 0025 Digital audio output Optical digital output Optical terminal Coaxial digital output Pin jack Pickup Wave length 658 nm 790 nm For U S A and Canada Laser power CLASS IIa CLA...

Reviews: