


1
\DVD-LS5\
5-inch wide screen LCD
2
\DVD-LS5\
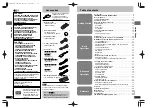
Colour button (COLOUR). . . . 27
3
\DVD-LS5\
Bright button (BRIGHT) . . . . . 27
4
\DVD-LS5\
Monitor button (MONITOR) . . 27
5
\DVD-LS5\
Monaural speaker
6
DC IN terminal (DC IN) . . . . . . . . . . . . . . 12
7
Headphone jack (
Ë
). . . . . . . . . . . . . . . . 16
8
Skip/Slow/Search buttons
(
:
,
9
) . . . . . . . . . . . . . . . . . . . . . . . 17
9
Disc lid switch (
2
OPEN) . . . . . . . . . . . 16
:
Repeat button (REPEAT) . . . . . . . . . . . . 24
;
Remote control signal sensor
<
Charge indicator (CHG) . . . . . . . . . . . . . 12
=
Standby indicator (
Í
) . . . . . . . . . . . . . . 12
>
Volume dial (
VOL) . . . . . . . . . . . . . 16
?
Audio output/,
Optical digital output terminal
(AUDIO/OPT OUT) . . . . . . . . . . . . . . 14, 34
@
Video output terminal (VIDEO) . . . . . . . 14
A
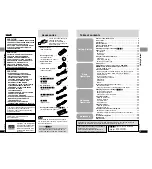
Top menu button (TOP MENU) . . . . 17, 18
B
Menu button (MENU) . . . . . . . . . 17, 18, 31
C
\DVD-LS5\
Return button (RETURN) . . . . 17
[DVD-PS3]
Return/Audio Only Player button
(
≥
RETURN/–AOP). . . . . . . . . . . . . . . 17, 22
D
\DVD-LS5\
Display button
(DISPLAY) . . . . . . . . . . . . . . . . . . . . . 13, 28
[DVD-PS3]
Display/LCD mode button
(
≥
DISPLAY/–LCD MODE). . . . . . 13, 16, 28
E
Cursor jockey (
3
,
4
,
2
,
1
)/
Enter button (ENTER) . . . . . . . . . . . . . . 15
Move the cursor jockey in the direction you
want to move the cursor.
F
Play/On button (
1
, ON) . . . . . . . . . . . . . 16
G
Stop/Off button (
∫
, – OFF) . . . . . . . . . . 17
H
Pause button (
;
) . . . . . . . . . . . . . . . . . . 17
I
[DVD-PS3]
Hold switch (HOLD
1
) . . . 16
J
[DVD-PS3]
Display . . . . . . . . . . . . . . . . . . 16
K
Setup button (SETUP) . . . . . . . . . . . . . . 15
L
Standby/on switch (
Í
). . . . . . . . . . . . . . 17
M
Stop button (
∫
). . . . . . . . . . . . . . . . . . . . 17
N
Numbered buttons (1–9, 0,
S
10) . . . . . . 17
O
Slow/Search buttons (
6
,
5
) . . . . . . 17
P
Play mode button (PLAY MODE) . . . . . 23
Q
Play button (
1
). . . . . . . . . . . . . . . . . . . . 16
R
Angle button (ANGLE) . . . . . . . . . . . . . . 26
S
Subtitle button (SUBTITLE) . . . . . . . . . . 26
T
Audio button (AUDIO) . . . . . . . . . . . . . . 26
U
Advanced surround button
(A.SRD) . . . . . . . . . . . . . . . . . . . . . . . . . . 25
V
Cancel button (CANCEL) . . . . . . . . . . . . 23
W
Skip buttons (
:
,
9
) . . . . . . . . . . . . 17
11
RQT7074
Getting Started
10
RQT7074
Getting Started
CO
LO
UR
MON
ITOR
BRIG
HT
TO
P M
EN
U
ME
NU
RE
TU
RN
DIS
PLA
Y
ON
–O
FF
REP
EA
T
ENT
ER
VIDE
O
VOL
AUD
IO
OPT
OU
T
OPEN
CHG
Í
?
@
>
8
9
:
7
<
1
2
3
4
5
6
=
;
TOP MENU
MENU
RETURN
DISPLAY
ENTER
ON
–OFF
H G
A
B
C
D
F
E
HO
LD
J
I
∫
5
6
:
9
;
1
1
3
4
6
7
9
0
8
5
2
S
10
A.SRD
SETUP
ENTER
PLAY MODE
SUBTITLE
DISPLAY
TOP MENU
AUDIO
ANGLE
RETURN
MENU
CANCEL
Q
C
D
E
H
A
B
S
P
R
T
U
V
W
O
L
M
N
K
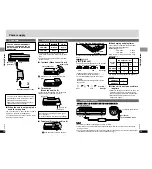
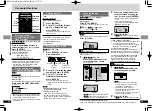
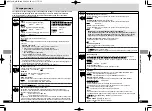
Buttons such as
A
function the same as the
controls on the unit.
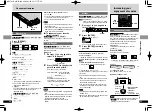
Control reference guide
VIDEO
VOL
AUDIO
OPT OUT
OPEN
CHG
Í
VIDEO
VOL
AUDIO
OPT OUT
ENT
ER
TOP
ME
NU
MEN
U
RET
URN
DIS
PLA
Y
–O
N
–O
FF
REPE
AT
OPEN
CHG
Í
COLOUR
MONITO
R BRIG
HT
VIDEO
VOL
AUDIO
OPT OUT
ENT
ER
TOP
ME
NU
MEN
U
RET
URN
DIS
PLA
Y
–O
N
–O
FF
REPE
AT
OPEN
CHG
Í
VIDEO
VOL
AUDIO
OPT OUT
TOP
ME
NU
MEN
U
RET
URN
SPL
AY
–O
N
–O
FF
REPE
AT
OPEN
CHG
Í
COLOU
R
MONITO
R BRIG
HT
COLOUR
MONITO
R BRIG
HT
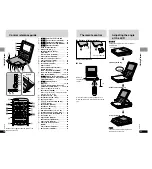
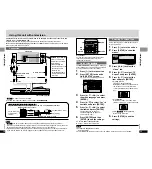
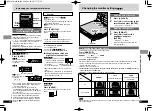
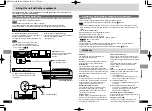
Open the LCD
Traditional Viewing
Slide
Click!
Enhanced Angle Viewing
Note
Close the LCD when moving the unit.
Do not carry by the LCD.
Compact viewing
Adjusting the angle
of the LCD
\DVD-LS5\
Change the angle of the LCD to suit your
viewing style.
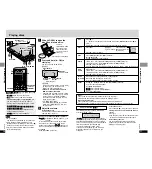
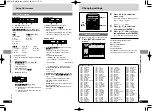
The remote control
∫
Battery (Lithium battery)
1
2
3
Face
+
upwards.
∫
Use
Aim at the sensor, avoiding obstacles, at a
maximum range of 7 m directly in front of the
unit.
30
°
30
°
Remote
control signal
sensor
7 m
Replacement : CR2025
[DVD-PS3]