background image

RQTC0178

14

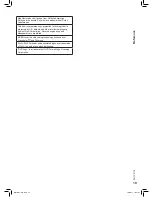
Changing the player settings

●  Referring to the table below, change as required.

●  Underlined items are the factory presets.

●  Items shown differ depending on the type of software.

●  Operations maybe differ depending on the type of software.

The settings remain intact even if you switch the unit to standby.

e.g. 

DVD-V

1

 Press [DISPLAY] twice.

2

 Press [

e


r

] to select “Setup” and press [OK].

“Language” tab

Display

● English  

● Deutsch 

● Français 

● Español 

● Italiano

● Nederlands 

● Svenska 

● Polski 

Subtitle

● English  

● German 

● French   

● Spanish 

● Italian

● Dutch   

● Swedish 

● Polish   

● Off

Audio

● English  

● German 

● French   

● Spanish 

● Italian

● Dutch   

● Swedish 

● Polish

DVD Menu

● English  

● German 

● French   

● Spanish 

● Italian

● Dutch   

● Swedish 

● Polish

Subtitle Text 

 The United Kingdom

● Latin1   

● Turkish  

● Latin2   

● Cyrillic

“Video” tab

TV Aspect

Choose the setting to suit your television and preference.

●  4:3 Pan&Scan: Regular aspect television (4:3) 

The sides of the widescreen picture are cut off so it fills the screen (unless  

prohibited by the disc).

●  4:3 Letterbox: Regular aspect television (4:3)  

Widescreen picture is shown in the letterbox style.

●  16:9: Widescreen television 

Use the television’s screen modes to change the way the picture is shown.

TV System

● NTSC   

● PAL 

“Audio” tab

Dynamic Range 

●  Off

● On: Adjusts for clarity even when the volume is low through compressing the range of the 

lowest sound level and the highest sound level. Convenient for late night viewing. (Only 

works with Dolby Digital.)

“Others” tab

Restore Default Settings

This returns all values in the Setup menu and the on-screen menu, except for “Set Password” 

and “Ratings” to the default settings.

System Information

Display firmware version of this unit.

DivX

®

 VOD Registration

You need this registration code to purchase and play DivX Video-on-Demand (VOD) content.  

(→ 10)

DivX

®

 VOD deactivation

Cancel the unit’s registration. (→ 10)

Set Password

Press to set password. 

●  Enter the default password “8888” then set your password.

Ratings

Setting ratings (When level 8 is selected)

●  1 to 7: To prohibit play of DVD-Video with corresponding ratings recorded on them.

●  8 No Limit

When setting a ratings level, a password screen is shown. Follow the on-screen instructions.

Do not forget your password.

A message screen will be shown if a DVD-Video exceeding the ratings level is inserted in the 

unit. Follow the on-screen instructions.

Set

Display

Subtitle

Audio

DVD Menu

English

English

English

English

Subtitle Text

Latin2

Language

Setup

Video
Audio
Others

Return

●  Press 

[

e


r


w


q

]

 and 

[OK]

 to set.

●  To enter number: press 

[

e


r

]

 to select.

●  To return to the previous screen: press 

[RETURN]

.

● 

To exit the screen:

 Press 

[RETURN]

 several times.

RQTC0178-B.indd   14

1/4/2011   10:37:36

Summary of Contents for DVD-LS92

Page 1: ...ed illustrations in these operating instructions are of DVD LS92 and for the United Kingdom Dear customer Thank you for purchasing this product For optimum performance and safety please read these ins...

Page 2: ...S NOT WATERPROOF KEEP DRY Before use Remove the connector cover How to replace the fuse The location of the fuse differ according to the type of AC mains plug figures A and B Confirm the AC mains plug...

Page 3: ...rates on AC between 100 V and 240 V But Obtain a suitable plug adaptor if the plug does not fit the AC mains socket Warning Risk of fire explosion and burns Do not disassemble heat above 60 C or incin...

Page 4: ...t shopping for a wide range of finished products take a browse on our website for further details Interested in purchasing an extended guarantee Please call 0870 240 6284 or visit our website www pana...

Page 5: ...dby mode and goes out when the unit is turned on Started To household mains socket Finished AC adaptor included Recharging the battery The battery is not charged at the time of purchase Charge before...

Page 6: ...unit Close the LCD Don t hold by the LCD Functions operated by buttons on the unit will not work when the LCD is closed Approximate recharging and play times Hours Battery pack Recharging When the un...

Page 7: ...ing the recording method and how the files were created 12 Tips for making data discs 1 This unit can play CD R RW recorded with CD DA or Video CD format 2 Discs recorded on DVD recorders or DVD video...

Page 8: ...ection Open the lid To change the language on the display 14 Language tab While stopped the unit automatically turns off once about 15 minutes about 5 minutes when using the battery pack have elapsed...

Page 9: ...V Press and hold u i while paused VCD DivX Press and hold i while paused Press q ON to return to normal play TOPMENU Top menu DVD V Shows a disc top menu MENU Menu DVD V Shows a disc menu VCD Switch...

Page 10: ...f plays does not decrease due to the resume play function Note Video images of the copyright protect DivX contents stored on a USB device cannot be output When you want to play the DivX contents store...

Page 11: ...ecial text or characters are included in the subtitles text When the file size is larger than 256 KB When characters with styling specified are included in the subtitle data Codes that specify the cha...
Page 12: ...creen and computer screen This unit cannot play files recorded using packet writing Naming folders and files on data discs Files are treated as contents and folders are treated as groups on this unit...

Page 13: ...DVD V Change soundtracks VCD Select L R L R L R Angle To select angles DVD V with multiple angles JPEG Interval JPEG To change the slideshow timing Fast Normal Slow Off Fast is the factory preset Tra...

Page 14: ...ge Off On Adjusts for clarity even when the volume is low through compressing the range of the lowest sound level and the highest sound level Convenient for late night viewing Only works with Dolby Di...

Page 15: ...o faulty installation Left side of this unit You can enjoy audio through your car audio system by connecting a car stereo cassette adaptor not included to the headphone jack on the left side of this u...

Page 16: ...dio performance 1 Frequency response DVD linear audio 4 Hz to 22 kHz 48 kHz sampling 4 Hz to 44 kHz 96 kHz sampling CD audio 4 Hz to 20 kHz 2 S N ratio 100 dB 3 Dynamic range 80 dB 4 Total harmonic di...

Page 17: ...n these operating instructions 7 The unit may not be operating properly due to lightning static electricity or some other external factor Turn the unit off and then back to ON Alternatively turn the u...

Page 18: ...radiate different colours The LCD is constructed with precision technology so 99 99 of the pixels are active but of the remaining of 0 01 there are pixels that may be black or emit light constantly Th...

Page 19: ...ected by U S patents and other intellectual property rights of Rovi Corporation Reverse engineering and disassembly are prohibited MPEG Layer 3 audio coding technology licensed from Fraunhofer and Tho...

Page 20: ...6 66 EC By disposing of these products and batteries correctly you will help to save valuable resources and prevent any potential negative effects on human health and the environment which could other...

Reviews: