background image

Chapter 2   Using Machine

10

Sending a Document via RightFax

When the RightFax server is used to send a fax, the following details are entered in the recipient (To) 
field and sender (From) field.

z

Using the RightFax function requires the configuration of RightFax server. Refer to 

RightFax Server Setting


(see page 27).

Field

Content

Recipient

Station name registered for One-Touch or ABBR. dialling. If manual number dialling is used, you can 
enter the user name from the Control Panel.

Sender

When the User Authentication is not enabled

Logo and Email address of this device
or
Name and Email address selected with the Sender Selection function

When the User Authentication is enabled

Name of the authenticated user registered with the Windows server

1

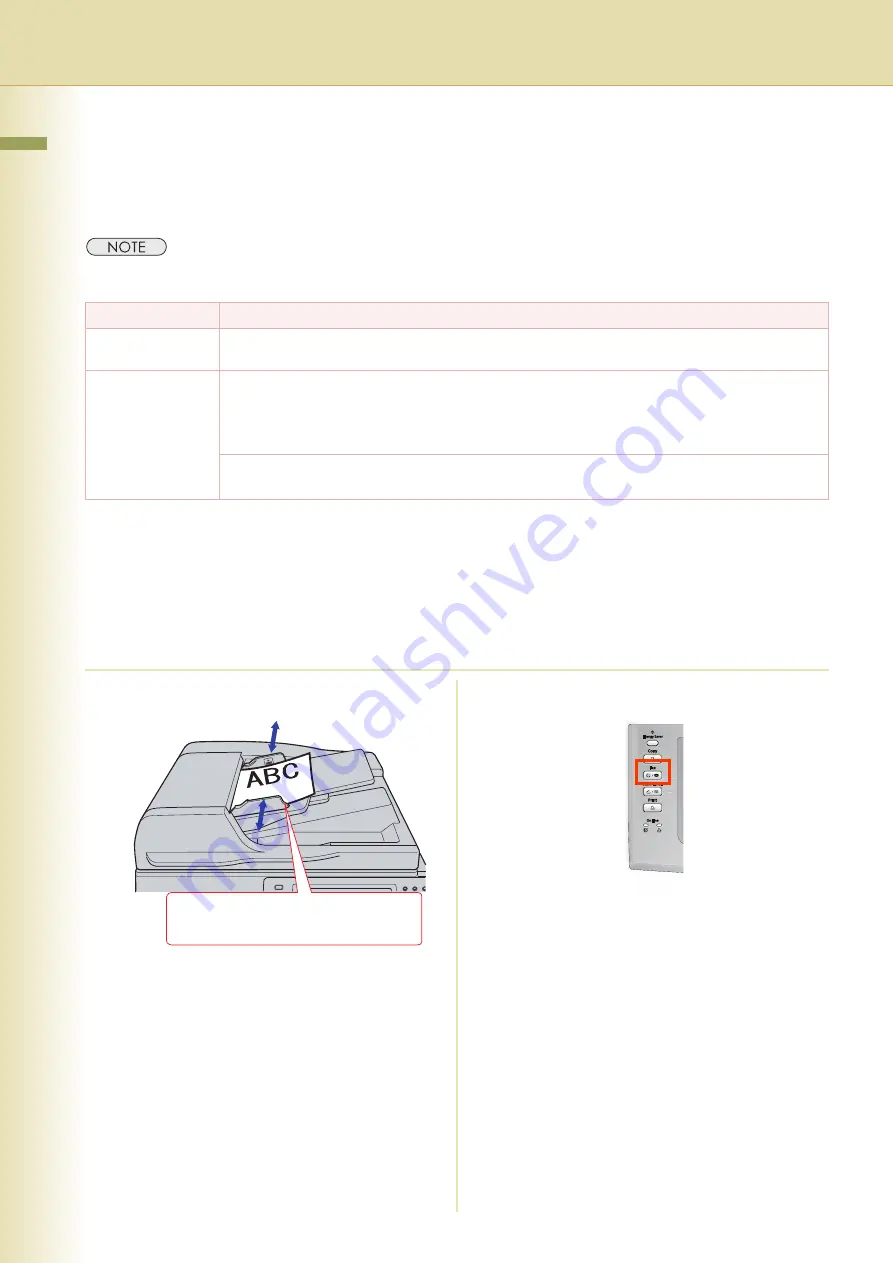
Place original(s) on the ADF.

z

If you need to log in, refer to 

Login 

Procedure (Using Copy/Fax/Scanner/
Printer)

 (see page 8).

2

Press the 

Fax

 key.

Face up. 
Up to 100 sheets (80 

g

/m

2

 / A4)

Summary of Contents for DP-C406

Page 1: ...C266 Before operating this machine please carefully read this manual and keep this documentation in a safe place for future reference Illustration shows optional accessories that may not be installed on your machine Operating Instructions For User Authentication ...

Page 2: ...uide For Administrator Describes how to set up the machine Setup Guide For User Describes how to install the printer driver and application software to client PC Copy Function Describes how to make a Colour Copy with creative features Facsimile and Internet Fax Function The Facsimile function is available when the optional G3 Fax Communication Board is installed Describes how to send receive a Fac...

Page 3: ...n Description Indicates important information that must be read in detail Indicates reference information Notation Description For Keys and Buttons Hard buttons on the Control Panel are depicted as key and soft buttons on the Touch Panel Display are depicted as xxx Ex Press the Start key and select More Menus ATTENTION NOTE ...

Page 4: ...ding a Document via RightFax 10 Chapter 3 Setting Machine Authentication Setting 12 Authentication Method Setting 15 ID Timeout Setting 17 Auto Reset Time Setting 19 Log on Attempts Setting 21 Lockout Time Setting 23 Job Tracking Setting 25 RightFax Server Setting 27 Chapter 4 Appendix Administrator Login 29 Administrator Name and Password 31 Description of Job Tracking Notice 33 ...

Page 5: ...log and the send receive log via Email The Email sent to the system administrator includes the name of the device user destination communication time and the image of the document that was sent or received zNTLM authentication is a user authentication protocol used in the Windows NT 4 family of operating systems NTLM uses a challenge response method and the password is encrypted when sending acros...

Page 6: ...k Dialling Fax Forward For details refer to the Operating Instructions For Facsimile and Internet Fax of provided CD ROM zIf the system administrator cannot receive the Job Tracking logs check both the network settings and the connection of the LAN cable Thursday 01 January 2009 11 57AM General Telephone Line PSTN Login Data Tracking Image Windows Server Mail Server PNAM Panasonic Device System Ad...

Page 7: ...t on the PC from the RightFax server zWhen the RightFax function is enabled the following functions are not available Password Transmission Deferred Polling Sub Address Transmission LAN Relay Transmission Polling Fax Cover Sheet Direct Transmission The document s is always stored into memory when sending the document s For details refer to the Operating Instructions For Facsimile and Internet Fax ...

Page 8: ...Authentication function 1 The login screen appears if User Authentication is enabled zUser Authentication can be set independently for each function copying faxing scanning and printing If User Authentication is disabled for the function the Control Panel displays the standby message The login screen appears only when a function that requires authentication is selected 2 Select User ID and enter y...

Page 9: ...tting see page 19 zThe system administrator can specify whether authentication is required independently for each function copying faxing scanning and printing For details refer to Authentication Setting see page 12 1 2 Message Explanation Authentication Failed The login failed Check your user name and password Check whether the date and time are set properly Logon Attempts Exceeded The system has...

Page 10: ... for One Touch or ABBR dialling If manual number dialling is used you can enter the user name from the Control Panel Sender When the User Authentication is not enabled Logo and Email address of this device or Name and Email address selected with the Sender Selection function When the User Authentication is enabled Name of the authenticated user registered with the Windows server 1 Place original s...

Page 11: ...unction Parameters of provided CD ROM 4 Select Enter Name 5 Enter the recipient s name and then select OK Up to 15 characters 6 Select OK 7 Press the Start key zWhen the machine does not have connection to G3 PSTN all G3 transmissions are executed through RightFax server as Emails When the machine has connection to G3 PSTN only Auto Receive is possible through PSTN zWhether User Authentication thr...

Page 12: ...nd then select 09 Key Operator Mode 4 Enter the Key Operator password 8 digits and then select OK zThe default password is 00000000 zTo change the password select 80 Key Operator Password in the General Settings Key Operator Mode and then enter the new password 5 Select 40 59 tab and scroll the screen and then select 45 User Authentication z 46 ID Timeout 47 Logon Attempts and 48 Lockout Time are ...

Page 13: ...thentication is enabled for the first time you also need to specify the time zone system administrator s name and system administrator s password 8 Select or to specify the time zone and then select OK 9 Enter the system administrator name and then select OK Ex panasonic 10 Enter the system administrator password and then select OK Ex pana zThe administrator name and password set here are required...

Page 14: ...3 Setting Machine 14 11 The function selection screen appears return to step 6 To continue with the setup select the function and select On or Off and then select OK 12 Press the Reset key to return to standby ...

Page 15: ...ral Settings 3 Select 5 9 tab and then select 09 Key Operator Mode 4 Enter the Key Operator password 8 digits and then select OK zThe default password is 00000000 zTo change the password select 80 Key Operator Password in the General Settings Key Operator Mode and then enter the new password 5 Select 40 59 tab and scroll the screen and then select 50 User Auth Domain 1 2 1 2 3 2 1 ...

Page 16: ...m name When NTLM or Clr Text is selected Enter the NT domain name NetBIOS name and then select OK Up to 15 characters Ex pana01 Enter the DNS domain name and then select OK Up to 60 characters Ex panasonic com Select On to use SSL or Off to disable SSL and then select OK When Kerberos is selected Enter the realm name in uppercase and then select OK 9 Select Close 10 Press the Reset key to return t...

Page 17: ...efore performing this setup you first need to set 45 User Authentication See page 12 1 Press the Function key 2 Select General Settings 3 Select 5 9 tab and then select 09 Key Operator Mode 4 Enter the Key Operator password 8 digits and then select OK zThe default password is 00000000 zTo change the password select 80 Key Operator Password in the General Settings Key Operator Mode and then enter t...

Page 18: ...K 7 Press the Reset key to return to standby Auto Rst An authenticated user will be logged out if no operation is performed on the machine for a specified time period after performing authentication EveryJob On the completion of a job the authenticated user will be logged out 1 2 ...

Page 19: ...Settings 3 Select 5 9 tab and then select 09 Key Operator Mode 4 Enter the Key Operator password 8 digits and then select OK zThe default password is 00000000 zTo change the password select 80 Key Operator Password in the General Settings Key Operator Mode and then enter the new password 5 Select 20 39 tab and scroll the screen and then select 28 Auto Reset Time 1 2 1 2 1 2 3 ...

Page 20: ...Chapter 3 Setting Machine 20 6 Select the auto reset time and then select OK zWhen None is selected the authentication is not reset 7 Press the Reset key to return to standby 1 2 ...

Page 21: ... set 45 User Authentication See page 12 1 Press the Function key 2 Select General Settings 3 Select 5 9 tab and then select 09 Key Operator Mode 4 Enter the Key Operator password 8 digits and then select OK zThe default password is 00000000 zTo change the password select 80 Key Operator Password in the General Settings Key Operator Mode and then enter the new password 5 Select 40 59 tab and scroll...

Page 22: ...hapter 3 Setting Machine 22 6 Select Input and enter the number of log on attempts and then select OK zUnlimited log on attempts are allowed if you set 0 7 Press the Reset key to return to standby 2 3 1 ...

Page 23: ...ore performing this setup you first need to set 45 User Authentication See page 12 1 Press the Function key 2 Select General Settings 3 Select 5 9 tab and then select 09 Key Operator Mode 4 Enter the Key Operator password 8 digits and then select OK zThe default password is 00000000 zTo change the password select 80 Key Operator Password in the General Settings Key Operator Mode and then enter the...

Page 24: ...Chapter 3 Setting Machine 24 6 Select Input and enter the lockout time 1 to 60 minutes and then select OK 7 Press the Reset key to return to standby 2 3 1 ...

Page 25: ...atically when using the Job Tracking function Otherwise your machine cannot receive any Emails Make sure that the Fax Parameters are NOT set as below Auto POP Receive Fax Parameter No 147 Invalid POP Timer Fax Parameter No 146 0 minute zThe Job Tracking setting is enabled when Fax and or Scan is selected in the Authentication setting See page 12 1 Press the Function key 2 Select Fax Email Settings...

Page 26: ...he Start key to select 132 Via Fax Server 7 Select the Job Tracking function and then select OK 8 Select the Email address to which to send the log and then select OK 9 Select the print out method for the received document s and then select OK This screen only appears if Rx or Tx Rx is selected in step 7 10 Press the Reset key to return to standby 3 2 1 1 2 None Disables Job Tracking Tx Records se...

Page 27: ...r Login Procedure Using Copy Fax Scanner Printer on page 8 for logging in as a user zThe machine will generate the Email address in the format shown below and then send the Email to the RightFax server Ex Ifax 5551212 name Jane rightfax pana com zTo change the Email address of the RightFax server set 35 Fax Server Mail Address Fax Email Settings User Parameters This setting is displayed only when ...

Page 28: ...meter can be directly selected by inputting the corresponding number with the Keypad for quick operation zIf you know the parameter number enter the number with the Keypad and then press the Start key Ex Enter 132 with the Keypad and then press the Start key to select 132 Via Fax Server 7 Select Valid to attach a cover sheet and then select OK 8 Enter an Email address of the RightFax server and th...

Page 29: ...n case of network trouble the administrator can log in using the Local Machine domain without being authenticated through the network 1 The login screen appears if User Authentication is enabled 2 Select User ID and enter the administrator ID and then select OK Ex panasonic 3 Select Password and enter the administrator password and then select OK 4 Select Domain and select 10 Local Machine and the...

Page 30: ...apter 4 Appendix 30 5 Select OK to start the authentication process 6 This completes the authentication zRefer to Authentication Setting see page 12 for the registration of administrator s ID and password ...

Page 31: ...hange the system administrator name or password 1 Press the Function key 2 Select General Settings 3 Select 5 9 tab and then select 09 Key Operator Mode 4 Enter the Key Operator password 8 digits and then select OK zThe default password is 00000000 zTo change the password select 80 Key Operator Password in the General Settings Key Operator Mode and then enter the new password 5 Select 40 59 tab an...

Page 32: ...ame up to 40 characters and then select OK The name is NOT case sensitive Ex panasonic 7 Enter the system administrator password up to 40 characters and then select OK The password is case sensitive Ex pana 8 Press the Reset key to return to standby 1 2 1 2 ...

Page 33: ...tation has not registered the ID number FWD Sender s Email address 2 Transmitted date and time Received date and time 3 Recipient s Email address as set in the Job Tracking setting See page 25 4 Subject Default Subject of the machine or specified subject If no subject is entered the following subject is shown instead IMAGE from Internet Fax 5 Transmitted document s Received document s Received doc...

Page 34: ...is a registered trademark of Monotype Imaging Inc registered in the U S Patent and Trademark Office and may be registered in other jurisdictions ColorSet Profile Tool Kit Profile Studio and Profile Optimizer are trademarks of Monotype Imaging Inc and may be registered in certain jurisdictions Copyright 2005 Monotype Imaging Inc All rights reserved Captaris and RightFax are trademarks of Captaris I...

Reviews: