background image

Playing back video

SQT0989

36

Playing titles on the HDD

You can quickly find the recorded titles by 
selecting the tab.

To select the tab

Press [

2

,

1

].

To change the displayed programme type tab

1 Select the programme type, then press the 

green button.

2 Select the item, then press [OK].

Select the title, then press [STATUS

].

To edit the chapter in Chapter View

Refer to “Editing chapters”. (

>

45)

e.g.,

Tab

Showing Information

Showing grouped titles

1

Press [OPTION].

2

Select “Grouped Titles” or “All Titles”, then 
press [OK].

Grouped Titles:

• Two or more titles recorded in the 

daily/weekly timer recording mode are 
bundled and displayed as one item.

All Titles

Playing back grouped titles

1

On the Grouped Titles screen:
Select the item marked with 

.

2 When playing all titles:

Press [PLAY/

a

1.3

1

].

When playing the individual title:

Press [OK] and select the title, then press 
[OK].

Editing the grouped titles

1

Select the title or the group, then press the 
yellow button.
• A check mark is displayed. Repeat this step.

• Press the yellow button again to cancel.

2

Press [OPTION].

3

Select the item, then press [OK].

Create Group:

Selected titles are bundled to form a group.

Release Grouping:

All the titles in the group are released.

Remove:

Selected titles are removed from the group.

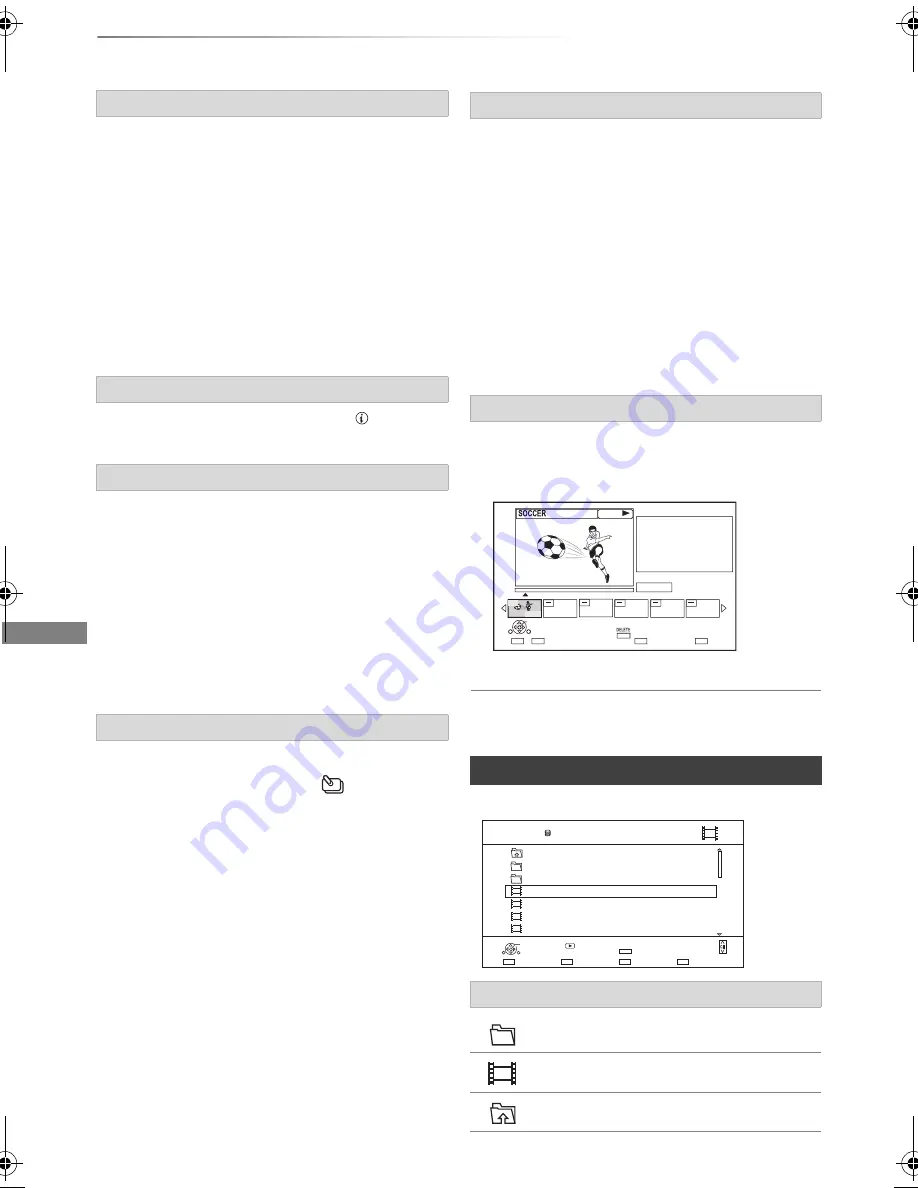
Playback from Chapter View

1

Select the title, then press [OPTION].

2

Select “Chapter View”, then press [OK].

e.g., 

[HDD]

3

Select the chapter, then press [OK].

Video list screen

Screen icons

Folder

Titles

Move to the parent folder

Press OK to start playing from 
the selected chapter.
Selected chapter can be edited 
via OPTION.
Press RETURN to go back to 
previous menu.

Page 001/001

0:00.00

001

0:12.29

Play

Select

Edit Chapter Mark

Play

RETURN

Delete

Parent Folder

Videos

\ Video \

Folder 01

Folder 02

video01.mpeg

video02.mpeg

video03.mpeg

video04.mpeg

HDD

Page 0001/0003

Select

Parent Folder

Play

RETURN

Delete

Page Up

Page Down

DELETE

Play

00.00.0000 00:00

00.00.0000 00:00

00.00.0000 00:00

00.00.0000 00:00

DMR-EX97EG_eng.book  36 ページ  2015年5月27日 水曜日 午後5時3分

Summary of Contents for DMR-EX97C

Page 1: ...save this manual for future use DVD Recorder Model No DMR EX97C DMR EX97S Software Firmware Update To support the latest features it s very important you install the latest updates to maintain proper operation of your unit For details refer to Software Firmware Update 76 or http panasonic jp support global cs This site is in English only EG ...

Page 2: ...ower supply voltage corresponds to the voltage printed on this unit Insert the mains plug fully into the socket outlet Do not pull bend or place heavy items on the lead Do not handle the plug with wet hands Hold onto the mains plug body when disconnecting the plug Do not use a damaged mains plug or socket outlet The mains plug is the disconnecting device Install this unit so that the mains plug ca...

Page 3: ...circuit Do not recharge alkaline or manganese batteries Do not use batteries if the covering has been peeled off Remove batteries if you do not intend to use the remote control for a long period of time Store in a cool dark place When disposing of the batteries please contact your local authorities or dealer and ask for the correct method of disposal Supplied accessories Remote control N2QAYB00104...

Page 4: ...es on the HDD 34 Playing titles on the media 37 Operation during play 38 Editing video Deleting Editing titles 42 Copying video Copying titles 46 Photo and Music Playing photos 54 Editing photos 56 Copying photos 57 Playing music 58 Copying Deleting music 59 With Other Equipment Copying the HD Video AVCHD 60 Registering the external HDD USB HDD 61 Convenient functions VIERA Link functions 63 Playb...

Page 5: ...Getting started Watching broadcasts Recording Playing back video Editing video Copying video Photo and Music With Other Equipment Convenient functions Troubleshooting Reference SQT0989 5 ...

Page 6: ...isk drive HDD HDD Video AVCHD AVCHD 3D JPEG MPO 3D photo MP4 MPEG2 Xvid MKV AAC MP3 External hard disk drive USB HDD 9 USB_HDD Video 1 AVCHD AVCHD 3D 2 3 MP4 MPEG2 Xvid MKV JPEG AAC MP3 MPO 3D photo DVD Video 4 DVD V Video DVD RAM RAM Video JPEG MPO 3D photo AVCHD 2 DVD R DVD R DL DVD R Video AVCHD 2 Xvid MKV JPEG MPO 3D photo AAC MP3 DVD RW DVD RW Video AVCHD 2 R R DL R Video Xvid MKV AVCHD 2 JPE...

Page 7: ... in HDD 60 4 Includes finalised DVD R DVD R DL DVD RW R and R DL The recording and playback of content on this or any other device may require permission from the owner of the copyright or other such rights in that content Panasonic has no authority to and does not grant you that permission and explicitly disclaims any right ability or intention to obtain such permission on your behalf It is your ...

Page 8: ...SB device Each folder can store up to 1000 files We recommend that you limit the depth of folder trees to about five levels The video file and subtitle text files are inside the same folder and the file names are the same except for the file extensions Some files may not be played back even if they have these extensions Information about contents Media Maximum titles HDD 1000 DVD RAM DVD R DVD RW ...

Page 9: ...TB is not usable This unit supports USB 2 0 High Speed Although this unit can use USB 3 0 devices as USB 2 0 devices in certain cases USB 3 0 devices cannot be used due to differing connector shape larger current ratings etc Use of USB 2 0 devices is recommended This unit does not recognise USB HDDs other than those in which the size of one sector is 512 bytes or 4096 bytes For details consult the...

Page 10: ...ecommend you create a Top Menu 78 DVD R The disc created in AVCHD format can only be played back on AVCHD compatible equipment Regarding 8 cm Disc This unit cannot record or edit the 8 cm disc Only playback or copy to the HDD is possible Discs that cannot be played Blu ray Disc DVD RAM in a cartridge 2 6 and 5 2 GB DVD RAM 12 cm DVD Audio Super Video CD Super Audio CD Video CD Operation and sound ...

Page 11: ... is turned on especially during operation otherwise the HDD and the recorded content may be damaged Do not subject the unit to any vibration and shock Do not remove the AC mains lead from the household mains socket The HDD is a temporary storage device It is recommended to save the recorded content on a disc or to keep the original data or CDs that they were copied from If you notice a problem wit...

Page 12: ...mode recording mode 27 Show the Timer Recording screen 31 Create chapter 39 Show Basic Settings menu 66 A To delete unwanted recorded titles timer programmes video or music 42 B TV operation buttons 19 C Channel select 23 Change pages in the Video Menu screen etc D Switching to the radio channel list 23 E Exit the menu screen F Show the TV Guide screen 25 G Show the FUNCTION MENU screen 22 H Retur...

Page 13: ...ndby mode the unit is still consuming a small amount of power 4 CI module eject button 14 5 CI slot 14 6 Disc tray 7 USB port Display Pull to flip down the front panel USB memory Disc Display 1 Drive HDD or DVD indicator 2 Disc indicator 3 Copying indicator 4 USB port indicator 5 Remote control signal indicator 6 Timer recording indicator This indicator lights up when the timer recording standby i...

Page 14: ...insert the CI module CI module TV service encryption is automatically decrypted and the broadcast can be viewed or recorded The recording might be prohibited by broadcasters Turn off the unit before you insert or remove the CI module Insert the CAM and the Smart Card with the correct direction When removing the CI module press the CI module eject button and pull it straight out For more details se...

Page 15: ...ll be disabled after a predetermined time e g Permitted playback period is 90 minutes after recording When the title does not have playback period icon will appear on the Video Menu screen after decrypting 35 When the title has playback period or icon will appear on the Video Menu screen after decrypting 35 Playing back a title with this restriction requires a CAM with a playback licence for it Th...

Page 16: ...nded that you use Panasonic s HDMI cable When outputting 24p signal please use HDMI cables 5 0 meters or less When the unit is not to be used for a long time To save power unplug it from the household mains socket This unit consumes a small amount of power even when the unit is in standby mode 87 EX97C Basic connections HDMI VHF UHF RF IN This unit s rear panel Household mains socket AC 220 to 240...

Page 17: ...thod suited to your environment A Using a single cable router B Connecting a satellite cable directly HDMI This unit s rear panel Household mains socket AC 220 to 240 V 50 Hz AC mains lead supplied Connect only after all other connections are complete HDMI cable TV Satellite dish Satellite dish Single cable router ...

Page 18: ...Amplifier receiver not compatible with 3D 3D programmes can be played back when this unit is connected to a 3D compatible TV This connection only supports up to 5 1ch When using a TV or an amplifier receiver that does not display ARC on the HDMI terminal it is necessary to connect the TV and the amplifier receiver with a digital audio cable to enjoy the TV audio on the amplifier receiver HDMI cabl...

Page 19: ... 05 FINLUX 61 Panasonic 01 02 03 04 AKAI 27 30 BEKO 05 71 72 73 74 BUSH 05 DAEWOO 64 65 DUAL 05 FERGUSON 10 34 FISHER 21 MITSUBISHI 05 19 20 47 METZ 05 28 79 MIVAR 24 NEC 36 NOKIA 25 26 27 60 61 OLEVIA 45 ORION 05 PHILCO 41 48 64 PHONOLA 05 PROVIEW 52 RADIOLA 05 NOBLEX 33 NORDMENDE 10 ONWA 30 39 70 PEONY 49 69 PHILIPS 05 06 46 PIONEER 37 38 PYE 05 SABA 10 FUJITSU 53 ITT LG GOLDSTAR 05 50 51 GRADIE...

Page 20: ...hrough it may not be possible to receive the channels Restart setup again EX97C Easy Setting 2 Press Í on the remote control or Í I on this unit The Easy Setting will start at the initial power on 1 DVB C Select the channel number allocation then press OK For Germany and Austria Normally set to Preset Channel Number For Switzerland Normally set to Operator s Channel Number LCN To change channel al...

Page 21: ...8 Set to a User Band not used by any other device User Band Frequency Set the User Band Frequency with number buttons User Band PIN If the single cable router requires a PIN to access an user band enter the PIN For details read the manual of the single cable router etc User Band Settings OK Select RETURN Start Auto Setup Please confirm user band settings before starting Auto Setup Tuner C1 1284 MH...

Page 22: ...Video AVCHD 34 Video MP4 Xvid MKV 36 Photo 54 Music 58 Timer Recording 31 Setup Basic Settings 66 You can change the unit s settings of DVB Tuning Sound Display Connection etc Wallpaper Personalize a background of the FUNCTION MENU To select from among Photo register photo in advance 55 Media Disc USB device USB HDD Copy Video Copy Menu 48 Copy Video AVCHD to DVD R 53 RETURN FUNCTION MENU OK Media...

Page 23: ... Current Category 2 Encrypted broadcast 3 Set timer 32 4 Subtitle 5 Teletext 6 Multiple audio Sub Channel To show detailed information Press STATUS again To hide the information screen Press EXIT To switch between the current programme and the next programme Press 2 1 To switch to another channel Press 3 4 then press OK Press AUDIO Audio will switch according to the contents of the programme every...

Page 24: ... recommended by the CAM To perform an update operate following the instructions on the screen If cancelled the notification is instead displayed on the channel information 23 e g To execute channel list upgrade press the red button Performing an update will delete the existing channel list To return to the original channel list restart Auto Setup in Basic Settings menu 67 69 The timer recording pr...

Page 25: ... CH W X To view a programme list for another day Press the green button Previous or the yellow button Next To see programme information Press STATUS To retrieve the programme data for the area where data have not been acquired Select the area then press STATUS To set a timer Recording using the TV Guide System 29 To search the programmes Refer to To search the programmes 30 Using Channel List 1 Pr...

Page 26: ...g cases When switching to other channels or other screen When performing PAUSE LIVE TV or REWIND LIVE TV for more than 8 hours This may vary depending on the HDD free space These functions do not work in the following cases When the clock is not set When setting clock manually Contents protected title Retention limit only 15 While copying While watching a programme being recorded When a radio prog...

Page 27: ...not start Conversion is stopped when this unit is turned on Conversion will start from the beginning again once the unit is switched to standby mode When converted audio content and subtitle will be converted with the same settings as at the start of recording When the programme recorded in DR mode is converted teletext will not be recorded About CI Plus restriction 15 1 Select the channel to reco...

Page 28: ... beginning or the titles previously recorded to the HDD Operation during Recording To check the recording programme e g To stop recording HDD REC OTR AUTO Recording programme displayed on the TV To pause recording Simultaneous rec and play 1 Press VIDEO MENU is displayed on the recording programme 2 Select the title then press OK Page Select Start Time Prog Type Rec Time Play RETURN Channel Date T...

Page 29: ...ogramme to cancel then press the red button 2 Select Timer Rec Cancel then press OK F disappears Refer to Operation during Recording 28 You can enter up to 32 programmes within a month in advance Each daily or weekly programme is counted as one programme About CI Plus restriction 15 Preparation If you want to change the recording mode Press REC MODE and select the recording mode then press OK 1 Pr...

Page 30: ...by the broadcaster e g delayed start To use this function set Signal Supported Recording to ON 31 The Signal Supported Recording function may not work if you manually change the start time or the stop time over 10 minutes If the signal is not sent correctly the recording may lack the beginning or the ending part of the programmes To search the programmes To use Signal Supported Recording If Overla...

Page 31: ...ose whether or not to use the Signal Supported Recording function by pressing the blue button Manually programming timer recording 3 Select the items and change the items right Timer recording options 4 Press OK The timer programme is stored Channel Name Schedule Mode Space Timer Recording 30 30 DR HDD TUE 06 01 2015 8 05 New Timer Programme Channel Name Schedule Mode Space Timer Recording 30 30 D...

Page 32: ...io of Preferred Language 68 70 Subtitles of Preferred Language 68 70 When the programme recorded in DR mode is converted teletext will not be recorded Only when recording broadcast in other than DR mode This unit will record in the DR mode once and then convert to the selected mode automatically during standby Even if you switch the unit to standby mode during the timer recording the recording is ...

Page 33: ...05 Delete Info Resolve overlap New Timer Programme MON 13 01 MON 13 01 10 00 11 50 11 00 11 45 11 30 1 00 8 00 10 45 MON 13 01 TUE 07 01 DR HG DR DR OK OK Guide Guide e g Screen icons F Red Timer recording standby is activated Grey Timer recording standby is deactivated Currently recording programme A part or all of the programme will not be recorded since the programme is overlapping The HDD is f...

Page 34: ...ight To play video files Select Video MP4 Xvid MKV then press OK The video list screen appears 36 4 Select the title then press OK Contents on HDD Recorded programmes can be played OK RETURN Video AVCHD Recorded Programmes Video MP4 Xvid MKV Photo Music Video Menu screen e g 1 Tab 36 2 Programme type 3 AVCHD tab e g Time Remaining 45 54 DR HDD Page Select Copy Grouped Titles Start Time Prog Type R...

Page 35: ...after the playback period has passed Playback period limit can be checked in the information of that title 36 Showing Information 1 Title is copy restricted 1 Title requires a CAM with a playback licence to play back If a certain time has elapsed after the recording the title cannot be played back The number of times the title can be played back may also be limited Grouped titles Title has not yet...

Page 36: ...uped titles 1 Select the title or the group then press the yellow button A check mark is displayed Repeat this step Press the yellow button again to cancel 2 Press OPTION 3 Select the item then press OK Create Group Selected titles are bundled to form a group Release Grouping All the titles in the group are released Remove Selected titles are removed from the group Playback from Chapter View 1 Sel...

Page 37: ...data files 9 only 1 Insert the media AVCHD If the menu screen is not displayed Press PLAY a1 3 1 2 When the Video Menu screen or menu screen etc appears Select the item or title then press OK Repeat this step if necessary Menu screen USB Device OK RETURN USB device is inserted View Photos Play Copy Video Play Copy Music Copy Video AVCHD Copy New Photos Video list screen Video Menu screen Playback ...

Page 38: ...lay The speed increases up to 5 steps R RW Up to 3 steps Xvid MKV MP4 and MPEG2 Audio is not heard during all levels search Press PAUSE Press PLAY a1 3 1 to restart play While paused press SLOW SEARCH 6 or SLOW SEARCH 5 Press PLAY a1 3 1 to restart play The speed increases up to 5 steps Xvid MKV MP4 and MPEG2 Slow motion is not effective AVCHD DVD R Forward direction SLOW SEARCH 5 only General ope...

Page 39: ...Play skips the specified time DVD V Xvid MKV AVCHD MP4 and MPEG2 TIME SLIP is not effective DVD V 1 Press OPTION 2 Select Playback Menu then press OK 3 Select Top Menu or Menu then press OK Press SKIP or SKIP 9 HDD USB_HDD For recorded titles 9 It will not skip the title But the title in the grouped titles will be skipped 36 HDD USB_HDD For recorded titles 9 RAM During the playback or pause Press ...

Page 40: ...etext display mode is TOP FLOF only Some functions may not work Teletext cannot be displayed when the subtitles are set to ON You can switch the aspect ratio of the screen 79 Preparation Connect 3D compatible TV to this unit 16 17 Perform the necessary preparations for the TV Play back following the instructions displayed on the screen 3D Type If 3D video cannot be played back in 3D you may be abl...

Page 41: ... refrain from viewing 3D images if you do not feel well or are experiencing visual fatigue In the event that you experience dizziness nausea or other discomfort while viewing 3D images discontinue use and rest your eyes This unit only guarantees the playback of the Frame Sequential and the Side by Side Half programme types Depending on the connected TV the video being played back might switch to 2...

Page 42: ...ntents are deleted DVD RW RW Available recording space increases only when the last recorded title is deleted Even after deletion is completed it may take time until the updated available space is displayed If the title is contents protected you may not perform editing other than deleting 15 1 On the Video Menu screen Select the title Multiple selection left 2 Press OPTION 1 Select Enter Title Nam...

Page 43: ...pears when setting the protection Partial deleting 1 Select Partial Delete in Edit then press OK 2 Press OK at the start point and end point to delete You can find the desired point by using play search etc 38 3 Select Continue then press OK Select Next then press OK to delete other sections Up to 20 sections can be set go to step 2 4 Select Delete then press OK 5 Press RETURN Chapter Mark is gene...

Page 44: ...d in the title Off Subtitle will not be recorded Timing Now Conversion begins immediately after step 4 Timer recording will not be performed during conversion During standby Conversion will be performed after the unit is switched to standby mode File Conversion Convert the selected title by changing its recording mode Please select recording mode and other options then press OK RETURN Subtitles Of...

Page 45: ...mum number of chapters you cannot perform the Resume play function 38 with the title HDD 2 Press DELETE 3 Select Yes then press OK All files in the folder will be deleted Editing chapters Edit Chapter Mark Select the point where you want to start a new chapter while viewing the title 1 Press the green button 2 Press OK at the point you want to divide Repeat this step 3 Press RETURN to go to Chapte...

Page 46: ...r creating Top Menu 1 For recorded titles 9 only 2 The title in the source media will be deleted 3 The recording mode cannot be changed 1 Insert or connect the media 2 Press FUNCTION MENU 3 Select Recorded Programmes or Video AVCHD in Contents on HDD then press OK 4 Select the title Multiple selection Select the title then press the yellow button A check mark is displayed Repeat this step Press th...

Page 47: ... cannot be copied HDD Page Select Copy Grouped Titles DVD RW Remain Start Time Prog Type Rec time OK RETURN Drama AVCHD Movie Not Viewed Copy Channel Date Title Name Titles All Page Up Page Down Movie 9 00 0 01 DR 1 2 90 Social Economic Remaining space The order of copying Setting the copying options Automatic Standby after Copy On This unit is turned to standby mode when it is not operated for ap...

Page 48: ...Copying HDD High Speed RETURN OK 2 Press OK to start copying Disc Copying titles with copying list HDD USB_HDD 1 2 3 HDD RAM DVD R DVD RW R RW RAM RW HDD 1 HDD USB_HDD 1 Press FUNCTION MENU 2 Select Copy Menu in Copy Video then press OK Except HDD USB_HDD 1 Insert a disc The menu screen appears 37 2 Select Copy then press OK 2 Set the copy direction 1 Select Copy Direction then press 1 right 2 Set...

Page 49: ...st If you want to specify the order edit the copying list after the titles are selected 50 Editing the copying list 4 Press OK 5 Press 2 Data size of each registered title Data size recorded to the copy destination RETURN Time Rec time Size 1360 MB 0 30 DR 9 00 Page Select Page Up Page Down HDD OK 001 003 Create List Grouped Titles 01 01 15 00 1 02 01 9 30 1 03 01 10 00 1 03 01 18 30 1 04 01 2 00 ...

Page 50: ... select titles Move Change the order of items on the copying list Select the title to move before step 2 Select the destination then press OK Copy 1 2 3 Cancel All Copy Direction Copy Mode Create List 4 Other Settings Start Copying HDD Disc SP Create copy list 2 Page 01 01 Size Destination Capacity No Size New item Total 2 Title 50 1 00 2 00 01 0 30 DR 25 0 30 DR 25 02 RETURN OK Screen icons Title...

Page 51: ...X HE HL HM XP SP LP EP FR DVD RAM only It is impossible to copy at high speed in the following cases HDD DVD R DVD RW R RW Titles that contain many deleted segments HDD R RW Titles recorded in EP mode and FR recordings 5 hours or longer mode Titles recorded in 16 9 aspect Notes for normal speed copy DVD R DVD RW R RW You cannot copy to the disc in the following cases When there is not enough free ...

Page 52: ...r to include the operation time before play begins Off Copying all the content on the disc 4 Press 2 6 Select Yes then press OK When the Top Menu is displayed Select the title you want to start copying then press OK After the last title on the disc has finished playing the Top Menu is recorded until the set time is reached 01 02 01 Mouse 03 02 04 Cattle Copying Title Playing HDD RAM DVD R DVD RW R...

Page 53: ... equipment etc 3D video may not be copied correctly 2 Press the blue button 3 Select Yes then press OK To stop copying Press and hold RETURN for 3 seconds While copying no other operations can be performed Timer recordings will not proceed All files in the folder will be copied The names of folders files cannot be changed after they are copied to the HDD We recommend that you create a folder with ...

Page 54: ... MENU 2 Select Photo in Contents on HDD then press OK Except HDD 1 Insert or connect the media The menu screen appears 37 2 Select View Photos then press OK 2 Select the folder then press OK 3 Select the photo then press OK Press 2 1 to display the previous or next photo 2 1 Photo Menu screen Screen icons 3D Tab 3D photos MPO Select from this tab to play back in 3D Photo protected New photo which ...

Page 55: ...tion Information shooting date etc is shown Wallpaper A photo being played back is registered as wallpaper on the FUNCTION MENU screen 22 Slideshow settings Start Slideshow You can start a slideshow Interval You can set up the time until the next photo is to display Transition Effect Effect for the next photo to display can be set Repeat Play You can set up to play back repeatedly Music Selection ...

Page 56: ...ultiple folders or photos Press the yellow button when selecting the folder or photo A check mark is displayed Repeat this step Press the yellow button again to cancel Enter Folder Name Refer to Entering text 79 Combine Folders HDD Delete Folder Move Photos HDD Select Move to new folder or Move to another folder then press OK If Move to another folder is selected set a destination folder Delete Ph...

Page 57: ...cting and copying the photos HDD RAM RAM DVD R R CD HDD USB_HDD USB HDD RAM 1 On the Photo Menu screen To copy the folder Select the folder then press the blue button To copy the photo 1 Select the folder then press OK 2 Select the photos to copy then press the blue button To select multiple folders or photos Press the yellow button when selecting the folder or photo A check mark is displayed Repe...

Page 58: ... 3 1 to restart play Press SKIP or SKIP 9 Refer to Repeat Play or Random in Basic Operation menu 64 Refer to Sound Effects in Sound Settings menu 65 To play music continuously even if the Power off link works Refer to Playing music continuously even after turning off power to the TV 63 Playing music CD CD DA Playing music file on the media 2 Select Play Copy Music then press OK The music list scre...

Page 59: ...cancel While copying no other operations can be performed Timer recordings will not proceed All files in the folder will be copied Up to 1000 files can be copied at once HDD 1 On the music list screen Select the file or folder Multiple selection left 2 Press DELETE 3 Select Yes then press OK All files in the folder will be deleted Copying 1 On the music list screen Select the file or folder e g Pa...

Page 60: ...nnect the video camera or insert the media Make the video camera ready for data transfer The menu screen appears 37 3 Select the title then press the yellow button A check mark is displayed Repeat this step Press the yellow button again to cancel All the recordings on the same date become a title 5 Select Start then press OK video camera etc Screen icons NTSC PAL Title recorded using a different e...

Page 61: ... necessary to delete one or more of them before registering a new USB HDD Registered USB HDDs cannot be used with devices other than this unit Certain non confirmed USB HDDs cannot be used with this unit If a problem occurs with the USB HDD please contact the manufacturer of the device Connect this unit with optional USB HDD Do not connect additional HDDs using a USB hub For details about connecti...

Page 62: ...the registering screen appears when connecting the USB HDD go to step 4 1 Press SETUP 2 Select Settings for USB HDD in HDD Disc USB HDD then press OK 3 Select USB HDD Registration then press OK 5 When the registering is complete message screen appears Press OK 6 The confirmation screen appears Press OK To cancel all USB HDD registrations 71 It is not possible to play back the content on the USB HD...

Page 63: ...ower of the unit on and to play music continuously When the unit is directly connected to an amplifier receiver 1 While playing music Press OPTION 2 Select TV Power Off then press OK Sound may be discontinued for several seconds when the power to the TV is turned off You can operate this unit using the TV remote control Refer to the operating instructions of the TV about the buttons that you can u...

Page 64: ... Czech GRE Greek DAN Danish SLK Slovak TUR Turkish POR Portuguese HUN Hungarian Others RUS Russian FIN Finnish Basic Operation Multi Audio Audio1 Dolby D Subtitle Language eng MPEG Subtitle Settings On Audio Channel LR Repeat Play Off Aspect Normal Menu Item Setting e g Basic Operation Soundtrack Show or change the soundtrack Multi Audio Switch in the case of multiple audio Audio Channel Change au...

Page 65: ... and appropriately converts it Video Select this setting when the content is distorted if Auto is selected Film Select this if the edges of the film content appear jagged or rough when Auto is selected However if the video content is distorted then select Auto Reset to Default Picture Settings Restores the default settings of the Picture Settings menu Sound Settings Sound Effects This function is ...

Page 66: ...s Press RETURN then press OK To select the other Favourites list Press the green button To add channels to the Favourites list Select the channel in the All DVB Channels column then press OK Repeat this step Red Change the sorting mode Yellow Add continuous block of channels to the list at once Press 3 4 to make the block then press OK Blue Select the Category To change the order of the channels l...

Page 67: ...g programmes are cancelled If the channel you are looking for is not found select Full for Scan Mode above DVB C Settings for DVB C Channels DVB T Settings for DVB T Channels Channel List You can edit the channel list To hide reveal channels 1 Select the channel 2 Press OK The check mark is removed displayed Red Change the sorting mode Yellow Reveal all channels Blue Change the Category To move th...

Page 68: ...egion length of the cable that is connected to the aerial etc When the signal is too strong red bar reduce the signal amplification at your aerial For details consult your dealer New Channel Message Set whether to obtain the information automatically when a new DVB channel is added Child Lock You can restrict the viewing playback recording of channels unsuitable to children PIN is required to chan...

Page 69: ... can update the channel list to the latest one 1 Select the method and settings Search Mode Free Channels All Channels Scan Mode Quick Scans the suitable frequency for the selected satellite Full Scans the whole frequency range 2 Press OK The unit starts searching for newly available satellite digital channels This function is not available during an Operator profile update 24 If the channel you a...

Page 70: ...ect the audio language Enter a code with the number buttons when you select Other 84 Language code list Subtitles Select the language for subtitle Enter a code with the number buttons when you select Other 84 Language code list Menu Select the language for disc menus Enter a code with the number buttons when you select Other 84 Language code list DVD Video Parental Control Set a rating level to li...

Page 71: ...to show the following settings Delete all titles Delete all recorded programmes and AVCHD on the built in HDD Delete does not work if one or more titles are protected Delete all videos MP4 Xvid MKV Delete all videos MP4 Xvid MKV on the built in HDD Delete all photos Delete all photos on the built in HDD Delete all music Delete all Music on the built in HDD Format HDD Formatting deletes all content...

Page 72: ...o signal to output Select PCM when the connected equipment cannot decode the respective audio format Not making the proper settings may result in noise System Volume Adjustment If the volume of a programme being watched through this unit is different than the volume of a programme being watched directly on the TV changing this setting may reduce the gap This function works only while you are watch...

Page 73: ...anels TV System Set in accordance with the TV System for the connected TV HDMI Connection HDMI Video Format You can only select items compatible with the connected equipment If Automatic is selected the output resolution best suited to the connected TV 1080i 720p or 576p 480p is automatically selected Deep Colour Output This setting is for selecting whether to use Deep Colour output when a TV that...

Page 74: ...de when it is not operated for approximately 5 minutes after completing Automatic Stop or Recording Time 27 Automatic Standby after Copy On This unit is turned to standby mode when it is not operated for approximately 5 minutes after completing copy 48 Copying from media other than HDD with Video Menu Copying titles with copying list EX97C DVB C RF OUT CATV Signal DVB T RF OUT Aerial Signal Set wh...

Page 75: ... PIN with the number buttons 2 Enter the new 4 digit PIN with the number buttons Make a note of PIN in case you forget it e g 3 Press OK OK Remember the PIN PIN Entry 0 0 0 0 System Update Software Update in Standby When you set this unit to standby mode software firmware updates 76 are downloaded automatically at the time you have specified Software Update Now Broadcast Refer to Software Firmware...

Page 76: ...ng the CAM Any buttons on the remote control or the unit cannot be used while upgrading the CAM If the timer recording is started CAM software upgrade is cancelled to start recording For details refer to your CAM s operating instructions or consult your dealer You cannot operate the unit until the update is complete Don t remove the AC mains lead during the update Removing the AC mains lead while ...

Page 77: ...K RAM To stop formatting Press RETURN You can cancel formatting if it takes more than 2 minutes The disc must be reformatted if you do this Do not disconnect the AC mains lead while formatting This can cause the disc unusable The contents are deleted when you format a disc even if you have set protection RAM Formatting normally takes a few minutes however it may take up to a maximum of 70 minutes ...

Page 78: ...DL and R DL Depending on the disc it may take longer than displayed on the confirmation screen approximately four times longer You cannot finalise discs recorded on other manufacturer s equipment DVD R DVD RW R If you finalise discs recorded on Panasonic equipment other than this unit the background selected as Top Menu may not be displayed Discs finalised on this unit may not be playable on other...

Page 79: ...an Scan or Letterbox the Zoom effect is disabled Entering text 1 Select a character then press OK Repeat this step to enter other characters Green Enter Alphanumeric characters Red Enter Symbols Yellow Enter Other Characters such as umlaut mark or accent grave PAUSE Delete a character PLAY a1 3 1 Shift the alphabetic characters on the screen to upper case lower case 2 Press STOP Finish Writing app...

Page 80: ...1 Press Í I on the main unit to switch the unit to standby If the unit does not switch to standby press Í I on the main unit for about 3 seconds The unit is forcibly switched to standby Alternatively disconnect the AC mains lead wait one minute then reconnect it 2 Press Í I on the main unit to switch it on If the unit still cannot be operated consult the dealer Cannot eject a disc 1 When the unit ...

Page 81: ...to 0 all items in the Noise Reduction 65 Set Audio Delay 72 The unit s TV System is different from that of the disc Change the TV System 73 TV System The picture may be distorted or a black screen may appear between scenes recorded with different aspect ratios Set Deep Colour Output 73 or Contents Type Flag 73 to Off 3D video is not output correctly 3D video may be output correctly by changing the...

Page 82: ...he title may be lost or the HDD may become unusable We cannot offer any guarantee regarding lost programmes An unusually loud sound is coming from the rotating disc If you want copy to perform more quietly select Normal Silent in Disc Speed for High Speed Copy 71 The time recorded on the disc and the available time shown do not add up DVD R R If you record or edit many times the remaining capacity...

Page 83: ...erted during playback the USB device may not be recognized by this unit Disconnect and reconnect the USB device If it still does not recognize the connection switch the unit to standby mode and turn it on again USB devices connected using a USB extension cable other than a dedicated one or a USB hub may not be recognized by this unit The TV Guide information is not displayed properly Set the clock...

Page 84: ... 6678 Bhutani 6890 Bihari 6672 Breton 6682 Bulgarian 6671 Burmese 7789 Byelorussian 6669 Cambodian 7577 Catalan 6765 Chinese 9072 Corsican 6779 Croatian 7282 Czech 6783 Danish 6865 Dutch 7876 English 6978 Esperanto 6979 Estonian 6984 Faroese 7079 Fiji 7074 Finnish 7073 French 7082 Frisian 7089 Galician 7176 Georgian 7565 German 6869 Greek 6976 Greenlandic 7576 Guarani 7178 Gujarati 7185 Hausa 7265...

Page 85: ... the main unit to eject the disc You cannot write to this disc The disc may be damaged Use a new disc Displayed when the unit is started and is switched to standby mode There was a power failure or the AC plug was disconnected while the unit was on The unit is carrying out its recovery process Wait until the message disappears There are already 32 timer programmes Delete unnecessary timer programm...

Page 86: ...tput is not performed When a disc is inserted There was something unusual detected with the disc or the unit The unit is trying to restore to the normal operation Once the message disappears you can use the unit again If it remains displayed consult the dealer The unit fails to operate properly Press Í I on the main unit to switch the unit to standby mode Now press Í I on the main unit again to tu...

Page 87: ...on TV system EX97C Tuner System DVB C DVB T Country Germany Austria Switzerland Channel coverage VHF 5 12 UHF 21 69 CATV S1 S20 M1 U10 7 MHz Band D051 D073 D113 D858 EX97S Tuner System DVB S DVB S2 Antenna receive frequency 950 MHz to 2150 MHz Input impedance Nominal 75 Demodulation QPSK 8PSK LNB input F shape terminal female power supply 13 V 18 V max 400 mA DiSEqC Version 1 0 or Tone burst A B 2...

Page 88: ...ing Remaining time in the DR mode is calculated with a bit rate of 14 Mbps But the bit rate differs depending on the broadcast so the displayed remaining time might be different from the actual remaining time Recording Mode HDD 500 GB HG 78 hours HX 117 hours HE 176 hours HL 235 hours HM 341 hours Recording Mode HDD 500 GB XP 107 hours SP 215 hours LP 430 hours EP 860 hours Recording Mode DVD RAM ...

Page 89: ...are trademarks or registered trademarks of HDMI Licensing LLC in the United States and other countries This product incorporates the following software 1 the software developed independently by or for Panasonic Corporation 2 the software owned by third party and licensed to Panasonic Corporation 3 the software licensed under the GNU General Public License Version 2 0 GPL V2 0 4 the software licens...

Page 90: ... AVCHD 53 60 D Delete Music 59 71 Photo 56 71 Video 42 71 77 Disc Finalise 78 Format 77 Media information 6 Protection 77 DVD Video 37 E Easy setting EX97C 20 Easy setting EX97S 21 Entering text 79 F Favourites EX97C 66 Favourites EX97S 69 Finalise 78 Format Disc 77 HDD 71 USB HDD 71 FUNCTION MENU 22 H HDD Format 71 Media information 6 L Language code list 84 Lens cleaner 11 M Manual Tuning EX97C ...

Page 91: ...ld Lock 68 Manual Tuning EX97C 67 Manual Tuning EX97S 69 Signal condition EX97C 68 Signal condition EX97S 69 TV Guide Operation 25 Timer recording 29 TV System 73 U USB HDD Cancellation of all USB HDD Registrations 71 Disconnection 62 71 Format 71 Media information 6 9 Registration 62 71 USB memories Media information 6 9 V Video AVCHD 34 37 Copy 46 Delete 42 DVD Video 37 MKV 37 Playback 34 37 Pla...

Page 92: ... negative effects on human health and the environment For more information about collection and recycling please contact your local municipality Penalties may be applicable for incorrect disposal of this waste in accordance with national legislation Note for the battery symbol bottom symbol This symbol might be used in combination with a chemical symbol In this case it complies with the requiremen...

Reviews: