background image

2

VQT4V74

Unit

To reduce the risk of fire, electric shock or product damage,

Do not expose this unit to rain, moisture, dripping or splashing.

Do not place objects filled with liquids, such as vases, on this 

unit.

Use only the recommended accessories.

Do not remove covers.

Do not repair this unit by yourself. Refer servicing to qualified 

service personnel.

Do not let metal objects fall inside this unit.

Do not place heavy items on this unit.

AC mains lead

To reduce the risk of fire, electric shock or product damage,

Ensure that the power supply voltage corresponds to the 

voltage printed on this unit.

Insert the mains plug fully into the socket outlet.

Do not pull, bend, or place heavy items on the lead.

Do not handle the plug with wet hands.

Hold onto the mains plug body when disconnecting the plug.

Do not use a damaged mains plug or socket outlet.

The mains plug is the disconnecting device.

Install this unit so that the mains plug can be unplugged from the 

socket outlet immediately.

Unit

This unit utilizes a laser. Use of controls or adjustments or 

performance of procedures other than those specified herein 

may result in hazardous radiation exposure.

Do not place sources of naked flames, such as lighted candles, 

on this unit.

This unit may receive radio interference caused by mobile 

telephones during use. If such interference occurs, please 

increase separation between this unit and the mobile telephone.

Placement

Place this unit on an even surface.

To reduce the risk of fire, electric shock or product damage,

Do not install or place this unit in a bookcase, built-in cabinet or 

in another confined space. Ensure this unit is well ventilated.

Do not obstruct this unit’s ventilation openings with newspapers, 

tablecloths, curtains, and similar items.

Do not place the unit on amplifiers/receivers or equipment that 

may become hot. The heat can damage the unit.

Do not expose this unit to direct sunlight, high temperatures, 

high humidity, and excessive vibration.

Batteries

Mishandling of batteries can cause electrolyte leakage and may 

cause a fire.

Danger of explosion if battery is incorrectly replaced. Replace 

only with the type recommended by the manufacturer.

When disposing the batteries, please contact your local 

authorities or dealer and ask for the correct method of disposal.

Do not mix old and new batteries or different types at the same 

time.

Do not heat or expose to flame.

Do not leave the battery(ies) in a car exposed to direct sunlight 

for a long period of time with doors and windows closed.

Do not take apart or short circuit.

Do not recharge alkaline or manganese batteries.

Do not use batteries if the covering has been peeled off.

Remove batteries if you do not intend to use the remote control for 

a long period of time. Store in a cool, dark place.

Precautions

WARNING

Small object

Keep the Memory Card out of reach of children to prevent 

swallowing.

CAUTION

This unit is intended for use in moderate climates.

Caution for AC Mains Lead

(For the AC mains plug of three pins)

For your safety, please read the following text carefully.
This appliance is supplied with a moulded three pin mains plug for 

your safety and convenience.

A 5-ampere fuse is fitted in this plug.

Should the fuse need to be replaced please ensure that the 

replacement fuse has a rating of 5-ampere and that it is approved 

by ASTA or BSI to BS1362.

Check for the ASTA mark 

Ï

 or the BSI mark 

Ì

 on the body of the 

fuse.
If the plug contains a removable fuse cover you must ensure that it 

is refitted when the fuse is replaced.

If you lose the fuse cover the plug must not be used until a 

replacement cover is obtained.

A replacement fuse cover can be purchased from your local 

dealer.

Before use

Remove the connector cover.

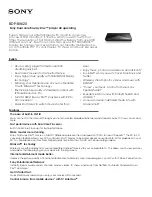
How to replace the fuse

The location of the fuse differ according to the type of AC mains 

plug (figures A and B). Confirm the AC mains plug fitted and follow 

the instructions below.

Illustrations may differ from actual AC mains plug.
1. Open the fuse cover with a screwdriver.

2. Replace the fuse and close or attach the fuse cover.

Restriction on use of 
unauthorized copied content

This unit adopts the following technology for copyright protection.
Cinavia Notice

This product uses Cinavia technology to limit the use of 

unauthorized copies of some commercially-produced film and 

videos and their soundtracks. When a prohibited use of an 

unauthorized copy is detected, a message will be displayed and 

playback or copying will be interrupted.

More information about Cinavia technology is provided at the 

Cinavia Online Consumer Information Center at http://

www.cinavia.com. To request additional information about Cinavia 

by mail, send a postcard with your mailing address to: Cinavia 

Consumer Information Center, P.O. Box 86851, San Diego, CA, 

92138, USA.

Fuse cover

Figure A

Figure B

Figure A

Figure B

Fuse

(5 ampere)

Fuse

(5 ampere)

DMP-BDT330&230&130_EB-VQT4V74_mst.book  2 ページ  2013年1月31日 木曜日 午後6時40分

Summary of Contents for DMP-BDT230

Page 1: ...ess otherwise indicated illustrations in these operating instructions are of DMP BDT330 Firmware updates Panasonic is constantly improving the unit s firmware to ensure that our customers are enjoying...

Page 2: ...ypes at the same time Do not heat or expose to flame Do not leave the battery ies in a car exposed to direct sunlight for a long period of time with doors and windows closed Do not take apart or short...

Page 3: ...ss point of 2 4 GHz or 5 GHz WLAN To dispose or transfer this unit The unit may keep the user settings information in the unit If you discard this unit either by disposal or transfer then follow the p...

Page 4: ...plifier receiver 11 Connecting to the network 13 Settings 14 Reprogramming the remote control 16 Playback Inserting or removing media 17 HOME menu 18 Multi User Mode 19 Playback 20 VIERA Connect Enjoy...

Page 5: ...aning sprays benzine thinner static electricity prevention liquids or any other solvent Do not use the following discs Discs with exposed adhesive from removed stickers or labels rented discs etc Disc...

Page 6: ...Xvid JPEG MPO AAC FLAC MP3 WAV WMA DVD R DL DVD RW Video AVCHD R RW R DL Music CD Music CD DA CD R CD RW MKV Xvid JPEG MPO AAC FLAC MP3 Music CD DA WAV WMA SD Memory Card from 8 MB to 2 GB SDHC Memory...

Page 7: ...oducers of the disc can control how discs are played so you may not always be able to control play as described in these operating instructions Read the disc s instructions carefully DVD RAM Super Aud...

Page 8: ...ttons 20 7 Show Pop up menu 21 8 Show Top menu 21 9 Show Option menu 28 10 Coloured buttons red green yellow blue Used for various purposes depending on the display 11 Transmit the remote control sign...

Page 9: ...left and right 3 BDT330 Blue LED It is possible to set the LED to turn on off 36 4 SD card slot 17 5 BDT330 V OFF LED Video off LED It is possible to set the LED to turn on off 36 6 USB ports 17 7 Di...

Page 10: ...sonic s HDMI cable When outputting 1080p signal please use HDMI cables 5 0 meters or less This unit consumes a small amount of AC power 43 even when turned off For the purpose of power conservation th...

Page 11: ...DT130 When connecting to a non 3D compatible amplifier receiver connect this unit to a TV then connect the TV and the amplifier receiver Please note however that the audio can only be up to 5 1ch HDMI...

Page 12: ...12 VQT4V74 OPTICAL Set HDMI Audio Output to Off 31 Set Digital Audio Output 31 OPTICAL IN BDT330 BDT230 Optical digital cable Amplifier receiver BDT130 DMP BDT330 230 130_EB VQT4V74_mst book 12...

Page 13: ...30 This unit supports Wi Fi DirectTM and can make a wireless connection to wireless devices without router You can use this function when enjoying Home Network feature etc Internet access is not avail...

Page 14: ...network name SSID 1 If your wireless connection is encrypted please be sure that you know your encryption key Select Search for wireless network or WPS PUSH button and press OK then follow the on scre...

Page 15: ...creen will be displayed Input the encryption key of your network Refer to the operating instructions of the hub or router You can perform this setup anytime by selecting Easy Network Setting in the Se...

Page 16: ...the following website and burn it to a CD R to update the firmware http panasonic jp support global cs This site is in English only To show the firmware version on this unit 36 Firmware Version Infor...

Page 17: ...efer to the instructions for the connected equipment When you connect a USB HDD use the right USB port USB2 CAUTION Do not place objects in front of the unit The disc tray may collide with objects whe...

Page 18: ...disable the Start up Banner 36 Music Photos Setup Network HOME Blu ray Disc Player Register 1st user Videos Videos Photos Music Disc Play back the contents 20 When multiple contents are recorded selec...

Page 19: ...4 Select Confirm and press OK To change the personalized user information Select Edit User Information from Setup menu 36 Press the coloured buttons in the HOME menu to switch to the user correspondi...

Page 20: ...e stopping point is memorized Resume play function Press 1PLAY to restart from this point The point is cleared if the media is removed On BD Video discs including BD J the resume play function does no...

Page 21: ...uipment Enjoying 3D video and photos Preparation Connect this unit to a 3D compatible TV 10 11 Perform the necessary preparations for the TV Play back following the instructions displayed on the scree...

Page 22: ...usable functions and the operating method may vary with each disc please refer to the instructions on the disc and or visit their website BD Live Internet Access may need to be changed for certain dis...

Page 23: ...ngs are possible using the Setup menu items When restricting the use of VIERA Connect 34 Network Service Lock When correcting the displayed time 34 Time Zone Summer Time If using slow Internet connect...

Page 24: ...e smartphone etc supports Miracast contact the manufacturer of the device 1 Press MIRACAST 2 Operate the Miracast compatible device On the device enable Miracast and select this unit as the device to...

Page 25: ...Windows Media Player or the smartphone etc Playlist of Windows Media Player can play back only the contents that are stored in the libraries When connected to DIGA 3 Register this unit to your DIGA T...

Page 26: ...ay cannot be played back by this unit This unit can be played back via connected equipment only when controlled using DMC Using the Digital Media Controller With the default setting the unit name will...

Page 27: ...ly switch the input channel and the screen of this unit will be displayed Additionally when the TV is off the TV will automatically turn on All connected equipment compatible with HDMI CEC including t...

Page 28: ...The items displayed differ depending on the type of media Select Off to cancel Random Select whether or not to play random Start Slideshow Start the slideshow Status Show the status messages Rotate R...

Page 29: ...the material to be played back This works only in the following cases BDT330 when 24p 4K 24p Output is set to 24p 4K or 24p 30 and the disc recorded at a rate of 60 fields per second is played back B...

Page 30: ...er equipment must also be 1080p compatible 24p Output BDT230 BDT130 When playing DVD Video set to On and then set 24p in Picture Settings 29 to On When BD Video DVD Video images other than 24p are pla...

Page 31: ...ctive audio format This unit decodes the audio format and transmits to the connected equipment Not making the proper settings may result in noise BD Video Secondary Audio Select whether or not to mix...

Page 32: ...ignals that are converted to 48 kHz are output If Off is selected and the connected equipment does not support 96 kHz the sound will not be output normally Signals are converted to 48 kHz despite the...

Page 33: ...eless router connection wizard will be displayed Double Speed Mode Setting 2 4GHz Set the connection speed for a 2 4 GHz wireless format If you connect using the Double Speed Mode 40MHz 2 channels use...

Page 34: ...BD Video Ratings Set an age limit of BD Video play Network Service Settings 23 VIERA Connect Press OK to show the following settings Time Zone Set the unit s time to match your location Some VIERA Co...

Page 35: ...laying and pausing etc this function is not available On Screen Messages Choose whether to show status messages automatically HDMI CEC Select Off when you do not want to use HDMI CEC System 4 3 Pan Sc...

Page 36: ...irmware update is available System Information Press OK to show the following settings Software Licence Information about the software used by this unit is displayed Firmware Version Information Displ...

Page 37: ...anging the HDMI auto connection setting You have forgotten your ratings password You want to cancel the ratings level The ratings level returns to the factory preset 1 Turn the unit on 2 Press and hol...

Page 38: ...on the disc doesn t match your TV PAL discs cannot be correctly viewed on an NTSC TV When 3D BD Video Playback in the Setup menu is set to Automatic images may not be output depending on the connectio...

Page 39: ...he audio cannot switch if Digital Audio Output is set to Bitstream Set Digital Audio Output to PCM 31 BDT330 When connecting this unit to a TV via an HDMI AV OUT MAIN and to an amplifier receiver via...

Page 40: ...Wireless Settings screen 33 the continuous lighting of at least 4 Reception indicators is the target for a stable connection If 3 or fewer indicators are lit or the connection is being interrupted cha...

Page 41: ...e connecting to a network No PLAY There is a viewing restriction on a BD Video or DVD Video 34 The media is dirty or badly scratched The unit cannot play REMOVE The USB device is drawing too much powe...

Page 42: ...g restarted during the firmware update Please do not turn off the unit UPD stands for a number The firmware is being updated Please do not turn off the unit FIN The firmware update is complete DMP BDT...

Page 43: ...x 0 5 W Power consumption in quick start standby mode BDT330 Approx 6 W BDT230 BDT130 Approx 5 5 W Dimensions WkHkD Including the projecting parts 430 mmk41 mmk184 mm Mass BDT330 Approx 1 6 kg BDT230...

Page 44: ...Digital Audio Output Bitstream PCM Output channel HDMI AV OUT Outputs using original audio 1 BD Video 7 1ch PCM 1 2 3 DVD Video 5 1ch PCM 3 OPTICAL Dolby Digital DTS Digital Surround Down mixed 2ch PC...

Page 45: ...enlandic 7576 Guarani 7178 Gujarati 7185 Hausa 7265 Hebrew 7387 Hindi 7273 Hungarian 7285 Icelandic 7383 Indonesian 7378 Interlingua 7365 Irish 7165 Italian 7384 Japanese 7465 Javanese 7487 Kannada 75...

Page 46: ...er Settings menu At least three 3 years from delivery of this product Panasonic will give to any third party who contacts us at the contact information provided below for a charge no more than our cos...

Page 47: ...CE OF THE DATA FILES OR SOFTWARE Except as contained in this notice the name of a copyright holder shall not be used in advertising or otherwise to promote the sale use or other dealings in these Data...

Page 48: ...dering application at www pas europe com Most major credit and debit cards accepted All enquiries transactions and distribution facilities are provided directly by Panasonic UK It couldn t be simpler...

Reviews: