background image

74   

VQT2N02

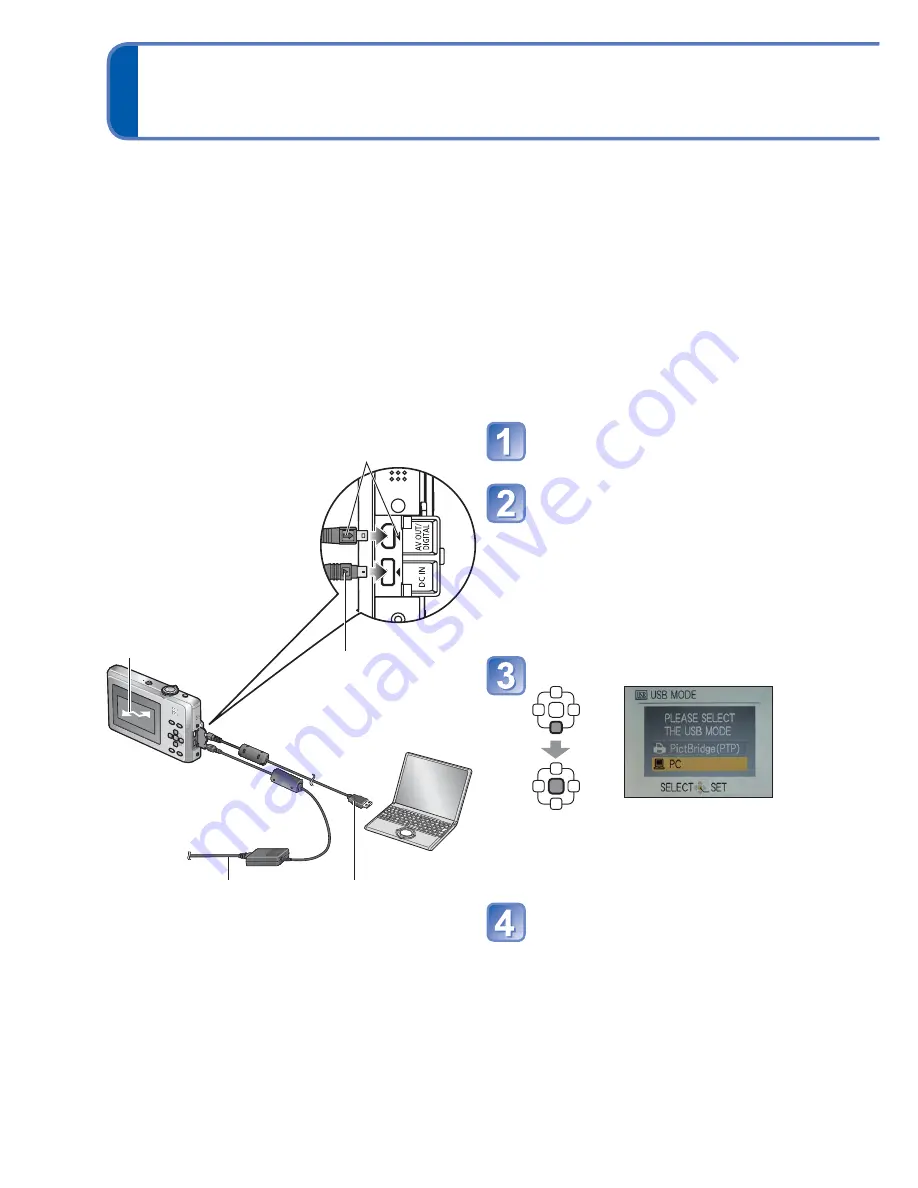
 Using with your PC


To cancel connection

Click 

‘Safely Remove Hardware’

 in the Windows System Tray 

 disconnect USB 

connection cable 

 turn off camera power 

 disconnect AC adaptor

Turn on power of both 

camera and computer
Connect camera to 

computer


• Please make sure you use the 

supplied USB connection cable.
Use of cables other than the 
supplied USB connection cable 
may cause malfunction.

Select [PC] on the camera

A message may be displayed on screen 

if [USB MODE] (

20) is set to [PictBridge 

(PTP)]. Select [CANCEL] to close the 

screen, and set [USB MODE] to [PC].

Operate with your computer

Check socket direction and insert straight in.

(Damage to socket shape can lead to faulty 

operation.)

[ACCESS] (sending data)


• Do not disconnect the 

USB connection cable 

while [ACCESS] is 

displayed.

USB connection cable

(always use cable 

supplied)

If using AC adaptor, 

turn off the camera 

before plugging in or 

removing.

Hold here

(Push until it is fully 

inserted.)

Pictures and motion pictures can be imported from the camera to your computer by 
connecting the two together.


• If your computer does not support SDXC memory cards, a message will be displayed 

requesting you to format the card. (Do not format the card. This will erase recorded 
pictures.) If the card is not recognized, refer to the following support website: 
http://panasonic.net/avc/sdcard/information/SDXC.html


• Imported pictures can then be printed or sent by e-mail using the ‘PHOTOfunSTUDIO’ 

software on the CD-ROM (supplied).

Getting Ready:


• Use a fully charged battery or connect an AC adaptor (optional). 


• When importing pictures from the built-in memory, remove any memory cards. 

Summary of Contents for DMCFP2 - DIGITAL STILL CAMERA

Page 1: ...Operating Instructions for advanced features Digital Camera Model No DMC FP2 DMC FP1 Before use please read these instructions completely VQT2N02 1...

Page 2: ...ed recording mode To use settings automatically selected by the camera Press the button To select the recording mode manually Press the MODE button Press to select the recording mode and then press ME...

Page 3: ...ick menu 16 Using the SETUP menu 17 CLOCK SET WORLD TIME TRAVEL DATE BEEP VOLUME 17 LCD MODE DISPLAY SIZE FOCUS ICON 18 AUTO POWER OFF AUTO REVIEW 19 RESET USB MODE 20 VIDEO OUT TV ASPECT VERSION DISP...

Page 4: ...atures for travel 51 TRAVEL DATE 51 WORLD TIME 52 Using the REC menu 53 PICTURE SIZE 53 SENSITIVITY 54 WHITE BALANCE 55 AF MODE 56 BURST DIGITAL ZOOM 57 COLOR MODE STABILIZER 58 AF ASSIST LAMP RED EYE...

Page 5: ...Do not get the camera wet or insert foreign objects This camera is not waterproof Do not expose the camera to water rain or seawater If camera gets wet wipe with a soft dry cloth Wring cloth thoroughl...

Page 6: ...s indicated as battery pack or battery in the text Battery Charger is indicated as battery charger or charger in the text Please dispose of all packaging appropriately Optional accessories Cards are o...

Page 7: ...cle Card Battery door 10 Release lever 10 Zoom lever 29 Shutter button 25 49 Flash 35 Lens 6 Self timer indicator 34 AF Assist Lamp 59 Lens cover 23 AV OUT DIGITAL socket 74 76 79 DC IN socket 74 76 A...

Page 8: ...ion The only batteries suitable for use with this unit are genuine Panasonic products and batteries manufactured by other companies and certified by Panasonic Batteries which do not support this funct...

Page 9: ...usage conditions The time required for charging varies depending on conditions of battery usage Charging takes longer at high or low temperatures and when the battery has not been used in some time B...

Page 10: ...ver press down in centre Always use genuine Panasonic batteries If you use other batteries we cannot guarantee the quality of this product Remove battery from camera after use Store the battery in bat...

Page 11: ...3 The access time for the built in memory may be longer than the access time for a card QVGA in REC QUALITY can only be available to record motion pictures in the built in memory Compatible memory car...

Page 12: ...e select screen is not displayed proceed to step Press MENU SET while the message is displayed Press to select the language and press MENU SET The PLEASE SET THE CLOCK message appears Press MENU SET T...

Page 13: ...o return to the previous screen press Turn on power again and check time display Time and date can be displayed by pressing DISPLAY several times Failure to set the date and time will cause the date t...

Page 14: ...is turned on Select the NORMAL PICTURE Mode Press the MODE button Press to select NORMAL PICTURE and then press MENU SET To display the PLAYBACK menu press the Playback button to switch to playback mo...

Page 15: ...nu Making the camera more convenient to use 17 22 Enables you to specify settings related to usability Adjust the Clock change the Beep sounds and so on PLAYBACK menu Playback mode only Using your pic...

Page 16: ...ed vary depending on recording mode Using Quick menu Recording menu items can be called up easily In recording mode display the Quick menu Press the button until the Quick menu is displayed Quick menu...

Page 17: ...mute the beep shutter sounds BEEP LEVEL Mute Low High BEEP TONE Change beep tone SHUTTER VOL Mute Low High SHUTTER TONE Change shutter tone VOLUME Adjust volume of sound from speakers 7 levels 0 LEVEL...

Page 18: ...nter POWER LCD will be deactivated if no operations are performed for 30 seconds while recording Brightness can be restored by pressing any button HIGH ANGLE will be cancelled when power is turned off...

Page 19: ...owing situations INTELLIGENT AUTO Mode 5 MIN and when a Slide Show is paused 10 MIN AUTO REVIEW Automatically display still pictures immediately after taking them OFF No auto review 1 SEC 2 SEC Automa...

Page 20: ...rs and clock settings will not be reset Camera movement may be audible as the lens function is reset This is not a fault USB MODE Select communication method for when connecting camera to a computer o...

Page 21: ...r card When a card built in memory is formatted the data cannot be restored Check the content of the card built in memory carefully before formatting YES NO This requires a sufficiently charged batter...

Page 22: ...o switch the Optical Image Stabilizer between on and off Cannot be displayed in playback mode To stop Press DISPLAY button Recording and zoom cannot be performed during demo AUTO DEMO View introductor...

Page 23: ...lect a picture To return to the recording mode Press the Playback button again The camera returns to the previous recording mode Close the lens cover The power is turned off The power can also be turn...

Page 24: ...Assist Lamp Do not look at it from close range Try to hold the camera steady when you press the shutter button Convenient ways to turn the power on Besides opening the lens cover you can also turn th...

Page 25: ...the camera at the subject meaning that clear pictures can be taken without the need to make settings manually Automatic Scene Detection Camera identifies the scene when pointed at the subject and mak...

Page 26: ...following conditions different scene types may be determined for the same subject Face contrast conditions of subject size distance colouring contrast movement zoom ratio sunset sunrise low brightnes...

Page 27: ...e has not been achieved Use flash or change SENSITIVITY settings Aperture value Shutter speed Jitter alert display Using the REC menu to change settings and set up your own recording environment Shutt...

Page 28: ...56 Return to desired composition Press fully AF area The focus display flashes and beep sounds when focus is not aligned Use the focus range displayed in red as a reference Even if the focus display...

Page 29: ...ation At a lower recording pixel level Extra optical zoom can be used to zoom up to 8 4 x DMC FP2 or 7 8 x DMC FP1 For zooming in even closer Digital zoom is available Maximum zoom ratios by picture s...

Page 30: ...using a tripod and SELFTIMER A greater degree of distortion may be generated by taking wider angled pictures of close objects while using more telescopic zoom may result in more colouring appearing ar...

Page 31: ...pliant with the unified DCF Design rule for Camera File system standard formulated by the Japan Electronics and Information Technology Industries Association JEITA and with Exif Exchangeable image fil...

Page 32: ...off the power during deletion Use a sufficiently charged battery or an AC adaptor optional Pictures cannot be deleted in the following cases Protected pictures Card switch is in LOCK position Pictures...

Page 33: ...alance when recording During playback zoom motion picture playback Slide Show Display on off During menu display Multi Playback or Calendar Playback Display cannot be changed Guide lines are not displ...

Page 34: ...g if shutter button is pressed fully After self timer lamp stops flashing it may then be lit for AF Assist Lamp This function cannot be used in HI SPEED BURST scene mode In SELF PORTRAIT scene mode 10...

Page 35: ...FLASH OFF Never flash Places where flash use is prohibited 1The flash is activated twice Be sure to stop moving before the second flash Note that the interval of flashes varies depending on the subje...

Page 36: ...feet ISO1600 Approx 1 15 m 4 9 m 3 77 feet 16 08 feet Approx 0 9 m 2 9 m 2 96 feet 9 51 feet HIGH SENS in SCENE MODE 45 ISO1600 ISO6400 Approx 1 15 m 9 8 m 3 77 feet 32 15 feet Approx 0 9 m 5 8 m 2 9...

Page 37: ...select during this period are automatically selected Take a picture display It may take some time until distant subjects come into focus When using INTELLIGENT AUTO Mode macro recording can be activa...

Page 38: ...gnment being severely reduced The resolution outside the area in focus may be lower Taking pictures at even closer range MACRO ZOOM To take even larger pictures of the subject setting to MACRO ZOOM en...

Page 39: ...ay not be possible in some cases Under exposed Optimum exposure Over exposed Plus direction Minus direction After exposure adjustment the adjustment value for example is displayed in the bottom left c...

Page 40: ...r the actual scene may affect the colouring of your picture The following REC menu settings will be automatically adjusted and cannot be selected manually available settings vary according to scene se...

Page 41: ...to a slim looking or glamorous appearance Use to select the transform level and press MENU SET to set The settings can also be changed in the Quick menu Take the picture Notes This function can be us...

Page 42: ...s of scenes with fast movement e g sports Tips Stand at least 5 m 16 4 feet away When the camera is set to STABILIZER and there is very little jitter or if STABILIZER is set to OFF shutter speed may s...

Page 43: ...atural looking pictures of food Tips Focus Max W 10 cm 0 33 feet and above Max T 50 cm 1 64 feet and above PARTY Brighten subjects and background in pictures of indoor events such as weddings Tips Sta...

Page 44: ...ER is set to OFF shutter speed may slow down up to 1 second Age display format depends on LANGUAGE setting AGE and NAME print setting can be made on your computer using the supplied CD ROM PHOTOfunSTU...

Page 45: ...ximum speed Approx 4 6 pictures sec DMC FP2 Approx 5 5 pictures sec DMC FP1 Number of recordable pictures Built in memory Approx 15 or more Card Approx 15 to 100 The maximum is 100 The burst speed and...

Page 46: ...he focus zoom exposure compensation shutter speed and ISO sensitivity are all fixed at the setting for the first picture The shutter speed becomes 1 30th of a second to 1 1600th of a second The follow...

Page 47: ...areas of contrasting colours when aligning the focus Check that the interior of the aircraft is not reflected in the window Stand at least 5 m 16 4 feet away Main fixed settings FLASH FORCED FLASH OF...

Page 48: ...layed Scene menu The zoom lever can also be used to switch to the next screen To see a description of a scene Select the scene and press DISPLAY Taking pictures in registered scene mode Press the MODE...

Page 49: ...is fixed In STABILIZER MODE 1 is fixed When there is no space left to store the motion picture recording automatically ends Additionally recording in progress may be stopped depending on the card used...

Page 50: ...ck momentarily or noise to be recorded Before recording motion pictures make sure the battery is adequately charged or use an AC adaptor optional When recording motion pictures using an AC adaptor if...

Page 51: ...layed in orange with a minus sign but not recorded When TRAVEL DATE is displayed in white with a minus sign the HOME date is one day in advance of the DESTINATION date this is recorded To print travel...

Page 52: ...ed destination during playback WORLD TIME Registering local time at your travel destination Set up Clock must be set in advance 12 Press MENU SET SETUP menu Select WORLD TIME PLEASE SET THE HOME AREA...

Page 53: ...0 480 12 5 M 4320 2880 10 5 M 4000 2672 10 5 M 4320 2432 9 M 4000 2248 1 This setting is not available in INTELLIGENT AUTO Mode represent the aspect ratios of the still pictures Extra optical zoom can...

Page 54: ...ings Intelligent ISO 80 100 200 400 800 1600 Setting guide SENSITIVITY 80 1600 Location recommended Bright outdoors Dark Shutter speed Slow Fast Interference Low High is automatically set in a range u...

Page 55: ...hting Blue sky Picture may appear red or blue if out of range This function may also not work correctly even within range if there are many light sources present We recommend setting to AWB or when un...

Page 56: ...ing Focuses on AF area in centre of picture Recommended when focus is difficult to align AF area AF area becomes larger in dark locations or when using digital zoom or Macro Zoom etc Cannot set to Fac...

Page 57: ...elected the flash is disabled When burst is performed with the built in memory data writing takes some time Settings will be stored even if power is turned off When you record subjects in motion where...

Page 58: ...en with no jitter correction AUTO The Optimum Image Stabilizer is performed automatically based on the recording conditions MODE 1 Constant correction Monitor image stable composition easy to determin...

Page 59: ...y press of shutter button and larger AF area displayed Cannot be set in Motion Picture Recording Mode The setting in other recording mode is applied RED EYE REMOVAL Automatically detects red eye and c...

Page 60: ...67 or use the PHOTOfunSTUDIO software on the CD ROM supplied On the setting screen of each menu Select the type of character Changes each time you press the button Upper lower case alphabet Symbols nu...

Page 61: ...nuary 2010 Cannot be displayed rotated Pictures displayed with cannot be played back Pictures taken with destination settings made in WORLD TIME are displayed in the calendar screen using the appropri...

Page 62: ...Motion pictures can be played back just as you view still pictures Operations during motion picture playback Pause Play Stop Fast rewind 2 steps Single frame rewind while paused Fast forward 2 steps...

Page 63: ...Y 66 When no card is inserted pictures are played back from the built in memory After you switch from recording mode to playback mode the Playback Mode automatically becomes NORMAL PLAY FAVORITE PLAY...

Page 64: ...setting is ON Set playback effects EFFECT Select music and effects according to picture atmosphere AUTO Camera selects optimum effect from NATURAL SLOW SWING and URBAN only available with CATEGORY SE...

Page 65: ...lected the picture may appear in black and white as a screen effect Music effects cannot be added Motion pictures cannot be played back in a slide show When the MOTION PICTURE category is selected the...

Page 66: ...o close FAVORITE PLAY select NORMAL PLAY Select the category Icons of categories with pictures dark blue No of pictures appears after a few seconds View pictures Previous Next To delete pictures Press...

Page 67: ...p Press MENU SET PLAYBACK menu Select TEXT STAMP Choose whether to stamp the age in years months This screen is not displayed if you selected OFF for NAME in step Select YES Screen varies according to...

Page 68: ...h text stamps cannot be set to RESIZE CROPPING or restamped and date based PRINT SET printing cannot be specified Characters may be cut off on certain printers Cannot be set in CATEGORY PLAY or FAVORI...

Page 69: ...U SET CROPPING Enlarge your still pictures and crop unwanted areas Set up Press MENU SET PLAYBACK menu Select CROPPING Press to select a still picture and then press MENU SET Select area to trim Expan...

Page 70: ...tically rotate portrait still pictures Set up Press MENU SET PLAYBACK menu Select ROTATE DISP FAVORITE By labeling your favourite pictures with a star you can enjoy SLIDE SHOW or FAVORITE PLAY of thes...

Page 71: ...release Press DISPLAY button After confirmation press to return to the menu screen To clear all Select CANCEL in step and select YES When using PictBridge compatible printers check settings on actual...

Page 72: ...SINGLE MULTI Picture protected Picture protected To cancel Press MENU SET again After confirmation press to return to the menu screen To clear all Select CANCEL in step and select YES To cancel while...

Page 73: ...Copying of picture data from the built in memory to memory cards will be terminated midway if there is insufficient space on the card Using memory cards with higher capacities than the built in memory...

Page 74: ...a Do not disconnect the USB connection cable while ACCESS is displayed USB connection cable always use cable supplied If using AC adaptor turn off the camera before plugging in or removing Hold here P...

Page 75: ...CD ROM Installed as standard on Macintosh Save motion pictures to your computer before viewing Do not use any other USB connection cables except the one supplied Turn off power before inserting or rem...

Page 76: ...emove any memory cards Adjust the print quality or other settings on your printer as needed Turn on power of camera and printer Connect camera to printer Please make sure you use the supplied USB conn...

Page 77: ...y may differ from set number Print with date and text With TEXT STAMP Recording date and the following information can be embedded into still pictures Recording date NAME and AGE from BABY and PET Sce...

Page 78: ...y 1 picture no border 1 picture with border 2 pictures 4 pictures Items may not be displayed if incompatible with printer To arrange 2 pictures or 4 pictures in the same still pictures set the number...

Page 79: ...to play each type of card in equipment compatible with the particular format Do not use any other AV cables except the supplied one You can play back pictures on TVs in other countries regions which...

Page 80: ...Exposure compensation 39 Aperture value Shutter speed 27 ISO Sensitivity 54 Focus range Zoom 29 Macro Zoom 38 11 LCD Mode 18 12 Burst Mode 57 13 White Balance 55 ISO Sensitivity 54 Colour Mode 58 14...

Page 81: ...le number 31 75 Picture number Total pictures 31 Motion picture recording time Elapsed playback time 62 Save destination 11 5 Recording information 6 Favourites settings 70 7 Recorded date and time Tr...

Page 82: ...ttings at once has been exceeded CANNOT BE SET ON THIS PICTURE Pictures that do not conform to DCF standards cannot be used for PRINT SET and TEXT STAMP PLEASE TURN CAMERA OFF AND THEN ON AGAIN SYSTEM...

Page 83: ...cording motion picture use a card rated with an SD speed class of Class 6 or higher SD speed class refers to a specification for sustained write speeds If recording stops even when using a card with s...

Page 84: ...rged battery not sold pre charged 8 If you leave the power on the battery will be depleted Turn the power off frequently by using AUTO POWER OFF 19 etc Please check the recording picture capacity for...

Page 85: ...he colouring 55 Brightness or colouring of recorded picture different from real life Taking pictures under fluorescent lighting may require a faster shutter speed and result in slightly changed bright...

Page 86: ...Modes are only displayed for approx 5 sec when the camera is turned on after these settings are made or after switching from playback mode to recording mode etc They cannot be always displayed Flash N...

Page 87: ...and their position differ in every picture THUMBNAIL IS DISPLAYED is shown on the screen The still pictures may have been recorded on another device If so they may be displayed with poor picture qual...

Page 88: ...era Set USB MODE to PC 20 Computer does not recognise card only reads built in memory Disconnect USB connection cable and reconnect with card in place I want to play computer pictures on my camera Use...

Page 89: ...o aperture settings being made Does not affect recording Clock is incorrect Camera has been left for a long period Reset the clock 12 Long time was taken to set clock clock behind by this amount When...

Page 90: ...h voltage lines If you record near radio transmitters or high voltage lines the recorded pictures and sound may be adversely affected Do not extend the supplied cord or cable Do not allow camera to co...

Page 91: ...monitor may be slightly less responsive than normal immediately after startup Normal brightness will return once the internal components have warmed up Personal Information If you complete NAME or AG...

Page 92: ...880 1030 6 GB 1190 1650 2690 3660 26210 1330 1580 8 GB 1590 2210 3610 4910 35080 1790 2110 12 GB 2400 3330 5440 7400 52920 2700 3190 16 GB 3200 4450 7260 9880 70590 3600 4250 24 GB 4650 6460 10550 14...

Page 93: ...00 11 13 Memory card 256 MB 57 83 110 150 1080 63 75 512 MB 110 165 220 300 2150 125 150 1 GB 220 330 440 600 4310 250 300 2 GB 460 680 900 1220 8780 520 610 4 GB 910 1340 1770 2410 17240 1020 1200 6...

Page 94: ...e and the QuickTime logo are trademarks or registered trademarks of Apple Inc used under license therefrom Other names company names and product names printed in these instructions are trademarks or r...

Reviews: