

4
RETURN
Owner ID
RETURN: leave
* * * *
PIN number
Name
House No
Postcode
DVB Auto-Setup
Please wait !
Ch 21
68
Prog.
Quality
Channel Service Name
Net ID TS ID
1 23 BBC ONE 12302 12289 9
2 23 BBC 12302 12289 9
RETURN
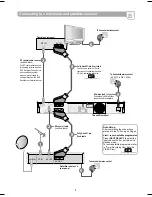
Download from TV with Q Link
If your television is equipped with the Q Link feature, it will start to
download TV tuning information to this unit. In order to be able to use
Q Link, the unit must be connected to a TV with Q Link or a similar
feature via a fully wired 21-pin Scart cable.
The auto setup tunes in all available analogue television stations.
This takes approx. 5 minutes.
RETURN : to cancel
Datenübernahme von TV
Analogue Auto-Setup in progress.(without Q Link)
Download in progress.(with Q Link)
Checking Broadcaster's data.
(with Q Link)
1
Analogue Auto-Setup in progress. Please wait.
RETURN : to cancel
Download in Progress. Please wait.
RETURN : to cancel
Checking Broadcaster's data. Please wait.
RETURN : to cancel
You can complete the Owner ID now. To skip this step and do it later,
press the
RETURN
button. Your DVD Recorder is now ready to use.
You can later set the Owner ID in the Setup Menu.
!
To enter the Owner ID, press
ENTER
.
!
Press . To set the Owner ID now, use
to enter a four-digit
PIN number.
Press
to correct the digit.
!
Make sure that you will remember the PIN number (make a note of it).
!
Press the
ENTER
button to confirm.
!
Select [Yes] with and confirm with
ENTER
.
!
Press . Enter the [Name], [House No] and [Postcode] in the same
way, using
.
!
Press the
ENTER
button to confirm each entry.
!
Press the
RETURN
button to leave the Owner ID screen. You will now
see the TV picture. Your DVD Recorder is now ready to use.
0
9
0
9
0
9
0
9
0
9
0
9
0
9
0
9
0
9
0
9
0
9
0
9
0
9
0
9
0
9
0
9
0
9
0
9
0
9
0
9
0
9
0
9
0
9
0
9
0
9
0
9
0
9
0
9
0
9
0
9
0
9
0
9
0
9
0
9
0
9
0
9
0
9
0
9
0
9
0
9
0
9
0
9
0
9
0
9
0
9
0
9
0
9
0
9
0
9
0
9
0
9
0
9
0
9
0
9
0
9
0
9
0
9
0
9
0
9
0
9
0
9
0
9
Depending on different countries or regions, the digital TV programme has
its own selection of operating frequency channels, frequency bands,
transmission parameters and frequencies. The unit automatically searches
for all available digital stations.
You can repeat the station search again.
2
(Operating Instructions)
58
(Operating Instructions)
53
(Operating Instructions)
45
Checking Broadcaster's data
(with Q Link)
Once the station data have been adopted from the television set,
the analogue stations are sorted accordingly.
You can repeat the station search again.
Setting the date and time
(
)
If the Date and Time are not transferred via a television station,
the Clock menu appears.
!
Set the clock manually.
if not found automatically
An incorrect date or time affects the programmed recording of
television programmes (note summer and winter time).
or
3
Analogue Auto-Setup
(without Q Link)
Auto-Setup
Off
Clock
Automatic
Please set the clock manually.
ENTER : store RETURN : leave
ENTER
CHANGE
RETURN
Time
Date
10
52
04
20
03
2006
:
:
/
/
Owner ID
You now have the opportunity
to enter your details and
help the police crack crime
see instruction book.
ENTER
RETURN
DVB Auto-Setup (Tuning digital channels)
Auto-Setup (Tuning analogue channels)
Owner ID
Auto setup for your unit is complete. The availability of stations may differ
regionally. You can now select your favourite stations and store them
in the required order in the profiles.
(Operating Instructions)
44
(Operating Instructions)
45 46
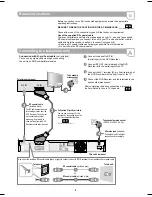
Automatic setup of the unit
After being switched on for the first time, the unit proceeds with an
automatic station search for digital channels. This is followed by the search
for analogue channels.
!
Switch the unit on using the
Standby/on
-switch.
!
Turn on the television and select the AV input that this unit is connected to.
(Operating Instructions)
52