background image

48

(EN)

1

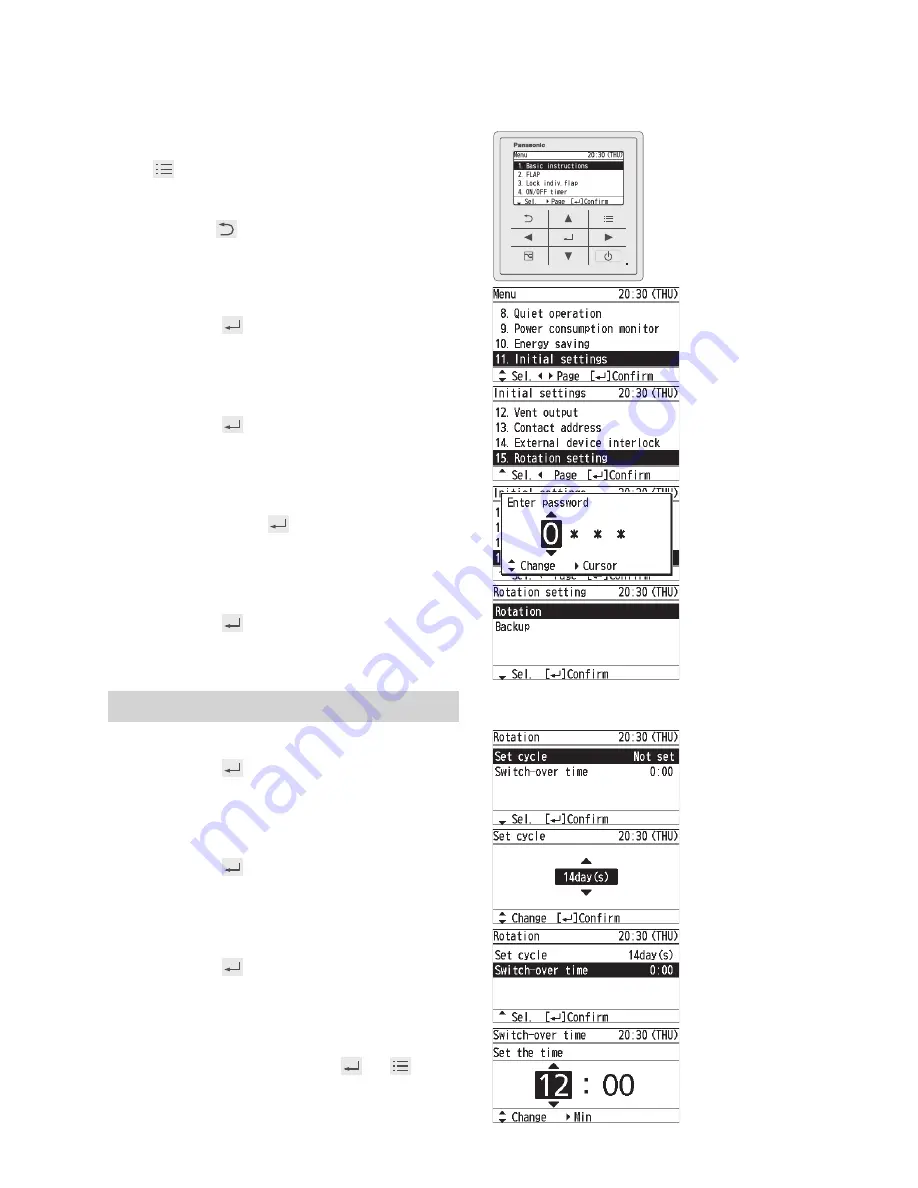
Display the menu screen.


„

To return to the previous screen

Press  .

2

Select [Initial settings].

▲ ▼ → 

3

Select the item to set.

▲ ▼ → 

4

Enter the password.

▲  ▼ → ► →   

(Repeat)

5

Select the item to set.

▲ ▼ → 

Rotation

6

Select [Set cycle].

▲  ▼ → 

7

Set [Set cycle].

▲ ▼ → 

• 1 to 7 days (by the day)/ 14 days/ 21 days/ 

28 days/None (Rotation operation OFF)

8

Select [Switch-over time].

▲ ▼ → 

9

Set [Switch-over time].

▲ ▼ → ► →   ▲ ▼ →   →   

(Press 2 times to finish.)

• 0:00 to 23:59

Initial Settings 

„

 Rotation (Continued)

„

 Backup (Continued)

Summary of Contents for CZ-RTC5B

Page 1: ...P 12 z z Flap Setting for Each Air Outlet 13 Lock individual flap 13 z z Timer Reservation 14 ON OFF timer 14 Weekly timer overview 15 Weekly timer 16 z z Filter Information 20 z z Quiet Operation Power Consumption Monitor 22 z z Energy Saving 24 ECONAVI 24 Temp auto return 30 Temp range 30 Auto shutoff 32 Schedule peak cut 34 Repeat off timer 36 z z Internal Drying Settings 37 z z Outing Function...

Page 2: ...ING Do not use this appliance in a potentially explosive atmosphere Do not operate with wet hands Do not wash with water In case of malfunction of this appliance do not repair by yourself Contact the sales or service dealer for repair and disposal In case of emergency remove the power plug from the socket or switch off the circuit breaker or the means by which the system is isolated from the mains...

Page 3: ...l interference to radio communications However there is no guarantee that interference will not occur in a particular installation If this equipment does cause harmful interference to radio or television reception which can be determined by turning the equipment off and on the user is encouraged to try to correct the interference by one or more of the following measures Reorient or relocate the re...

Page 4: ...pp z z Service offering storage of electricity consumption data Utilize electricity consumption data saved in the cloud for energy saving activities z z Support for browsing operating instructions Browse the operating instructions for the remote controller and connected units on your smartphone with ease z z Support with simple solutions when you have a problem Rapid response when an error occurs ...

Page 5: ...the menu screen P 10 Operation indicator Illuminates during operation Blinks during alarm Start Stop button Starts Stops operation Enter button Fixes the selected content Press centre No glove No pen Energy saving button Switches Energy saving Normal operation Cross key buttons Selects an item Up Down Right Left ...

Page 6: ...lock is functioning P 40 z z To cancel lock Press button for 4 seconds The indoor unit is stopped or slight blow operation is in process Part Names Screen display Only the partial settings can be checked on the top screen To check all the settings P 55 Operation is locked P 40 datanavi outputting P 4 Under operation of nanoe X Present time day P 40 Appears when ECONAVI is being set to ON ECONAVI s...

Page 7: ... control operation is restricted by a central control device ON OFF timer is set P 14 Weekly timer is set P 15 Energy saving operation is in process P 8 Fresh air is used for ventilation Only when connecting a heat exchange ventilation unit or connecting a commercially sold fan P 54 Prevents the room temperature from increasing too much or decreasing too much when no one is in the room P 38 Circul...

Page 8: ...power failure has occurred z z If no operation is performed for a certain period of time the backlight turns off to save electricity Press any button for illumination z z The energy saving operation restricts the maximum current value resulting in decreased cooling heating performance If the current of outdoor units does not reach the peak due to low load operation the current value is not restric...

Page 9: ...s When the cursor is not visible Cool Dry 18 C to 30 C Heat 16 C to 30 C Auto 17 C to 27 C Fan speed Press Flap Press 2 times Flap Setting for Each Indoor Unit P 12 スイング 停止 Swing Pressing during swing can stop the flap at your preferred position Cursor Depending on the model either of the displays appears Auto Cannot be selected in Fan mode Depending on the model selectable airflow directions may...

Page 10: ...ns to the top screen 2 Select the menu item To turn the page Press Selectable menus 1 to 16 For details of screen examples see the next page Menu List Some menus cannot be used if the function is not fitted If unavailable menus are selected the following display appears The administrator password is required for setting P 43 Refer to the website for datanavi P 4 ...

Page 11: ...detects human activity and conserves energy based on the activity level P 24 Temp auto return Restores the temperature after the set time has elapsed even if the temperature is changed P 30 Temp range Restricts the temperature range that can be set P 31 Auto shutoff Sets the auto shutoff timer P 32 Schedule peak cut Determines the time zone for the energy saving operation P 34 Repeat off timer Sto...

Page 12: ...s to finish Pressing or during swing can stop the flap at your preferred position Pressing or while swing is stopped sets the flap at the specified position Depending on the model the specifications may differ The swing operation is unavailable or the airflow direction cannot be changed and This function is disabled is displayed Depending on the model the airflow is adjusted with 3 levels in the c...

Page 13: ... 2 Select Lock indiv flap 3 Select the indoor unit to set e g 1 1 1 2 to 1 8 4 Select the air outlet The square mark indented on the panel of the indoor unit indicates air outlet No 1 There are some models that do not have a square mark indented The air outlet No changes according to the installation direction Check by actual operation ALL All the air outlets 5 Select the flap direction Press 2 ti...

Page 14: ...ample when Operating the air conditioner according to the meeting start time 1 Display the menu screen To return to the previous screen Press 2 Select ON OFF timer 3 Select the timer type Select OFF timer or ON timer 4 Select Set To set the timer to OFF select Unset 5 Set the time hour minute Press 2 times to finish Upper limit Stops in 72 h by the 30 minutes Note z z If ON timer and OFF timer are...

Page 15: ... with the specified temperature TEMP Sets the temperature to the specified temperature during operation Combination examples 1 Stop operation earlier on No overtime work day 8 00 17 00 8 00 22 00 ON ON OFF ON Weekday No overtime work day The setting registered for 1 day can be copied to other days P 19 2 Set the temperature higher after the fixed time 8 00 22 00 17 00 ON 26 C 28 C ON TEMP OFF TEMP...

Page 16: ...ly timer 3 Enable the Weekly timer Select the item with and select enable disable with 4 Select for all days when the timer is used Repeat Select the days with and select enable disable with 5 Select the day for the timer setting 6 Select the field to register the timer setting Up to 8 settings are available for each day After registration the items are arranged in time series automatically ...

Page 17: ...Set the temperature Only when the timer operation is ON TEMP or TEMP 10 Confirm the setting content Confirm and press Press 2 times to finish To register additionally Repeat from step 6 without pressing To copy the setting content to other days P 19 To set the timer to OFF Starting with step 1 select in step 3 and press 2 times To set the timer to OFF for specified days after registration national...

Page 18: ...e as follows To change the setting following steps 7 to 10 on page 17 set the time timer operation and temperature and confirm the content To delete the setting select YES Press 2 times to finish To change or delete settings repeatedly Repeat from step 1 without pressing Note To delete all schedules of selected days 1 Select the day in step 1 above and press 2 Select Delete all with and press 3 Se...

Page 19: ...s is convenient to apply the same schedule to multiple days 1 Display the menu screen To return to the previous screen Press 2 Select Weekly timer 3 Select Timer copy 4 Select the copy source day 5 Select for all copy target days Select the days with and select with Copy source 6 Select YES Press 2 times to finish ...

Page 20: ...ng time 4 Confirm the operation time to the next cleaning Press 2 times to finish When cleaning is immediately necessary The screen shown on the right is displayed Clean the filter See operating instructions of the indoor unit After the filter is cleaned Select Filter sign reset in step 3 above and select YES Press 2 times to finish The filter cleaning time count is reset ...

Page 21: ...1 EN Note z z If the function is not fitted the display shown on the right appears and this function cannot be used z z When the cleaning time comes the icon shown on the right appears on the top screen ...

Page 22: ...een To return to the previous screen Press 2 Select the item to set Quiet operation 3 Enter the password Repeat 4 Set Select enable disable to Select the item with and select with 5 Select Quiet time 6 Set the time to perform quiet operation Repeat Press 2 times to finish ...

Page 23: ...on cannot be used z z Using the quiet operation function may deteriorate the performance to reduce the operation sound z z The power consumption shows an approximate calculation result which may differ from the measurement result calculated by a power meter Pressing can switch data of 1 week total and data of each day Pressing can switch data of 1 year total and data of each month 1 day Power cons...

Page 24: ...approx 1 hour or more the unit operates in the specified Absence operation mode In the default setting the energy saving operation continues with the set temperature restricted No one in the room for 3 hours Cooling Cooling will stop and the unit will be in fan only mode Heating Heating will stop and the unit will be in fan only mode When the sensor detects movements in the room which have been em...

Page 25: ...performed after a lapse of 3 hours since the room has been empty Operates in the Fan mode only Stops and resumes operations after human movements are detected Stops and will not resume operations even after human movements are detected Continues to operate in the current mode If you need to do so please contact the dealer z z Turn the ECONAVI function OFF if You want to maintain the room temperatu...

Page 26: ...26 EN 1 Display the menu screen To return to the previous screen Press 2 Select Energy saving 3 Select ECONAVI 4 Select the item to set ECONAVI 5 Press 2 times to finish ON OFF Energy Saving ...

Page 27: ...is detected the operation status is restored according to the level of human activity Stop no restart Stops the operation After stopped the operation is not resumed even if human activity is detected Stop restart Stops the operation After stopped the operation is resumed if human activity is detected and the operation status is restored according to the level of human activity Absence operation st...

Page 28: ...flow direction of the selected air outlet is fixed setting and changing are not available Not set Direct Indirect Note z z ECONAVI can be set only with the separately sold ECONAVI panel or holder on the wall etc or indoor units equipped with the Direct airflow Indirect airflow function z z Direct Ind airflow can be set on the remote control for each flap of the indoor unit Only for the indoor unit...

Page 29: ...2 times to finish ON OFF Note z z To operate the Circulation in HEAT mode set the fan speed to AUTO and set the airflow direction to any one of Direct airflow スイング 停止 and F3 F4 F5 z z In the following cases each message appears and this function cannot be used When the indoor unit is not supported the motion sensor is not equipped or the floor temperature sensor is not equipped Locked or prohibit...

Page 30: ...outside the range cannot be set 1 Display the menu screen To return to the previous screen Press 2 Select Energy saving 3 Select the item to set Temp auto return 4 Select the item and set to To operate only when energy can be saved Select Return type with and select Saving with 5 Set the time to return to the set temperature 10 to 240 min by the 10 min 6 Set the temperature Press 2 times to finish...

Page 31: ...series Repeat from step 4 without pressing Note z z Temp auto return When Return type is set to Saving this functions only when the temperature set in step 5 saves more energy than the changed temperature e g When Cool 26 C is set and the temperature is changed to 28 C Saving Keeps 28 C Normal Returns to 26 C z z The temperature range that can be set varies depending on the model ...

Page 32: ...ntervals and stop the operation automatically e g 60 min ON OFF 21 00 22 08 Detect Detect Detect 23 00 9 00 60 min 60 min 60 min Closing time Opening time Auto shutoff in effect Leaves the shop without turning off A C If operation is detected automatically stops Returns to get something left behind and turns on A C Auto stop 1 Display the menu screen To return to the previous screen Press 2 Select...

Page 33: ...f is activated 5 Set hour minute Press 2 times to finish End time Time when Auto shutoff stops 5 Set hour minute Press 2 times to finish Timer Time interval to detect operation status after Stop time 5 Set Press 2 times to finish 10 min to 180 min by the 10 min ...

Page 34: ...u screen To return to the last screen Press 2 Select Energy saving 3 Select Schedule peak cut 4 Enter the password Repeat 5 Set Select enable disable to 6 Select Set schedule 7 Change the setting Select the field to register Large Small 11 00 13 00 16 00 19 00 Time zone to reduce the operation capacity Operation capacity ...

Page 35: ... change Select the field to change in step 7 on the previous page Select Change Following the above steps 8 to 9 select the start time end time and operation capacity To delete Select the field to delete in step 7 on the previous page Select Delete Select YES Press 2 times to finish Note z z An administrator password is required to use schedule peak cut P 43 ...

Page 36: ...g off 1 Display the menu screen To return to the previous screen Press 2 Select Energy saving 3 Select Repeat off timer and set to 4 Set the timer to stop Press 2 times to finish 10 min to 180 min by the 10 min ON OFF 60 min Finishes working without turning off A C Turns on A C Starts working Auto stop e g Setting to stop operation after 60 minutes ...

Page 37: ... Set Setting for all units Press 2 times to finish ON OFF Settings for individual units Press 2 times to finish ON OFF To stop the internal drying operation Press If you wish to resume operating indoor units during internal drying press Note z z If the function is not fitted the display shown on the right appears and this function cannot be used Internal Drying Settings ...

Page 38: ...38 EN Outing Function This function prevents the room temperature from rising too high or dropping too low when no one is in the room due to outing etc z ...

Page 39: ...lay the menu screen To return to the previous screen Press 2 Select Outing function 3 Select Select enable disable and set to 4 Select Set lower upper limit temp 5 Set the temperature range Press 2 times to finish ...

Page 40: ...Initial settings 3 Select the item to set Clock 4 Set the date and time Repeat Clock type 4 Select the type to display Press 2 times to finish AM PM 24 h Operation lock 4 Select the type of lock and set to Press 2 times to finish To cancel lock Select in step 4 Lock all keys Lock menu Operations Select YES Press 2 times to finish ...

Page 41: ...ngs 3 Select Controller name 4 Enter the name Repeat the same procedure for all characters Up to 16 characters Space is included in the number of characters To change the character type Select the character type with and press Character type To enter space Select Space with and press To delete 1 character Select BS with and press 5 Select Conf Press 2 times to finish Controller name ...

Page 42: ... 2 Select Initial settings 3 Select the item to set Touch sound 4 Press 2 times to finish ON OFF Contrast 4 Press 2 times to finish Backlight 4 Press 2 times to finish Notes when using datanavi When the brightness of the backlight is low it may not be possible to receive data from smartphones Language 4 Press 2 times to finish ...

Page 43: ...screen Press 2 Select Initial settings 3 Select the item to set 4 Enter the password as necessary Repeat Select the number with and move to the next field with A password does not need to be entered when displaying the contact address Password change 5 Enter a new password Repeat 6 Enter the password again to confirm Press 2 times to finish ...

Page 44: ...hen the remote controller sensor is selected for the temperature sensor setting the Main sensor controls the operation Vent output 5 Press 2 times to finish Set When the air conditioner is turned ON OFF the connected ventilation fan is turned ON OFF too To interlock the air conditioner and the fan another installation work is required Contact address 5 Confirm Confirm then Press 2 times to finish ...

Page 45: ...vice interlock 1 Display the menu screen To return to the previous screen Press 2 Select Initial settings 3 Select the item to set 4 Enter the password as necessary Repeat External device interlock 5 Select Ext dvice intrlok 6 Select ON ...

Page 46: ... dtctn 7 Select the item to set 8 Set and confirm Press 2 times to finish Duration of absence dtctn The operation off timing can be changed The setting can be made between 0 and 60 minutes by the minute Note z z An administrator password is required to use external device interlock P 43 z z The external device interlock can be set using the separately sold ECONAVI panel or by connecting the holder...

Page 47: ...on of 1 outdoor unit and 1 indoor unit by one remote controller Backup operation The backup operation is a support operation performed by a refrigerant system in standby mode when the room temperature does not reach the set temperature due to poor performance or occurrence of an alarm Example When an error occurs while System 1 is in operation and System 2 is in standby System 2 will start up In n...

Page 48: ...o set 4 Enter the password Repeat 5 Select the item to set Rotation 6 Select Set cycle 7 Set Set cycle 1 to 7 days by the day 14 days 21 days 28 days None Rotation operation OFF 8 Select Switch over time 9 Set Switch over time Press 2 times to finish 0 00 to 23 59 Initial Settings Rotation Continued Backup Continued ...

Page 49: ...set value Main system setting When Set cycle is set System that performs the preceding operation When Set cycle is OFF System that always performs the operation The other system is a backup system Note z z An administrator password is required to use rotation settings P 43 z z If the function is not fitted the display shown on the right appears and this function cannot be used z z Setting cycle Th...

Page 50: ...anoe X nanoe X For a freshness and cleaner environment nanoe X generates negative ions using the air in the room to give a healthy air It also reduces the smell in the room and constrains propagations of mold and bacteria nanoe X Function nanoe X Internal cleaning ...

Page 51: ... in cooling or dry mode for more than 5 minutes When finished the internal cleaning operation is started Drives for about Max 75 minutes The figure at right shows the display during the internal cleaning operation If you wish to resume operating during internal cleaning press To stop the internal cleaning operation Press When the internal cleaning operation finished and stopped the remote control ...

Page 52: ...dividual units 5 Set Setting for all units Press 2 times to finish ON OFF Settings for individual units Press 2 times to finish ON OFF Note z z When you set nanoe X to OFF the internal cleaning function is also set OFF z z In the following case the message appears and this function cannot be used When the indoor unit is not supported or the nanoe X kit is not equipped ...

Page 53: ...for all units Press 2 times to finish ON OFF Settings for individual units Press 2 times to finish ON OFF In case of nanoe X set to OFF the display shown on the right appears Note z z In the following case the message appears and this function cannot be used When the indoor unit is not supported or the nanoe X kit is not equipped ...

Page 54: ...54 EN Ventilation Setting 1 Display the menu screen To return to the previous screen Press 2 Select Ventilation 3 Select Ventilation ON OFF 4 Select ON or OFF Press 2 times to finish ...

Page 55: ...f setting information icons 1 Display the menu screen To return to the previous screen Press 2 Select Setting list 3 Select the item Only icons currently being displayed on the screen are displayed here 4 Confirm Confirm then Press 2 times to finish ...

Page 56: ... operation is in process P 8 The operation capacity of the outdoor unit is restricted Schedule peak cut is set P 34 Temp auto return is set P 30 Temp range is set P 31 Auto shutoff is set P 32 Repeat off timer is set P 36 Quiet operation is set P 22 The temperature sensor of the remote controller is detecting the room temperature P 44 Operation lock is set P 40 Fresh air is used for ventilation On...

Page 57: ... If operation does not start turn off the circuit breaker and consult the dealer of purchase about the symptom and Model No Is displayed Alarm indication e g Defective indoor unit No z z If any of the following alarm indications appears stop operation once and restart approx 1 minute later Alarm indication off E04 E06 P10 P20 H06 If the indication does not reappear use the unit If the indication r...

Page 58: ...tion is set to OFF Turn the ECONAVI function ON with the remote controller z z The indoor unit may not support the ECONAVI function If you turn the ECONAVI function ON with the remote control but there is no change the indoor unit does not support the ECONAVI function Please contact the dealer The remote controller screen displays z z nanoe X is considered abnormal Turn OFF the nanoe X function wi...

Page 59: ...ensation Indoor use only Power Source DC16 V supplied from indoor unit Clock Precision 30 seconds month at normal temperature 25 C Adjust periodically Holding time 72 hours When fully charged Approx 8 hours are required for full charge Number of connected indoor units Indoor unit Up to 8 units During group controlling Specifications ...

Page 60: ... Panasonic Corporation 2018 ...

Reviews: