background image

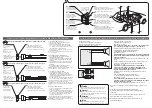
Before Wiring/Vor der Verdrahtung/

Avant le câblage/Voor het aansluiten van de bedrading

Exclusively operated with 12 V battery with negative (–) 
ground.
Connect the power lead (red) very last. 

(for non-ISO connector)

Connect the battery lead (yellow) to the positive (+) terminal 
of the battery or fuse block terminal (BAT). 

(for non-ISO 

connector)

Strip about 5 mm of the lead ends for connection.

(for non-ISO connector)

Apply insulating tape to bare leads.
Secure loosened leads.

Dieses Gerät ist ausschließlich für den Anschluss an Bordnetze 
mit 12 V Batterie und negativer (–) Klemme an Masse bestimmt.
Schließen Sie den Versorgungsleiter (rot) zum Schluss an. 

(wenn kein ISO-Stecker verwendet wird)

Schließen Sie das Batteriekabel (gelb) an die positive (+) 
Klemme der Batterie oder an die (BAT) Klemme des 
Sicherungsblocks an. 

(wenn kein ISO-Stecker verwendet wird)

Entfernen Sie etwa 5 mm der Isolierung von den Kabelenden 
für den Anschluss. 

(wenn kein ISO-Stecker verwendet wird)

Isolieren Sie alle freiliegenden Leiter.
Sichern Sie alle losen Leiter.

Alimentez l’appareil absolument par la batterie de 12 V avec 
sa polarité négative (–) mise à la masse.
Raccorder le fi l d’alimentation (rouge) en dernier.

(pour un connecteur non-ISO)

Connectez le fi l (jaune) à la borne positive (+) de la batterie 
ou à la borne (BAT) de la boîte à fusibles. 

(pour un connecteur 

non-ISO)

Dénudez les extrémités de fi l de 5 mm environ pour la 
connexion. 

(pour un connecteur non-ISO)

Recouvrez les fi ls nus d’un ruban isolant.
Resserrez les connexions de fi ls.

Uitsluitend voor gebruik met een 12 V accusysteem met 
negatieve (–) aarding.
Sluit de stroomdraad (rood) pas het allerlaatst aan. 

(voor een niet-ISO aansluiting)

Sluit de accudraad (geel) aan op de positieve (+) aansluiting 
van de accu of van het zekeringenblok (BAT). 

(voor een niet-ISO 

aansluiting)

Strip ongeveer 5 mm van de uiteinden 
van de draden om de verbinding tot 
stand te kunnen brengen. 

(voor een niet-

ISO aansluiting)

Isoleer blote draadeinden met isolatieband.
Zet loshangende draden vast.

English

Deutsc

h

Français

Nederlands

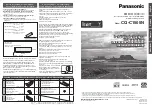
WMA MP3 CD Player/Receiver

WMA MP3 CD-Player/Receiver

Récepteur/lecteur CD avec lecture WMA/MP3

WMA MP3 CD-speler/radio

Model:  

CQ-C1505N

TEXT

•  Please read these instructions carefully before using this product and keep this manual for future reference.
•  Bitte lesen Sie diese Bedienungsanleitung vor der Verwendung dieses Produktes aufmerksam durch und bewahren 
  Sie sie danach für spätere Nachschlagzwecke sorgfältig auf.
•  Prière de lire ces instructions attentivement avant d’utiliser le produit et garder ce manuel pour l’utilisation ultérieure.
•  Leest u deze instructie alstublieft zorgvuldig door voor u dit product in gebruik neemt en bewaar deze handleiding voor later gebruik.

•  Mounting angle side to side

front to rear

: horizontal
: 0 – 30°

• Montagewinkel seitlich

vorne-hinten

: horizontal
: 0 – 30°

•  Angle de montage latéral

longitudinal

: horizontal
: 0 – 30°

• Bevestigingshoek links/rechts

voor/achter

: horizontaal
: 0 – 30°

• Mounting space
• Einbauöffnung
•  Espace nécessaire pour le montage
• Benodigde ruimte

Supplied Hardware/Mitgeliefertes zubehör/Matériel d’installation/Meegeleverde onderdelen

No.

Item

Diagram

Q’ty

No.

Item

Diagram

Q’ty

Mounting Collar
Einbauhalterung
Cadre de montage
Bevestigingskraag

YEFX0217263A

1

Lock Cancel Plate
Verriegelungsfreigabeplatte
Plaque antiblocage
Ontgrendelingsplaat

2

Power Connector
Versorgungsstecker
Connecteur d’alimentation
Stroomstekker

YEAJ02874

1

Mounting Bolt (5 mm 

)

Befestigungsschraube (5 mm 

)

Boulon de fi xation (5 mm 

)

Bevestigingsbout (5 mm 

)

1

Trim Plate
Abdeckplatte
Plaque de garniture
Afwerkingsrand

YEFC051020

1


 and 

 consist of a set. (YEP0FZ5700)  



 und 

 bestehen als Satz. (YEP0FZ5700)


 et 

 constituent un jeu. (YEP0FZ5700)  


 en 

 bestaan uit een set. (YEP0FZ5700)

Before Installation/Vor dem Einbau/

Avant l’installation/Voor de installatie

Consult a professional for installation.

•  Verify the radio using the antenna and speakers before installation.

Wenden Sie sich zum Einbau an einen Fachmann.

•  Probieren Sie den Radiobetrieb vor dem Einbau mit Antenne und 

Lautsprechern aus.

Prenez contact avec un spécialiste pour le montage.

•  Vérifi ez l’autoradio avant de procéder au montage.

Vraag een vakman voor de installatie.

•  Controleer voor de installatie of de radio werkt met de antenne en de 

luidsprekers.

0 – 30

e

53 mm

182 mm

4.5 mm – 6.0 mm

Remove Mounting Collar 

 and Trim Plate 

 from the main 

unit temporarily, which are already mounted at shipment.

Die bei der Lieferung montierte Einbauhalterung 

 und 

Abdeckplatte 

 vorübergehend vom Gerät abmontieren.

Démontez provisoirement le cadre de montage 

 et la 

plaque de garniture 

 de l’appareil principal, qui sont déjà 

mis en place lors de l’expédition.

Verwijder de Bevestigingskraag 

 en de Afwerkingsrand 

die bij het verlaten van de fabriek gemonteerd zijn, tijdelijk 
van het hoofdtoestel.

Installation Instructions

Installation Instructions

Einbauanleitung

Einbauanleitung

Instructions d’installation

Instructions d’installation

Installatiehandleiding

Installatiehandleiding

YEFM294288  FT1006-0        Printed in China

Gedruckt in China

Imprimé en Chine

Gedrukt in China

Matsushita Electric Industrial Co., Ltd.

Web Site : http://panasonic.net

Summary of Contents for CQ-C1505N

Page 1: ...English WMA MP3 CD Player Receiver Model CQ C1505N Operating Instructions Please read these instructions carefully before using this product and keep this manual for future reference ...

Page 2: ...d vehicle components fuel tank brake suspension steering wheel pedals airbag etc for wiring or fixing the product or its accessories Installing the product on the air bag cover or in a location where it interferes with airbag operation is prohibited Check for piping gasoline tank electric wiring and other items before installing the product If you need to open a hole in the vehicle chassis to atta...

Page 3: ...ernal damage to the unit Faulty installation may lead to an accident a malfunction or fire Do not block the air vent or the cooling plate of the unit Blocking these parts will cause the interior of the unit to overheat and will result in fire or other damage Do not install the product where it is exposed to strong vibrations or is unstable Avoid slanted or strongly curved surfaces for installation...

Page 4: ...built into it you too will be proud to be a member of our family Laser Product Label Indications and Their Locations CAUTION LASER RADIATION WHEN OPEN DO NOT STARE INTO BEAM Caution This product utilizes a laser Use of controls or adjustments or performance of procedures other than those specified herein may result in hazardous radiation exposure Do not take apart this unit or attempt to make any ...

Page 5: ...f FM Radio Data System is received the clock is adjusted automatically by the Clock Time service Hold down or to change numbers rapidly 1 Select the radio AM mode Radio AM LW MW FM 2 Press DISP clock display 3 Hold down DISP for more than 2 seconds Hour blinks 4 Adjust the hour Hour entered sets the hour ahead sets the hour back 5 Press DISP Minute blinks 6 Adjust the minute Minute entered sets th...

Page 6: ...anasonic UK Ltd It couldn t be simpler Also available through our Internet is direct shopping for a wide range of finished products so take a browse on our website for further details Customer Care Centre For customers within the UK 08705 357357 For customers within the Republic of Ireland 01 289 8333 Visit our website for product information E mail customer care panasonic co uk Matsushita Electri...

Page 7: ...of MP3 WMA files recorded with certain writing software or CD recorders The file extension mp3 or wma should be assigned to each file depending on the file format This unit does not have the play list function Although Multi session recording is supported the use of Disc at Once is recommended Supported file systems ISO 9660 Level 1 Level 2 Apple Extension to ISO 9660 Joliet Romeo Note Apple HFS U...

Page 8: ...ack title Title name Artist name MP3 WMA WMA WMA tag Folder name Album name File name Title name Artist name Displayable characters Displayable length of file name folder name within 32 characters Unicoded file and folder names are reduced by half in the number of displayable characters Name files and folders in accordance with the standard of each file system Refer to the instructions of writing ...

Page 9: ... face plate until a click is heard Cleaning the Unit Fuse Caution This face plate is not waterproof Do not expose it to water or excessive moisture Do not remove the face plate while driving your car Do not place the face plate on the dashboard or nearby areas where the temperature rises high Do not touch the contacts on the face plate and the main unit since this may result in poor electrical con...

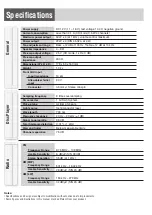
Page 10: ... frequency 8 times oversampling DA converter 1 bit DAC System Pick up type Astigma 3 beam Light source Semiconductor laser Wave length 790 nm Frequency response 20 Hz 20 kHz 1 dB Signal to noise ratio 96 dB Total harmonic distortion 0 01 1 kHz Wow and flutter Below measurable limits Channel separation 75 dB FM Frequency Range 87 5 MHz 108 MHz Usable Sensitivity 6 dB µV S N 30 dB Stereo Separation ...

Page 11: ...does not emphasize any part Default ROCK speedy and heavy sound exaggerates bass and treble POP wide ranged and deep sound slightly emphasizes bass and treble VOCAL clear sound emphasizes middle tone and slightly emphasizes treble Notes If no operation takes place for more than 5 seconds in the SQ selection mode the display returns to the regular mode Settings of SQ bass and treble are influenced ...

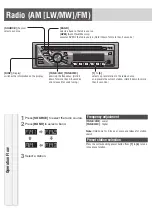
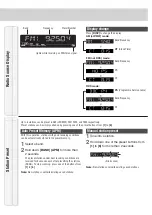
Page 12: ... down for more than 2 seconds TUNE TUNE down up the frequency Hold it down for more than 0 5 seconds and release it for seek tuning DISP Display switches the information on the display 1 Press SOURCE to select the radio source 2 Press BAND to select a band 3 Select a station Frequency adjustment TUNE Lower TUNE Higher Note Hold down for 0 5 sec or more and release for station search Preset station...

Page 13: ...r more than 2 seconds The preset stations under best receiving conditions are received for 5 seconds each after presetting the stations SCAN To stop scanning press one of the buttons from 1 to 6 Note New stations overwrite existing saved stations Radio Source Display Station Preset Up to 6 stations can be preset in AM LW MW FM1 FM2 and FM3 respectively Preset stations can be simply called up by pr...

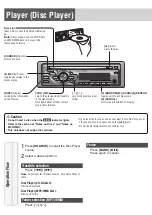
Page 14: ...use play in the player source SOURCE Source selects a source Caution Do not insert a disc when the indicator lights Refer to the section of Notes on Discs and Notes on MP3 WMA This unit does not support 8 cm discs If you insert an 8 cm disc and cannot eject it turn ACC of your car off once and turn it on again then press Eject Do not insert foreign matter into the disc slot 1Press SOURCE to select...

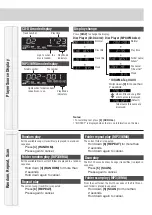
Page 15: ...EPEAT Press again to cancel Folder repeat play MP3 WMA The current folder is repeated Hold down 6 REPEAT for more than 2 seconds Hold down again to cancel Scan play The first 10 seconds of each songs tracks files is played in sequence Press 5 SCAN Press again to cancel Folder scan play MP3 WMA From the next folder the first 10 seconds of the first file on each folder is played in sequence Hold dow...

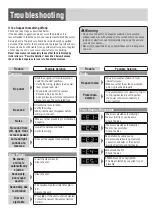
Page 16: ...g Left and right sounds are reversed Connect the speaker lead correctly Disc Player No sound or disc is automatically ejected Load the disc correctly Clean the disc Sound skip poor sound quality Clean the disc Sound skip due to vibration The maximum permissible tilt angle is 30 Secure the unit Disc not ejectable Press If the disc is still not ejected contact the nearest Panasonic Service Centre Tr...

Page 17: ...o select AF level PI Seek Programme Identification Seek If reception becomes poor when tuning in a preset station press the same preset number button The same station with better reception will be searched for Press same preset number button again to cancel blinks Note For PI Seek cancel the TA mode first then execute PI Seek Low level AF operating sensitivity Default High level AF operating sensi...

Page 18: ...NT 3 SPORT SPORT 4 POP M POP M 5 CLASSICS CLASSICS 6 MUSIC ROCK M EASY M LIGHT M OTHER M JAZZ COUNTRY NATION M OLDIES FOLK M Another station in the same PTY is searched for by pressing BAND Notes When there is no corresponding programme type station NONE is displayed A desired PTY appears for 5 seconds Preset contents are changeable Detailed PTY Selection 1Press or to select PTY SPEECH MUSIC NEWS ...

Page 19: ...to adjust Volume Setting Range 0 to 40 Default 18 Up Down Bass Setting Range 12 dB to 12 dB by 2 dB Default 0 dB Increased Decreased Treble Setting Range 12 dB to 12 dB by 2 dB Default 0 dB Increased Decreased Balance Setting Range 15 levels each Default CNT centre Right enhanced Left enhanced Fader Setting Range 15 levels each Default CNT centre Front enhanced Rear enhanced Notes If the fader is ...

Page 20: ...station Default OFF MONO ON lights FM Local FM LOCAL OFF Only stations with good reception are detected in seek tuning Default OFF LOCAL ON lights AM Local AM LOCAL OFF Only stations with good reception are detected in seek tuning Default OFF LOCAL ON lights Region RDS The frequency is changed also for programs outside the region Default OFF Note When the Region mode is switched from OFF to ON or ...

Page 21: ...e ces instructions attentivement avant d utiliser le produit et garder ce manuel pour l utilisation ultérieure Leest u deze instructie alstublieft zorgvuldig door voor u dit product in gebruik neemt en bewaar deze handleiding voor later gebruik Mounting angle side to side front to rear horizontal 0 30 Montagewinkel seitlich vorne hinten horizontal 0 30 Angle de montage latéral longitudinal horizon...

Page 22: ... de l appareil principal Vastzetten hoofdtoestel Snapping point Einschnapppunkt Position de rupture Breekpunt Securing to the fire wall Befestigung an Brandschutzwand Obtenir un pare feu Vastzetten aan het brandschot Using the rear support strap Option Verwendung der Einbauleiste Option Utiliser de la barrette de support arrière Option Gebruik van de achter steunstrip optioneel Tapping Screw Optio...

Page 23: ...Hersteller des Produktes Fil de la télécommande extérieure En cas d utilisation d une télécommande extérieure non Panasonic se référer aux conseils du fabricant concerné pour les connexions électriques Externe afstandsbedieningsdraad Bij gebruik van een externe afstandsbediening die niet van Panasonic is dient u voor aansluiting de handleiding of de fabrikant van het product in kwestie te raadpleg...

Page 24: ...plakken Opmerking Voor andere auto s dan die van type A en B dient u uw garage te raadplegen Speaker Connection Anschluss der Lautsprecher Branchement avec les haut parleurs Aansluiten van de luidsprekers Connect as follows Nehmen Sie den Anschluss wie folgt vor Branchez les haut parleurs comme suit Sluit de luidsprekers als volgt aan L R Use ungrounded speakers only Allowable input 50 W or more I...

Reviews: