background image

21

T

roub

leshooting

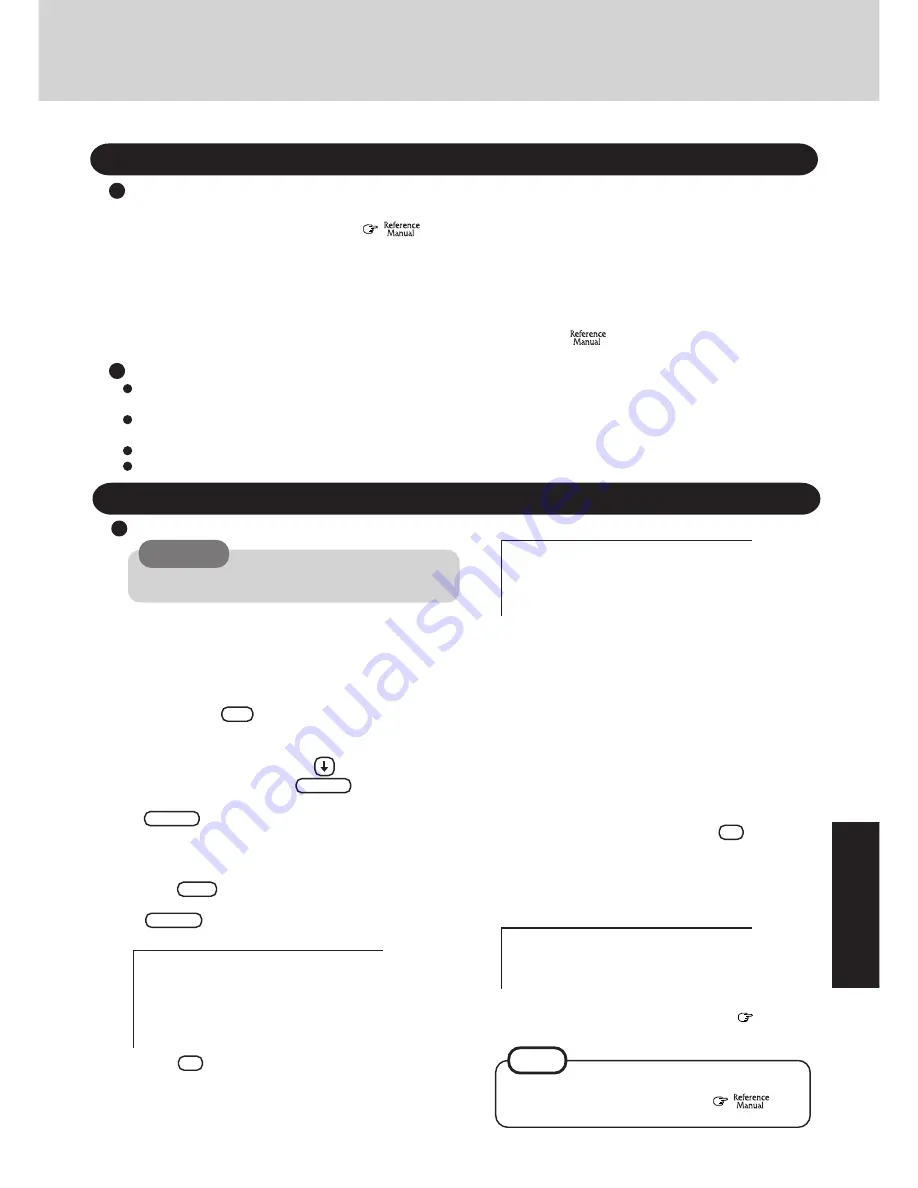
Reinstalling Software

Before Reinstallation

 Preparing

Reinstalling

CAUTION

If data on your hard disk is compressed, the data should
be uncompressed.

 Important

 Windows  95

1

Turn off the computer.

2

Attach the port replicator, floppy disk drive, and

CD-ROM drive.

3

Set the FIRSTAID FD in the floppy disk drive.

4

Turn the computer on.

5

When the message [Press <F2> to enter SETUP] is dis-
played, press    

F2

    and then run the Setup Utility.

If the password has been set, enter the supervisor pass-
word.

6

Select [Exit] menu, press


until [Get default

values] and then press


 Enter

   .

7

At the confirmation message, select [Yes] and press
   

Enter

   .

8

In [Power], set [ECO Mode Timeout] to [Disable] in [Ac
Adapter Operation].

9

Set the Product Recovery CD-ROM in the CD-ROM drive.

 Save all important data.  If reinstallation is carried out, all data existing prior to the installation will be lost.  The reinstal-

lation will return the computer to the conditions at time of purchase.

 Before the reinstallation procedure, remove all peripherals (except for the CD-ROM,  port replicator, and floppy disk

drive).

 Be sure the AC adapter is connected until the reinstallation procedure is completed.
 When the computer enter the ECO mode, the computer to the LCD is automatically cut.  In this case, perform the keyboard operation.

Reinstalling Windows

All data on the whole HDD has been restored to the factory
default.

Please set the Product Recovery CD in the CD-ROM Drive

 Will you continue ?

Y. Continue
N. Abort

15

Perform the setup procedure for Windows 95 by fol-
lowing the instructions on the screen.  

 page 11

14

After the "restore" procedure completes, the following
message will appear on the display.

NOTE

When an UPDATE FD is to be created, follow the
steps in the readme.txt on the disk.  (


”Cre-

ating BACKUP DISKS”)

Prepare the following:

• BACKUP DISK(s) created in advance (


 "Creating BACKUP DISKS")

Confirm that there is the following line in the AUTOEXEC.BAT on the FIRSTAID FD.

mscdex.exe  /D:YOUR_CD   /L:L

• Product Recovery CD-ROM (included)
• External floppy disk drive (option, CF-VFDU01)
• Port Replicator (option, CF-VEB341)
• PC Card-compatible CD-ROM drive

Prepare the CD-ROM drive used in "Make a copy of the CD-ROM driver" ( 

 "Creating BACKUP DISKS") of the

BACKUP DISK creation procedure.

11

Press    

Y


 , and then following screen should ap-

pear.

Reinstalling has finished.

After shutdown, remove the Firstaid FD and CD-ROM Drive,
and then restart the computer.

Press any key to shutdown.

Reinstalling Windows

Choice your operation

1. Restore the whole HDD to the factory default
2. Restore the drive C (Normal format) to the factory default.
3. Restore the drive C (Quick format) to the factory default.
4. Abort

12

Make a selection from the menu.

To restore all contents of the hard disk to factory
default, including the partition setting(s):
Select [1. Restore the whole HDD to factory default].

To restore the hard disk (C drive) to factory de-
fault, excluding the partition  setting(s):
Select [2. Restore the drive C (Normal format) to fac-
tory default].

To restore the hard disk (C drive) to factory de-
fault with quick format operation, excluding the
partition setting(s):
Select [3. Restore the drive C (Quick format) to the
factory default.].

13

At the confirmation message , press   

Y

   .

The operations of “format” and “restore” for the hard
disk start automatically.  (The operations take about one
hour.)

16

Run the Setup Utility, and perform Steps 6 and 7 again.

10

Press    

F10

  .

At the confirmation message, select [Yes] and press
   

Enter

   .  The computer will reboot, and this screen

should appear.

Summary of Contents for CF-17

Page 1: ...rence Manual Read Me First Key Combination LED Indicators Touch Pad Advanced Reference Manual Touchscreen Panasonic Hand Writing Touch Pad Reference Manual Technical Information DMI Viewer CreatingBAC...

Page 2: ...ional Business Machines Corporation Microsoft MS DOS and Windows are registered trademarks of Microsoft Corporation of the United States and or other coun tries Intel is a registered trademarks of Int...

Page 3: ...ment is designed to be connected to the telephone network or premises wiring using a compatible modu lar jack which is Part 68 compliant See Installation Instructions for details 3 The REN is used to...

Page 4: ...alence Numbers of all the devices does not exceed 5 REN See bottom of the computer RESTRICTIONS CONCERNANT LE RACCORDEMENT DE MAT RIEL AVIS L tiquette d Industrie Canada identifie le mat riel homologu...

Page 5: ...r Hauptstromversorgung Diese Sicherungsbatterie darf nur von Kundendienstpersonal ausgewechselt werden Warnung Bei falschem Gebrauch besteht Explosionsgefahr Entsorgung gebrauchter Batterien nach Anga...

Page 6: ...Do not put the battery pack into a microwave oven or a pressurized chamber Avoid Extreme Heat Cold and Direct Sun light Do not charge use or leave the battery pack for extended periods where it will b...

Page 7: ...le Do not power off your computer while software applications are running or HDD indicator is on Properly shut Windows down to avoid problems Start Shut Down Save all valuable data to disks Backing up...

Page 8: ...arged battery and optional charger if possible When transporting spare batteries inside a package briefcase etc it is recommended that the batteries be stored in a plastic bag Do not place the compute...

Page 9: ...1527 Windows 95 Book Product Recovery CD ROM Registration Card Windows 95 System Pack 1 Operating Instructions 1 Battery Pack 1 AC Adapter 1 AC Cord 1 Model No CF VZSU15 2 Read the LIMITED USE LICENSE...

Page 10: ...s excludes a pointing device connected to the USB port e g a USB mouse 4Connect your computer to a power outlet CAUTION Handling the AC adapter Do not twist or pull the AC power cord forcefully Doing...

Page 11: ...13 Touchscreen NOTE 6 Input the correct date time and time zone and press Close You can also complete these settings at a later time 7 Follow the on screen instructions You can complete these settings...

Page 12: ...FD Turn on the computer At the confirmation message select No Insert the Product Recovery CD ROM At the prompt input the following L en addfile Enter Follow the message on the screen After this progr...

Page 13: ...l point pen Do not allow things that could dirty the touch pad such as oil The cursor may not work properly in such cases When the touch pad becomes dirty Wipe to remove dirty areas by using a dry sof...

Page 14: ...s bar can be dragged for example to the right to enlarge the display of the Table of Contents Change the display size You can choose to magnify de magnify the display Page indicator A desired page can...

Page 15: ...orrectly Once the computer is powered off you must wait at least ten seconds before powering it on again When the CPU temperature rises the computer may not power on to prevent the CPU from overheatin...

Page 16: ...rom a key the touch pad or the touchscreen for two minutes The LCD is powered off ECO mode The LCD will resume operation when the touch pad or the touchscreen is used or a key is pressed We recommend...

Page 17: ...Setup to reconfigure the system 0251 System CMOS checksum bad Default configuration used System CMOS has been corrupted or modified incorrectly perhaps by an application program that changes data sto...

Page 18: ...sted nnnn kB System RAM Passed Where nnnn is the amount of system RAM in kilobytes successfully tested Operating System not found Operating system cannot be located on either drive A or drive C Enter...

Page 19: ...to increase You can set the date and time through Date Time in Start Settings Control Panel When the computer is connected to a Local Area Network LAN please confirm the date and time of the server If...

Page 20: ...ke Ctrl key To save power your computer may have automatically entered the suspend or hiberna tion mode Computing On the Road Set None for Wallpaper in Start Settings Control Panel Display Back ground...

Page 21: ...appear on the display NOTE When an UPDATE FD is to be created follow the steps in the readme txt on the disk Cre ating BACKUP DISKS Prepare the following BACKUP DISK s created in advance Creating BACK...

Page 22: ...documentation available to any third party by time sharing or otherwise without the prior written consent of MEI D You may not copy or reproduce or permit to be copied or reproduced the Programs or r...

Page 23: ...uvez assembler en sens inverse compiler en sens inverse ni retracer les Logiciels ni aucune de leurs copies de fa on lectronique ou m canique en tout ou en partie Vous ne pouvez utiliser copier modifi...

Page 24: ...ve the seal POWER Power Switch Headphone Jack RAM Module Port Replicator Expansion Bus Connector Hard Disk Drive Hard Disk Drive Battery Pack Battery Power To adjust the volume select the on the task...

Page 25: ...41 F to 95 F Environment Humidity 30 to 80 RH No condensation Not in use Temperature 20 C to 60 C 4 F to 140 F Humidity 30 to 90 RH No condensation Physical Dimensions 6 229 mm X 43 mm X 188 mm W X H...

Page 26: ...free from defects in materials and workmanship under normal use for a period of sixty 60 days from the date of delivery thereof to you as evidenced by your purchase receipt This is the only warranty P...

Page 27: ...enced by your purchase receipt for your Panasonic Computer product THIS IS THE ONLY WARRANTY THAT PCI MAKES RESPECTING THE SOFTWARE MEDIA PCI does not warrant the software Please refer to the software...

Page 28: ...that promotes energy saving through the use of computers and other office equipment The program backs the development and dissemination of products with functions that effectively reduce energy consu...

Reviews: